Peter Lynn Lynx User manual


WELCOME
ank you for buying this Peter Lynn product, and welcome to the World of Peter Lynn,
a world of wind driven excitement, where people passionately pursue their dreams.
Whether that’s freeriding at a local beach or enjoying the virgin snow on a back country
adventure. Peter Lynn is here to help you pursue your dream, making you achieve your
ultimate challenge. Are you ready?
Peter Lynn has been there taking challenges from the early days of the sport. Challenges
to develop breakthrough ideas, make better products, improve performance and quality
in all aspects of those products. We have the right kites for all kite disciplines, for any
terrain and for all conditions. All this is realized by a passionate crew of kite sports
enthusiasts and we invite you to join us. It’s that passion that makes us fly.
Before any attempt to use this product, please ensure you pay full and careful attention
to the contents of this manual. While traction kiting is an exciting and fun sport, it can
be highly dangerous, especially if not all the necessary safety precautions are taken. So
please make sure you learn this great sport in a safe way. Only then will you progress
quickly and enjoy this beautiful sport to the max.
Enjoy!

SAFETY INSTRUCTIONS
CAUTION: Kite powered sports can be very dangerous and physically demanding. e user of this product
should understand that participating in kite powered sports may involve serious injury or death and agrees to
observe the safety precautions listed below.
Safe location and weather conditions:
• Stay away from power lines, roads, airfields, railway lines, trees and buildings.
• Never launch your kite in crowded areas. Do not fly your kite over bystanders.
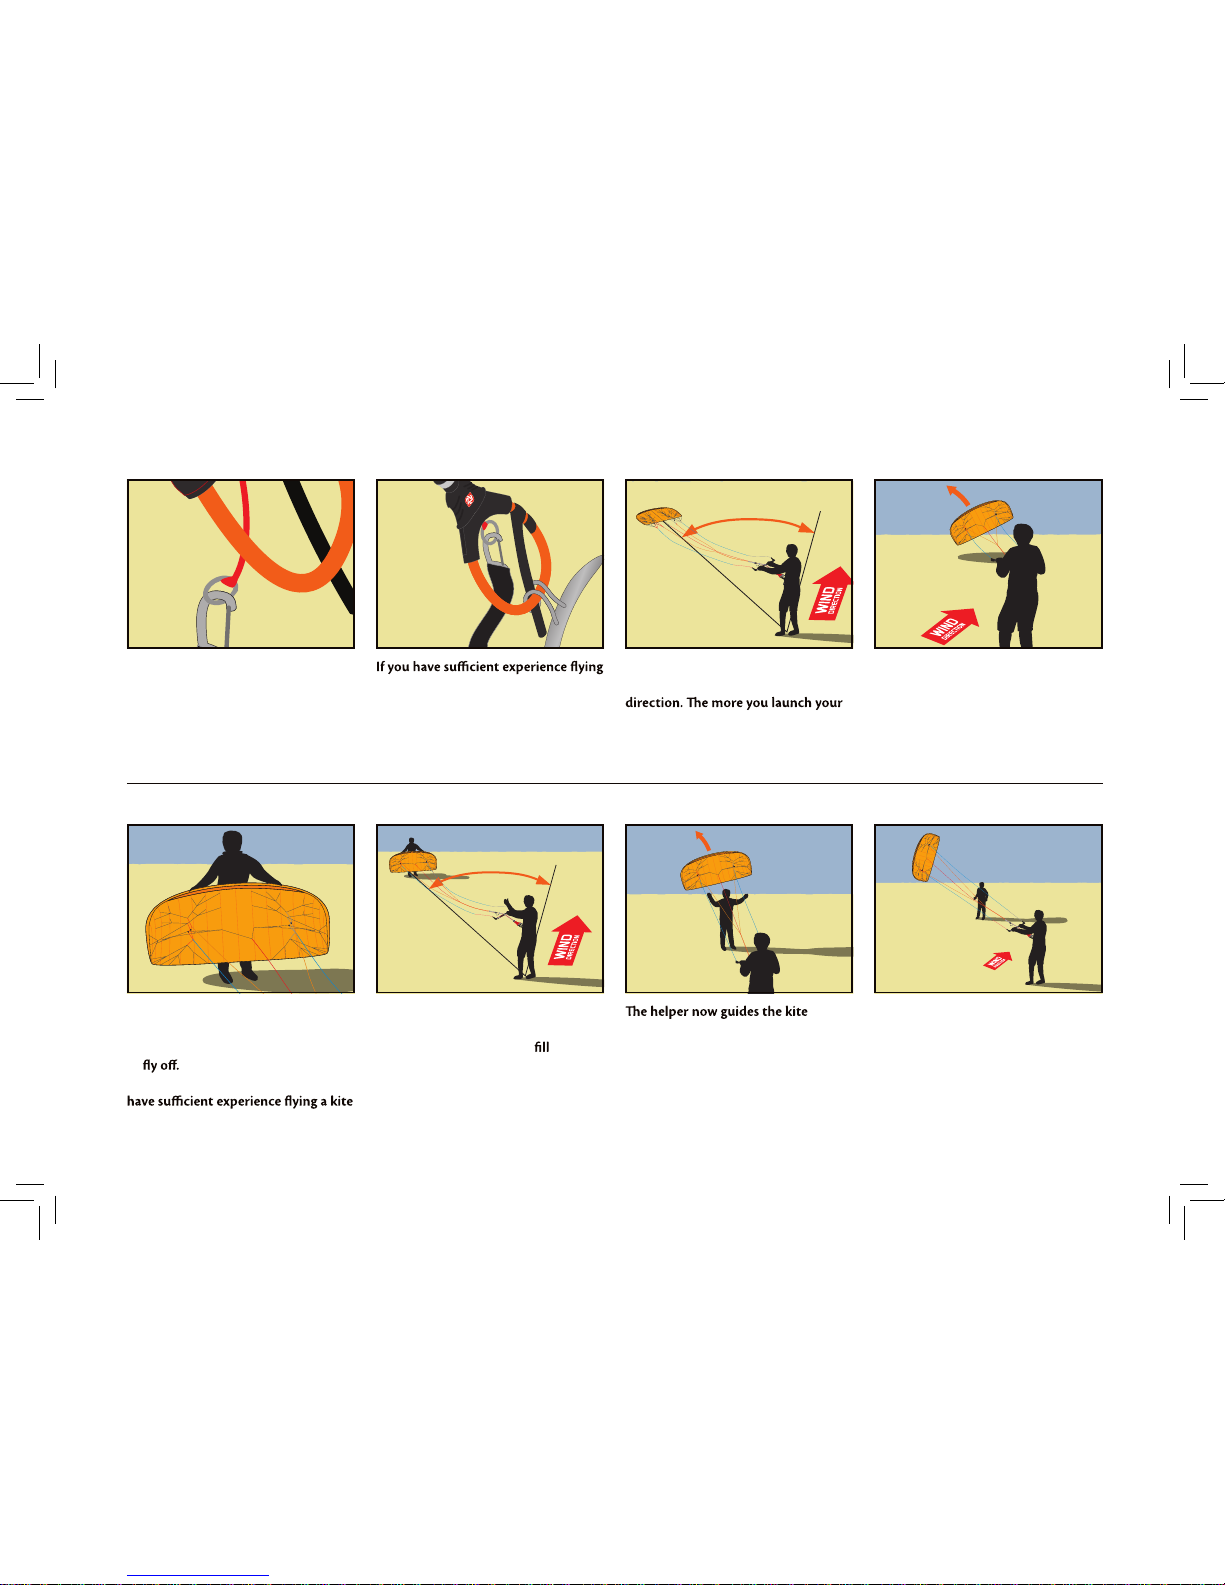
• Make sure there is a ‘clear’ downwind area at least three times the distance of
your flying line length.
• Never fly kites or use this product in thunderstorms, lightning or gusty/stormy
winds.
• Never fly a kite or use this product with wind forces so strong that you are una-
ble to maintain full control of your kite and its power at all times.
• Do not fly a kite or use this product when wind conditions are likely to change
dramatically.
• Stop kiting immediately when a storm or lightning is approaching.
• Make sure you are familiar with the location and local customs and laws before
attempting any kind of kite sports.
Safe traction kiting:
• A traction kite is not a toy and should not be flown by inexperienced persons
and certainly not by children.
• Learn to fly kites by starting in light winds with a small sized kite.
• Never use any type of kite or this product for paragliding, parachuting or base
jumping.
• Never use any type of kite or this product for jumping o high places like hills or
clis
• Never use any type of kite or this product for any manlifting activity.
• Always use fully protective gear when snowkiting, landboarding or buggy riding.
Safety issues when using this product:
• is kite has been manufactured with high quality materials and has been manu-
factured using the latest and most advanced production methods.
• Prior to every use of this product, fully check your equipment for any signs of
wear and tear. Replace parts immediately where needed.
• Prior to every use of this product, check if your safety releases are still working
properly and you are aware how to use it. In case the safety release does not
work as it should, do not use this product and replace parts where needed.
• Only use this product for snowkiting, landboarding and buggy riding.
• Only use this product when you are in a good state of health. Never use this
product when under the influence of alcohol, drugs or medication.
• Do not alter, modify or change this product. Repairs should be done by a profes-
sional kite repair shop, sail repair shop, or by the Peter Lynn company.

THE WIND WINDOW
Before flying your kite it is very important to understand the ‘wind window’.
e image shows where the kite will create the most power (straight downwind,
also known as the ‘power zone’) and where the kite will create the least power
(edge of the window and zenith).
MAXIMUM POWERMINIMUM POWER
EDGE OF WIND WINDOW POWER ZONE
OVERVIEW & TERMINOLOGY
1
23456
7
8
9
10
11 11
12
13
14 15
16
17 18
19
20
21
22
23
24
25
26 27
28
29
1. To p skin
2. Lower skin
3. Gauze covered air inlets
4. Velcro bridle loop
5. Leading edge
7. Left bridle
8. Left depower bridle
9. Right bridle
10. Right depower bridle
11. Velcro dirt-outs
12. Dirt channel
13. Trailing edge
14. Left top flying line
15. Right top flying line
16. Stop & go safety line
17. Left rear flying line
18. Right rear flying line
19. Center top flying line
20. Safety line
21. Left leader line
22. Power adjuster
23. Right leader line
24. Land & relaunch handle
25. Control bar with colour coded EVA foam
26. Swivel
27. Centrix Push-away depower loop with
primary quick release
28. Safety leash
29. Secondary quick release
6. Stop & Go safety system

STEP 2. PREPARING YOUR KITE AND BRIDLES
Take the kite out of the bag and
unfold the kite. Lay the kite down
with the lower skin up, trailing edge
opposite to the wind direction. Put
some sand or other suitable weight on
the trailing edge of the kite to prevent
it from blowing away.
Remove the bridle loops from the
Velcro tag and check that the bridles
are not tangled.
-
gether in the Velcro tag in the centre
of the leading edge of the kite.
Place the depower bridle with pulleys
flat on the grond, make sure these
lines are free of tangles and twists.
Place the rear line attachment point
on the outside, the top line attach-
ment points on the inside.
REAR
LINE TOP
LINE SAFETY
LINE TOP
LINE REAR
LINE
STARTING OFF
To start flying your kite you need to follow these steps:
Step 1. Finding the right location to launch your kite.
Step 2. Preparing your kite and bridles.
Step 3. Setting up your bar and lines.
Step 4. Checking your safety systems.
Step 5. Launching the kite.
STEP 1. FINDING THE RIGHT LOCATION TO LAUNCH YOUR KITE
Find a spot to setup, away from airports, powerlines, trees and buildings. When
launching, the area should be free of kiteflyers or other people. Also make sure
there are no sharp objects on the ground, to prevent any damage to your kite.
Starting at the kite, slowly walk
backwards while unwinding your
lines. Walk in the opposite direction
of the wind, this prevents line tangles
and enables you to launch easier and
faster.
When unwinding your
lines, make sure the lines have a little
tension to straighten them out. Place
your bar flat on the ground with the
correct side up (red colour on the
left). Make sure all leader lines are
untangled and not hooking behind
any part of the bar.
Walk back toward the kite with the
lines between your to remove
any twist or tangles. Place the lines
flat on the ground in a straight line.
Attach the flying lines one by one us-
ing larkshead knots.
LARKSHEAD KNOTS
Your fying lines can remain attached to the kite at all times. In
case you need to take them re-attach them to the bridle
loops using larkshead knots.
Take the sleeve of the flying line, and make a larkshead. Slide it
over the knot on the end of the bridle loop. Pull the larkshead
tight and slide it towards the knot on the end of the bridle loop.
Please note the knot and loop on the rear line attachments are
reversed to prevent wrong attachment of the flying lines.
BRIDLE LOOP
BRIDLE LOOP
FLYING LINE
FLYING LINE
FLYING LINE
FLYING LINE
FLYING LINE
FLYING LINE
BRIDLE LOOP
BRIDLE LOOP
BRIDLE LOOP
BRIDLE LOOP
STEP 3. SETTING UP YOUR BAR AND LINES
For Top flying lines and Life Line / Safety flying line
For Rear flying lines

STEP 4. CHECKING YOUR SAFETY SYSTEMS
Before using this kite, please check the manual cupplied with your bar on how
to activate your safety systems and re-attach the safety systems used.
We recommend to test the safety system when using the kite for the first time
so you are aware how the system works, how to activate it and how to re-attach
it after activating.
Never be afraid to use it because it can save your life!
We recommend to check if your quick releases are in working order before
every launch!
Re-connecting the primary safety releaseActivating the primary quick release
Re-connect the primary safety release by placing stainless steel ring on the end
of the depower loop tube into the depower loop center piece. e pin will move
to the inside of the depower loop. Slide down the release cu to secure the pin.
Always make sure all parts are free of sand and snow before re-connecting your
safety system.
To activate your primary quick release, push the release cu part towards the
kite.
e safety system works in two steps:
Primary safety - If you need to lose the power of the kite without losing the kite
itself, the primary safety release can be used. e kite loses its power but is still
connected to the rider by the safety leash.
Secondary safety release - When the kite is still pulling after using your primary
quick release, use the secondary release on the leash.

WARNING!
• e secondary safety system does not function if the primary safety on the
depower loop is not pulled first.
• e secondary safety should only be pulled in case the primary safety was
somehow not sucient to completely depower the kite. Pull this safety only
if there is no other way, as it will completely disconnect you from your kite.
A loose kite might result in dangerous situations for bystanders or other kite
flyers and may also result in permanent loss of the kite.
• After using your safety system, putting tension on any of the other lines can
cause your kite to take o and start to pull.
TIPS REGARDING SAFETY SYSTEMS
• Check if your quick releases are in working order before every launch!
• Regularly rinse your bar and safety systems with tap water.
Activating the secondary quick release Re-connecting the secondary quick release
To activate your secondary quick release, move the red release in the direction
of the arrow.
Re-connect the secondary safety release by placing the loop over the stainless
steel pin, folding the pin down an sliding the relaese cu back in place. Make
sure the release cu is sitting right against the ball after reconnecting.
DEPOWER LOOP LOCK-IN PIN
To prevent accidental unhooking of
your depower loop, you can use the
lock-in pin. Place the lock-in pin
through the spreader bar hook, just
below the depower loop tube.

STEERING
DEPOWERING / POWERING
To make the kite turn, pull on one
side of the bar.
When pushing the bar away, the
power of the kite will be reduced.
To reduce the overall power of the
kite, pull in the line coming out of the
cleat to the desired position.
Depowering your kite Less power overall
Faster steering
Powering your kite More power overall
POWER ADJUSTER
For faster steering, pull in the bar be-
with a tighter turning radius.
When pulling in the bar, the kite will
produce more power.
To increase the overall power of the
kite, pull the line slightly towards you
andmove it away from thecleat. Now
let the line out and let it lock back
into the cleat at the desired position.
STEERING AND POWER CONTROL
When the depower loop is hooked in, the bar can slide over the depower line,
which gives you more control over the power of the kite and can cause the kite
to turn faster when steering.
When the kite is flying, you can easily control the power of the kite by moving
line changes the kite’s angle of attack causing the kite to produce more or less
power.
Normal steering
LAUNCHING - Self launch
45o
Make sure the kite is still secured
from blowing away by some sand or
other substance on the trailing edge.
Attach the safety leash to the round
ring on the end of the safety line.
Stand at a position so your flying lines
are at about 45 degrees to the wind
kite directly downwind, the more
power the kite will produce when
launching.
Check again if the area is clear of
people. Slowly take a few steps back
untill the kite launches. Steer the kite
towards the edge of the wind window
and slowly let it fly up to the zenith.
a kite with a harness, you can hook in
the depower loop.
45o
As an alternative to the self-launch,
you may also ask someone to hold the
kite by the leading edge, so it is ready
to
Attach your safety leash and if you
with a harness, hook in your depower
loop.
Stand at a position so your flying lines
are at about 45 degrees to the wind
direction. First let the kite with air,
and check if you are ready to launch.
Signal your helper.
LAUNCHING - Launch with Helper
upward.
Steer the kite towards the edge of the
wind window and slowly let it fly up
to the zenith.

SAFETY SYSTEM
Your depower kite is with a safety system allowing you to instantly loose
all power of the kite, without losing the kite itself. Always use the safety leash
when kite flying! When accidentally letting go of the bar without the leash
attached to your harness, the kite may endangering other kite or
bystanders downwind.
slowly move towards the ground.
Grab the bar while still holding the
safety line. Check that the safety line is
not tangled or hooked behind any part
of the bar or your body.
If you are flying your kite with the
depower loop hooked in, unhook or
pull the primary quick release.
Move towards the bar while pulling in
the safety line.
Wait till the kite has reached the
ground before taking any next action.
Let go of the safety line and grab the
bar with both hands. Take a few steps
back.
You are now ready to relaunch your
kite.
towards the kite along the safety line
that is attached to your safety leash.
Hold the safety line while resetting the
primary safety release.
Activating the safety system
Recovery after using the safety system
REVERSE RELAUNCHING YOUR KITE
To relaunch your kite with the
leading edge down, pull on the
relaunch handle.
Once it is in the air, pull in one side of When the kite has completely turned
around, let go of the relaunch handle
and grab the bar. You can now con-
tinue flying your kite.

LANDING WITH A HELPER
SELF LANDING (LIGHT WINDS)
SELF LANDING (STRONG WINDS)
PACKING UP
First check if the area is clear of
people. Fly the kite to the ground at
the edge of the wind window. Here a
helper grabs the kite while you walk
forward.
First check if the area is clear of
people. Fly the kite to the ground at
the edge of the wind window. Grab
backwards towards the ground.
Secure it with some sand or other
suitable weight. Especially in strong
winds, a kite can easily take again,
and there is no tension on the flying
lines.
Secure the relaunch handle to the
ground. You can now walk towards
the kite to secure it with some sand or
other suitable weight.
First check if the area is clear of
people. Fly the kite to the ground at
the edge of the wind window. Pull
the safety release or unhook your
depower loop and let go of the bar.
Wind the lines in
onto the bar. When reaching the kite,
use the bungee chords to secure the
flying lines on the bar.
Secure the bridle loops and line
sleeves with the Velcro tag in the
centre of the leading edge.
Secure the safety line to a or
heavy object. You can now walk to-
wards the kite to secure it with some
sand or other suitable weight.
Fold the kite, starting from the tips
towards the center. Now place the
control bar on the
trailing edge, and fold the bar neatly
into the kite, taking care not to fold
the fibers in the leading edge.
Place your kite in the bag to prevent it
from getting damaged.
TOP/REAR LINE ADJUSTMENTS
In the long term your top lines may stretch from your rear lines. To
get the best performance form you kite, it is important to have the
between the top and rear lines set correctly.
If the kite steers very direct but does
not accelerate in flight, leaving you
with minimum pull, your top lines are
too long / rear lines are too tight.
If the kite steers very slow, with very
little response on your bar, but flies
fast, your top lines are too short / rear
lines are too loose.
Rear lines too tightRear lines too loose
To make any adjustments, it is recommended to use the power adjuster. You
may even change the position of the black stopper balls to adjust the range of
the adjuster if preferred.

TROUBLESHOOTING
Kite does not want
to fly
Are there any obstacles disturbing
the wind?
Is the kite clear of sand and water?
Is your Life line the correct length?
Your kite needs a bit of wind to get going. If the wind is too light it is
Winds can easily get reduced by large obstacles like buildings, trees,
hills or dunes.
Wet kites, or kites with a lot of sand in it are hard to fly.
line is too tight, the kite may not want to fly .
control
Kite does not fly
smooth
Are you holding your bar the right
way around?
Is the kite clear of sand and water?
Are your bridles and flying lines free
of tangles?
Are any parts on the bar hooking
behind each other?
Are your left and right flying line the
same length?
Holding the bar the wrong way around makes steering your kite very
Wet kites, or kites with a lot of sand in it are hard to fly.
Bridle lines can easily get caught behind the bridle loops or parts of
the kite. Tangled or twisted bridles or flying lines may make steering
If any parts of the bar hook behind each other the kite may not steer
properly.
Are there any obstacles disturbing
the wind?
Is the kite clear of sand and water?
Is your kite damaged?
the kite from flying properly.
Winds can easily get disturbed by large obstacles like buildings, trees,
hills or dunes, making the kite fly less smooth.
Wet kites, or kites with a lot of sand in it may start to shake in flight.
Damaged kites may change the behaviour of the kite.
Fly your kite with more wind.
Choose a better location or fly with
wind direction.
Dry kite. Remove any sand or water.
Check kite and get it repaired if
necessary.
Fly your kite with more wind.
Choose a better location or fly with
wind direction.
Remove any sand or water.
Shorter flying lines by moving the
knots on leader lines on the bar.
Make sure the bar is the right way up.
Remove any sand or water.
Check bridle lines and correct bridle
if necessary.
Undo tangles from flying lines.
properly.
Check the lines are the same length,
adjust the knots on the side leader
lines on the bar if necessary.
ProblemProbable causeExplanation Solution
REMOVING SAND OR OTHER DIRT FROM YOUR KITE
If there is any sand, mud or grass in the kite, remove it to keep your kite flying
properly and prevent damages.
If the dirt is in the open cells, turn the kite upside down, hold it by the trailing
edge.
Dirt can also be removed by guiding it towards the smallest tip cell via the Dirt
channel along the trailing edge.
Open the Velcro dirt-out to allow the dirt to fall out.
When the dirt in your kite is wet, remove as much as possible; then dry your
kite and repeat the action as described above.

Bar care:
• Make sure you regularly check your bar for wear and tear. Replace parts when
needed.
• Make sure your lines are free of knots.
• Before launching, always check that your quick release is in working order and
free of sand or other debris.
• After every session, rinse your bar with tap water to remove any sand or salt
from the bar.
If there are problems with your kite or your bar, please contact your Peter Lynn
dealer.
CARE AND MAINTENANCE
of the kite sport puts a high strain on the equipment involved. By taking good
care of your equipment, you can minimize the wear on your equipment.
Kite care:
• Inspect your equipment before launch. Check for tears, abrasions, undone
stitching, and all other forms of damage.
•
Regularly remove sand or other dirt from your kite, to improve perfor-
mance and reduce wear.
• Avoid crashing the kite on its leading edge. A hard crash can
damage the or cells of the kite.
• Regularly check your bridles for wear and tear. Regularly check if the lines are
still intact and that loops are free of wear.
•
Do not rig on rough terrain. Stay far away from sharp items that could dam-
age your kite, such as seashells, trees, washed up wood or fences.
• Secure your kite using soft items like sand or sand bags. Do not use items
with sharp edges like rocks.
• Do not unnecessarily leave a kite unused for a longer period of time to pre-
vent UV damage.
• Always make sure your kite is dry before packing and free of sand or sharp
items. Let your kite dry naturally, do not use devices such as a hair dryer.
• Regularly rinse your kite after using it on the beach. If you want to clean your
kite, use a soft cloth moistened with lukewarm water only. Never use chemi-
cal cleaners, they will damage the fabric.
• Never put the kite in a washing machine and never try to iron your kite.
• When storing for a long time, it is advised to leave part of the bag open, to
allow fresh air to get in the bag, and any remaining traces of moist to dry up.
WARRANTY
Peter Lynn warrants this product, when it is purchased from an authorized Peter
Lynn dealer by a retail customer, to be free of major defects in material or work-
manship to the original purchaser, for a period of six (6) months from the date of
limitations:
warranty is solely for the of the original retail purchaser and may
not be assigned. For retail customer warranty claims, proof of purchase from an
authorized Peter Lynn dealer is required. If the date of purchase can not be estab-
lished, Peter Lynn will make a determination based on the last production year
and/or the condition of the particular product claimed.
warranty on this product is valid only when it is solely used for designated pur-
poses and does not apply to any product used for rental and/or teaching purposes.
• Peter Lynn will make the warranty determination, which may require inspec-
tion and/or photos of the equipment. Photos must clearly show the defect(s).
If necessary, this information must be sent to the Peter Lynn dealer where the
product was originally purchased, postage prepaid. Alternatively you may contact
the Peter Lynn distributor in (or nearest to) your country.
• If a product is deemed to be defective by Peter Lynn, the warranty covers the repair
or replacement of the defective product only. Peter Lynn will not be responsible
for any costs, losses, or damages incurred as a result of loss of use of this product.
wear and tear including, but not limited to, damage due to excessive sun exposure,
use in combination with other than Peter Lynn control gear, damage caused by im-
proper handling and storage, and damage caused by anything other than defects
in material and workmanship.
warranty is voided if any unauthorized repair, change or has been
equipment takes from the date of the original purchase only. original
dealer and the date of purchase must be clear and legible.
are no warranties which extend beyond the warranty herein.
Warranty Claims
Warranty claims must be processed through an authorized Peter Lynn dealer and be
issued a return authorization prior to shipping the product concerned. For claims
processing please contact the Peter Lynn dealer the product was purchased from
or call - or write to - the national Peter Lynn distributor. If there is no Peter Lynn
distributor in your country, please our contact details on our website
www.peterlynn.com.
DISCLAIMER – RELEASE OF LIABILITY
Peter Lynn / Vliegerop bv. - Release of Liability
Caution
Before making any attempt to set up or use this product, you agree to have read and
fully understood the entire Peter Lynn user manual; including, but not limited to,
all instructions and warnings it contains. You also agree to make sure that any other
user of this Peter Lynn product, prior to using it, will also read and fully understand
this Peter Lynn user manual; including, but not limited to, all instructions and
warnings it contains.
Assumption and acceptance of risk
Kite powered sports can be very dangerous and physically demanding. While
powerkiting in its many forms is an exciting and fun sport, it can be highly dangerous
for yourself and others around you, especially if the necessary safety precautions are
participating in kite powered sports can result in serious personal injury – and even
death – to the user as well as to third parties. Before setting up and using this Peter
Lynn product you agree to assume and accept any risk of injury, whether known or
unknown, to both yourself and any third parties from using this Peter Lynn product.
To reduce these risks, we strongly recommend you to stick to the safety precautions
listed in this Peter Lynn user manual.
Disclaimer and Release of Liability
Concerning the purchase of this Peter Lynn product by you, you hereby agree, to
the greatest extent allowed by law, to waive any claims you have or may have in the
future against Peter Lynn and all related entities resulting from using this Peter Lynn
product and/or any of its components.
You will also release Peter Lynn and all related entities from any liability for special,
indirect, incidental, consequential or exemplary damages, whether in contract, tort,
negligence, strict liability or otherwise including, but not limited to, loss of property
other than this Peter Lynn product, loss of use of this product, or other property or
other economic losses. Peter Lynn shall not be liable for contribution or -
tion, whatever the cause.
All terms and conditions contained herein shall, in the event of your death or inca-
pacity, apply and be binding upon your heirs, next of kin and any other representa-
provisions regarding liability and warranty are exclusive and in lieu of all other
liability- and warranty statements, whether written, oral or implied.

This manual suits for next models
2
Table of contents
Other Peter Lynn Aircraft manuals

Peter Lynn
Peter Lynn LEI series User manual

Peter Lynn
Peter Lynn ARC Twinskin 2004 User manual

Peter Lynn
Peter Lynn PLKB User manual

Peter Lynn
Peter Lynn Scorpion User manual

Peter Lynn
Peter Lynn SPARK Instruction Manual

Peter Lynn
Peter Lynn Pepper Instruction Manual

Peter Lynn
Peter Lynn Twinskin User manual