Petromax HK150 User manual

2
q
ACHTUNG! Bitte entferne vor der Inbetriebnahme die rosafarbenen
Transportringe, die sich oben und unten am Glas benden.
CAUTION! Remove the pink packaging rings on the glass before using
the lamp for the rst time.
ATTENTION ! Lors de la première utilisation, il est important d’enlever
l’emballage de protection du verre.
¡CUIDADO! Retirar los anillos protectores rosas situados alrededor del
cristal antes de utilizar la lámpara por primera vez.
注意! 務必在第一次點燈前移除玻璃燈罩上下方的粉紅色塑膠
墊圈。
ВНИМАНИЕ! Перед вводом лампы в эксплуатацию удалите,
пожалуйста, розовые транспортные кольца, расположенные
сверху и снизу на стекле.
주의! 램프를 처음
사용하기 전에 유리 글로브
둘레의 핑크색 포장 링을 꼭
제거하세요.
注 意!注 意! はじめてご使 用にな
る前 に ガ ラス上下 に に あ るピ
ンクのリングを必ず外してく
ださい。
HUOMIO! Poista pinkit kul-
jetussuojat lasin ylä- ja ala-
puolelta ennen ensimmäistä
käyttöä.
VARNING! Ta bort de rosa
skyddsförpackningsringarna
från glaset innan lampan an-
vänds första gången.
DE
EN
FR
ES
TW
RU
KR
JP
FI
SE

3
DE
EN
FR
ES
TW
RU
KR
JP
FI
SE
Gebrauchsanleitung für Petromax Starklichtleuchten HK150-HK500
Lies diese Anleitung sorgfältig durch und bewahren Sie sie auf!
Sicherheitshinweise
• Leuchte ausschließlich im Freien betreiben.
• Sicherheitsabstand zu brennbaren und wärmeempfindlichen Gegenständen einhalten.
• Leuchte nicht auf empfindliche Oberflächen stellen.
• Mit der Zeit kann es zum Anlaufen / Verfärben der Haube kommen. Dies ist kein Defekt, sondern ein
normaler Prozess, bedingt durch die starke Hitzeentwicklung.
• Leuchte nicht unbeaufsichtigt brennen lassen.
•
Keine Duftöle oder gefärbte Öle verwenden. Unbedingt reines Paraffinöl oder Petroleum verwenden.
Wir empfehlen Petromax Alkan.
• Leuchte unbedingt immer von Kindern und Tieren fern halten.
• Leuchte nicht abdecken.
•
Verbrennungsgefahr! Erhitzte Leuchte nicht oberhalb des Tanks berühren. Nach dem Betrieb
Lampe vollständig abkühlen lassen.
• Druck nach dem Betrieb vollständig über Luftablassschraube ablassen.
• Keinen Brennstoff während des Betriebs nachfüllen oder ablassen.
• Nur Original-Petromax-Ersatzteile verwenden. Bei Verwendung anderer Teile erlischt die Gewähr-
leistung.
•
Bei unsachgemäßer Bedienung oder Zweckentfremdung der Leuchte wird keine Haftung über-
nommen.
• Im Betrieb nicht in den Glühstrumpf schauen.
• Den Rauch beim Abflammen des Glühstrumpfs nicht einatmen.
• Bei befüllter Lagerung das Manometer und den Vergaser zudrehen.
Produktbeschreibung
Die Petromax ist die wohl bekannteste Starklichtleuchte der Welt. Seit mehr als 100 Jahren wird sie als
wetterresistente und zuverlässige Außenbeleuchtung vielseitig eingesetzt. Je nach Bauart besitzt sie
eine Lichtleistung von 400, 280, 200 oder 120 Watt. Die Lichtleistung kann nicht reguliert werden. Mit
entsprechendem Zubehör kann die Leuchte in eine Heizung und einen effizienten Kocher umgebaut
werden.

4
DE
EN
FR
ES
TW
RU
KR
JP
FI
SE
Lieferumfang
Deiner Petromax Starklichtleuchte liegen folgende Teile bei:
• 1 x Trichter
• 1 x Ersatzteilset bestehend aus 6 Teilen
• 1 x Einfüllkännchen für Spiritus
• 2 x Glühstrumpf
Teilebeschreibung
Eine Petromax Starklichtleuchte besteht aus mehr als 200 Einzelteilen. Nachfolgend sind die Hauptteile
abgebildet. Eine vollständige Übersicht aller Einzelteile erhältst du im Internet auf: www.petromax.de
oder über unseren Kundenservice.
1. Haube
2. Innenmantel
3. Mischkammer
4. Brenner
5. Rändelmuttern
6. Vergaserdüse + Nadel
7. Vergaser
8. Luftablassschraube
9. Rapidzünder
10. Handrad
11. Manometer
12. Handpumpe
13. Vorheizschale

5
DE
EN
FR
ES
TW
RU
KR
JP
FI
SE
Bedienen der Leuchte
Vor Inbetriebnahme der Leuchte
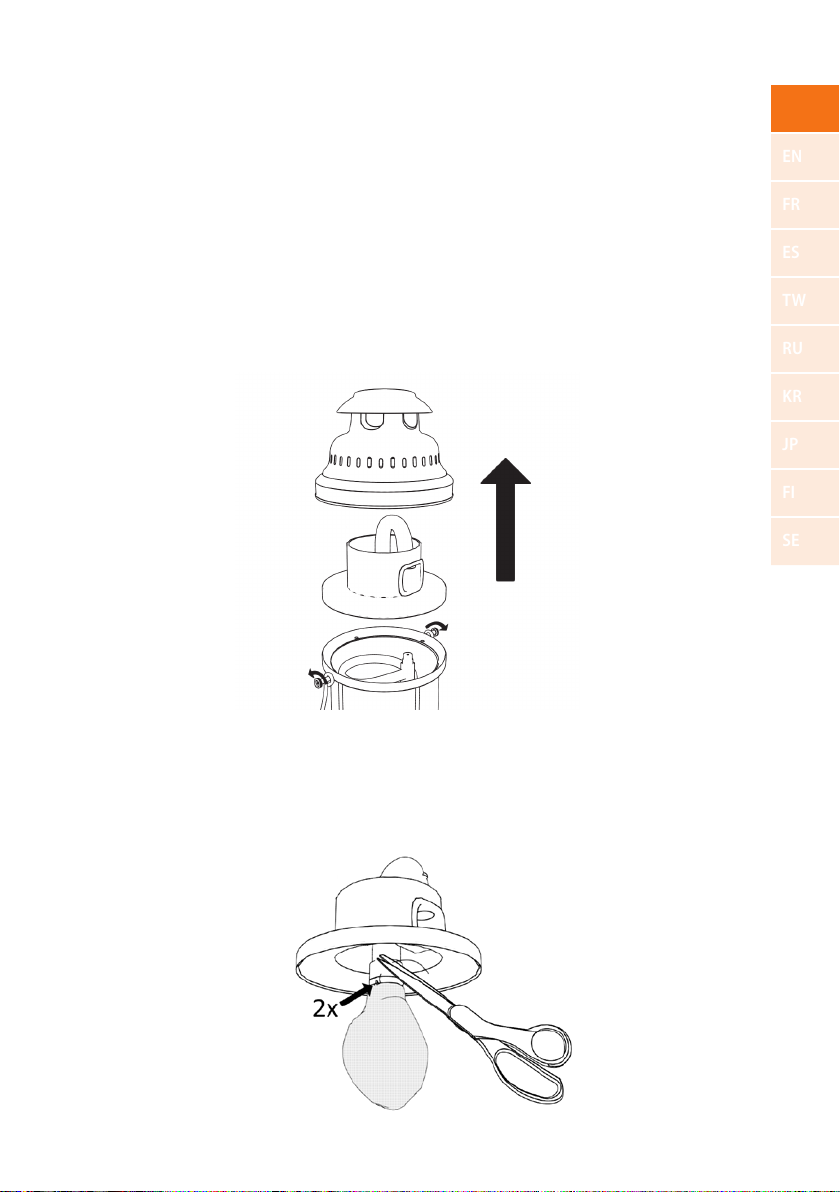
• Beschädigte Glühstrümpfe unbedingt durch neuwertige ersetzen.
• Unbedingt auf festen Sitz von Düsennadel, Vergaserdüse, Mischkammer und Brenner achten.
Inbetriebnahme der Leuchte
• Siehe „Inbetriebnahme: Schritt für Schritt“.
Während des Betriebs der Leuchte
•
Sobald Druck laut Manometer unter 1 bar fällt, vorsichtig Druck mittels Handpumpe auf Tank bringen
(ca. 2,5 bar).
Löschen der Leuchte
• Zum Löschen der Leuchte Druck mittels Luftablassschraube am Manometer ablassen.
•
Bei unvorhergesehener Flammenentwicklung unverzüglich Luftablassschraube am Manometer öffnen.
• Anschließend Handrad nach oben drehen.
Fehlerbehebung
Die Pumpe arbeitet nicht einwandfrei.
Pumpenkolben herausziehen, Ledermanschette fetten und leicht aufstauchen (wenn nötig erneuern!).
Unter Drehen der Kolbenstange Pumpenkolben wieder in den Pumpenzylinder einführen.
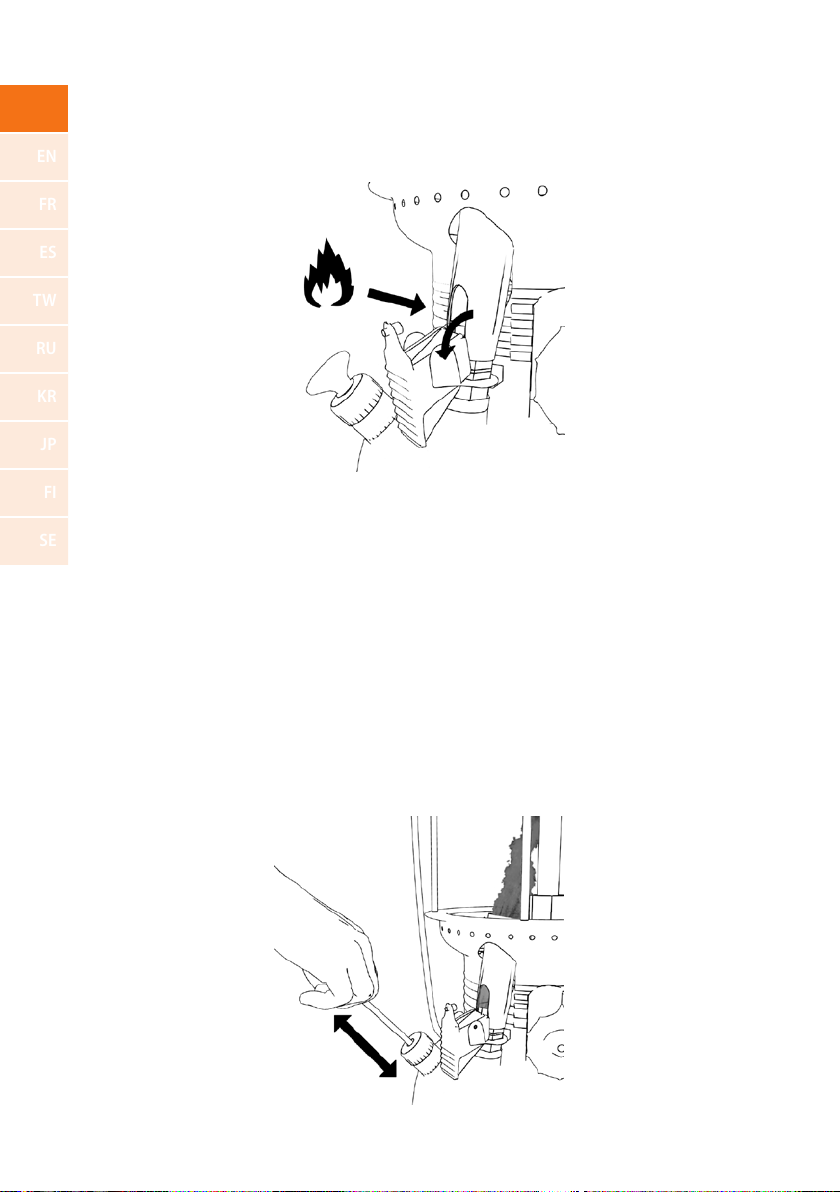
Die Leuchte brennt am Oberteil.
Leuchte mindestens 90 Sekunden mit dem Rapidzünder vorheizen. Beim Vorheizen mit Spiritus mind.
2 volle Spiritusschalen verwenden.
Der Glühstrumpf flammt nicht vollständig ab.
Beim Verwenden des Rapidzünders Glühstrumpf so positionieren, dass dieser gut von der Flamme
des Rapidzünders erfasst wird.
Der Rapid zündet nicht richtig.
Darauf achten, dass weder zu viel noch zu wenig Druck im Tank ist. Das Manometer sollte knapp vor
dem roten Strich stehen! Ggf. Düse des Rapidzünders mit der gelieferten Handreinigungsnadel reinigen.
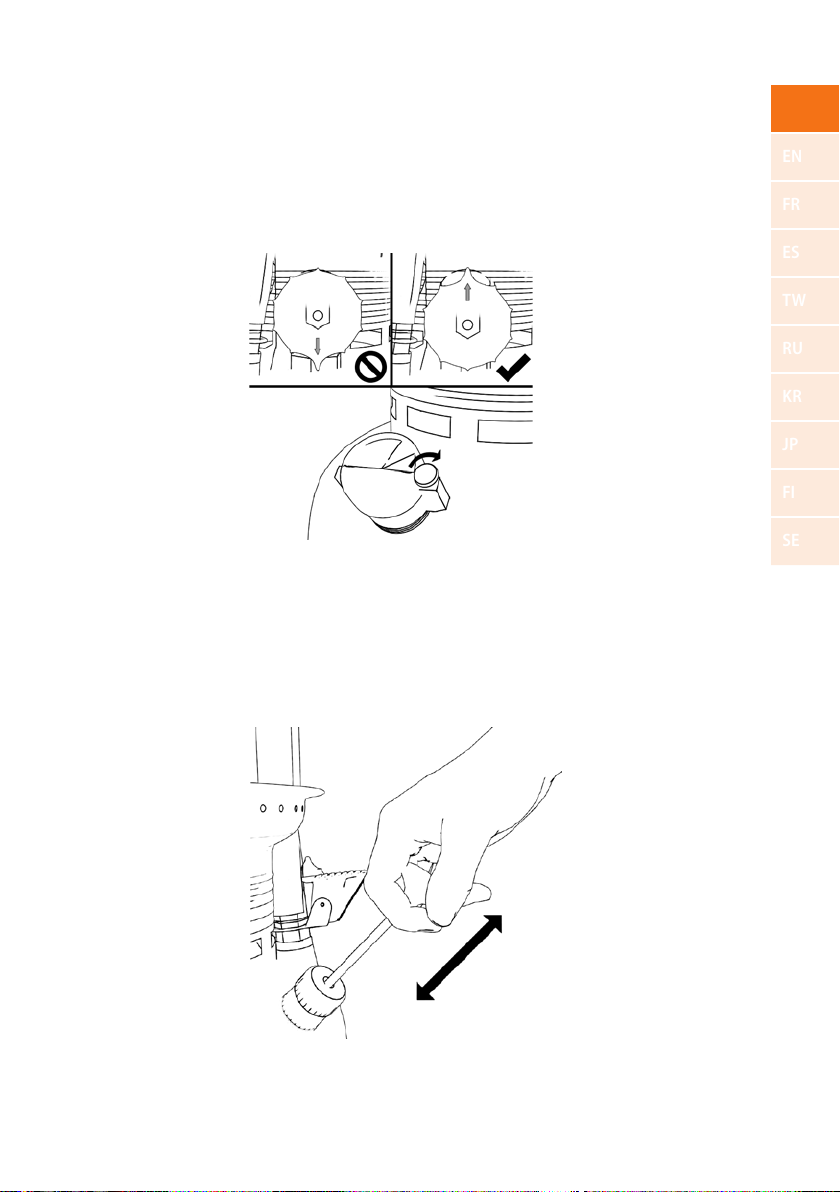
Die Leuchte flackert oder wird dunkler.
Sicherstellen, dass genug Druck und Brennstoff im Tank vorhanden sind. Handrad ggf. zügig um 360°
drehen, um Vergaserdüse mittels Düsennadel von eventuellen Partikeln zu befreien.

6
DE
EN
FR
ES
TW
RU
KR
JP
FI
SE
Der Tonbrenner fällt heraus.
Ersetzen Sie sowohl den Tonbrenner, als auch die Mischkammer, da sich im Laufe der Zeit das Gewinde
verändert.
Vorheizen der Leuchte mit Spiritus
Alle aktuellen Petromax-Modelle sind neben dem Rapidzünder mit einer Vorheizschale ausgestattet.
Das Vorheizen mit Spiritus ist schonender für den Glühstrumpf.
Vorheizen der Leuchte mit der Vorheizschale
• Bitte für mind. 90 sek vorheizen.
• Neuen Glühstrumpf mit Spiritus beträufeln.
• Schale mit Brennspiritus mithilfe des Spirituskännchens befüllen.
• Spiritus in der Schale entzünden und warten, bis die Schale leer gebrannt ist.
• Nochmals Schale mit Spiritus befüllen und entzünden.
• Warten, bis Spiritus fast verbrannt ist und dann Handrad drehen (Nase zeigt nach unten).
Gewährleistung
Bei sachgemäßem Gebrauch erhältst du auf deine Petromax-Leuchte eine Gewährleistung von zwei
Jahren ab Kaufdatum. Dies betrifft nicht Verschleißteile. Funktioniert dein Produkt nicht zufriedenstellend
aufgrund von Schäden am Material oder Herstellungsmängeln, hast du Anspruch auf Nachbesserung.
Setze dich dazu mit Ihrem Händler in Verbindung.
Service
Bei Fragen und Problemen unterstützen wir dich gern. Unseren Kundenservice erreichst du per E-Mail
unter: service@petromax.de.

7
DE
EN
FR
ES
TW
RU
KR
JP
FI
SE
Inbetriebnahme: Schritt für Schritt
Vor Inbetriebnahme der Leuchte bitte unbedingt die Sicherheits- und Warnhinweise beachten.
Den beim Zünden entstehenden Rauch nicht einatmen!
Leuchte keinesfalls in geschlossenen Räumen verwenden!
Schritt 1
• Rändelschrauben lösen.
• Haube und Innenmantel nach oben entnehmen.
Schritt 2
• Glühstrumpf mit Doppelknoten an Brennerwulst anbinden. Nicht an Mischkammer anbinden!
• Überstehende Fäden so kurz wie möglich abschneiden.

8
DE
EN
FR
ES
TW
RU
KR
JP
FI
SE
Schritt 3
•
Innenmantel und Haube wieder aufsetzen (bei älteren Modellen der HK500 muss die Regulier-
schraube sichtbar sein).
• Rändelschrauben wieder handfest verschrauben.
•
Abstand zwischen Düse und Mischrohr vor jeder Inbetriebnahme erneut einstellen (14,3 mm - 14,7 mm).
Schritt 4
• Manometer abschrauben.
• Brennstoff einfüllen (siehe Sicherheitsund Warnhinweise).

9
DE
EN
FR
ES
TW
RU
KR
JP
FI
SE
Schritt 5
• Sicherstellen, dass Handradnase nach oben zeigt.
• Manometer auf Tank handfest verschrauben.
• Luftablassschraube am Manometer handfest zuschrauben.
Schritt 6
• Pumpensicherung durch Drehen des Pumpenknopfs lösen.
• Handpumpe so lange betätigen, bis Manometer ca. 1,5 bar anzeigt.

10
DE
EN
FR
ES
TW
RU
KR
JP
FI
SE
Schritt 7A
•
Kipphebel des Rapidzünders nach unten kippen und sofort den ausströmenden Brennstoff mit
Feuerzeug entzünden.
Schritt 7B (nur bei neuem Glühstrumpf)
•
Bei neu eingesetztem Glühstrumpf, Kipphebel nach ca. 10 Sek. wieder schließen und Glühstrumpf voll-
ständig abflammen lassen, bis dieser graugefärbt erscheint und keine schwarzen Stellen mehr aufweist.
•
Anschließend Kipphebel erneut nach unten kippen und sofort den ausströmenden Brennstoff
entzünden.
Schritt 8
• Handpumpe betätigen und Druck bei 1,5 bar halten.
• Rapidzünder heizt jetzt den Vergaser vor. Vorheizzeit von mindestens 90 Sek. einhalten.

11
DE
EN
FR
ES
TW
RU
KR
JP
FI
SE
Schritt 9
• Nach 90 Sek. Handradnase nach unten drehen.
• Sobald die Leuchte leuchtet, Kipphebel nach oben legen.
• Leuchte auf Betriebsdruck (2,5 bar) bringen.

12
DE
EN
FR
ES
TW
RU
KR
JP
FI
SE
User Manual for Petromax Pressure Lamps HK150-HK500
Please read these instructions carefully and keep them for future reference!
Cautions
• Only use the lamp outdoors. Do not use indoors!
• The lamp must not be used close to objects that are flammable or sensitive to heat.
• Over time, the hood may disolour due to the high heat generated. This is no defect, but a normal
process.
• Do not place the lamp on delicate surfaces.
• Never leave the lamp unattended while it is in use.
•
Only use pure paraffin oil or kerosene. Do not use scented or coloured oils. Recommendation:
Petromax Alkan.
• This lamp is not a toy and it must not be used by children. Keep out of reach of children and animals.
• Do not cover the lamp.
• Risk of burning! Do not touch the lamp above the tank during use or 1 hour after use. After use
let it cool down fully.
• Release the pressure completely after each use by opening the bleeder screw.
• Do not add or remove fuel while the lamp is in use.
•
Only use original Petromax replacement parts. The warranty expires should other replacement
parts be used.
• In case of improper use or misappropriation, we assume no liability.
• Do not stare into the incandescent mantle.
• Do not inhale the smoke emitted by the burning incandescent mantle.
• When stored in filled condition, the manometer and the carburettor must be turned off.
Product description
The Petromax is easily the most well-known pressure lamp in the world. It has been widely used for
more than 100 years as a weather-resistant and reliable external light source. Depending on the model, it
provides a luminous power output of 400, 280, 200 or 120 watts. The brightness level cannot be adjusted.
With the appropriate accessories, the lamp can be used for heating or converted in an efficient cooker.

13
DE
EN
FR
ES
TW
RU
KR
JP
FI
SE
Scope of delivery
Your Petromax lamp comes with a package that contains the following items:
• 1 x funnel
• 1 x accessories and replacement parts set (6 pieces)
• 1 x spirit can
• 2 x incandescent mantle
Parts description
A Petromax lamp is composed of more than 200 individual parts. The figure below shows all main
parts. Contact our customer service for further information.
1. Hood
2. Inner casing
3. Mixing chamber
4. Burner
5. Knurled nuts
6. Spray nozzle + needle
7. Carburettor
8. Bleeder screw
9. Rapid preheater
10. Handwheel
11. Manometer
12. Hand pump
13. Preheat cup

14
DE
EN
FR
ES
TW
RU
KR
JP
FI
SE
Using the lamp
Prior to starting the lamp
• Damaged mantles must be replaced immediately.
•
Make sure that needle, spray nozzle, mixing chamber, and burner are properly tightened and connected.
Starting the lamp
• See “Starting: Step by Step.”
After starting the lamp
•
When the pressure falls below 1 bar, carefully add pressure to the tank using the hand pump (approx.
2.5 bar).
Extinguishing the lamp
• To extinguish the lamp, release the pressure via the bleeder screw.
• In the case of unpredicted flames development, open the bleeder screw immediately.
• Finish by turning the handwheel upward.
Troubleshooting
The pump does not work properly.
Pull out the pump plunger, grease the leather seal and gently widen the leather seal (replace it if
necessary!). Push the pump plunger back into the cylinder of the pump by turning the pump plunger.
The upper part of the lamp catches fire.
Preheat the lamp for at least 90 seconds using the rapid preheater. When pre-heating with the use of
spirit (preheat cup), use at least two full cups of spirit.
The incandescent mantle does not burn properly.
When using the rapid preheater, position the incandescent mantle in a way that it can easily catch fire
via the rapid preheater.
The rapid preheater does not ignite/burn properly.
Ensure that there is neither to much nor too little pressure in the tank. The manometer needle should
be just below the red line! If necessary, clean the nozzle of the rapid preheater with the cleaning needle
included in the replacement parts set.
The light flickers or gets darker.
Make sure that there is enough pressure and fuel in the tank. If necessary, rapidly turn the handwheel
360 degrees to free the spray nozzle of any particles via the needle.

15
DE
EN
FR
ES
TW
RU
KR
JP
FI
SE
The clay burner falls out.
Change the clay burner and the mixing chamber for the thread size changes over time.
Preheating the lamp with spirit
All current Petromax models come with a preheat cup in addition to a rapid preheater. Preheating with
spirit is more gentle on the mantle.
Preheating the lamp through the preheat cup
• Preheat for at least 90 seconds.
• Sprinkle the new mantle with spirit.
• Fill the preheat cup with spirit using the spirit can.
• Burn the spirit in the preheat cup and wait until the cup has burned to the point of being empty.
• Again, put spirit in the preheat cup and ignite it.
• Wait until the spirit has almost completely burned out, and then turn the handwheel (with the nose
pointing down).
Warranty
In the case of proper use, a warranty period of two years will apply to your Petromax pressure lamp
from the date of purchase. This does not apply to wearing parts. If your product does not function
properly due to damages in the material or manufacturing defects, you are entitled to a warranty
repair. Contact your retailer for that purpose.
Service
If you have questions regarding the contents of the manual, or if you need additional information,
please let us now. You can contact our customer service via email at: service@petromax.de.

16
DE
EN
FR
ES
TW
RU
KR
JP
FI
SE
Starting the Lamp: Step by Step
Before using your Petromax lamp, read the Safety notes and Warnings very carefully.
Do not inhale the smoke emitted by the lamp, its parts, and the mantle!
Do not use indoors!
Step 1
• Loosen the knurled nuts.
• Remove the hood and the inner casing.
Step 2
• Tie the mantle to the burner bead with a double knot. Do not tie the mantle to the mixing chamber!
• Trim loose threads as short as possible.

17
DE
EN
FR
ES
TW
RU
KR
JP
FI
SE
Step 3
•
Install the inner casing and the hood, (for older models of HK500 make sure that the regulating
screw at the mixing tube is visible).
• Tighten the knurled nuts by hand.
• Adjust the distance between the mixing tube and nozzle before each use (14.3 mm -14.7 mm).
Step 4
• Unscrew the manometer.
• Add fuel to the tank (see Safety Notes and Warnings).

18
DE
EN
FR
ES
TW
RU
KR
JP
FI
SE
Step 5
• Make sure that the nose is pointing upward.
• Screw the manometer onto the tank by hand.
• Make sure that the bleeder screw on the manometer is properly tightened.
Step 6
• Unlock the pump by turning the pump knob.
• Repeatedly push the hand pump’s plunger until the manometer reads approx. 1.5 bar.

19
DE
EN
FR
ES
TW
RU
KR
JP
FI
SE
Step 7A
•
Push the lever of the rapid preheater downward, and immediately ignite the flowing fuel with a lighter.
Step 7B (with new mantle only)
• With a newly installed mantle, close the lever after approx. 10 seconds. Let the mantle burn down
completely until appears dyed grey, and make sure that the mantle has no black bits.
• Finish by pushing the lever downward and immediately ignite the flowing fuel.
Step 8
• Repeatedly push the hand pump’s plunger to keep the pressure at 1.5 bar.
• The rapid preheater will now preheat the carburettor. It must be preheated for at least 90 seconds.

20
DE
EN
FR
ES
TW
RU
KR
JP
FI
SE
Step 9
• After 90 seconds, turn the handwheel nose down.
• As soon as the lamp lights, close the lever of the rapid preheater.
• Bring the lamp to operating pressure (2.5 bar).
Other manuals for HK150
1
This manual suits for next models
1
Table of contents
Languages:
Other Petromax Lantern manuals