PGO TR3-50 User manual

DEAR CUSTOMERS:
Thank you for buying T-rex of PGO Tricycle. It is a fact that the efficiency
and sustaining life of each tricycle depend heavily on the operating method of
each user. Thus this owner’s manual will provide you a precise knowledge of
easy adjusting, sustaining and precaution for your tricycle. We hope you will read
and check it carefully.
This manual includes 3 kinds of engine displacement:
●TR3-50 : 2 stroke engine (2T), 50cc displacement, abb. as “CP50”.
●TR3-125 : 4 stroke engine (4T), 125cc displacement, abb. as “CP125”.
●TR3-150 : 4 stroke engine (4T), 150cc displacement, abb. as “CP150”.
Please recognize your tricycle model clearly in order to read the following
instruments.
If there is any question, please do not hesitate to ask your dealer for
assistance.

Check List before Delivery
Name:Tel:Age:Sex:
Address:
Model:EngineNo:VINNo:
Delivery date:Year Month day Dealer:
NO Check Item YNNO Check Item YN
1 Steering of Handle Bar 7 Tire Pressure
2 Gap of Brake Lever 8 Confirm Engine No & Document
3 Lights and Horn 9 Owner’s Manual
4 Fuel Tank and Fuel Kind 10 Operating Method Introduction
5 Engine Oil 11 Periodic Maintenance introduction
6 Disk Brake fluid 12 Warranty Introduction
Staff Signature:Customer Signature:
Suggestion:
※ Please Sign both customer & service Staff.
※ Mail this chart to agent, and then the Warranty will be effective.

CATEGORY(CONTENT)
1. Notation for safety riding…………………4
2. Outline characteristics……………………6
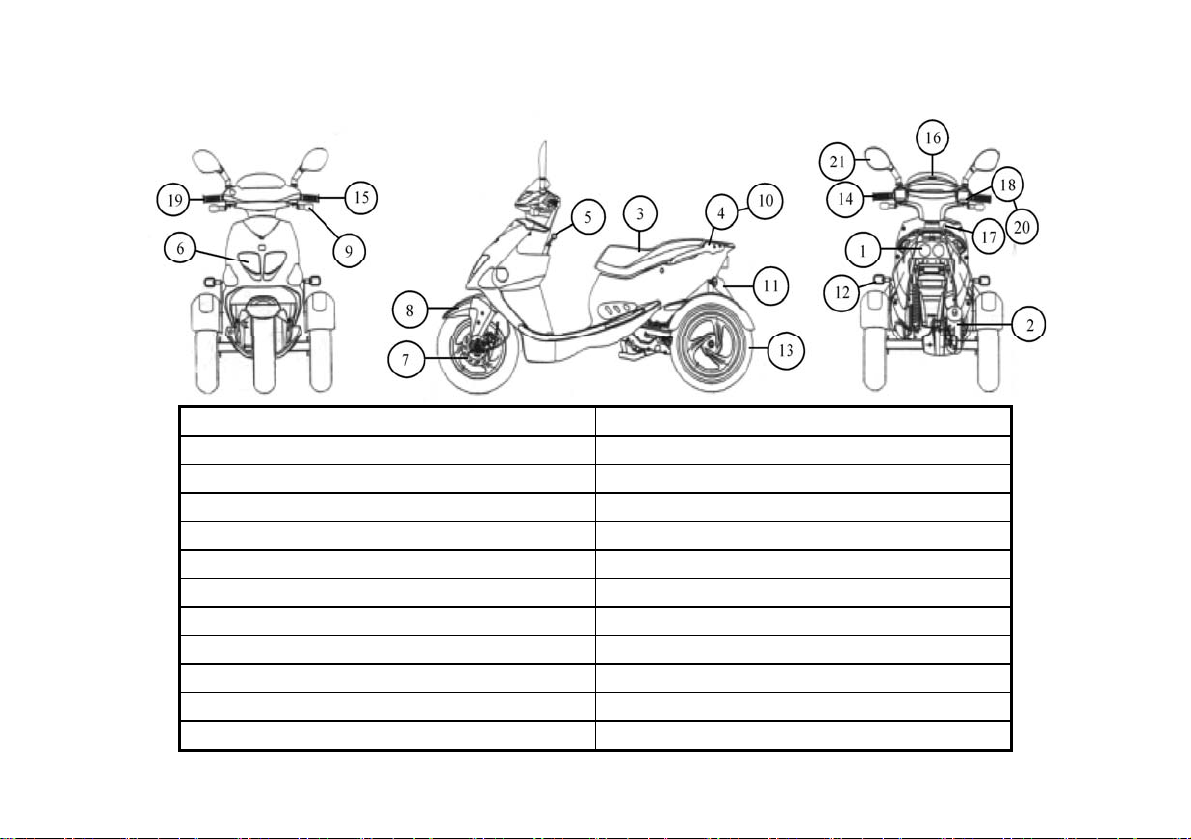
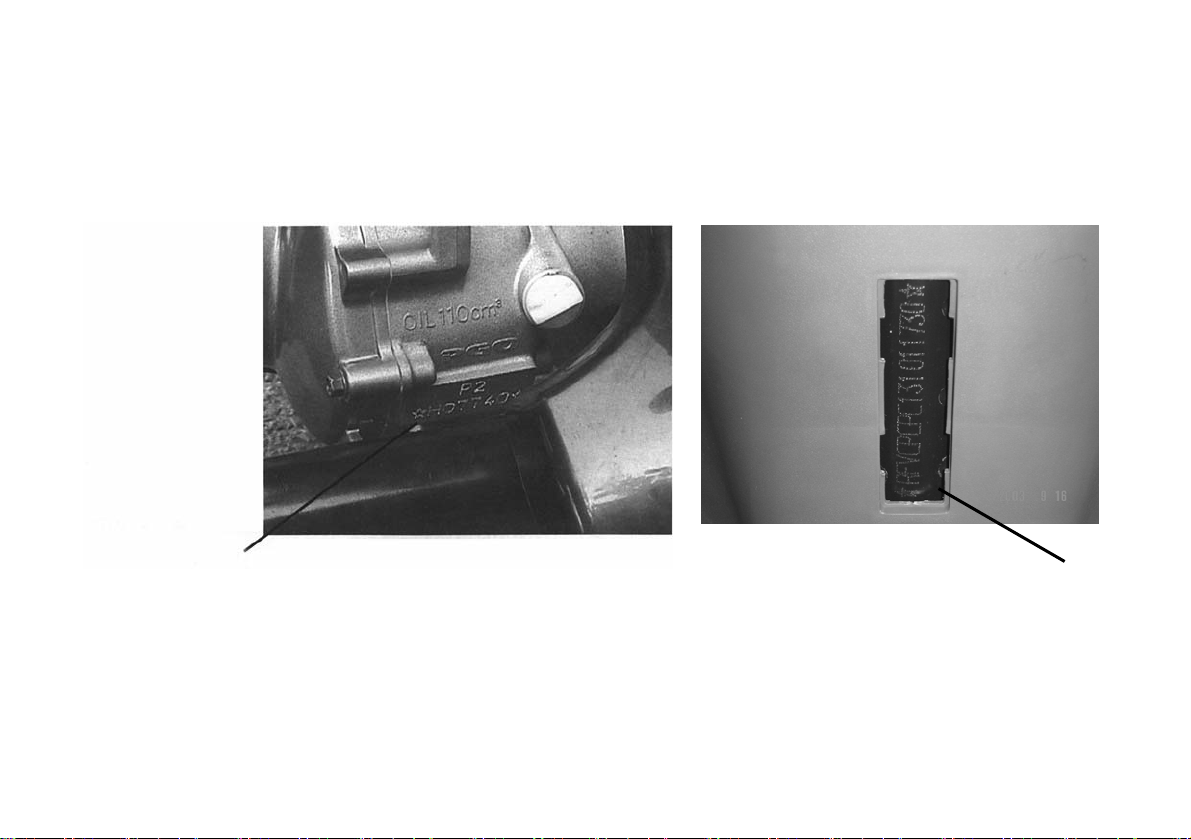
3. Recognition………………………………7
4. Function of each Controller………………8
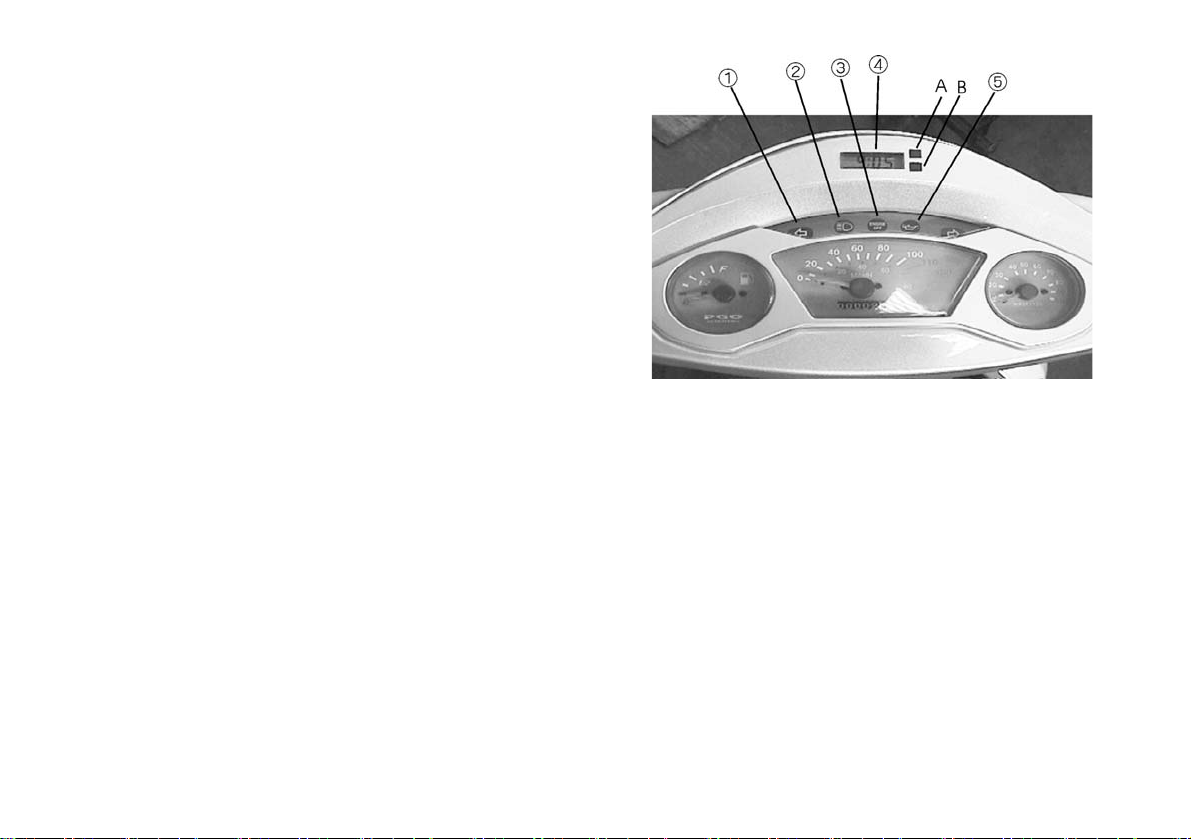
4.1 Each indicator light……………………9
4.2 Speedometer…………………………10
4.3 Handle switch…………………………11
4.4 Fuel Tank Cover……………………12
4.5 Kick Starter……………………………12
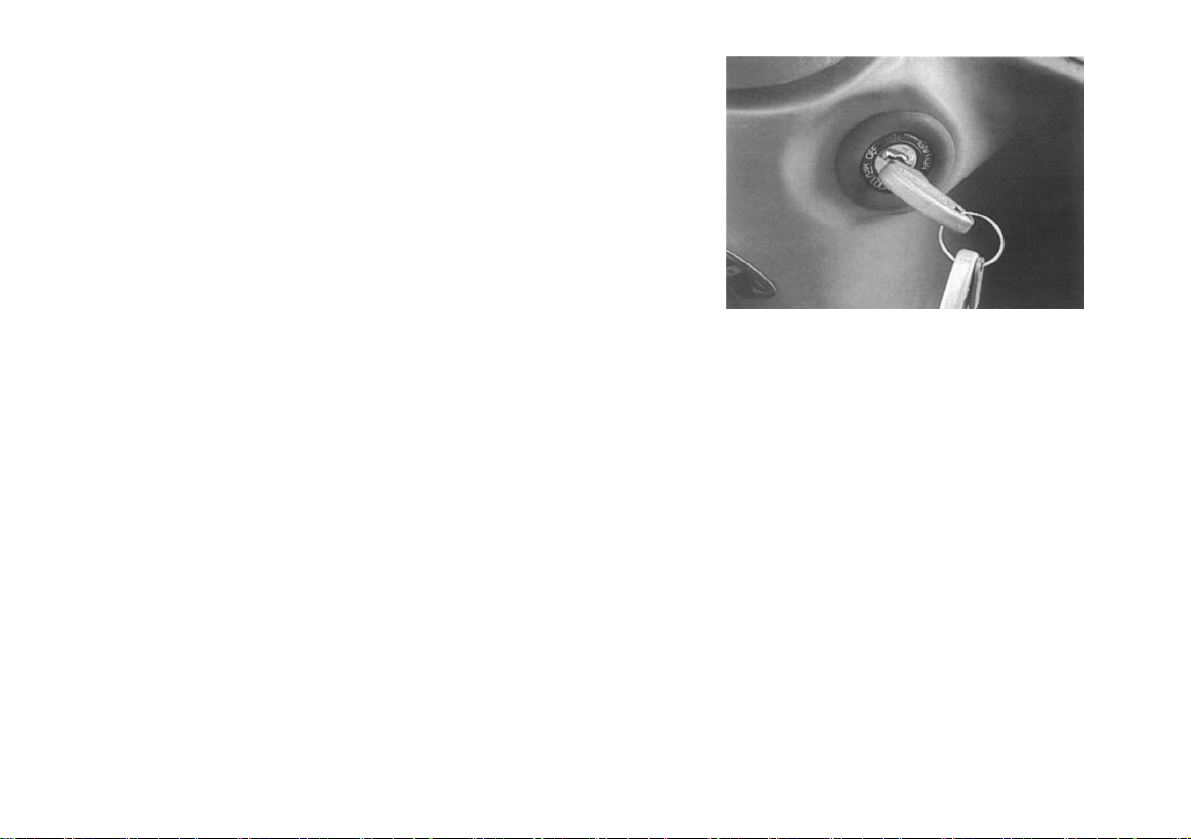
4.6 Handle(steering)lock…………………13
4.7 Seat lock………………………………13
4.8 Luggage comp………………………14
4.9 Gear shifting…………………………..14
5. Inspection before riding…………………15
5.1 Rear and front brake lever…………16
5.2 Brake…………………………………17
5.3 Brake oil leaking check………………17
5.4 Our suggestion…………………………18
5.5 Throttle grip……………………………19
5.6 Lubricant………………………………19
5.7 Air-cleaner………………………………20
5.8 Tire………………………………………20
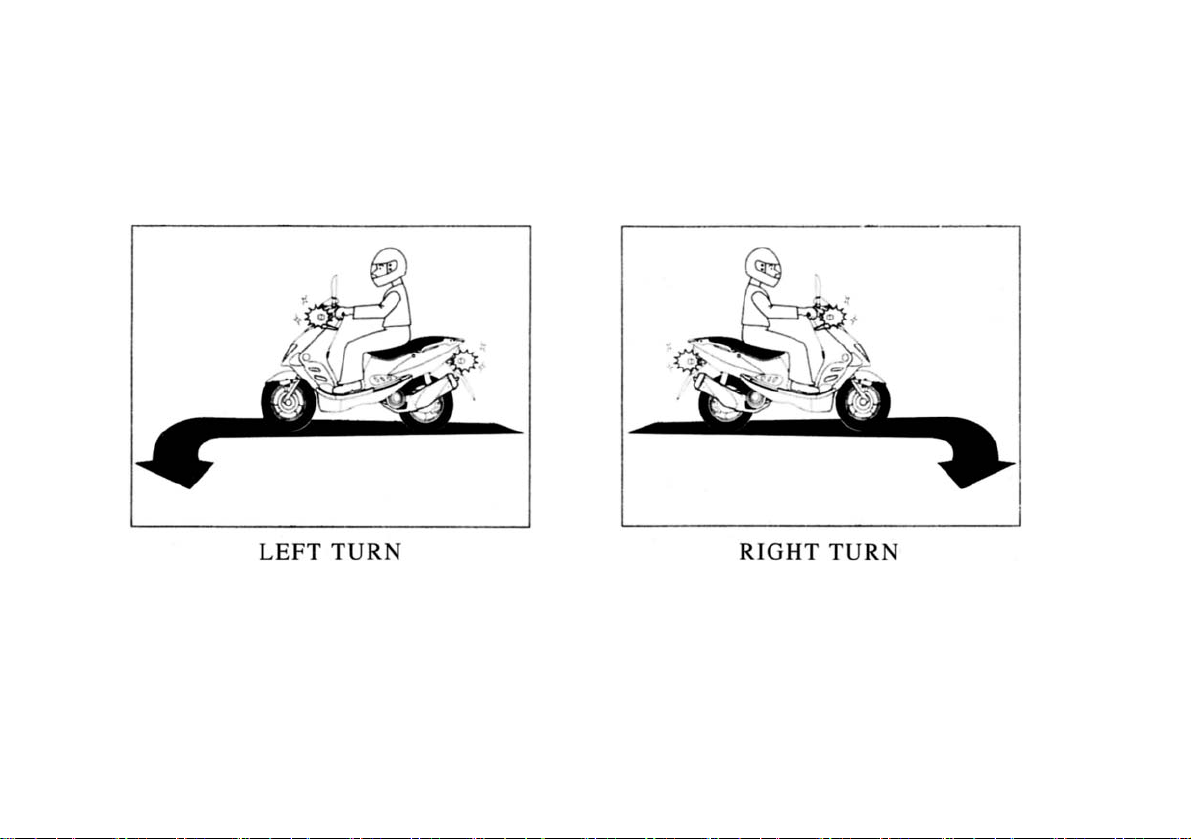
5.9 Lamps & signal lights…………………23
5.10 Switches………………………………23
5.11 Fuel……………………………………23
5.12 Catalyster……………………………24
6. Notation for operation & riding…………25
6.1 Starting engine…………………………26
6.2 Warm up the engine……………………27
6.3 Brake operation………………………28
6.4 Engine initial run-in……………………29
7. Periodical maintenance…………………30
7.1 The air-cleaner check………………33
7.2 The spark plug check……………35
7.3 Brake adjustment…………………36
7.4 Rear brake check…………………36
7.5 Front brake check……………………37
7.6 Brake oil check………………………37
7.7 Front fork check………………………39
7.8 Battery…………………………………40
7.9 Fuse replacement……………………40
7.10 Gear oil replacement…………………41
8. Reverse gear box…………………………41
9. Spec. list…………………………………43
Appendix
Periodic maintenance record……………47
5

PGO Warranty Card
Name Telephone Registration date
Address
Model
T-rex
Displacement:
CC
Engine NO: Vin NO:
Customer Signature Dealer Signature

1.NOTATION FOR SAFETY RIDING
1.Please give certain signal during the situations as the following pictures:
2

3
2. It is very difficult by using brake with the road is wet. To avoid sliding, please use the
brake gradually for slowing down the speed.
3. Slow down the speed when riding to the intersection or corners gradually increase the
speed after turning.
4. Be careful when passing the car which is parking. The driver may open the door and get
off but ignore your coming.
5. Be careful when passing the“Road Working Area"some facilities on the road may
influence your riding. So, please slow down your speed.
6. If washing your scooter, please check the brake after washing because the braking lining
may become wet.
7. Please wear safety pant, gloves, helmet and fresh color jacket when riding.
8. Do not put too much luggage on the scooter that may cause unbalance during riding.
Please fasten the goods tightly, because the loose packing and unbalance may influence
your attention to the road situation.

2.OUTLINE CHARACTERISTICS:
Please read the indication no. carefully before using this scooter.
1. TAIL LAMP/BRAKE LAMP 13. REAR TIRE
2. MUFFLER 14. REAR BRAKE LEVER
3. SEAT 15. LEFT SWITCH
4. LUGGAGE COMP. 16. SPEEDOMETER/CLOCK
5. GEAR SHIFTING 17. MAIN SWITCH
6. HEAD LAMP 18. RIGHT SWITCH
7. FRONT BRAKE DISK 19. FRONT BRAKE LEVER
8. FRONT FENDER 20. THROTTLE GRIP
9. FRONT TURN SIGNAL LAMP 21. BACK MIRROR
10. PASSENGER HOLDING BAR
11. SEPARATED MUDGUARD
12. REAR TURN SIGNAL LAMPS
4

3.RECOGNITION
1. Engine No. is located (stamped) on the rear side of the left crankcase.
2. VIN (Vehicle Identification Number) is located inside the front inner cover.
Engine No.
Vin No.
Note:
Your dealers need this number for ordering the parts, please write down the engine
No. and VIN for their reference.
5

4. FUNCTION OF EACH CONTROLLER
MAIN SWITCH:
The main switch controlling the ignition and lighting -
system the operation methods are shown on the
following:
ON:
Electrical circuit is connected and engine can be started. At this moment, the key can’t
be pulled out.
OFF:
All electrical circuits are cut, at this moment, the key can be pulled out.
LOCK:
In this position, the handle comp. can be locked and key can be pulled out. Please refer
to page 11“Handle lock operation"
Note:
Please turn to“OFF"or“LOCK"(Pull out the key) location when park the scooter.
6

4.1 EACH INDICATOR LIGHT
1.Signal indicator
2.High beam indicator
3.Engine stop lamp
4.Clock
5.Oil warning lamp (only 2T model is available)
SIGNAL INDICATOR(GREEN):
When operation, the lamp will flash with sound.
HIGH BEAM INDICATOR(BLUE):
The engine start“≣D"lights indicating that the high beam is working.
ENGINE STOP LAMP(RED):
If the engine stop button switches to“OFF",the light will be“ON"then the electric
circuit will be disconnected. the engine will be restarted, if the button switches to“RUN".
CLOCK:(CURRENT TIME GENERALLY DISPLAYED)
Current second will be displayed while button“A"to be pressed twice current time will be
displayed if the button “A” to be pressed one time.
Current date will be displayed while button “A” to be pressed. However, current time will be
displayed automatically if the button “A” released over 2~3 second.
7

4.2 SPEEDOMETER
1. Fuel gauge
2. Mileage meters
3. Tachometer
Fuel Gauge:
Indicate the volume of fuel in the tank. the indicator will move from “F"to“E"empty as
the fuel is consuming. With the indicator point to the“Fuel Refill Line",Please refill fuel
a.s.a.p.
Note:
When switch off, the indicator will point at the“E"Position.
Tachometer:
Tachometer : Indicates the engine rotating speed by rpm (round per minute).
8

9
4.3 HANDLE SWITCH
1. Hi/Lo Beam Switch
Turn to“≣D"for far distance lightening,“///D"for near distance. ⑤
④
2. Turn Signal Button
Left/Right turn:Turn the button to the left / right side. The button will returen to central
position automatically after pushing the button to “OFF"the signal.
3. Horn Button
Push the horn button, the sound will be heard.
4. Engine Off Switch
Engine will be forced to stop while switched to “OFF"position. Engine will be allowed
to restart if switched to“RUN"position.
5. Start Button
Pull the break lever, and push the start button simultaneously, then the engine will be started.
6. Light Switch
Turn it to the first shift, the fog light will be “ON". To the second shift, the head lamp &
rear be“ON".
7. Overtake Lamp
The lamp will blink after pushing the button.

4.4 FUEL TANK COVER
Plug the key into lock and turn it
clockwise 1/4 round for cover opening.
4.5 KICK STARTER (only for TR3-50)
Pull the kick out from the engine and
kick down, then the engine will be
started.(use kick starter for substituting
to push the start button)
10

4.6 HANDLE(STEERING)LOCK
¾insert the key into the key hole.
¾turn the handle bar to the left side
and turn the key to the “LOCK”
position simultaneously. The
handle will be locked & the key
can be pulled out.
Note: Do not turn to lock position during riding.
4.7 SEAT LOCK
If need to open the seat, please insert
the key and turn clockwise. Put back
the seat to its original position for
closing & locking. Please be sure the
seat fastened before riding.
11

4.8 LUGGAGE COMP
Located under the seat. Put your helmet head upward.
Note:
1. The max. Loading weight is 5 Kgs.
2. If engine has been operating over a long time, The luggage comp. will become hot.
Do not put luggage in the luggage comp. if dangerous for high temperature.
3. Do not put important or fragile goods for security.
4. Raining or wash may cause luggage wet inside. Please use water resistant material
for luggage wrap.
5. Please lock the cover when leaving the scooter.
12

4.9 GEAR SHIFTING
1. Forward
¾Turn the shifting bar to the left(“D” position),
¾Accelerate slowly to drive forwardly.
2. Neutral
¾Turn the shifting bar to the middle(“N” position),
3. Backward
¾When shifting, you have to pull the brake lever simultaneously, otherwise the engine
will stop automatically for your safety.
¾Turn the shifting bar to the right(”R” position), accelerate slowly to drive backward.
Note:
For your safety, never exceed 10 km/h when the vehicle drive backward.
Only shifting the gear when the vehicle is total stopped.
13

TIPS of GEAR SHIFTING
1.Shifting control bar
¾Pull a little bit to your body for un-engaged.
¾Turn to your selection, and engage this bar.
2.Neutral
¾Always shift to Neutral first, don’t change between “D” & “R” directly for your safety!
¾Accelerating the engine to about 3000~4000 rpm, then you can change to Forward or
Backward easily.
3. Backward
¾PGO tricycle is equipped with backward speed restriction controller, that’s a really safety
device, we recommended you to drive slowly when backward!
14

15
5. INSPECTION BEFORE RIDING:
PLEASE DO THE INSPECTION AS FOLLOWS BEFORE RIDING.
ITEM PROCEDURE RAGE
Front Brake Check the brake function, clearance, brake oil level, see if it’s leaking. If
necessary, may refill FMVSS DOT 3 or SAE J1703 brake oil. 15、26
Rear Brake Check the brake function and clearance, proper adjustment if necessary. 15、16
Throttle Grip Check if it is smooth, put some lubricant & have some 18
Lubricant Adjustments if necessary.
Check the oil level/according to the request to refill oil. 18
Tire Check the pressure, the wear out situation. 19
Controller
/Gauge Cable Check if smooth operation. Add lubricant if necessary. -
Central Stand Check if smooth. Add lubricant if necessary. -
Assembly/
Fasten Fits Check all the assembling parts, fixing & adjusting if necessary. -
Fuel Tank Check the fuel level. Refill up if necessary. 8
Lamp/Signal
Lights Check if it is operating at good condition. 9

5.1 REAR AND FRONT BRAKE LEVER
Hold the handle and pull the lever, the brake will be operating.
Rear Brake Lever
The rear brake will be on function when hold the handle and pull the left hand lever
Front Brake Lever
The front brake will be on function when hold the handle and pull the right hand lever
16

17
5.2 BRAKE (REF. PAGE 35)
1. Front & Rear Brake Lever:
You may check the brake during the low speed riding. Check the clearance, if not
correct, please adjust.
Note: If the lever is loose, that means the brake system is out of order (It is dangerous).
Do not ride it before fixing.
2. Brake Oil:
Check the oil level, refill brake oil if necessary. (Using FMVSS DOT 3 or SAE J1703 brake
oil).
3. Pad Of Disk Brake:
Take your scooter to your dealers if need to replace the brake pad.
5.3 BRAKE OIL LEAKING CHECK
Holding brake lever for few minutes and check if any oil is leaking from the joint of brake tube or
master cylinder.
Note: If the brake oil is leaking, Please let your dealers check it for you. (It is a dangerous situation)
This manual suits for next models
2
Table of contents