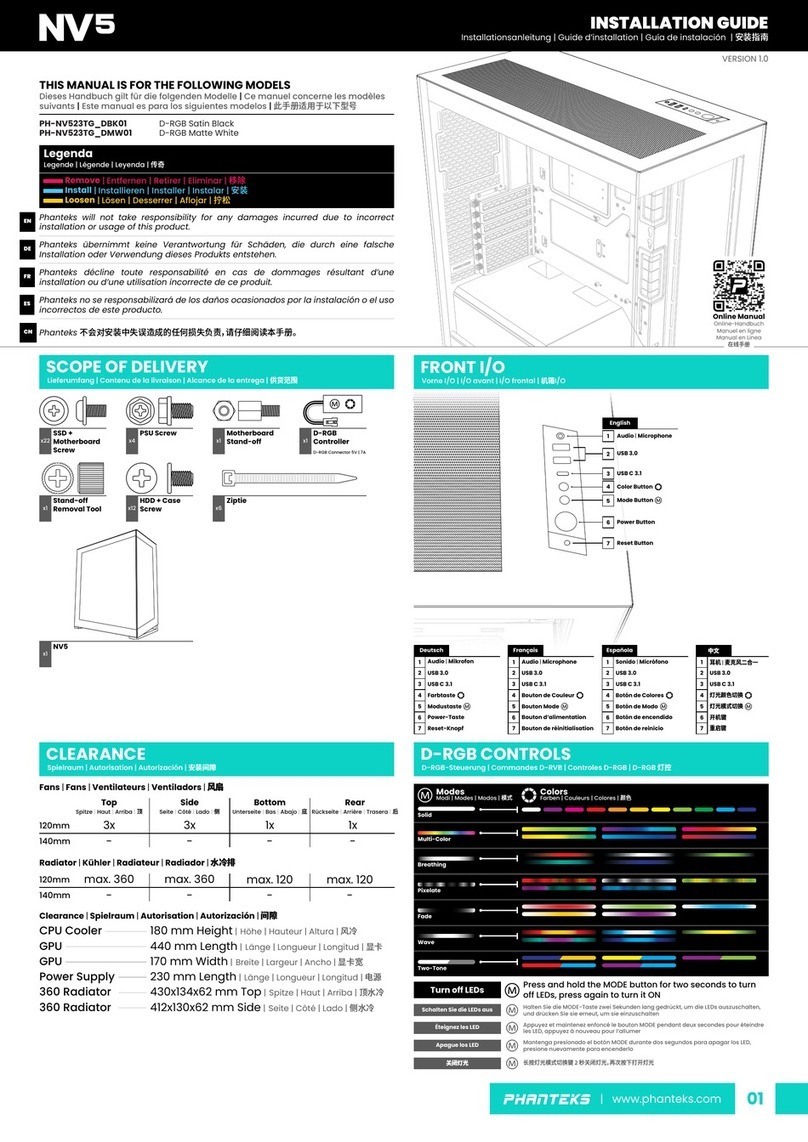
Phanteks EVOLV Series User manual

USER MA N U A L V1. 0


Thank you
for choosing

2
3. Support
Contact us 30
Warranty 31
1. What’s inside?
Introduction 3
4
Exploded view 5
Accessories 6
2. Choose your setup
7
Get started 8
Installing motherboard 10
Installing power supply 11
Installing fans
Connecting the Fan Hub
12
Installing drives 14
Installing water cooling
Radiator installation
Pump/Reservoir installation
17
Installing GPU Anti-Sag Bracket
20
TABLE OF CONTENTS
Connecting front I/O 21
D-RGB lighting
Sync lighting with D-RGB motherboard
22
Cable Management 24
Optional Upgrades: 25
Installing vertical GPU 27
Installing Dual System 28
包含哪些配件?
选择安装
支持
简介
配置Evolv X机箱
准备工作
安装主板
安装电源
安装风扇
连接风扇集线器
与D-RGB主板同步灯控
散热器安装
水泵/水箱安装
安装硬盘
安装冷排
安装显卡支架
连接前置I/O
D-RGB灯控
理线
可选升级
安装垂直显卡
安装双系统
联系我们
质保
参数
拆分图
配件
目录

Evolv X作为一台最具扩展性的多功能中塔机箱,她将为您提供最强大的硬件兼容扩展功能!
其奢华用料、精心设计、精湛工艺,是基于Evolv系列产品的持续创新和探索;
追风者团队
3
INTRODUCTION
Welcome to Phanteks!
The Evolv X is one of the most versatile mid-tower chassis out there, ready for the
future and the most powerful hardware.
Built from premium materials that are engineered with utmost care and attention
to detail. A design based on continuous product improvement and innovation
throughout the Evolv Series. Discover the ultimate building experience.
Phanteks believes that meaningful designs are created through
the fusion of form and function.
The Phanteks team
简介

机箱参数 标配配件
空间
支持
PCI扩展槽&硬盘位
尺寸
结构
材质
中塔
阳极氧化铝板
喷砂钢构架
钢化玻璃侧板
高级版140mm风扇
通用型风扇集线器
3.5” 可堆叠的硬盘架(兼容2.5” )
显卡垂直安装底座(塑胶)
配件盒
显卡防下垂固定支架
空气导流盖板
工具盒
CPU散热器限高
显卡限长
前置冷排厚度
质保 5年
联系方式(国际)
电话:(中国) 0755-27179016
联系方式(北美和南美)
顶部冷排厚度
电源开机键,2xUSB 3.0,
麦克风,耳机,D-RGB模式键
双侧钢化玻璃面板
D-RGB颜色键
主板支持
侧透
PCI扩展槽
内置3.5”
内置2.5”
前置I/O
4
INCLUDED ACCESSORIES
Premium fan 140 mm 3x (installed 标配)
Universal Fan Hub 1x (installed 标配)
3.5” stackable HDD bracket 4x
Vertical GPU Mount 1x
Accessory bag 1x
Anti-Sag Bracket 1x
1x
Toolbox 1x
CLEAR ANCE
CPU Cooler Clearance 190 mm (7.48 in)
GPU Clearance 435 mm (17.24 in)
Front Radiator thickness 95 mm (3.74 in)
Top Radiator thickness 65 mm (2.56 in)
SUPPORT
Contact
(North and South America)
Warranty
5 Years*
CAS E SPECIFIC ATIO NS
Dimension 240 mm x 520 mm x 510 mm
(WxHxD) 94.5 in x 20.5 in x 20.1 in
Form Factor Mid Tower
Materials Anodized aluminum panels
Powder coated steel chassis
Tempered glass side panels
MB Support
E-ATX, ATX, Micro-ATX, Mini ITX
Front I/O
Power button, 2x USB 3.0,
Microphone, Headphone, D-RGB
Mode button, D-RGB Color button,
USB 3.1 GEN 2 Type-C
Side Window
Yes, Tempered glass both sides
PCI SLOTS & DRIVE B AYS
PCI slots 7x
Internal 3.5” 10x (4 included 标配4个)
Internal 2.5” 9x (6 included 标配6个)
FAN 120 mm 140 mm
Front 3x 3x (2 installed 标配2个)
Top 3x 2x
Rear 1x 1x (1 installed 标配1个)
RADIATOR 120 mm 140 mm
Front Up to 360 Up to 420
Top Up to 360 Up to 280
Rear 120 140
SPECIFICATIONS
*see page 31
风扇
前
顶
后
前
顶
后
散热器
技术参数

5
EXPLODED VIEW
1. Chassis
2. Front Panel
3. Top Panel
4. Side Panels
5. Radiator Bracket
6. PSU Bracket
7. Dual System Cover
8. SSD Covers
9. Airow Cover
10. Front Dust Filter
11. PSU Filter
1
2
8
7
5
6
3
10
4
11
4
9
拆分图
机箱壳
前面板
顶面板
侧板
散热器支架
电源支架
双系统盖板
SSD 盖板
空气导流盖板
前置防尘网
电源防尘网

-配件盒里标配4个
-3把风扇已安装于机箱上
-配件盒标配
-磁铁吸附
-配件盒标配
显卡防压支架
6根150mm魔术带
追风者LOGO微章
-显卡转接线另外选购
-高风压
-静音
-可安装3.5 ” 或2.5 ”硬盘
6
3.5”MODULAR HDD BRACKET
- 4 included in accessory box
- For 3.5”or 2.5”Drive
PREMIUM FAN 140 MM
- 3 Pre-installed
- Hight static pressure
- Silent operation
VERTICAL GPU MOUNT
- Included in accessory box
- Riser Cable is sold separately
ACCESSORY BAG AND TOOLBOX
Fan screw
AIRFLOW COVER
- Included in accessory box
- Magnetic
M3x5 mm
Motherboard/
SSD/ODD screw
6-32x6 mm
Hex screw
Motherboard
6-32x6 mm
Thumb screw
6-32x5 mm
Case screw
6-32x9 mm
HDD screw
Riser Cable
screw
12x
34x
12x 6x 16x 3x7x
1x
1x
ToolboxAccessory bag
GPU Anti-Sag Bracket
6x Zip Tie 150mm
Phanteks Logo Badge
ACCESSORIES
主板/SSD/ODD螺丝
风扇螺丝
主板铜柱螺丝
3.5”
可堆叠硬盘支架 高级版140mm风扇
空气导流盖板垂直显卡安装
配件包及工具盒
配件包 工具盒
配件
六角螺丝
电源/垂直显卡底座 左右侧板/顶部面板
理线盖板/显卡支撑架
水泵支架/魔术带底座
手拧螺丝
机箱螺丝
HDD螺丝 显卡软排线
螺丝

7
CONFIGURE YOUR EVOLV X
The E VOLV X has the most v ers a t i le chassis d e s i g n .
W i th so m a ny p ossibilities y o u c an u s e t his o v e r v i e w
t o c h oos e and p lan t h e bes t c o n fi guration for y o u r
buil d .
D U A L
S Y STEM
STORAGE
W A T E R
C O O LING
PAGE 14 PAGE 17PAGE 28
C O O LING
PAGE 12
风冷区
水冷区
存储区
双系统
EVOLV X机箱具有多功能设计,提供多方案可能性,您可以根据产
品功能述描来选择及规划最佳配置。
配置EVOLV X机箱
12页17页14页28页

-磁铁吸附
8
PREPARATIONS
The Evolv X case is designed to support installation in standing position.
Don’t turn on the power to your system untilinstallation is complete.
Discharge your body’s static electric charge by touching a grounded
surface before performing any hardware procedure.
Make sure to consult the manuals of your hardware before installation.
If you do not feel comfortable with performing the installation
procedure, consult a qualied computer technician.
GET STARTED
UNLOCKING S IDE PANE L S
4 x
REM O VING F RONT PANEL
R E M O V E :
2.
1.
2
1
开始安装
筹备工作
Evolv X机箱支持立式安装
在安装完成之前,请勿打开系统电源。
在安装任何硬件程序之前,通过触摸地面来释放身体的静电。
安装前请务必查阅硬件手册。
如果您在装机过程遇到困难,请咨询专业的电脑技术员。
拆除前面板 拆除侧面板

9
OPENING SID E P ANE L S
2 x
REQUIRE :
L O OSEN :
3.
REM O VING T O P P ANEL
4.
Use the 4x thumb screws on the front to
secure the Side Panels during transport or
public events.
2
3
打开侧面板
拆除顶部面板
在运输或移动时,请先固定4颗前面侧板螺丝。
螺丝刀型

10
S T ANDOFF POSITIONING
Micro AT X
ATX / E-AT X
(Pre-installed)
These standos have a special
collar to keep the motherboard in
place when installing vertically.
Some motherboards require
installation / repositioning
of the standos. Please consult
your motherboard manual for
the correct stando positioning.
REQUIRE:
For repositioning
standos
INSTALLING MOTHERBOARD
Use t he m o the r b o a r d s s c r e w s f r om the t oolb o x t o i n sta l l
y o ur m o the r b o a r d on the pr e - installe d standoff s .
By loosening the thumb screws you can
slide the Cable Covers left and right for
optimal cable management.
安装主板
使用配件盒中的主板螺丝将主板安装在预安装的支架上。
主板定位孔
部分主板需要安装/重新定位主板铜柱。
相关正确的铜柱安装位置请参考主板手册
通过松开翼形螺钉,您可以左右滑动线缆
盖,以实现最佳的线缆管理。
图示位置主板支撑铜柱带有定位功能,可提供辅助
定位易于安装!
用于定位对孔
S T AND O F F P OSITIONING

11
INSTALLING POWER SUPPLY REQUIRE:
Connect all needed cables to the
power supply before installing it in
the case.
4 x
The p o w er s u ppl y c a n be instal l e d b y r e m o v i n g
the PSU bracketo nt he rear.
2 x
L O OSE N :
1. PUSH
1
2
2. OPEN
安装电源
请将电源先锁入安装支架,再锁入机箱;
按压
打开
将所有需要的接线连接到电源,然后再将其安装到
机箱中。

12
INSTALLING FANS REQUIRE:
1 4 0
FAN
1 4 0
FAN
1 2 0
FAN
1 2 0
FAN
T O P
R E A R
1 4 0
FAN
120
FAN
F R O N T
C o n fi g u r e y o u r a i r fl o w -pa t h with this o v e r v i e w. A l l f a n loca t i o n s
suppo r t b o t h 120mm and 140mm f ans .
circulating when you install 2x120 mm or2x 140 mm fans.
AIRFLO W COVE R
BA
2 x
L O O SEN:
使用此视图配置气流路径, 所有风扇位置均支持120mm和140mm风扇。
安装2x 120 mm或2 x 140 mm风扇时,
请安装磁性气流盖板防止热气流再循环。
气流盖板
安装风扇

连接风扇集线器
将风扇集线器4-PIN 线连接到主板PWM 4-pin风扇接口上
将额外的风扇连接到集线器的相应接口上
将SATA接头连接到电源
黑色 3针接口
黑色 4针接口
13
CONNE C TING THE UNIVERSAL FAN HUB
The White Connector will provide the
RPM signal to the motherboard.
1.
2.
Y O U R M O T H ERBOARD F A N HEADER
CONNEC T E X T R A F ANS T O T H E C O RRESPON D ING
CONNEC T O R O N THE UNIVE R S A L F A N H U B
Choosing a PWM output provides the most
customization options in the motherboard
settings.
You can choose a PWM or DC output in the
motherboard settings. The Fan Hub will
automatically translate the signal to all
connected 3- and 4-pin fans.
Check WWW.PHANTEKS.COM/FAQ for more technical
details.
3. CONNEC T T H E S A T A C ABLE T O T H E P O W E R S U PPL Y
W H ITE 3-/4-PIN UNIVERSAL
B L A C K 4 -PIN
B L A C K 3 -PIN
T O PSU
TO MOTHERBOARD
SATA
FAN HUB 4-Pin
Expand the number of fans withsplitter
cables up to a maximum of 4A total power.
Splitter cables are sold separately:
PH-CB-Y4P/ Y3P
连接主板
连接电源
您可以在主板设置中选择PWM或DC输出。风扇集线器会
自动将信号转换为所有连接的3针和4针风扇。
相关更多详情,请登录WWW.PHANTEKS.COM/FAQ
选择PWM输出可在主板中设置更多的自定义选项
使用分接线扩展风扇数量,最大可达4A总功率。
分接线单独出售:
PH-CB-Y4P/ Y3P
白色 3/4针通用接口
必须接入1把风扇且只能接入1把风扇
白色端口为主板调试风扇转速信号,

安装硬盘
14
INSTALLING DRIVES
2.5”S SD INSTALL ATION
B o th S S D C o v e r s s u ppo r t 3x 2.5” SSD s .
E a ch SSD is moun t e d with 4 xs c r e w s .
REQUIRE:
4 x
CABLE S
4 x
OPTIONAL SSDS T O R A G E
Up to 3x a dditional SS Ds can be installed using
the *Pha nteks 2,5”SSD bracket ( PH- S D BK T _ 0 1 ).
*SSD brackets are not included and sold separately.
PH-SDBKT_01 required
4 x
REMO V E :
两块SSD盖板都支持3个 2.5” SSD硬盘
每个SSD 安装用4颗螺丝
可选配SSD硬盘
使用追风者 2,5”SSD硬盘架
*(PH-SD B K T _01)可扩展3个SSD
*
不标配SSD支架,可选购
2.5”SSD安装

15
REQUIRE :
3.5” H DD INSTALL A TIO N
B O T T OM COMPARTMENT
T W O S T A C K - C ONFIGUR A TIONSINGLE S T A C K - C O N F IGUR A TION
4x P h a n t e k s Stack a ble 3.5” H DD Brackets a r e included .
Additional brackets are sold separately(PH-HDDKT_03).
The HDD bracket can also house
a 2.5” SSD instead of a 3.5” HDD.
4 x
Each HDD bracket can be stacked
together to offer more flexibility.
HDD
HDD INS T ALL A TION S T A CK / INSTALL R EMO V E
1. LIFT UP LATCH
2. PULL OUT
2
2
1
1
ACB
195mm PSU Clearance
250mm PSU Clearance
POSITION A+CPOSITION B
3.5”HDD硬盘安装
HDD硬盘安装 支架堆叠安装 拆除
机箱标配4个可堆叠3.5“HDD支架
每个HDD支架可以堆叠在一起,以
便具有更大的灵活性。
HDD支架也可以安装2.5”SSD
上拉闩锁
提升闩锁
两个堆叠配置
位置A+C 位置B
单堆叠配置
拉出
如需增加支架可单独购买(PH-HDDKT_03)

16
MAIN C O M P ART M ENTREQUIRE:
Up t o 6 S t ackabl e H DD B r a ckets can be installe d
i n the main comp a r tme n t .
1. TO R E V E A L THE HDD MOUNT S
3.
2.
SECURE WITH 2 THUMBSCRE W S
1 x
REMOVE:
2 x
MOUNT T H E
H D D B R A C K E T S I N P OSITIO N
A
S T A C KS T A C KS T A C K
B
C
D
E
F
Stack the HDD brackets before mounting
if you install more than 1x bracket.
主隔口
主隔口最多可安装6个可堆叠硬盘支架。
拆除理线盖板,才看到HDD安装位 将(单/堆叠)HDD支架安装到位
用2个手拧螺丝固定
如果安装超过1个支架,请在安装前堆叠HDD支架。

17
INSTALLING WATER COOLING
1 2 0 FORM FACTOR
1 4 0 FORM FACTOR
120
140
240
280
360
420
F R ONT
R E A R
1 2 0 FORM FACTOR
140 FORM FACTOR
120
140
REQUIRE :
T O P
1 2 0 FORM FACTOR 1 4 0 FORM FACTOR
12014 0
24028 0
360
21
Use the Airow Cover to prevent
hot air from circulating.
安装水冷排
顶部
后面
前面
120规格
120规格
120规格
140规格 使用气流盖防止热空气循环。
140规格
140规格

散热器间距
18
RADIA T OR CLEARANCE
MAX. R ADIATOR CLEA RANCE
140mm Radiators : A:405mm B:146mm C:65 mm
120mm Rad iat ors : A:40 5mm B:1 26mm C:65mm*
T O P F R ONT
MAX. RADIATOR CLEA R ANCE:
A:465mm B:148mm C:95mm
*If the motherboard and its components (e.g. memory)
are 50mm or lower there is no limit in Radiator thickness.
T O P
A
A
B
C
B
C
Installing allport in the top radiator bracket
and/or a drain port inthe front of the case
makes water cooling maintenance much easier.
The port diameters are 20.5mm.
Phanteks Passthrough tting: PH-PTF_BK/CR_G1/4
Phanteks Ball-Valve tting: PH-BVA_BK/CR_G1/4
D R AIN PORTFILL PORT
TNORF
*
如果主板及其组件(例如内存)为50mm或更低,则散热器厚度没有限制。
顶部
顶部
前面
最大散热器间距 最大散热器间距
前面
在顶部散热器支架和/或机箱前部的排水口安装注水口使水
冷维护更加容易。 端口直径为20.5mm。
追风者止水阀:PH-PTF_BK/CR_G1/4
追风者球型塞:PH-BVA_BK/CR_G1/4
排水口
注水口
This manual suits for next models
1
Table of contents
Other Phanteks Chassis manuals
Popular Chassis manuals by other brands

Paradyne
Paradyne Hotwire 8747 installation instructions

Supero
Supero SC113 Series user manual

Intel
Intel SE7500WV2 - Server Chassis - SR2300 Product guide

nMedia
nMedia HTPC 100 SA Quick installation guide

CommScope
CommScope FACT NG4 installation instructions

Goldstar
Goldstar MC-993A Adjustment instructions