PhaZZer NV3 Series Specifications

Page - 1
1-NV3-B / 1-NV3-C
Operator Instructions
8/16/2019 Version 1.0
Monocular
Digital Day/Night Vision
With 8X ZOOM
Pha erPha er
CERTIFIED
Pha erPha er

Contents
Overview.......................................................................................1
Operating Hints.............................................................................1
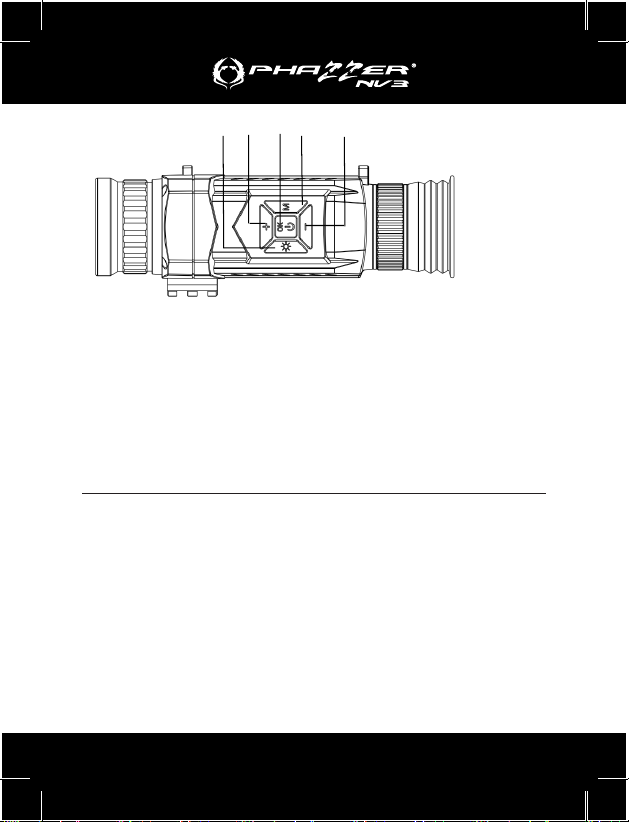
Components .................................................................................2
Operating Instructions ..................................................................3
Battery Installation ....................................................................3
Power On..................................................................................3
Power O ..................................................................................4
Icons Description.......................................................................... 4
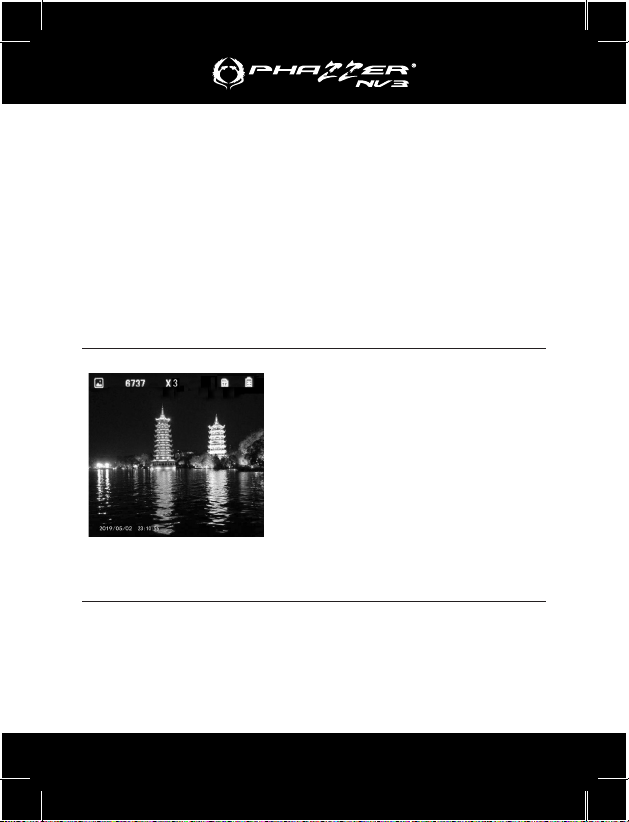
Scenery Observation.................................................................... 4
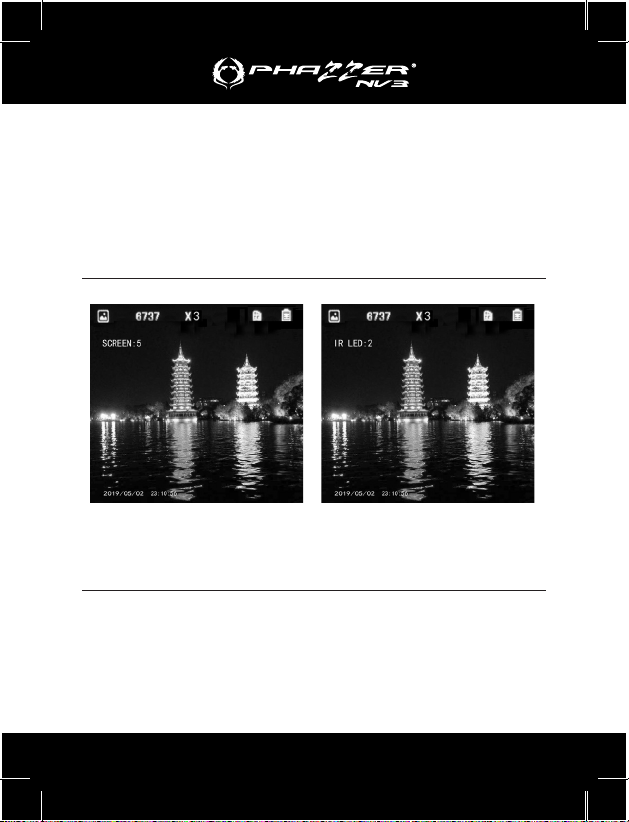
Brightness Adjustment..................................................................5
Brightness Adjustment .............................................................5
Adjustment for Illumination........................................................5
Screen Brightness and Infrared Illuminator Adjustment ............... 6
Photo Shooting............................................................................. 6
Announcements........................................................................ 6
Photo Shooting .........................................................................6
Video Shooting and Playbacking..................................................7
Video Shooting..........................................................................7
Playbacking...............................................................................7
Time/Menu Setting ....................................................................... 8
Time Setting..............................................................................8
Menu Setting.............................................................................8
Menu Descriptions........................................................................9
PCs Connection..........................................................................10
PCs Connection...................................................................... 10
Auto Power O/Power Management .......................................... 11
Battery Selection..................................................................... 11
External Power........................................................................ 11
Basic Parameters .......................................................................12
Conguration Standard...............................................................13
Basic Parameters....................................................................13
Package Content ....................................................................13
Operating Environment and others.............................................14

Page - 1
Overview
Name: PhaZZer Monocular NV3 Digital Day/Night Vision
with 8X Zoom - Black or Camouage
Model: 1-NV3-B or 1-NV3-C
Features:
The PhaZZer NV3 Day/Night Vision Monocular can be
used in complete darkness or low light environments.
• The viewing distance in complete darkness is Innity
• The viewing distance in a low light environment is 200
meters (650 ft)
The PhaZZer NV3 can be used during the day or at night.
If the light is too strong during the day, it will get a better
visual eect when the objective lens shelter is on. At night,
the objective lens shelter should be removed for better
observation and optimal performance. It comes equipped
with photo, video, and playback functions and with zoom
capabilities of 5X optical zoom and 8X digital zoom.
Operating Hints
Phazzer NV3 Day/Night Vision Monocular is the optimal
instrument to obtain images of objects in low light and
dark environments.
It is equipped with an Infrared illuminator for optimal use
in dark environments.
The infrared illuminator should be turned on when in use
in a dark environment. You can adjust the brightness of
the infrared illuminator according to the distance of the
object. It is also equipped with a low-level illuminance

Page - 2
transducer.
If there is any light source, such as streetlamps or moon-
light, the infrared illuminator does not need to be turned
on. You can adjust the focal length of the objective lens
and the screen brightness to achieve a clear image.
Components
1 2 3 4 5 6 7 8 9 10
1 - Objective focus wheel
2 - Objective lens
3 - Infrared illuminator
4 - Battery compartment
5 - Operating zone
6 - USB 2.0 socket
7 - TF card socket
8 - Dioptre ring
9 - Eyecup
10 - Ocular lens

Page - 3
11 - Menu Switch for auxil-
iary light and adjustment of
brightness of screen
12 - UP
13 - POWER/Function
Check
14 - Functions(for photo
shooting, video shooting,
videoing, playback and
video output)
15 - DOWN
Operating Instructions
Battery Installation
The PhaZZer NV3 Day/ Night Vision Monocular comes
equipped with a 16340mAh lithium-ion battery. To unscrew
the battery cover, turn counterclockwise. Insert the battery
with negative electrodes bottomed, and then tighten the
battery cover clockwise.
Battery runtime is approx.2 hrs. without the use of the
infrared illuminator and approx. 1 hr. with the use of the
infrared illuminator.
11 12 13 14 15

Page - 4
Power On
Long press the” Power/OK” Switch (button#13) for 3 sec-
onds while looking through the Eyecup (Image #10) The
monocular is on when the screen displays the lightened
PhaZZer Screen and icons are shown. (Please refer to
Picture 1). The monocular is now in still photo/view mode.
Power O
In any mode, long press the “Power/OK” Switch (but-
ton#13) for 2 seconds to power the monocular o.
Icons Description
Picture 1
1 - Current mode
(Photo shooting)
2 - Image Capacity Remaining
3 - magnication range
4 - TF card in
5 - Battery charge indicator
6 - System time
Scenery Observation
In the observing (photo/view) mode, aim the monocular
at the objects to be observed. Look at the screen from
Eyecup (Image #9).
• Adjust the diopter ring (image #8) to focus and sharp-
en the images.

Page - 5
• Adjust the objective focus wheel (image #1) to get the
sharpest image
The Automatic ne-tuning control, that is operated by the
viewer, will adjust according to the average brightness of
the central focal point.
Digital zoom is implemented by pressing the “+” (Up but-
ton #12) and “-“ (Down button #15) ranging from 1X to 8X.
If the light source is bright enough, turn the auxiliary light
o to save the battery power.
If the light source is not bright enough, turn the auxiliary
light on and adjust the brightness accordingly.
Brightness Adjustment
While in photo/view mode, press the light switch (button
#11) to activate the brightness adjustment menu (as in
Picture 2), the number after “SCREEN:” is the current
brightness of the screen. The brightness ranges from
1 to 10 by pressing the “+ “ (Up button #12) for a light-
er screen and the ” -“ (Down button #15) for a darker
screen. Once appropriate brightness is achieved, the
screen brightness adjustment mode will automatically shut
o after 3 seconds.
Adjustment for Illumination
While in the photo/view or video mode, press the light
switch (button #11) twice to enter the auxiliary light adjust-
ment menu (as in Picture 3). The index after the ”IR LED”
displays the brightness of the auxiliary light. In normal
conditions you can get a good view at range 2.

Page - 6
Press the “+” (Up button #12) or the “–“ (Down button
#15) to adjust the infrared illuminator ranged from 0 to
9 (9-lightest, 0-turn o). Once appropriate brightness is
achieved, the auxiliary light adjustment mode will auto-
matically shut o after 3 seconds.
Screen Brightness and Infrared Illuminator
Adjustment
Picture 2 Picture 3
Photo Function
Please Note:
In any mode above, the menu will disappear if there is no
operation performed within 3 seconds.
Turn the auxiliary light o to save the power when the light

Page - 7
source is light enough. Don’t block the auxiliary light when
it is turned on.
Photo Shooting
The PhaZZer NV3 Day/Night Vision Monocular enters the
photo/view mode automatically after powering the device
on. (Picture 1). You can observe the scenery or take still
photos.
You can take still photos by pressing the “Power/OK”
(button ”#13”) with one short press. Each press takes one
still photo. The photo will be saved automatically to the TF
card.
The remaining image capacity is counted by the storage
in the TF card and will be displayed on the screen. The
capacity is approximate and may vary slightly from actual
capacity.
Video and Playback Functions
Video
In the photo/view mode, short press “M” (Mode button
#14) to activate the video mode. Press the “Power/OK”
(button #13) to start the video (shown as “START”). The
time shown in the left corner shows the video record time.
Press “Power/OK” (button #13) again to stop the video re-
cording. (shown as “STOP”). In the video mode, the video
clips will be saved in the TF card automatically. When the
video recording ends, time shown in the left corner shows
the remaining time available in the storage of TF card.
Playback
In the photo/view mode, short press the “M” (Mode button

Page - 8
#14) to use the playback function. In the playback mode,
press the “+” (Up button #12) and the “-“ (Down button
#15) to choose the photos and videos for playback. When
you have located the photos or video to playback, press
the “Power/OK “ (button #13) to view them.
Tips: In the video recording process, if the device sud-
denly loses power, an error has occurred. This error can
occur when you check the video in the playback mode
and is due to a corrupted le.
Correction: To correct the error, you must connect the
NV3 device to your computer and format or delete the
corrupted le from the TF card.
Tips: You can not use the screen brightness and illumina-
tor brightness functions in the Playback mode.
Time/Menu Setting
Time Setting
To set the current date and time you must long press the
“M” (Mode button #14) to start the menu. Scroll to the
“Time Setting” option using the “+” (Up button #12) or “-“
(Down button #15) and short press “Power/OK” (button
#13) to enter. You can switch between the year / month /
day / hour / minute / second, using the “+” (Up button #12)
and the “-“ (Down button #15)” to adjust to correct setting
then short press the “Power/OK” (button #13) to conrm.
Menu Setting
Long press the “M” (Mode button #14) to enter the menu.
Use the “+” (Up button #12) and the”-“ (Down button #15)
to select the option you need, short press “Power/OK”

Page - 9
(button #13) to enter, and press “Power/OK” (button #13)
when setting is done. Short press “M” (Mode button #14)
to exit the menu setting mode.
Menu Descriptions
Menu
Options
Optional
Choices Tips
White
Balance
Auto/Sunlight/
Cloudy/
Tungsten /
Fluorescent
Select due to dierent
weather conditions.
EV -2~+2 Adjust EV according to
dierent light levels to
get a better eect.
Audio Yes/No Record while video
shooting or not.
Date Tag Yes/No Retain a date tag on the
le when you are shoot-
ing or not.
Time
Setting
Set the system time.

Page - 10
Menu
Options
Optional
Choices Tips
Auto
Power-o
O/One Minute/
Three Minutes
Automatically shutdown
if there is not any opera-
tion after specied time.
Language
Setting
English/
Chinese/
Japanese
Set language environ-
ment.
Flicker 50Hz/60Hz
Format Format TF card
Reset
System
Reset menu parameters
to factory defaults
PCs Connection
PCs Connection
The PhaZZer DV3 Day/Night Vision Monocular is
equipped with a USB 2.0 interface. Connect the viewer to
the computer by inserting the USB cable into the com-
puter port. The battery is charging when the monocular
connects with your PC.
Press ”Power/Ok” (button #13) for 3 seconds. Choose
from the function screen: Memory,PC, camera, or video
mode. Select “Memory”.and the Monocular can now be
used as a mobile storage device, Your PC will identify the
monocular automatically and read the content in the TF
card. Install the “PC camera” software in the TF card to

Page - 11
the computer.
Restart the monocular, select “PC camera” to enter the
video recording mode, a real-time video recording starts
once the PC camera software is installed and the comput-
er is on.
Select “Video” mode to view the scenery on the PC
through the monocular. When connected to the PC, the
battery is charging.
Auto Power O/Power Management
The viewer will turn o automatically if there is no op-
eration performed within 3 minutes. (Shut o the auto
power-o function or specify the auto power-o time in the
”Menu Setting”.
The viewer will not turn o automatically in the video and
playback mode.
Battery Selection
High capacity rechargeable lithium-ion battery,
16340mAh, 3.7V.
Please charge the battery for at least 10 hours before rst
time use.
External Power
The PhaZZer DV3 Day/Night Vision Monocular is
equipped with external power. It can be charged through
the USB interface, or by a standard mobile charging
source.
The monocular will work continuously and will not turn o
automatically when using an external power supply.

Page - 12
The battery will also charge when the monocular connects
to an external power source.
Basic Parameters
Menu
Options Optional Choices Tips
Optical
Performance
Magnication 5
Dimension of Objectives φ35mm
FOV 7°x5.25°
Ocular Adjustable
Range
±0.5
Observing Distance
(Low Light Environment)
2m~∞
Digital
Performance
Sensor Low
Illumination
HD 1 / 3
COMS
Pixel 1.3 Million
Photo 1280x1024
Video 720P
Display Screen 1.54 inch
Digital Magnication 8

Page - 13
Conguration Standard
Basic Parameters
Power Operating Voltage 3.7V DC
Replaceable
Battery
Rechargeable lithium-ion
battery, 16340mAh
Charging Source 5.0V/700mA Adapter
Other Measure-
ment(L*W*H)
178x72x78mm
Weight 300g
Package Content
Items Amount
Objective Lens Shelter 1
External Power Adapter 1
USB Cable 1
NV1-535 Monocular 1
Pouch 1
Shoulder Strip 1
Hand Grip Strip 1
16340mAh lithium-ion Battery 1
Cloths 1

Page - 14
Operating Environment and others
Keep the PhaZZer DV3 Day/Night Vision Monocular in it’s
soft pouch when not in use. Operating temperature range
is -5~40°C. Relative humidity is 80%.
In order to avoid the wetness and mildew, please store
the device in a clean and dry environment and avoid
high pressure, mechanical damage, humidity and solar
radiation.
Avoid rain and fog as much as possible, as well as drop-
ping, bumping and collision.
Blow away any dust before wiping any optical surface,
such as objective lens, ocular lens and digital illuminator.
Wipe it gently using a ne, soft cloth.
When the monocular in not in use for a long period of
time, please charge the battery occasionally to avoid the
loss of the life of the battery.

Arthur Evelyn Bldg
Suite 5, Main St.
Charlestown, Nevis.
www.PhaZZer.com
(402) 881-1117 • Sales@Phazzer.com
Pha erPha er
CERTIFIED
Pha erPha er
This manual suits for next models
2
Table of contents