Philips HF320/00 User manual

HF 320

2
English Page 4
• Keep page 3 and open when reading these
operating instructions.
Français Page 16
• Pour le mode d'emploi: dépliez la page 3.
Deutsch Seite 28
• Schlagen Sie beim Lesen der
Gebrauchsanweisung Seite 3 auf.
Nederlands Pagina 40
• Sla bij het lezen van de gebruiksaanwijzing
pagina 3 op.
Italiano Pagina 53
• Prima di usare l'apparecchio, aprite la pagina 3 e
leggete attentamente le istruzioni per l'uso.
Ελληνικά Σελίδα 65
•Ανοίξτε την σελίδα 3 για τισ οδηγίεσ
χρήσεωσ.

3
SYS.
mmHg
DIA.
mmHg
PULSE
min.
MEM.
START
HF 320
DIGITAL BLOOD PRESSURE MONITOR
HF 320
A B D C
FG E H

English
Important
•Read these instructions for use carefully in
order to obtain accurate measuring results.
•This blood pressure meter is only suitable for
measuring the blood pressure of adults.
•This blood pressure meter measures blood
pressure on the basis of the pulse rate. If you
have a very weak or irregular pulse, it is
possible that the blood pressure meter will not
be able to determine the right blood pressure
value.
Diabetics and people who suffer from cardiac
arrhythmia, vascular constriction or liver
disorders must consult their doctor before they
start measuring their own blood pressure, since
their blood pressure values might deviate from
the normal values. This also applies to pregnant
women.
•If in doubt, consult your doctor.
•Only a doctor is capable of interpreting your
blood pressure values; never change your
medication without consulting a doctor.
4

List of functions
(See picture on the inside of the sleeve)
ASystolic pressure in mmHg (= mm mercury pressure)
BDiastolic pressure in mmHg (= mm mercury pressure)
CPulse rate (the number of heartbeats per minute)
DRelease button for the lid
EOn/off button
FMemory button for seven previously measured values
GProtective lid with brief directions for use
HWristband
Before the first measurement
- Remove the protective foil from the
display.
- Place the two AAA (LR03) batteries
in the battery compartment. Make
sure that the + and - poles are
pointing in the right direction.
Please note: Insert the lower
battery + pole first.
5

Placing the wristband
- Put the wristband on the left wrist
with the control panel on the inside of
the wrist. Make sure that there is no
piece of clothing between the wrist
and the wristband.
The wristband must be placed
approx. 1 cm (0.5 inch) away from
the palm of the hand
- Tighten the wristband firmly around
the wrist; make sure that there is no
room left between the wrist and the
wristband.
Note: the coloured marks on the
wristband indicate a wrist
circumference of 13.5-19.5 cm (5.25-
7.75 inches). If the marks do not
overlap, the circumference of your
wrist is too big to allow accurate
functioning of this blood pressure meter.
Conditions for accurate blood pressure measurement
- Rest your elbow on a table and hold up your forearm in
such a way that the wristband is at about the same height
as your heart. Support your forearm.
- Sit down and relax for 10 minutes before you use the
blood pressure meter for the first time. Breath deeply in
and out five times before you start measuring.
6

- You have to wait at least 3 minutes between 2
measurements to avoid incorrect values caused by
temporary congestion of the arteries.
- Carry out the measurement every day at the same time,
since your blood pressure fluctuates in the course of the
day.
- Do not eat, smoke or drink before you measure your blood
pressure. Alcoholic beverages in particular will influence
the measurement.
- Do not attach too much importance to the results of a
single measurement. Carrying out measurements
regularly over a longer period of time and recording the
results will give you a better insight into your blood
pressure than a single measurement.
Carrying out the measurement
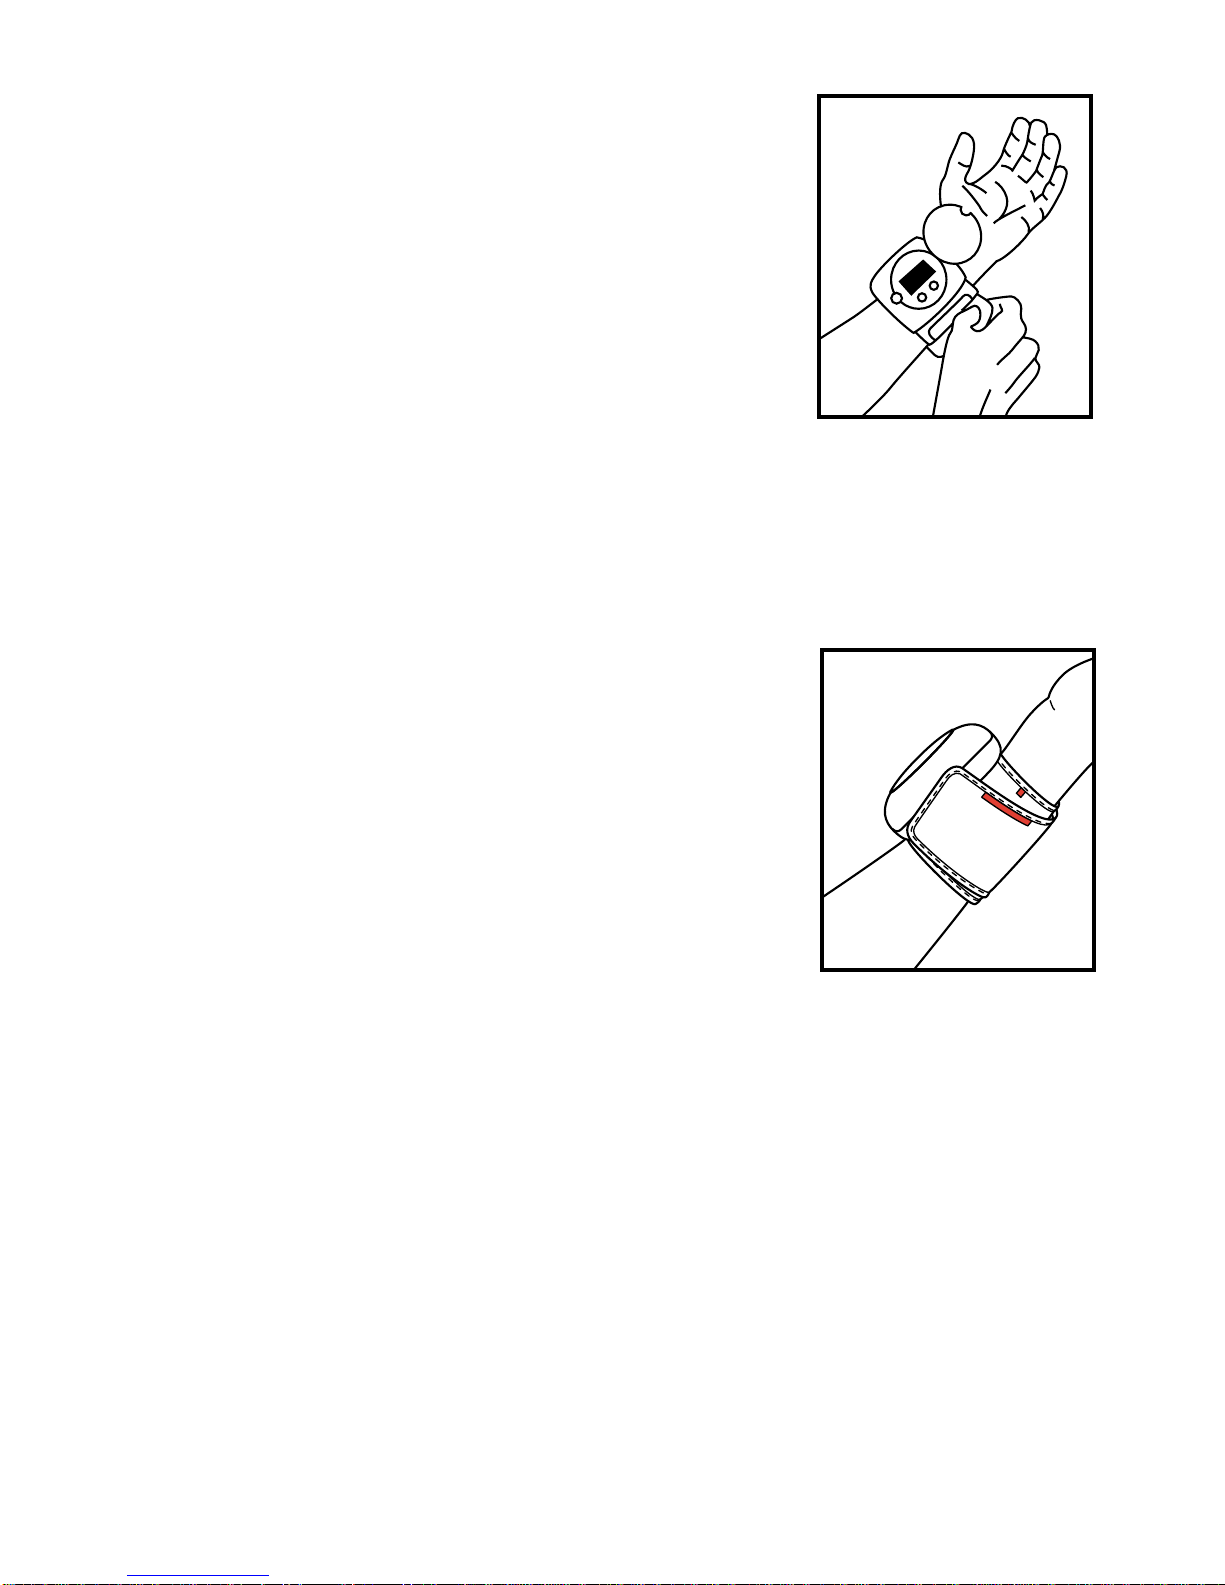
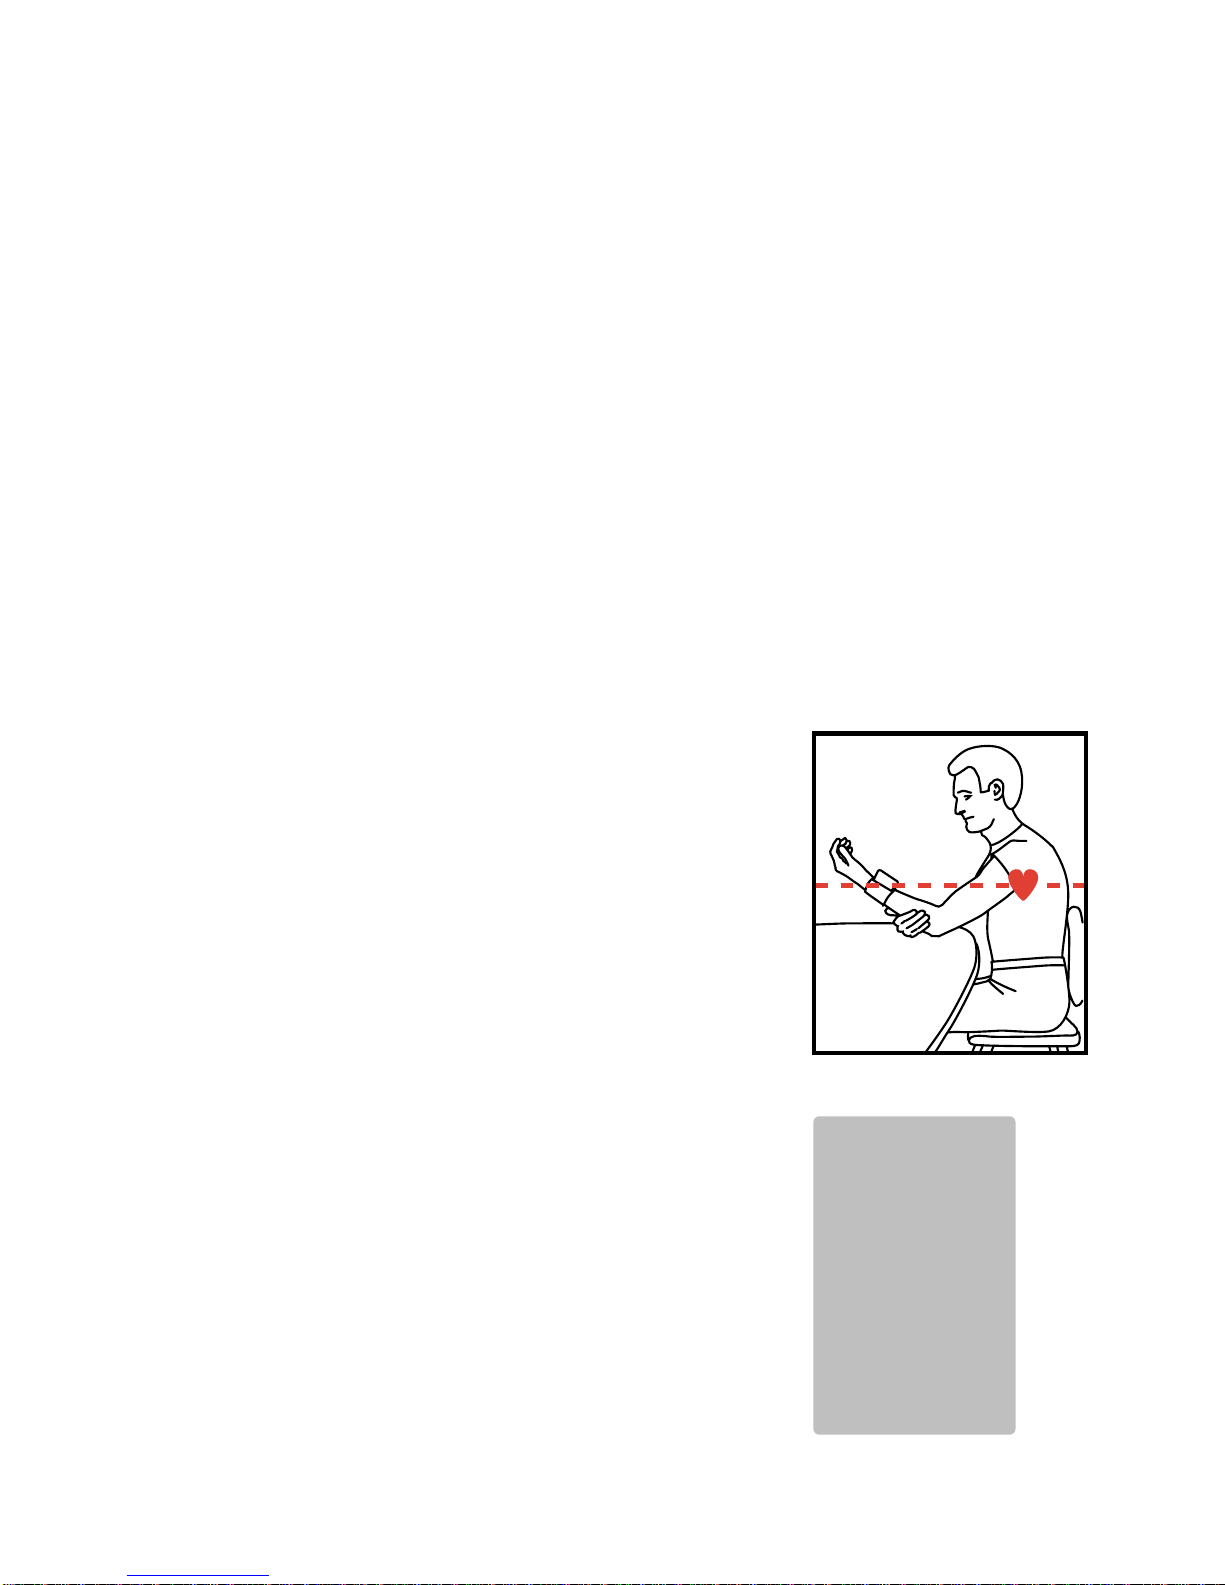
- Sit down comfortably, put the
wristband around your wrist and hold
it at the same height as your heart.
Note: if you expect your systolic
pressure to exceed 150, read the
instructions in chapter “Systolic
pressure higher than 150 mmHg”.
- Press the START button. All symbols
will appear on the display for a
moment.
- The wristband will inflate automatically
and the display will show the
increasing pressure.
When the correct pressure has been
7
888
888
888

reached in the wristband, pressurisation is stopped and the
measurement starts.
Note: the blood pressure meter will automatically increase
the pressure in the wristband if the pressure in the
wristband turns out to be too low during the measurement.
Remain seated in a relaxed way.
• During the measurement the pressure in the wristband will
be slowly reduced and the ❤symbol will appear to
indicate that the measurement is in progress.
• When the measurement has been completed, the cuff is
automatically depressurised.
Your systolic pressure (SYS), diastolic pressure (DIA) and
pulse (PUL) will now appear on the display.
You can switch the appliance off by pressing the START
button again. If you forget to switch the appliance off, it will
switch off automatically after three minutes.
Memory
The appliance automatically stores
previously measured values in the
memory. Up to seven measurements
can be stored. You can retrieve this
data in the following way:
- Press the MEMORY button; the data
of the most recently stored
measurement is displayed.
8
145
076
081
140
079
078
138
077
080

• Every time you press the MEMORY button, the data of the
measurement previous to the one currently shown will
appear on the display.
• The memory will be erased when you replace the
batteries.
Systolic pressure higher than 150 mmHg
If you switch the appliance on in the normal way, the
wristband will be inflated to 180 mmHg. If your systolic
pressure is higher than 150 mmHg, the appliance will have
to interrupt the measurement in progress in order to inflate
the wristband to the correct pressure. This will cause your
wrist to be squeezed tight for quite some time. You can
avoid this inconvenience by following the instructions below,
which will make the wristband inflate to the correct value
straight away.
- Put the wristband around your wrist.
- Sit down comfortably and hold the wristband at the same
height as your heart.
- Press the start button and keep it pressed in until the
value shown on the display is 40 mmHg higher than your
expected systolic pressure.
Example: if you expect your systolic pressure to be 160
mmHg, keep the START button pressed in until the value
shown on the display is 200.
Release the START button.
• The measurement will now take place fully automatically
as described in chapter “Carrying out the measurement”.
9

Messages on the display
Symbol What to do
Measurement is in progress. Remain
seated and do not move.
This message is displayed if you have
moved during the measurement.
Measure your blood pressure again and
do not move during the measurement.
The wristband has not been put around
the wrist correctly. Take it off and put it
back on again and carry out the
measurement once more.
The batteries are almost empty.
Replace both batteries. Use alkaline,
Philips Powerlife or rechargeable
batteries, size AAA (LR03).
General information about blood pressure
Blood pressure is measured in mmHg (mm mercury
pressure). Blood pressure consists of two values. Systolic
pressure (SYS) is created by the contractions of the heart
muscle which pumps the blood into the arteries. Diastolic
pressure (DIA) is created when the heart relaxes and fills
with blood again. The World Health Organisation (WHO)
has laid down the following standard values with regard to
the blood pressure of adults:
10
❤
Err
Err
(UF
‡

High blood pressure = risk factor
Systolic pressure (SYS) is too high when it exceeds 160
mmHg and diastolic pressure (DIA) is too high when it
exceeds 95 mmHg.
We speak of ‘high blood pressure’ when one of the two
pressures exceeds the value mentioned above.
Borderline values
Systolic pressure: 140-160 mmHg
Diastolic pressure: 90-95 mmHg
Standard values
Systolic pressure: max. 140 mmHg
Diastolic pressure: max. 90 mmHg
Causes and consequences of high blood pressure
Causes of high blood pressure are, among other things,
obesity, a high cholesterol level, smoking, excessive alcohol
consumption, emotions, excessive salt consumption, a lack
of exercise, hereditary inclination towards high blood
pressure and certain diseases such as kidney and
metabolic disorders.
In the long term, high blood pressure can lead to reduced
elasticity of the walls of arteries (arteriosclerosis), which is
one of the major causes of cardiac infarcts, cerebral hae-
morrhages and cerebral infarcts as well as kidney disorders.
11

Blood pressure fluctuation
The blood pressure of healthy people, but especially that of
people with high blood pressure, fluctuates greatly. Blood
pressure fluctuates in the course of the day and in the
course of the month. The season and the temperature also
have an impact on blood pressure. Generally, a person’s
blood pressure is lower when the weather is hot and higher
when it is cold.
To give an example of the fluctuations in blood pressure
that occur during the day, a graph showing the blood
pressure of a 35-year-old man has been included.
The blood pressure fluctuations may amount to 30 to 50
mmHg as a result of changing circumstances during the
day. Normally, blood pressure will go up when a person is
working or exercising and will drop to its lowest level during
the hours of sleep. So there is no need to be alarmed if one
Sleeping
012 13
Blood Pressure (mmHg)
14 15 16 17 18 19 20 21 22 23TimePM AM
241234567891011
20
40
60
80
100
120
140
160
12

measurement shows your blood pressure to be higher than
usual.
Why measure blood pressure at home?
An incidental blood pressure measurement carried out by a
doctor is not a true representation of your actual blood
pressure. It is possible that a person’s blood pressure is
higher when it is measured by a doctor than it is when it is
measured at home, because people tend to be somewhat
tense during a visit to the doctor. This is why the pressure
measured by doctors is often called ‘white coat’ blood
pressure.
By measuring your blood pressure every morning before
breakfast you can determine your basic blood pressure. By
always carrying out the measurement at the same time of
day, external influences on blood pressure can be excluded
as much as possible.
If you want to gain insight into the daily fluctuations of your
blood pressure, measure your blood pressure at several set
points during the day. The risk of illness due to high blood
pressure depends on all pressures that occur during the
day, not only on the blood pressure you happen to have in
the morning.
Always write down the date and the time along with the
blood pressure values measured. Keep in mind that only a
doctor is capable of analysing your blood pressure values.
On no account make a diagnosis yourself and NEVER
change the dose of medication prescribed by a doctor.
13

Difference between measurement at upper arm and
wrist
• The blood pressure measured with a watch-type blood
pressure monitor may differ from the values measured on
the upper arm. Measurement with a wrist blood pressure
monitor may show a difference of up to 10 mmHg for a
healthy adult. The blood vessels in the upper arm are
connected to those in the wrist and, as a result, blood
pressure fluctuations also occur in the wrist. Therefore,
measuring blood pressure at the wrist is a good way of
monitoring your blood pressure.
In those who suffer from hypertension, arteriosclerosis,
diabetes, kidney failure and other disorders of the
circulation system, the difference may be greater than 10
mmHg. In that case measurement on the upper arm is to
be preferred.
In case of doubt, consult your doctor about the best
method in your case or make a comparison between a
measurement on the upper arm and one on the wrist.
Maintenance
• This digital blood pressure meter consists of very fragile
precision parts. Be careful to avoid extreme temperatures,
humidity, sunlight, shocks and dust.
• Only clean the appliance with a soft, moist cloth and some
washing-up liquid.
Carefully remove stains on the wristband with a moist
cloth and some soap.
• Do not bend the wristband too far backwards and make
14

sure that the wristband has not been rolled up too tightly
when you put it away.
• Remove the batteries from the appliance if the blood
pressure meter will not be used for quite some time.
• Do not throw the batteries away but hand them in at an
officially assigned collection point.
Technical data Philips HF 320
Measuring method Oscillometric
Measuring range Cuff pressure: 20 - 280 mmHg
Pulse: 40 - 200 beats/minute
Measuring accuracy Cuff pressure: ± 3 mmHg
Pulse: ± 5%
Memory 7 measurements
Batteries 2 x 1.5V alkaline or Philips Powerlife
batteries (AAA/LR03)
Wristband Wrist circumference of 13.5-19.5 cm.
(5.25 - 7.75 inches)
Operating temperature +10°C to +40°C.
Storage temperature -20°C to +70°C.
Air humidity 85% or less
Weight approx. 140 g without batteries
This appliance meets the requirements of MDD 93/42/EEC
for medical appliances.
15

Français
Important
•Pour obtenir des résultats de mesures exactes,
lisez ces instructions avec attention.
•Cet appareil ne mesure que la tension artérielle
des adultes.
•Cet appareil mesure la tension artérielle d’après
la fréquence de battement du pouls. Si vous
avez un pouls très faible ou bien irrégulier, il se
peut que votre autotensiomètre ne puisse pas
déterminer la bonne valeur de tension.
•Les diabétiques et les personnes qui souffrent
d’arythmie cardiaque, de rétrécissement des
vaisseaux ou de dysfonctionnement du foie
doivent consulter leur médecin avant de
procéder eux-mêmes àla mesure de leur
tension artérielle, car les valeurs de leur tension
artérielle peuvent différer des valeurs normales.
Ceci s’applique aussi aux femmes enceintes.
•En cas de doute, consultez votre médecin.
16

Listes des fonctions
(Voir figure à l’intérieur du brassard)
ATension systolique en mmHg (= mm de pression de
mercure)
BTension diastolique en mmHg (= mm de pression de
mercure)
CFréquence du pouls (nombre de battements du cœur
par minute)
DBouton d’ouverture du couvercle
EBouton Marche/Arrêt
FBouton mémoire pour les sept valeurs de mesure
précédentes
GCouvercle de protection et instructions d’utilisation
HBrassard
Avant la première mesure
- Retirez le film protecteur de l’écran
d’affichage.
- Placez les deux piles AA (LR 03)
dans le compartiment des piles.
Assurez vous que les pôles + et – sont
placés dans le bon sens.
Nota: insérez la pile de dessous avec
le pôle + d’abord.
17

Mise en place du brassard
- Glissez votre poignet gauche dans le
brassard. Le tuyau en caoutchouc
qui est relié au brassard doit être
placé sur la face intérieure du bras et
dirigé vers la main. Le brassard doit
être placé à environ 1 cm (o.5 inch)
au dessous de la main.
- Serrez le brassard autour du poignet
sans laissez de place entre le
poignet et le brassard.
Nota: les marques colorés sur le
brassard indique une circonférence du
poignet de 13.5-19.5 cm (5.25-7.75
inches). Si vous ne dépassez pas les
marques, la circonférence de votre
poignet est trop grande pour permettre
le fonctionnement exacte du
tensiomètre.
Conditions pour une mesure exacte de la tension artérielle
- Reposez votre bras sur une table de telle sorte que votre
avant-bras soit approximativement au même niveau que
votre cœur.
- Asseyez-vous et, avant la première utilisation de l’appareil
de mesure de la tension artérielle, détendez vous pendant
environ 10 minutes. Respirez profondément cinq fois
avant de commencer prendre votre tension.
18

- Vous devez attendre au moins 3 minutes entre 2 mesures
pour éviter des erreurs de mesure causées par la
congestion temporaires des artères.
- Effectuez la mesure tous les jours à la même heure, car
votre tension artérielle varie au cours de la journée.
- Ne mangez pas, ne buvez pas et ne fumez pas avant de
prendre votre tension. Les boissons alcoolisées en
particulier influent sur le résultat.
- N’attachez pas trop d’importance aux résultats d’une
seule mesure.
- Des mesures régulières sur une période plus longue, et
leur enregistrement, vous donneront un meilleur aperçu
de votre tension artérielle qu’une mesure unique.
La prise de la mesure
- Asseyez-vous confortablement,
mettez le brassard autour du poignet
et tenez-le au niveau de votre cœur.
Nota: Si vous pensez que votre
tension systolique est supérieure a
150, lisez les instructions au chapitre
“tension systolique supérieure a 150
mmHg”.
- Appuyez sur le bouton START.
Pendant un moment tous les
symboles s’affichent à l’écran.
- Le brassard se gonflera
automatiquement et l’écran indiquera
l’augmentation de la tension.
Lorsque la tension artérielle correcte est
19
888
888
888

atteinte, le gonflage du brassard cesse et la mesure débute.
Nota: Le tensiomètre augmentera automatiquement la
pression dans le brassard si celle-ci s’avère être trop faible
pendant la mesure. Restez assis et détendus.
• Pendant la mesure, la pression du brassard se réduira
doucement et le symbole ❤apparaîtra pour indiquer que
la mesure est en cours.
• Quand la mesure est terminée, le brassard se dégonfle
automatiquement.
Votre tension systolique (SYS), votre tension diastolique
(DIA) et votre pouls (PUL) s’affichent alors à l’écran.
Appuyez à nouveau sur le bouton START pour arrêter
l’appareil. Si vous oubliez de l’arrêter, l’appareil s’arrête
automatiquement au bout de trois minutes.
La mémoire
L’appareil garde en mémoire
automatiquement les sept dernières
valeurs mesurées. Vous pouvez
retrouvez les données de la manière
suivante:
- Appuyez sur le bouton MÉMOIRE;
les données sauvegardées
s’afficheront.
• Chaque fois que vous appuyez sur le
bouton MÉMOIRE, les données des
20
145
076
081
140
079
078
138
077
080
This manual suits for next models
2
Table of contents
Languages:
Other Philips Blood Pressure Monitor manuals