aa
bcd
ab
ef
cd
gh
b
c
d
5mm5mm5mm5mm
5mm
183 mm
53mm
5mm
AI
K
M
C
E
G
BJ
L
N
D
F
H
English
These instructions are for a typical installation.
However, if your car has different requirements,
make the corresponding adjustment. If you have
any questions regarding installation kits, consult
your Philips car audio dealer.
Caution
This unit is designed for negative ground•
(earth) 12 V DC operation only.
Always install this unit in the car dashboard.
•
Other locations can be dangerous as the rear
of the unit heats up during use.
To avoid short-circuit: before you connect,
•
ensure that the ignition is off.
Ensure that you connect the yellow and red
•
power supply leads after all other leads are
connected.
Ensure that all loose leads are insulated with
•
electrical tape.
Ensure that the leads do not get caught under
•
screws orin parts that will move (e.g. seat rail).
Ensure that all ground (earth) leads are run to
•
a common ground (earth) point.
Use only the supplied mounting hardware for
•
a safe and secure installation.
Improper fuses can cause damage or fire.
•
When you need to change the fuse, consult a
professional.
Note on the power supply lead (yellow)
When you connect other devices to this•
apparatus, ensure that the rating of the car
circuit is higher than the total fuse value of all
the connected devices.
Notes on speaker connection
Never connect speaker wires to the metal•
body or chassis of the car.
Never connect speaker wires with stripes to•
one another.
Connection: for cars with ISO connectors
Caution
Ensure that all loose leads are insulated with•
electrical tape.
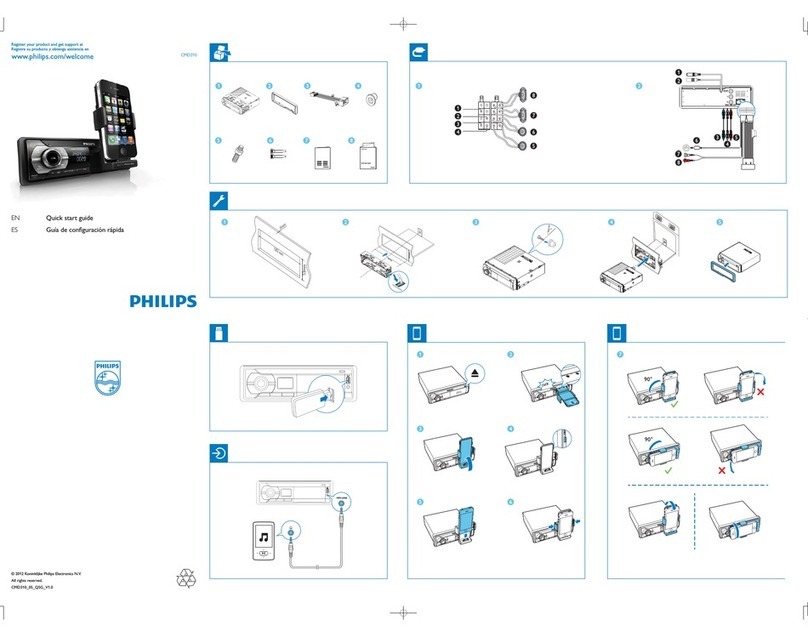
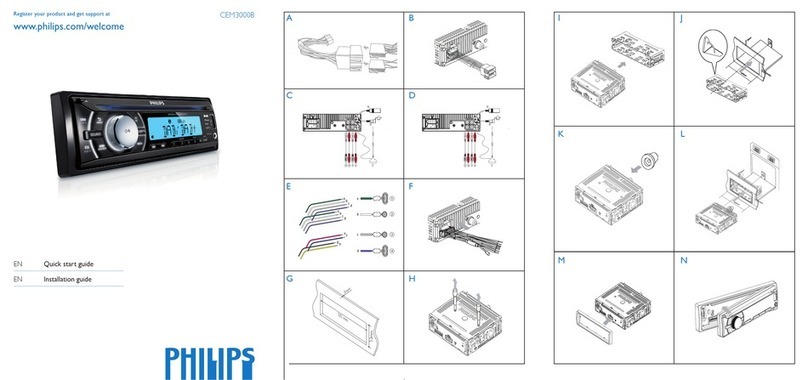
1Pull out the ISO connectors from car
dashboard and connect them to the bigger
end of the supplied standard connector. A
2Connect the other end of the supplied
standard connector to the unit. B
3Connect the antenna and amplifier as
illustrated, if applicable.You can connect the
car audio to the amplifier through RCA-TO-
RCA cables (not supplied). C
Connector Connect to
1 ANTENNA Antenna
2 FRONT LINE
OUT R (Socket)
Front right speaker
3 FRONT LINE
OUT L (Socket)
Front left speaker
4 REAR LINE
OUT R (Socket)
Rear right speaker
5 REAR LINE
OUT L (Socket)
Rear left speaker
6 SUBWOOFER Subwoofer
Connection: for cars without ISO
connectors
Caution
Be sure to connect the black ground (earth)•
lead first.
1Connect the antenna and amplifier as
illustrated, if applicable. D
Connector Connect to
1 ANTENNA Antenna
2 FRONT LINE
OUT R (Socket)
Front right speaker
3 FRONT LINE
OUT L (Socket)
Front left speaker
4 REAR LINE
OUT R (Socket)
Rear right speaker
5 REAR LINE
OUT L (Socket)
Rear left speaker
6 SUBWOOFER Subwoofer
2Cut off the bigger end of the supplied
standard connector.
Русский
Данные инструкции приведены для
выполнения типовой установки. Однако при
наличии определенных требований может
понадобиться выполнение соответствующей
регулировки. При возникновении вопросов
относительно монтажных комплектов
обратитесь к поставщику автомобильных
аудиосистем Philips.
Внимание
Данное устройство предназначено для•
использования с источником постоянного
тока с напряжением 12 В и отрицательным
заземлением.
Всегда устанавливайте данное устройство
•
на приборной панели автомобиля. Уста-
новка в другом месте может быть опасна
из-за нагревания задней панели устройства
в процессе использования.
Для предотвращения замыкания перед
•
подключением устройства убедитесь, что
зажигание выключено.
Желтый и красный кабели источника
•
питания необходимо подключать после
подключения остальных кабелей.
Убедитесь, что все незакрепленные прово-
•
да изолированы с помощью изоляционной
ленты.
Убедитесь, что провода не прижаты
•
винтами или не зажаты деталями, которые
могут двигаться (например, направляющей
сиденья).
Убедитесь, что все заземленные провода
•
соединены в общей точке заземления.
Для обеспечения надежной и безопасной
•
установки аудиосистемы используйте толь-
ко монтажное оборудование, входящее в
комплект поставки.
Использование несоответствующих предо-
•
хранителей может привести к поврежде-
нию или возгоранию. При необходимости
заменить предохранитель обратитесь за
помощью к специалисту.
Примечание относительно кабеля источника
питания (желтого цвета)
При подключении других устройств к дан-•
ному устройству убедитесь, что номиналь-
ное значение автомобильной цепи больше
общего значения предохранителей всех
подключенных устройств.
Примечание относительно подключения
динамиков
Запрещается подключать кабели•
динамиков к металлическому корпусу или
шасси автомобиля.
Не соединяйте кабели динамиков с•
полосами друг с другом.
Подключение: для автомобилей,
оснащенных разъемами ISO
Внимание
Убедитесь, что все незакрепленные прово-
•
да изолированы с помощью изоляционной
ленты.
1Извлеките разъемы ISO из приборной па-
нели и подключите их к большому гнезду
прилагаемого стандартного разъема. A
2Подключите другой конец прилагаемого
стандартного разъема к устройству. B
3При необходимости подключите антенну
и усилитель, как показано ниже. Автомо-
бильную аудиосистему можно подклю-
чить к усилителю с помощью кабелей
RCA-RCA (не входят в комплект). C
Разъем Подключить к
1 ANTENNA Антенна
2 FRONT LINE
OUT R (разъем)
Передний правый
динамик
3 FRONT LINE
OUT L (разъем)
Передний левый
динамик
4 REAR LINE
OUT R (разъем)
Тыловой правый
динамик
5 REAR LINE
OUT L (разъем)
Тыловой левый
динамик
6 САБВУФЕР Сабвуфер
Подключение: для автомобилей, не
3Check the car’s wiring carefully and connect
them to the supplied standard connector. E
1 Green/black strip Left speaker (Rear)
2 White/black strip Left speaker (Front)
3 Gray/black strip Right speaker (Front)
4 Purple/black strip Right speaker (Rear)
e RED Ignition key +12V DC when
ON/ACC
f BLUE Motor/electric antenna relay
control lead/Amplifier relay
control lead
g BLACK Ground
h YELLOW To the +12V car battery which
is energized at all times
4Connect the supplied standard connector to
the unit. F
Tip
The pin arrangement for the ISO connectors•
depends on the type of vehicle you drive. Be
sure to make proper connections to prevent
damage to the unit.
Mount into the dashboard
1If the car does not have an on-board drive or
navigation computer, disconnect the negative
terminal of the car battery.
If you disconnect the car battery in a car•
that has an on-board drive or navigation
computer, the computer may lose its
memory.
If the car battery is not disconnected, to•
avoid short-circuit, ensure that the bare
wires do not touch each other.
2Ensure that car dashboard opening is within
these measurements: G
3Remove the two screws on the top of the
unit. H
4Remove the mounting sleeve with the
supplied disassembly tools. I
5Install the sleeve into the dashboard and
bend the tabs outward to fix the sleeve. J
Note
If the unit is not fixed by sleeve but by the•
supplied screws, skip this step.
6Place the supplied rubber cushion over the
end of the mounting bolt. K
7Slide the unit into the dashboard until you
hear a click sound. L
8Reconnect the negative terminal of the car
battery.
Attach the front panel
1Attach the trim plate. M
2Insert the right side of the panel in the
chassis until it is correctly engaged.
3Press the left side of the panel until the
mechanism locks it into place. N
оснащенных разъемами ISO
Внимание
Сначала подключите черный провод за-•
земления.
1При необходимости подключите антенну
и усилитель, как показано ниже. D
2Отрежьте конец большего размера
прилагаемого стандартного разъема.
3Внимательно проверьте кабели
автомобиля, затем подключите их к
стандартному разъему. E
1 Зеленый/черный
кабель
Левый динамик
(тыловой)
2 Белый/черный
кабель
Левый динамик
(фронтальный)
3 Серый/черный
кабель
Правый динамик
(фронтальный)
4 Сиреневый/
черный кабель
Правый динамик
(тыловой)
e Красный Ключ зажигания +12 В
постоянного тока (работа
в положениях ключа ON/
ACC)
f Синий Кабель релейного
управления
электроантенной/антенной с
приводом/кабель релейного
управления усилителем
g Черный Заземление
h Желтый Автомобильный аккумулятор
+12 В (постоянно работает)
4Подключите прилагаемый стандартный
разъем к аудиосистеме. F
Совет
Вид разъемов ISO различается в зависимо-•
сти от марки автомобиля. Будьте внима-
тельны: неправильное подключение может
повредить устройство.
Установка на приборную панель
1Если у автомобиля отсутствует бортовой
автомобильный или навигационный
компьютер, отключите отрицательный
вывод автомобильного аккумулятора.
Если аккумулятор будет отключен•
в автомобиле с бортовым
автомобильным или навигационным
компьютером, информация в памяти
компьютера может быть удалена.
Если автомобильный аккумулятор•
не отключен, для предотвращения
замыкания убедитесь, что оголенные
кабели не касаются друг друга.
2Убедитесь, что отверстие на приборной
панели соответствует следующим
значениям. G
3Извлеките два винта из верхней части
устройства. H
4С помощью инструментов для разборки,
входящих в комплект поставки, снимите
корпус устройства. I
5Установите корпус в приборную панель и
отогните язычки наружу, чтобы закрепить
корпус. J
Примечание
Если аудиосистема закреплена не корпусом,•
а с помощью прилагаемых винтов, пропу-
стите этот шаг.
6Установите входящую в комплект рези-
новую прокладку на конец монтажного
болта. K
7Вставьте устройство в приборную панель
до щелчка. L
8Подключите отрицательный вывод авто-
мобильного аккумулятора.
Крепление передней панели
1Присоедините накладную панель. M
2Установите панель правой стороной в
раму, пока она не встанет на место долж-
ным образом.
3Надавите на левую сторону панели, чтобы
механизм встал на место. N
