Aiwa CDC-MP3R User manual

CDC-MP3R
YZ
STEREO CAR CD RECEIVER
RADIO-TOCADISCOS DE CD ESTEREOFONICO PARA
AUTOMOVIL
d
OPERATING INSTRUCTIONS
MANUAL DE INSTRUCCIONES
MODE D’EMPLOI
BEDIENUNGSANLEITUNG
ISTRUZIONI PER L’USO
GEBRUIKSAANWIJZING
INSTRUKCJA OBSŁUGI
KEZELÉSI ÚTMUTATÓ
NÁVOD K OBSLUZE
ENGLISH
ESPAÑOL
FRANÇAIS
DEUTSCH
ITALIANO
NEDERLANDS
POLSKI
MAGYAR
ČESKY

tousi-E-2
1
ENGLISH
Welcome
ThankyouforyourpurchasingthisAIWAproduct.
To optimize the performance of this unit, please
read through this manual carefully.
In addition to this operating instructions manual,
be sure to refer to the separate installation and
connections manuals as well.
PRECAUTIONS
• This unit is designed to be operated on a 12-volt
DC negative-ground electrical system only.
• To prevent short-circuiting, disconnect the
negative car battery terminal until the unit has
been mounted and connected completely.
• When replacing the fuse, be sure to use one
whose amperage rating is identical. Use of a
fuse of higher amperage may cause serious
damage to the unit.
• Do NOT attempt to disassemble this unit. Laser
rays from the optical pickup are dangerous to
the eyes.
• Make sure that pins or other foreign objects do
not get inside the unit; they may cause
malfunctioning, or a safety hazard such as
electrical shock or exposure of laser rays.
• When your car was parked in direct sunlight
resulting in a considerable rise in temperature
inside the car, allow the unit to cool off before
operating it.
• Keep the volume at such a level that you can
hear outside warning sounds (horns, sirens,
etc.).
Notes on CDs
• A defective or soiled CD inserted in the unit can
cause sound to drop out during playback.
• Handle a CD by holding its
inner and outer edges.
• Do NOT touch the surface of the unlabeled side
of a CD.
• Do NOT attach any seal or
labeltoeitherside(thelabeled
side or the recorded side) of a
disc.
• Do NOT expose the CD to
directsunlightorexcessive
heat.
•Clean the CD before
playback. Wipe the CD
from the center outward
with a cleaning cloth.
• NEVERusesolventssuch asbenzine or alcohol
to clean a CD.
•
Smaller 3-inch (8-cm) CDs cannot be played on
this unit. And do not use an adaptor as it may
cause a malfunction. NEVER insert a 3-inch (8-
cm) CD or its adaptor. If inserted, it may not eject.
•
Do NOT use irregularly shaped CDs (example:
heart-shaped, octagonal ones). Doing so may
resultin amalfunction. NEVERinsert an irregularly
shaped CD. If inserted, it may not eject.
CAUTION
Modificationsor adjustments tothisproduct, which
are not expressly approved by the manufacturer,
may void the user’s right or authority to operate
this product.
NOTE
AIWA CO. LTD. - JAPAN - DECLARES UNDER
ITS OWN RESPONSIBILITY THAT THE
PRODUCT DESCRIBED IN THIS MANUAL IS
IN COMPLIANCE WITH THE DIRECTIVES OF
D.M. 28.8.95 No. 548, ACCORDING TO THE
STIPULATIONS OF PARAGRAPH 3 OF
ATTACHMENT A OF D.M. 25.6.85 AND
PARAGRAPH 3 OF ATTACHMENT 1 OF D.M.
27.8.87 (REGULATIONS REGARDING
FREQUENCIES).
The above information is only for Italy.
Before operation
Discs with the logo on the
right side can be played
back on this unit.
In addition, this unit can be played back a CD-
R or CD-RW that contains audio titles or MP3
files.
Notes
• Dependingonthe conditions of the recording
equipmentorthe CD-R/RW disc itself, some
CD-R/RW discs can not be played on this
unit.
• The unit can not play back the CD-R/RW
discs that contains no data or different kind
on formatted data other than MP3.
For more information about MP3, see page 13.

tousi-E-3
ENGLISH
2
TABLE OF CONTENTS
PARTS AND CONTROLS .................................................................................................................. 3
DETACHING AND ATTACHING THE FRONT PANEL ...................................................................... 4
SETTING THE CLOCK ....................................................................................................................... 5
RADIO OPERATION .......................................................................................................................... 5
PRESETTING STATIONS .................................................................................................................. 6
USING RDS FEATURES .................................................................................................................... 8
CD PLAY ........................................................................................................................................... 11
MP3 PLAY ........................................................................................................................................ 13
SOUND ADJUSTMENTS ................................................................................................................. 15
CD CHANGER PLAY ........................................................................................................................ 17
CONNECTING A PORTABLE CASSETTE/MD/MP3 PLAYER OR OTHER EQUIPMENT .............. 18
SETTING THE BEEP TONE ............................................................................................................. 18
SETTING THE CONTRAST CONTROL ........................................................................................... 18
STEERING-WHEEL-MOUNTED REMOTE CONTROL UNIT .......................................................... 19
TROUBLESHOOTING ...................................................................................................................... 23
MAINTENANCE ................................................................................................................................ 23
SPECIFICATIONS ............................................................................................................................ 24
DEMO (Demonstration) mode
The unit has an extra display mode (DEMO mode), which demonstrates the display of the operation
modes of the unit. The unit switches to DEMO mode automatically if you turn the unit on and leave it as
it is for 5 seconds after all the connections have been completed.
To cancel DEMO mode
During DEMO mode, press and hold DISP for more than 2 seconds.
To resume DEMO mode, press and hold DISP again for more than 2 seconds.
ENGLISH
CAUTION
Use of controls or adjustments or performance of
procedures other than those specified herein
may result in hazardous radiation exposure.
Thiscompactdiscplayeris classified as a CLASS
1 LASER product. The CLASS 1 LASER
PRODUCT label is located on the exterior.
CAUTION!
Invisible laser radiation when open
and interlocks defeated. Avoid
exposure to beam.
ADVARSEL!
Usynlig laserståling ved åbning, når
sikkerhedsafbrydereer ude af funktion. Undgå
udsættelse for stråling.
VAROITUS!
Laitteen käyttäminen muulla kuin tässä
käyttöohjeessa mainitulla tavalla saattaa altistaa
käyttäjän turvallisuusluokan 1 ylittävälle
näkymättömälle lasersäteiylle.
VARNING!
Om apparaten används på annat sätt än i denna
bruksanvisning specificerats, kan användaren
utsättaför osynlig laser-strålning, somöverskrider
gränsen för laserklass 1.

tousi-E-4
Display window
PARTS AND CONTROLS
3
ENGLISH
Front panel
Rear panel
Front panel
1PWR (power on/off)/MUTE button
2FUNCTION button
3TUNE
i
/t(forward skip) button
4TUNE
k
/r(back skip) button
5DISP (display) button
6OPEN button
7A.ME (Auto Memory)/PS (Preset Scan)
button
8SELECT button
9Jog Dial
0Preset station buttons 1 – 6
!ALBUM/DISC Mbutton
@ALBUM/DISC Nbutton
#INT (intro) button
$REP (repeat) button*
%REP1 (repeat 1) button
^RANDOM button
&AUX IN jack (3.5-mm dia.)
*Sensor for the remote control
(TA (Traffic Announcement) button
)AF (Alternative Frequency) button
Display window
-Main display section
=AF (Alternative Frequency) indicator
qTA (Traffic Announcement) indicator
wTP (Traffic Program) indicator
eCT (Clock Time) indicator
rMT (mute) indicator
tCD-CH (CD changer) indicator*
yCD operation indicator
uDSSA (Drivers Sound Stage Adjustment)
indicator
iST (stereo) indicator
oH-BASS (High BASS) indicator
pLevel indicator
[CD indicator
]CD-ROM indicator
Rear panel
\Antenna jack
aREAR preout jacks
sFRONT preout jacks
dCD changer connector
* Usable only when an optional CD changer is
connected.

tousi-E-5
ENGLISH
4
DETACHING AND
ATTACHING THE FRONT
PANEL
You can detach the front panel from the unit and
carry it with you when you leave your car
unattended.
When you carry the front panel out of your car,
use the supplied carrying case.
1Press and hold PWR for more than 2
seconds to turn the unit off.
2Press OPEN to open the front panel
and pull it out as illustrated 1– 3.
Notes
• When you leave the front panel open, do not put
anything on the panel.
• When you carry the front panel in the carrying
case, do not drop or apply mechanical shock to
the panel, and never let the panel become wet.
Attaching the front panel
1Fit the lower side of the front panel to
its hinge pegs as illustrated 1– 2.
2Close the front panel.
Notes
• Do not press OPEN by accident when you push
the front panel to secure it in above procedure.
• Do not touch the connector on the reverse side
of the front panel, as doing so may contaminate
the connector and cause poor connection,
resulting in a malfunction.
Security Lamp
When the front panel is detached, you can find an
LED lamp on the front side of the unit. This lamp
is designed to deter theft, and continues to flash
when the front panel is detached. This unit is not
equipped with any other security system, such as
a security alarm, so there are limitations to its
effectiveness.
LED lamp

tousi-E-6
5
ENGLISH
SETTING THE CLOCK
To turn the unit on
You can turn the unit on by pressing any
button on the front panel except OPEN and
the Jog Dial.
1Withtheuniton,pressandholdSELECT
for more than 2 seconds until the clock
indication appears.
2Press TUNE
i
, then rotate the Jog Dial
to set the hour.
Press TUNE
k
, then rotate the Jog Dial
to set the minute.
Rotate the Jog Dial clockwise to go forward.
Rotate the Jog Dial counterclockwise to go
backward.
3Press SELECT.
The clock starts working from 0 second.
To have the clock displayed when the unit is on
Press DISP. To return the unit to its former
display, press DISP repeatedly.
RADIO OPERATION
1Press FUNCTION repeatedly to select
the band from among F1 (FM1), F2
(FM2), F3 (FM3), MW and LW.
The band indications appear cyclically in
order.
• F1, F2 and F3 share the same frequency
range.
2Press (and hold for more than 2
seconds) either TUNE
i
or TUNE
k
to
tune in the desired station.
Theunitstartsscanningandtunesinastation
automatically (seek tuning).
Press TUNE
i
to increase and TUNE
k
to
decrease the frequency.
Press the button again to cancel seek tuning.
Repeattheprocedure until the desired station
is tuned in.
Note
If you press (for less than 0.5 second at a
time)either TUNE
i
or TUNE
k
,the frequency
increases or decreases step by step.
3Adjust the volume with the Jog Dial.
Band
indication Frequency
indication

tousi-E-7
ENGLISH
6
To turn the unit off
Pressandhold PWR for more than 2 seconds.
Ifyoupressthisbuttonforlessthan2seconds,
it functions as MUTE.
Note
The unit turns on in the last mode selected when
you turned off the unit.
FUNCTION button
Each time you press FUNCTION, the unit
switches to one of the following modes, in
cyclic order.
* CD Play mode (available while a CD is in
the unit)
** CD Changer Play mode (available while an
optional CD changer is connected)
PRESETTING STATIONS
To preset stations automatically
(Auto Memory)
1Press FUNCTION repeatedly to select a
desired band from among F1 (FM1), F2
(FM2), F3 (FM3), MW and LW.
2Press and hold A.ME/PS for more than
2 seconds to activate the automatic
presetting function.
The 6 strongest stations found will be stored
in memory for preset station buttons 1 to 6 in
order of their signal strength. The “A MEM”
indication appears while the unit is in this
mode.
Use this function to automatically preset up to 6
stations each for F1, F2, F3, MW and LW (up to
a total of 30 stations).
• When the auto memory operation is completed,
the preset stations are automatically tuned in for
5 seconds each in order.
• Tostoptheautomemory operation,pressA.ME/
PS again.
To check the preset stations (Preset Scan)
• If you wish to check the preset stations, press
A.ME/PS for less than 2 seconds. The preset
stations stored in memory will be tuned in for 5
seconds each in order.
• To stop this function, press A.ME/PS again or
press any of the preset station buttons 1 to 6.
continued

tousi-E-8
7
ENGLISH
To tune in a preset station
1Press FUNCTION repeatedly to select a
desired band from among F1 (FM1), F2
(FM2), F3 (FM3), MW and LW.
2Pressthedesired preset stationbutton.
The preset station number appears to the
right of the frequency indication.
Active tuning reception control (ATRC)
This unit automatically suppresses FM noise
caused by varying signal strength resulting from
movement of the car.
• The built-in automatic blending circuit mixes the
left and right channel signals according to the
strength of the reception. At the same time, the
high-cut circuit activates to maintain sound
quality.
• If the reception becomes even weaker, the unit
automatically switches to Monaural mode to
reduce noise.
To preset stations manually
You can manually preset stations that have not
been selected by an auto memory operation.
1Press FUNCTION repeatedly to select
the band from among F1 (FM1), F2
(FM2), F3 (FM3), MW and LW.
2Tune in the station that you wish to
preset with TUNE
i
or TUNE
k
.
3Pressandhold oneofthe preset station
buttons 1 to 6 for approximately 2
seconds.
While the station you are presetting is being
registered in memory, the unit beeps.
The preset station number appears to the
right of the frequency indication.
Preset station number
Repeatthese procedures to preset upto6stations
each for F1, F2, F3, MW and LW.
• If you preset a station on a preset station button
on which another station of the same band has
alreadybeen preset,thepreviouslypreset station
will be erased.
PRESETTING STATIONS

tousi-E-9
ENGLISH
8
continued
USING RDS FEATURES
What’s RDS?
Developed by the European Broadcasting Union
(EBU), the Radio Data System (RDS) offers
listeners various information services, such as
station name display and traffic announcements
through FM broadcasting.
Since the RDS signals are in digital data form,
you cannot hear them. This means you can
receive FM programs without being disturbed by
RDS data signals.
This unit can receive the following types of RDS
digital data;
•PS (Program Service) name
Displays the station name during reception.
•AF (Alternative Frequencies)
Automatic tuning to alternative frequencies.
•TP (Traffic Program)
Automatic traffic announcement reception in a
mode other than MW or LW reception mode.
•PTY (Program Type)
Program selection by program type, such as
news or sports, rather than by station.
•EON (Enhanced Other Network)
Switches automatically when a traffic
announcement begins on another network.
Press AF, and the information is updated
automatically.
•CT (Clock Time)
Adjusts the clock time automatically.
To use the CT service, press AF holding TA
pressed. When “CT” appears on the display,
rotate the Jog Dial to select “CT ON” to start the
service or “CT OFF” to stop the service.
When the unit successfully receives the service
signal, the CT indicator lights, and the clock is
adjusted automatically. If the unit is in Standby
mode because the signal strength has fallen
belowa certain level or thetuned-in station does
not offer the CT service, the CT indicator blinks.
Note
The clock adjustment using CT function is not
always reliable in accuracy.
IMPORTANT
• These RDS functions are effective only in FM
(FM1, FM2, or FM3) mode.
• The above functions may not operate correctly
where RDS transmissions are in the
experimental stages.
Station name
Displaying the station name
If the received station has a program service
name, the station name is displayed.
• The station name may not be displayed if the
signal strength is below a certain level.
Receiving alternative frequencies
WhentheFMprogramtunedin is being broadcast
on network stations, you can continue to listen to
that program when driving long distances without
frequent manual retuning.
During FM reception, press AF to turn on the AF
indicator.
• If the station tuned in does not offer AF data, the
AF indicator blinks.
The unit searches for an alternative frequency
that has the stronger signal among the network
stations and immediately retunes to that
frequency.
90.1MHz
88.5MHz
88.0MHz
For example, if the program tuned in is broadcast
at 88.0 MHz, 88.5 MHz, and 90.1 MHz as shown
in the illustration above, the tuned-in station
frequency will change to 88.0 MHz, 90.1 MHz,
and 88.5 MHz as the car moves.
If no alternative frequencies are found, press AF
to leave AF mode.

tousi-E-10
9
ENGLISH
USING RDS FEATURES
Receiving traffic announcements
Once the unit is set to TA (Traffic Announcement)
Standby mode, you can hear traffic
announcements as soon as they begin, if the unit
is in a mode other than MW or LW reception
mode.
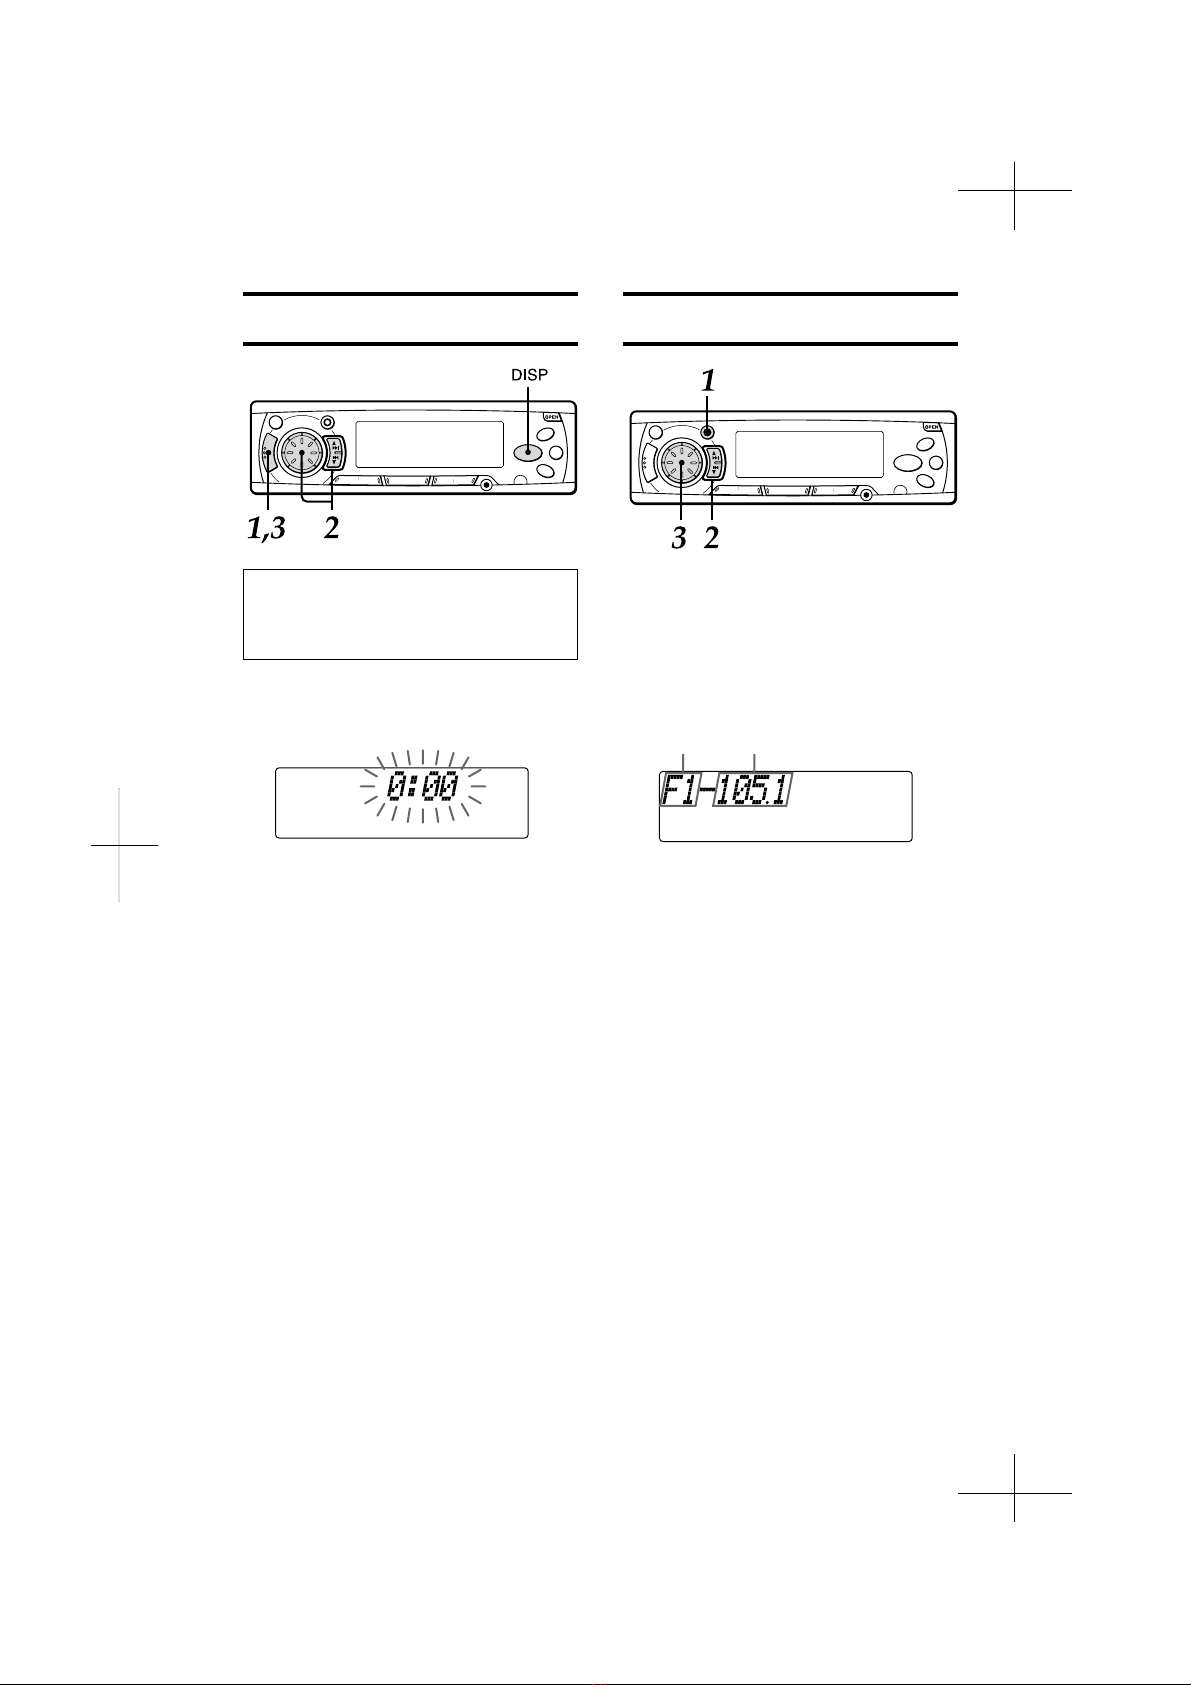
1. Tune in an FM station.
2. Press TA to turn on the TP indicator and
enter TA Standby mode.
If the tuned-in station does not offer traffic
announcement service, the TP indicator
blinks.In this case, tune in anotherFMstation.
3. Selecta mode other than MW or LWreception
mode.
When a traffic announcement starts, the unit
automatically enters FM reception mode, and the
TA indicator lights. The frequency indicator also
displays the station name a few seconds later.
When the announcement is finished, the TA
indicator goes out, and the original source will be
heard.
During FM reception, press AF, then press TA to
turn on the AF and TP indicators. This function is
also available in CD or CD Changer Play mode.
If the signal strength of an alternative frequency
falls below a certain level, both the AF and TP
indicators blink.
This function is activated automatically when a
traffic announcement has begun on another
network, so you can listen to the traffic
announcement.
Traffic announcements are heard at a preset
level, regardless of the volume setting. This is
convenient when you want to hear no other
sources other than the traffic announcement.
When the listening volume is set lower than the
preset level, the volume increases to the preset
level.
Setting the preset level for TA mode
1. Press and hold AF for more than 2 seconds.
“BOOST 40”is displayed.
Adjust the volume using the Jog Dial.
The volume changes by five steps each time
the Jog Dial is rotated.
2. Press SELECT to store the adjusted volume
in memory.
The volume will not be stored in memory if
SELECT is not pressed.
•Whenreceivingtrafficannouncements,you
can increase the volume manually, but you
cannot decrease it, even though the
indicator changes.
Note
Each time you rotate the Jog Dial clockwise, the
sound increases in increments of five (45, 50, 55,
60, 65, 70, 75, 80).
Each time you rotate the Jog Dial
counterclockwise, the sound decreases in
increments of five (35, 30, 25, 20, 15, 10, 5, 0).
Receiving traffic announcements (while in a
mode other than MW or LW reception mode)
Press TA to turn on the TP indicator. The unit will
search for the TP station without disturbing the
current mode.
When a traffic announcement starts, the current
mode pauses, and you can hear the
announcement.Whenthe announcement is over,
the previous mode resumes.
Note
If the CD changer is in the Repeat or Intro Play
mode before a traffic announcement begins,
normal CD play will resume after the
announcement is finished.
•Press TA to turn off traffic announcements and
return to the previous mode. This cancels TA
mode and restores the previous mode.
About urgent broadcasts (with AF, TA button OFF)
Even when playing a CD, the unit automatically
switches to Radio mode to receive urgent
broadcasts.
When the urgent broadcast is completed, the unit
automaticallyswitchesback to CD or CD Changer
Play mode (i.e., to the condition it was in prior to
the urgent broadcast). To cancel reception of an
urgentbroadcastbeforethebroadcastisfinished,
you can:
•Insert a CD, thus switching to CD Play mode (if
a CD is already inserted, eject it and then
reinsert it).
•Press FUNCTION repeatedly to select the
desired play mode.
To listen to traffic announcements, press
FUNCTION repeatedly to switch to Radio mode,
then press TA.

tousi-E-11
ENGLISH
10
Selecting FM by program type
This feature may not yet be available in your area.
1. During FM reception, press and hold TA for
more than 2 seconds.
TheunitentersPTY mode, and “PRO–TYPE”
willappear on the display for about 5 seconds.
2. While the indicator is turned on, press the
appropriate preset station button.
Thetable below shows the initialassignmentof
thepresetstation buttons to the program types.
3. While the indicator is turned on, press and
hold the appropriate preset station button for
more than 0.5 seconds.
A station of selected type is searched, and
thereceptionstartsautomaticallyifit is found.
Using Auto Memory with RDS
In RDS mode you can access the stations you
preset with the automatic presetting (Auto
Memory) function (see page 6).
1. With the unit in RDS mode, press and hold
A.ME/PS for more than 2 seconds. The “A
MEM”indication lights.
If two or more stations are broadcasting the
same program simultaneously, and their
signal strengths are about the same, only the
station with the strongest signal is preset.
2.
To tune in a preset FM RDS station, first
confirm that the AF or TP indicator is on. Then
follow the procedure for automatic presetting
(Auto Memory). For details, see page 6.
Preset station button
1
2
3
4
5
6
Program type
NEWS
SPORT
EDUCATE
SCIENCE
ROCK M
CLASSICS
Changing the program type assignment
You can reassign a desired program type to one
of the preset station buttons (1 to 6).
1. PressandholdPWRformore than 2 seconds
to turn off the power.
2. Press and hold TA for more than 2 seconds
so that the “PRO–TYPE”indication appears.
“PRO–TYPE”will be displayed for about 5
seconds.
3. While the indication is turned on, rotate the
Jog Dial to display the desired program type
as follows.
1NEWS
2AFFAIRS
3INFO
4SPORT
5EDUCATE
6DRAMA
7CULTURE
8SCIENCE
9VARIED
0POP M
!ROCK M
@EASY M
#LIGHT M
$CLASSICS
%OTHER M
4. When the desired program type is displayed,
press and hold one of the preset station
buttons (1 to 6) for more than 2 seconds.
The program type is assigned to that button.
→
→

tousi-E-12
11
ENGLISH
CD PLAY
You can play a CD, CD-R, or CD-RW by following
the procedure below.
1Press OPEN to open the front panel,
then insert a CD with the labeled side
upward to start CD play.
z(eject) button
2Close the front panel.
The track number and elapsed playing time
will be displayed.
3Adjust the volume with the Jog Dial.
Notes
•If a CD is already inserted, press FUNCTION
repeatedly to select CD Play mode to start CD
play.
•Be sure to close the front panel after inserting or
ejecting a CD.
Button operations in CD Play mode
Switching modes
When the unit is in a mode other than CD Play
mode,inserting a CD switchesthe unit to CDPlay
mode automatically.
Notes
•Smaller 3-inch (8-cm) CDs cannot be played on
this unit. And do not use an adaptor, as it may
cause a malfunction.
•When you insert a CD, CD play starts with the
first track on the CD. In other cases (when
switching from the radio operation or turning on
the unit), CD play starts at the point on the CD
where it had stopped previously.
•When you insert a CD-R/CD-RW, it may take
longer to start playing.
•A CD-R/CD-RW cannot be played if it contains
no data or data in the wrong format, etc. In those
cases,theindication “CANCEL TO EJECT KEY”
appears.
Track number Elapsed
playing time CD indicator
CD operation
indicator
Press
z
t
r
To
Eject a CD.
Skip to the next track with a short press
(for less than 0.5 second).
Each extra press skips forward one
extra track.
To search forward rapidly, press and
hold tuntil the desired part is
played, then release it.
Restart the track currently in play with a
short press (for less than 0.5 second).
Each extra press skips backward one
extra track.
To search backward rapidly, press and
hold runtil the desired part is
played, then release it.

tousi-E-13
ENGLISH
12
Intro play
Press INT during CD play.
The “SCAN”indication lights up, and the first 10
seconds of all the tracks on the CD are played in
order.
When the desired track is found, press INT again.
The unit returns to normal CD play.
Repeat play
Press REP1 during CD play.
The “REPEAT 1”indication lights up, and the
currently selected track is played repeatedly.
Press REP1 again to cancel Repeat play.
Note
If Repeat play is not activated, all the tracks on
the CD are played repeatedly.
Random play
Press RANDOM during CD play.
The “RANDOM”indication lights up, and the
tracks on the CD are played in random order.
Press RANDOM again to cancel Random play.
Note
During Random play, even if ris pressed
repeatedly, it won’t take you back to previous
tracks, only to the beginning of the current track.

tousi-E-14
13
ENGLISH
Elapsed playing time
MP3 PLAY
You can play MP3 files* written on CD-ROMs,
CD-Rs, or CD-RWs by following the procedure
below.
* An MP3 file stores audio data compressed
using MPEG1, the audio layer-3 file-coding
scheme. We call files that have the “.mp3”
extension “MP3 files.”
1Press OPEN to open the front panel,
then insert a CD-ROM, CD-R, or CD-RW
with the labeled side upward.
The unit starts scanning the disc.
2Close the front panel.
Duringscanning ofthedisc, “NOWREADING”
scrolls across the display.
Notes
•It may take 2 minutes or more to scan a disc,
depending on the complexity of the folder
tree. If scanning does not finish within 2
minutes, “CANCEL TO EJECT KEY”
appears on the display. If you leave the unit
as it is, it will start scanning again.
•If there are no tracks (MP3 files) on the disc,
“NO MP3”appears.
After scanning, the total number of albums
and tracks appear on the display, then the
unit automatically starts playing the disc from
the first track of the first album.
The total number
of Albums The total number
of Tracks
Album number Track number
CD-ROM indicator
Each time the track is changed, this display
appears and remains for 5 seconds.
After playing a track, the unit plays the next track
of the same album.
After playing all the tracks of the album, the unit
plays the first track of the next album.
Notes
•If a disc is already inserted, press FUNCTION
repeatedly to select CD Play mode to start MP3
play.
•Be sure to close the front panel after inserting or
ejecting a disc.
To skip tracks and albums
Press To
9Skip to the next track
0Skip to the beginning of the
current track or the previous
track
ALBUM/DISCNSkip to the next album
ALBUM/DISCMSkip to the previous album
To switch modes
To switch to another mode, press FUNCTION.
If you play the disc again after switching to
another mode or turning off the unit, the unit will
start playing the disc from the beginning of the
track previously played.
continued

tousi-E-15
ENGLISH
14
To change the display mode
Press DISP repeatedly until your desired display
appears.
Each time you press DISP, the display changes
as follows:
↓
Clock
↓
Elapsed playing time
↓
Track number and filename
↓
Track name*
↓
Artist’s name*
↓
Album number and album name
* If there are no names on the track, “NONE”
appears.
Notes on MP3
•The unit can read MP3 files written in the format
compliant with ISO 9660. However it does not
support the MP3 data written by the method of
Packet Write.
•The unit cannot read an MP3 file that has a file
extension other than “.mp3.”
•If you play a non-MP3 file that has the “.mp3”
extension, you may hear some noise.
•In this manual, we refer to what are called “MP3
file”and “folder”in PC terminology as “track”
and “album,”respectively.
•The unit can play up to 512 tracks per disc.
•The unit may not play tracks in the order of track
numbers.
•The unit plays only the audio tracks if a disc
contains both audio tracks and MP3 files.
Note
When playing a disc of 8k bps or VBR*, the
elapsed playing time in the display window will
not be correct and also the intro play may not
function properly.
*VBR: Variable Bit Rate
Notes on indications in the display
•Up to 32 characters are displayed for the name
of an album or a track. Characters other than
uppercase letters (“A”to “Z”), lowercase letters
(“a”to “z”), numerals (“0”to “9”), and underscore
(“_”) may not be displayed.
•When playing MP3 files, the elapsed playing
time displayed may not be correct.
•To display up to 30 characters for a track name
or an artist’s name, ID3TAG version 1.x is
required. Characters other than uppercase
letters (“A”to “Z”), lowercase letters(“a”to “z”),
numerals (“0”to “9”), and underscore (“_”) may
not be displayed.
Notes on creating your own CD-Rs
or CD-RWs containing MP3 files
•To enjoy high quality sound, we recommend
convertingto MP3fileswitha samplingfrequency
of 44.1 kHz and a fixed bit rate of 128 kbps.
•Do NOT store more than 512 MP3 files per disc.
•Note that the unit may not play tracks in the
order that you wrote them to the disc.
•The unit can read up to 5 sessions with a multi
sessiondisc. When you play adisc that contains
6 or more sessions, the unit can play the first 5
sessions.
•For ISO 9660-compliant format, the maximum
allowable depth of nested folders is 8, including
the root directory (folder).
Tips on identifying the order of the
tracks
•Include a two- or three-digit number at the
beginning of each album or track name. (e.g.
“01,”“02,”…or “001,”“002,”…)
If you use the numbers such as “1,”“2,”“3,”…
“9,”“10,”“11,”…, the unit unexpectedly plays in
the order of “1,”“10,”“11,”…“2,”“20,”“21,”…
“3,”“30,”“31,”and so on.
•It is recommended that you use only the parent
folders (do not create child folders under a
folder).
•Writing software capable of writing MP3 files in
numerical and alphabetical order is required if
you want them in order. For details on using the
software, refer to the operating instructions
supplied with your software.

tousi-E-16
15
ENGLISH
SOUND ADJUSTMENTS
1Press SELECT repeatedly to select the
mode that you wish to adjust from:
BASS,TRE(treble),BAL (balance), FAD
(fader) and VOL (volume).
Each time you press SELECT, one of the
following indicators appears, in cyclic order.
If you do not proceed with the following step
2 within 5 seconds, the selected mode is
canceled, and the indication returns to the
current source mode.
2Rotate the Jog Dial to adjust the level.
Adjust each mode referring to the audio
control indications in the display window.
Without selecting any mode with SELECT,
only the volume level can be adjusted by
rotating the Jog Dial.
MUTE button
Pressthisbutton to temporarily lower the volume.
Press it again to restore the previous volume.
The“MT”indicatorflashes while the mute function
is active.
Clockwise
Increases the
bass level
Increases the
treble level
Decreases the
level of the left
speaker(s)
Decreases the
level of the rear
speakers
Increases the
volume level
Counterclockwise
Decreases the
bass level
Decreases the
treble level
Decreases the
level of the right
speaker(s)
Decreases the
level of the front
speakers
Decreases the
volume level
H-BASS (High BASS)
You can enjoy music with strong bass sound.
1Press SELECT repeatedly to select
H-BASS (High BASS) mode.
2Rotate the Jog Dial to select the bass
sound level.
The bass sound level changes as follows.
When H-BASS is activated, the “H-BASS”
indicator lights up.
↓
OFF
H-BASS 1 Low
H-BASS 2 Medium
H-BASS 3 High
↑
↔↔↔

tousi-E-17
Source Level Adjuster
You can adjust the output level in each mode to
equalize the volume level.
1Press FUNCTION repeatedly to select
the desired mode.
2Press DISP while pressing SELECT.
The “LEVEL 0”indication appears.
3Rotate the Jog Dial to adjust the level.
Rotateclockwiseto increase the output level.
Rotate counterclockwise to decrease the
output level.
If you do not operate the Jog Dial within 5
seconds, this function is canceled, and the
indicationreturnstothecurrentsourcemode.
Returning to the factory settings
Adjusted settings of VOL, BASS, TRE, BAL,
FAD, H-BASS, DSSA, and source level can be
returned to the factory settings with a simple
operation.
1With the unit off, press and hold DISP
for more than 2 seconds.
The “LEVEL --”indication appears, and all
sound settings are returned to the factory
settings.
DSSA (Drivers Sound Stage
Adjustment)
You can adjust the sound stage and tone balance
to best serve a particular seat in the car.
1Press SELECT repeatedly to select
DSSA (Drivers Sound Stage
Adjustment) mode.
2RotatetheJogDialtoselectthe position
of sound stage.
Sound stage changes as follows.
Note
When DSSA is activated, you cannot adjust BAL
(balance), FAD (fader), BASS and TRE (treble)
modes.
↔↔
↓
OFF
For the front left seat
For the front right seat
↑
ENGLISH
16

tousi-E-18
17
ENGLISH
CD CHANGER PLAY
You can play CDs with this unit by connecting the
optional AIWA CD changer. Make sure that the
disc magazine loaded with the CDs is inserted in
the connected CD changer.
To install and connect the optional CD changer,
refertotheseparateInstallation and Connections
manual.
1Press FUNCTION repeatedly to select
CD Changer Play mode to start playing
from the CD.
The CD and track numbers will be displayed.
CD changer operation indicator
2Adjust the volume with the Jog Dial.
CD
number Track
number CD changer
indicator
To switch modes
To switch to another mode, press FUNCTION.
To skip tracks
*Press for less than 0.5 second.
To play another CD
To start playing the previous CD in the disc
magazine, press ALBUM/DISC M.
To start playing the next CD, press
ALBUM/DISC N.
The CD number appears.
Intro play
Press INT (the “SCAN”indication appears).
The first 10 seconds of each track on all the CDs
in the disc magazine are played in sequence.
To cancel Intro play, press INT again.
Repeat play
To repeat the current track, press REP1 (the
“REPEAT 1”indication appears).
To repeat the current CD, press REP (the
“REPEAT”indication appears).
To cancel either mode, press the same button
again.
Random play
Press RANDOM (the “RANDOM”indication
appears).
All the tracks on the current CD are played in
random order.
To cancel Random play, press RANDOM again.
Buttons
t
r
Press*
Skips to the next
track
Skips back to
the beginning of
the current track
or the previous
track
Press and hold
Advances
rapidly
Release it to
resume play
Reverses
rapidly
Release it to
resume play

tousi-E-19
CONNECTING A
PORTABLE CASSETTE/
MD/MP3 PLAYER OR
OTHER EQUIPMENT
This unit is equipped with a line-level input (AUX
IN) jack, delivering high sound quality.
1Connect a portable cassette/MD/MP3
player, etc. via the AUX IN jack (3.5-mm
dia.) of the unit.
2Press FUNCTION repeatedly to select
AUX IN mode.
The “AUX IN”indication appears.
3Start playback on the connected
equipment.
•For further information on the portable cassette/
MD/MP3 player, etc., refer to the operating
instructions for that equipment.
ENGLISH
18
SETTING THE BEEP TONE
The unit is preset at the factory to beep each time
you press any button on the front panel except
OPEN (no beep with the Jog Dial). You can mute
this beeping by following the procedure below.
1Withtheunit off, press and hold SELECT
for more than 2 seconds.
2Rotate the Jog Dial to select “BEEP
ON” or “BEEP OFF”.
3Press SELECT.
The unit turns off.
SETTING THE CONTRAST
CONTROL
You can change the contrast of the display.
1With the unit on, press and hold
FUNCTION for more than 2 seconds.
The current contrast indication appears.
2Rotate the Jog Dial to select the
contrast.
Rotate clockwise for higher contrast.
Rotate counterclockwise for lower contrast.

tousi-E-20
19
ENGLISH
aAllen screw M3 ×4 mm (1 ea.)
bAllen wrench (1 ea.)
cCushion (2 ea.)
dBelt (1 ea.)
eInner belt holder (1 ea.)
fOuter belt holder (1 ea.)
Supplied mounting kit
The letters below are keyed to those in the instructions.
Use only the supplied mounting hardware for safe and secure installation.
STEERING-WHEEL-
MOUNTED REMOTE
CONTROL UNIT
Precautions
•When the infrared receptor on the main unit is
exposed to direct sunlight, it may not respond to
signals from the remote control unit.
•Whiledriving, keep your eyes on the roadasyou
operatetheremotecontrolunit. NEVER operate
the remote control unit while turning.
•Do NOT install the remote control unit where it
may hinder the function of any safety device,
such as an air bag.
•Besuretoinstalltheremotecontrol unit securely
on the steering wheel. Unstable installation
may interfere with operation of the vehicle.
•Do NOT install the remote control unit where it
will obstruct your view of the instrument panel.
•Be sure to install the remote control unit on the
side of the steering wheel closer to the main
unit. If you install the remote control unit on the
opposite side from the main unit, the infrared
signal may not reach the main unit’s receptor,
disabling remote operation.
•There may be cases in which the infrared signal
does not reach the infrared receptor on the main
unit, depending on the installation location.
•Do NOT install the remote control unit on the
outer rim of the steering wheel. Doing so may
hinder steering and cause a traffic accident. Be
sure to install the remote control unit on the
inner rim of the steering wheel.
CAUTION
Modificationsor adjustments tothisproduct, which
are not expressly approved by the manufacturer,
may void the user’s right or authority to operate
this product.
Other manuals for CDC-MP3R
1
Table of contents
Languages:
Other Aiwa Car Receiver manuals

Aiwa
Aiwa CT-FX531M User manual

Aiwa
Aiwa CT-FX7029M Specification sheet

Aiwa
Aiwa CT-FX530M User manual

Aiwa
Aiwa CDC-MA01 User manual

Aiwa
Aiwa CT-X418 User manual

Aiwa
Aiwa CDC-Z106 User manual

Aiwa
Aiwa CT-X428 User manual

Aiwa
Aiwa CT-FX5300M YL User manual

Aiwa
Aiwa NSX-WK790 User manual

Aiwa
Aiwa CDC-Z107 YU User manual