Русский
Выбор страны/региона
1Нажмите чтобы включить устройство.
2Поверните регулятор для выбора
параметра:
3Нажмите для подтверждения.
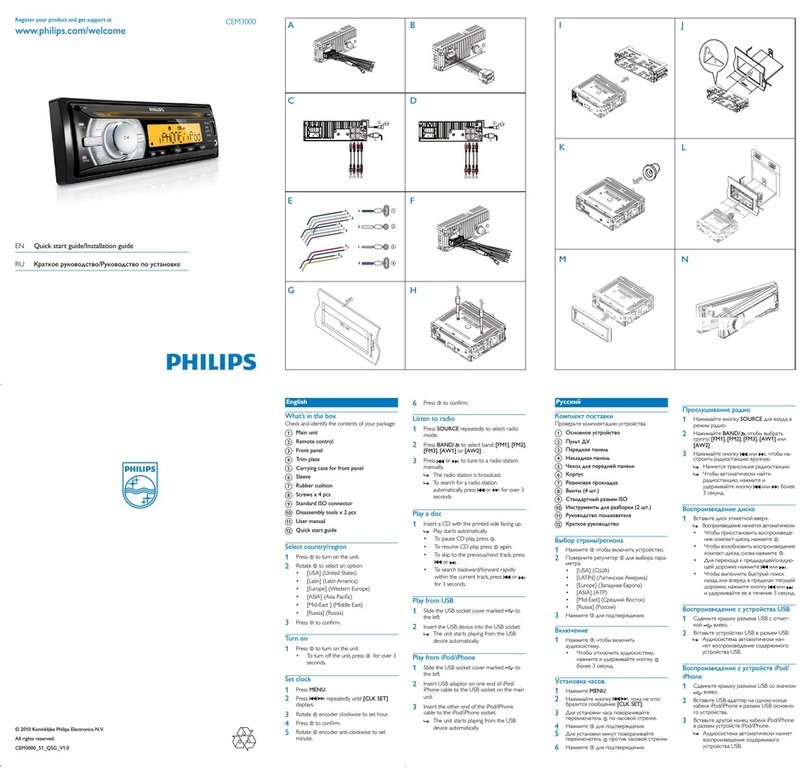
e Красный Ключ зажигания +12 В
постоянного тока (работа
в положениях ключа
ON/ACC)
f Синий Кабель релейного
управления
электроантенной/антенной с
приводом/кабель релейного
управления усилителем
gЧерный Заземление
h Желтый Автомобильный
аккумулятор +12 В
(постоянно работает)
4Подключите прилагаемый стандартный
разъем к аудиосистеме.
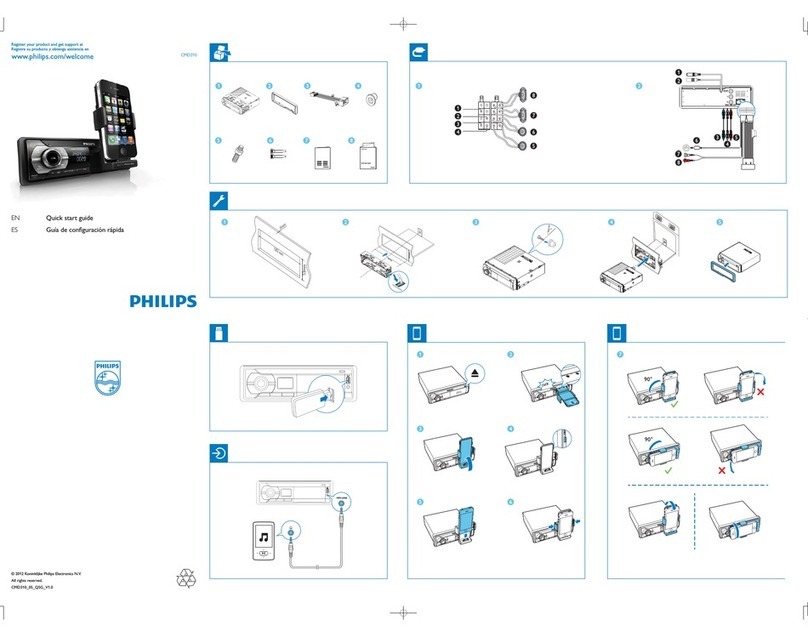
Установка на приборную панель 5
1Если у автомобиля отсутствует бортовой
автомобильный или навигационный
компьютер, отключите отрицательный
вывод автомобильного аккумулятора.
2Извлеките два винта из верхней части
устройства.
3Извлеките два винта из верхней части
устройства.
4Установите корпус в приборную панель и
отогните язычки наружу, чтобы закрепить
корпус.
5Установите входящую в комплект
резиновую прокладку на конец
монтажного болта.
6Вставьте устройство в приборную панель
до щелчка.
7Подключите отрицательный вывод
автомобильного аккумулятора.
Крепление передней панели 5
1Присоедините накладную панель.
2Установите панель правой стороной
в раму, пока она не встанет на место
должным образом.
© 2010 Koninklijke Philips Electronics N.V.
All rights reserved.
CEM1000_51_QSG_V1.0
English
Select country/region
1Press to turn on the unit.
2Rotate to select an option:
3Press to confirm.
Connection
For cars with ISO connectors 1
2
3
1Pull out the ISO connectors from car
dashboard and connect them to the bigger
end of the supplied standard connector.
2Connect the other end of the supplied
standard connector to the unit.
3Connect the antenna and amplifier as
illustrated, if applicable.You can connect the
car audio to the amplifier through RCA-TO-
RCA cables (not supplied).
Connector Connect to
1 ANTENNA Antenna
2 REAR LINE
OUT R
Rear right speaker
3 REAR LINE
OUT L
Rear left speaker
For cars without ISO connectors 3
4
1Connect the antenna and amplifier as
illustrated, if applicable.
2Cut off the bigger end of the supplied
standard connector.
3Check the car’s wiring carefully, then connect
them to the supplied standard connector.
1 Green/black strip Left speaker (Rear)
2 White/black strip Left speaker (Front)
3 Gray/black strip Right speaker (Front)
4 Purple/black strip Right speaker (Rear)
Turn on
1Press to turn on the unit.
To turn off the unit, press• for over
3 seconds.
Set clock
1Press MENU.
2Press or repeatedly until current time is
displayed.
3Rotate clockwise to set hour.
4Press to confirm.
5Rotate anti-clockwise to set minute.
6Press to confirm.
View clock
1Press and hold OPTIONS repeatedly until
the clock is displayed.
Listen to radio
1Press SOURCE repeatedly to select Tuner.
2Press or to select band: [FM1], [FM2],
[FM3], [AM1], or [AM2].
3Press or to tune to a radio station
manually.
The radio station is broadcast.•
To search for a radio station automati-•
cally, press or for over 3 seconds.
e RED Ignition key +12V DC when
ON/ACC
f BLUE Motor/electric antenna relay
control lead/Amplifier relay
control lead
gBLACK Ground
h YELLOW To the +12V car batter y
which is energized at all times
4Connect the supplied standard connector to
the unit.
Mount into the dashboard 5
1If the car does not have an on-board drive or
navigation computer, disconnect the negative
terminal of the car battery.
2Remove the two screws on the top of the
unit.
3Remove the mounting sleeve with the supplied
disassembly tools.
4Install the sleeve into the dashboard and
bend the tabs outward to fix the sleeve.
5Place the supplied rubber cushion over the
end of the mounting bolt.
6Slide the unit into the dashboard until you
hear a click sound.
7Reconnect the negative terminal of the car
battery.
Attach the front panel 5
1Attach the trim plate.
2Insert the right side of the panel in the
chassis until it is correctly engaged.
3Press the left side of the panel until the
mechanism locks it into place.
Подключение
для автомобилей, оснащенных разъемами
ISO 1
2
3
1Извлеките разъемы ISO из приборной
панели и подключите их к большому гнезду
прилагаемого стандартного разъема.
2Подключите другой конец прилагаемого
стандартного разъема к устройству.
3При необходимости подключите
антенну и усилитель, как показано ниже.
Автомобильную аудиосистему можно
подключить к усилителю с помощью
кабелей RCA-RCA (не входят в комплект).
Разъем Подключить к
1 ANTENNA Антенна
2 REAR LINE OUT R Тыловой правый
динамик
3 REAR LINE OUT L Тыловой левый
динамик
для автомобилей, не оснащенных разъемами
ISO 3
4
1При необходимости подключите антенну
и усилитель, как показано ниже.
2Отрежьте конец большего размера
прилагаемого стандартного разъема.
Отрежьте конец большего размера
прилагаемого стандартного разъема.
3Внимательно проверьте кабели
автомобиля, затем подключите их к
стандартному разъему.
1 Зеленый/черный
кабель
Левый динамик
(тыловой)
2 Белый/черный
кабель
Левый динамик
(фронтальный)
3 Серый/черный
кабель
Правый динамик
(фронтальный)
4 Сиреневый/
черный кабель
Правый динамик
(тыловой)
3Надавите на левую сторону панели, чтобы
механизм встал на место.
Включение
1Нажмите , чтобы включить
аудиосистему.
Чтобы отключить аудиосистему,•
нажмите и удерживайте кнопку
более 3 секунд.
Установка часов.
1Нажмите MENU.
2Нажимайте или , пока не появятся
текущие значения времени.
3Поверните регулятор по часовой
стрелке для настройки значения часов.
4Нажмите для подтверждения.
5Поверните регулятор против часовой
стрелки для настройки значения минут.
6Нажмите для подтверждения.
Просмотр часов
1Нажмите и удерживайте кнопку OPTIONS
до тех пор, пока не отобразятся часы.
Прослушивание радио
1Нажимайте SOURCE для выбора радио.
2Нажмите кнопку или , чтобы выбрать
диапазон: [FM1], [FM2], [FM3], [AM1],
или [AM2].
3Нажимайте кнопку или , чтобы
настроить радиостанцию вручную.
Начнется трансляция радиостанции.•
Чтобы автоматически найти•
радиостанцию, нажмите и удерживайте
кнопку или более 3 секунд.
