Philips CVR300 User manual
Register your product and get support at
www.philips.com/welcome
Always there to help you
用户手册 15User manual 1
使用手冊 29
CVR300
Question?
Contact
Philips


1
English
EN
Contents
1 Important 2
Safety 2
Notice 2
2 Your car driving recorder 4
Introduction 4
What's in the box 4
Overview of the main unit 5
3 Get started 6
Install the driving recorder 6
Insert Micro SD card 6
Turn on the driving recorder 7
For the rst time use 7
Mode switch 7
4 Video Recording 8
Video settings 8
5 Photo capture 9
Photo settings 9
6 Playback 10
Video playback 10
Photo playback 10
7 Connect the driving recorder to
a computer 12
8 System settings 13
9 Product information 14
General 14

2EN
1 Important
Safety
• Read and understand all instructions
before you use your apparatus. If damage is
caused by failure to follow instructions, the
warranty does not apply.
• Use only the supplied mounting hardware
for a safe and secure installation.
• Only use attachments/accessories specied
by the manufacturer.
• To avoid short circuit, do not expose the
apparatus to rain or water.
• Never insert objects into the ventilation
slots or other openings on the apparatus.
• Clean the apparatus and frame with a soft,
damp cloth. Never use substances such as
alcohol, chemicals or household cleaners
on the apparatus.
• Risk of damage to the apparatus screen!
Never touch, push, rub or strike the screen
with any object.
• Batteries (battery pack or batteries
installed) shall not be exposed to excessive
heat such as sunshine, re or the like.
• Danger of explosion if battery is incorrectly
replaced. Replace only with the same or
equivalent type.
• For your own safety, do not operate the
device while driving.
• Do not install the device in the position
that blocks the driver's sight or affects the
work of the airbags.
• To void accident caused by exhaust of car
battery, disconnect the car charger before
leaving the car for the users whose car
cigarette lighter keeps power supplying
after the engine is stopped.
• When the car engine is stopped or the
power is shut down, the device still can
save the recording les with its built-in
battery power,do not remove the micro
SD card during the period to prevent data
loss.
• The apparatus shall not be exposed to
dripping or splashing.
• Do not place any sources of danger on the
apparatus (e.g. liquid lled objects, lighted
candles).
Notice
Any changes or modications made to this
device that are not expressly approved by
WOOX Innovations may void the user’s
authority to operate the equipment.
Environmental information
All unnecessary packaging has been omitted.
We have tried to make the packaging easy to
separate into three materials: cardboard (box),
polystyrene foam (buffer) and polyethylene
(bags, protective foam sheet.)
Your system consists of materials which can
be recycled and reused if disassembled by
a specialized company. Please observe the
local regulations regarding the disposal of
packaging materials, exhausted batteries and old
equipment.
Disposal of your old product and
batteries
Your product is designed and manufactured
with high quality materials and components,
which can be recycled and reused.
Never dispose of your product with other
household waste. Please inform yourself about
the local rules on the separate collection of
electrical and electronic products and batteries.
The correct disposal of these products helps
prevent potentially negative consequences on
the environment and human health.
Your product contains batteries, which cannot
be disposed of with normal household waste.
Please inform yourself about the local rules on
separate collection of batteries.The correct

3
English
EN
disposal of batteries helps prevent potentially
negative consequences on the environment and
human health.
Please visit www.recycle.philips.com for
additional information on a recycling center in
your area.
Always bring your product to a professional to
remove the built-in battery.
2013 © WOOX Innovations Limited. All rights
reserved.
Specications are subject to change without
notice.WOOX reserves the right to change
products at any time without being obliged to
adjust earlier supplies accordingly.

4EN
2 Your car driving
recorder
Congratulations on your purchase, and
welcome to Philips! To fully benet from the
support that Philips offers, register your product
at www.philips.com/welcome.
Introduction
With the car driving recorder, you can:
• Record videos automatically when you are
driving
• Take photos
• Play back videos/photos
What's in the box
Check and identify the contents of your
package:
a Driving recorder
b Suction bracket
c Car charger
d mini USB cable
e User Manual
5
English
EN
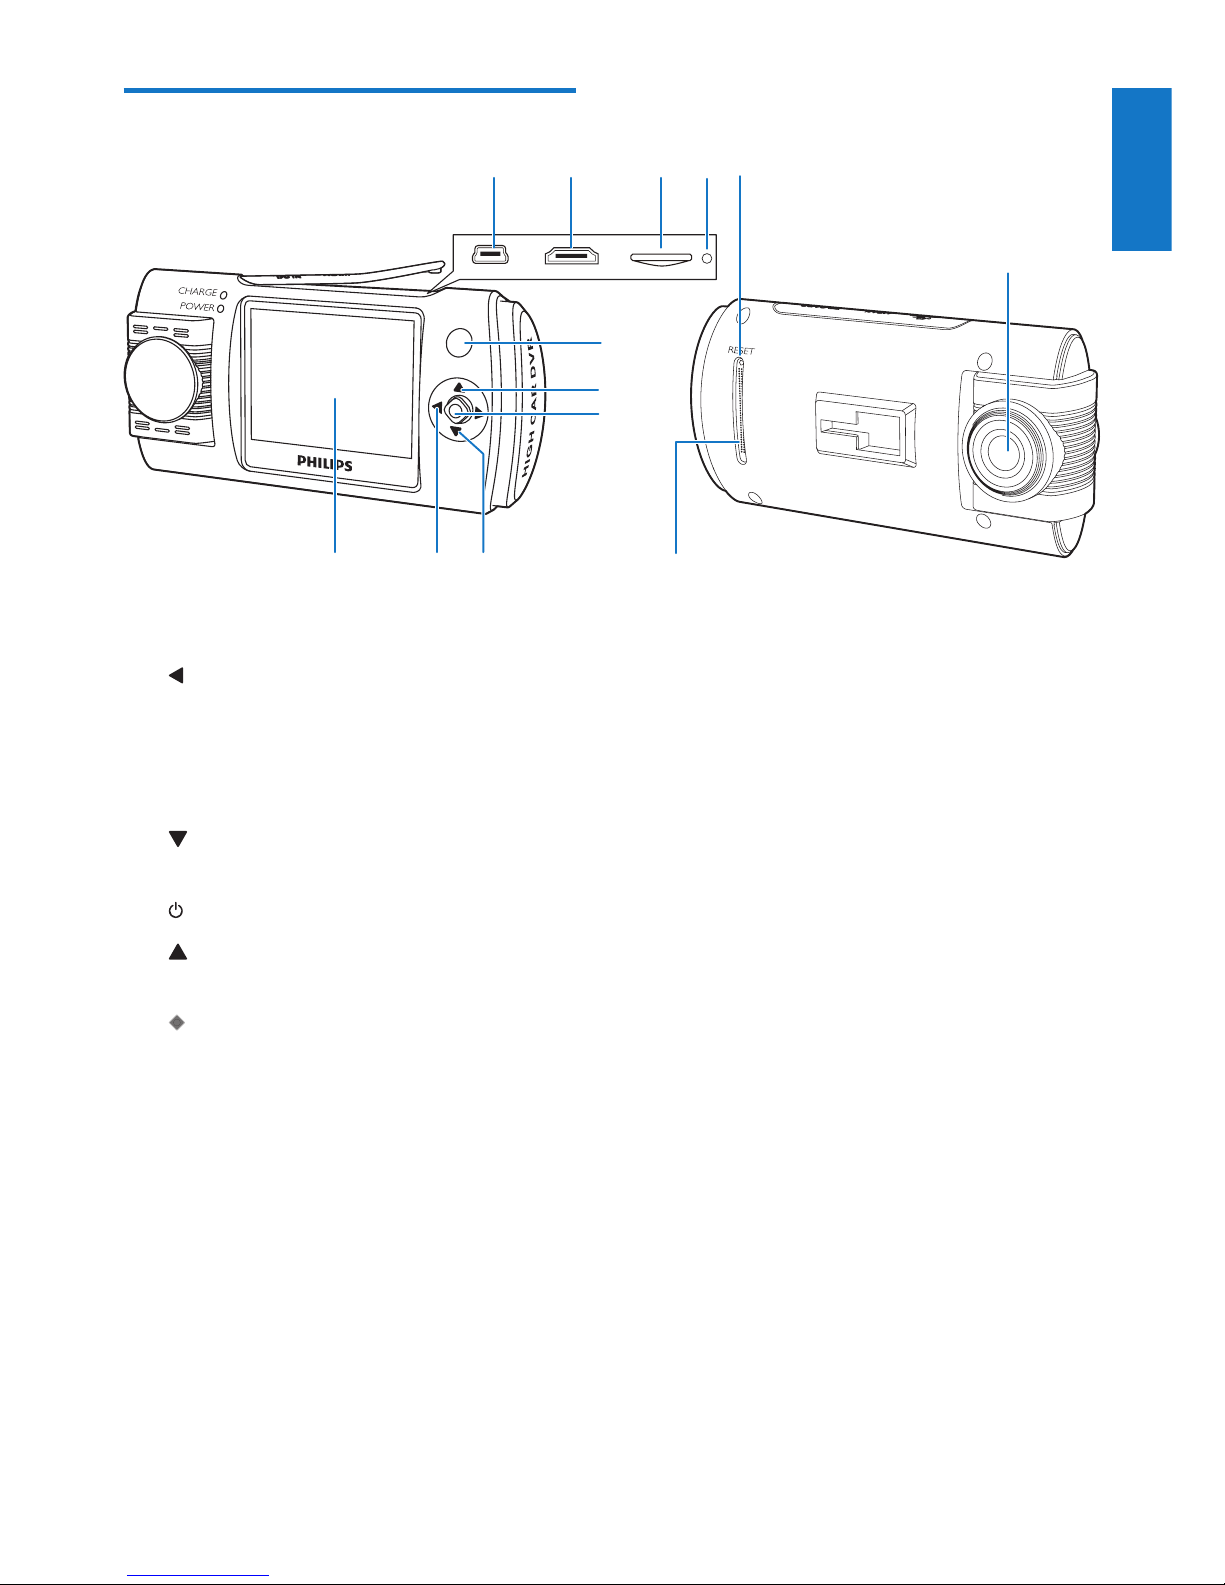
Overview of the main unit
a LCD touch screen
b
• Press repeatedly to select the video
recording mode or photo capture
mode.
• Exit the sub-menu.
c
• Press to access settings.
d
e
• Press to access playback mode.
f
• Conrm a selection.
• Take photos.
• Start video recording.
g Speaker
h Camera lens
i Reset key
j DC socket
k Micro SD card slot
l mini HDMI socket
m mini USB socket
abc
d
e
f
g
h
ijlkm

6EN
3 Get started
Install the driving recorder
Caution
•Do not place the driving recorder in locations where
it may block the driver's view or affect the operation
of airbags.
Note
•In order to get clear images,if there is any smudginess
on the windshield, please clean it before installing.
1 Connect the driving recorder with the
suction bracket below:
2 Wipe clean the windshield.
3 Remove the protective cover of the
suction bracket and rotate the x button
of suction.
4 Connect the USB cable to:
• The mini USB socket of the driving
recorder
• The cigarette lighter socket of the car
Insert Micro SD card
Caution
•Insert the micro SD card before using the driving
recorder.
•Insert the micro SD card with the right direction.
Wrong direction may damage the driving recorder and
the card.
A
B

7
English
EN
Note
•When using for the rst time, please format the micro
SD card to ensure videos are recorded normally.
Insert a micro SD card into the card slot until
you hear a "click".
• To remove the micro SD card
Push the card inwards until you hear a "click".
» The card is disengaged.
Turn on the driving recorder
Press to turn on the driving recorder.
• To turn off the driving recorder, press and
hold for more than 3 seconds.
Note
•When using for the rst time, please set the date/time.
For the rst time use
After the driving recorder is turned on, set the
language and format the micro SD card.
Select language
1 Press to access system setting menu.
2 Press / to select the language setting
menu and then press to enter the menu.
3 Press / to select a languages, then
press to conrm.
Format SD card
1 Press to access system setting menu.
2 Press / to select format micro SD
card menu and then press to enter the
menu.
3 Select YES to format the micro SD card.
Mode switch
• Press repeatedly to select the video
recording mode or photo capture mode.
• Press to access playback mode.
• Press to access system setting menu.

8EN
4 Video Recording
When the driving recording is turned on, video
recording starts automatically.
Video recording screen:
a Video resolution
b Digital effect
c White balance
d Record time
e Motion detection
Note
•The driving recorder will continue running for a while
after the engine is shut down to protect last recorded
le.
•For safety reasons the built-in battery will stop charging
if the device remains at a high-temperature for period
of time. If the built-in battery runs out of power you
will need to reset the date and time.
a
bc
de
Video settings
1 In video recording mode, press to enter
video settings menu.
2 Press / to toggle through the sub-
menus and press to enter the sub-menu.
3 Press / to select an option and press
to conrm.
• You can adjust the following settings:
• Video Resolution
• Record Time
• Motion detection
• Date Stamp
• Voice Recorder
Note
•Press to exit the sub-menu, press again to exit the
video settings menu.
•The selected option is highlighted with red font.
Other manuals for CVR300
1
Table of contents
Other Philips Dashcam manuals

Philips
Philips CVR600 User manual

Philips
Philips CVR500 User manual

Philips
Philips CVR700 User manual

Philips
Philips ADR610 User manual

Philips
Philips ADR810 User manual

Philips
Philips GoSure ADR900s User manual

Philips
Philips ADR900 User manual

Philips
Philips GoSure ADR830 User manual

Philips
Philips CVR308 Product information sheet

Philips
Philips ADR810 User manual


