ITALIANOESPAÑOLNEDERLANDS
Introduzione.
Ci congratuliamo con lei per aver acquistato il nuovo bollitore Philips! In queste
istruzioni troverà tutte le informazioni necessarier per usare il bollitore al meglio e
per molto tempo, ottenendo sempre risultati ottimali.
Descrizione generale.
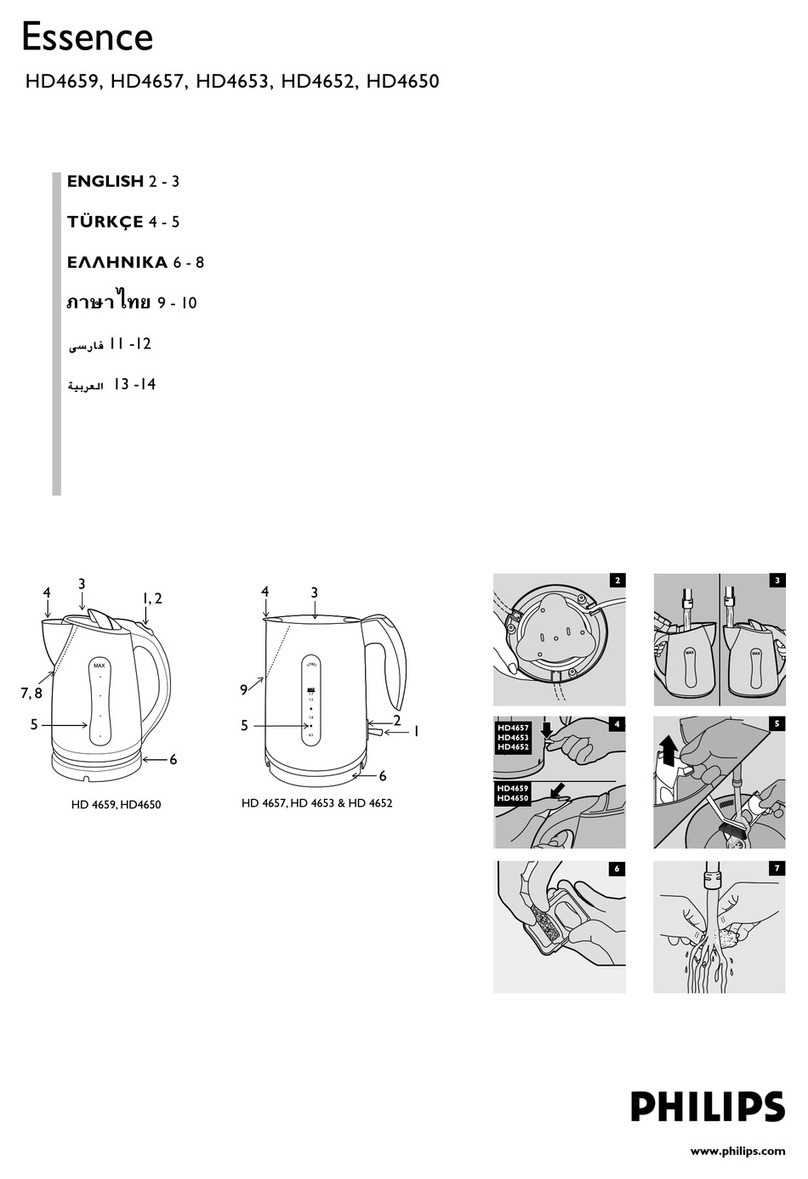
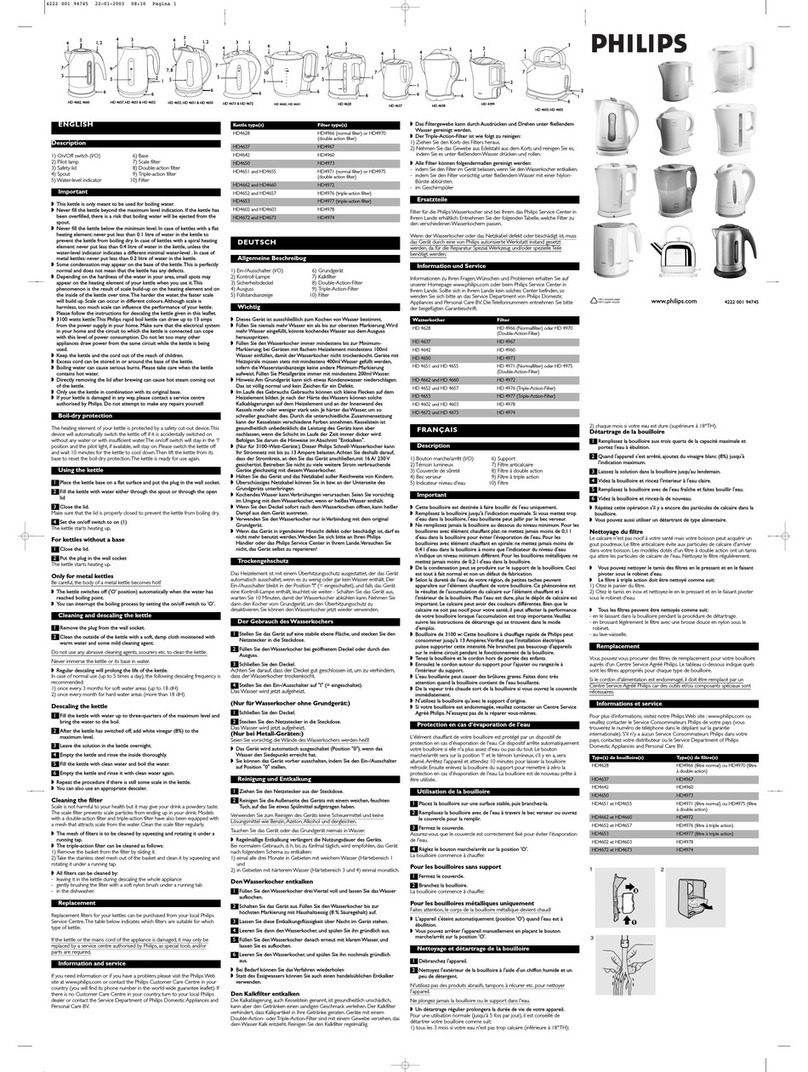
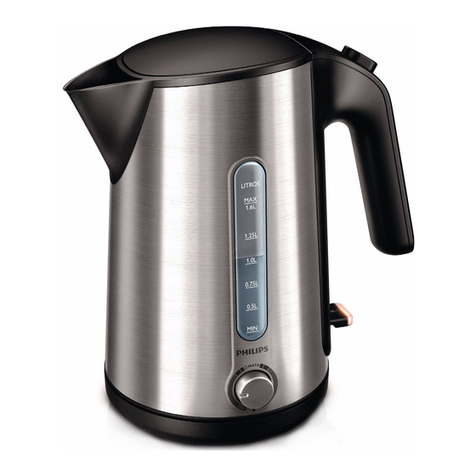
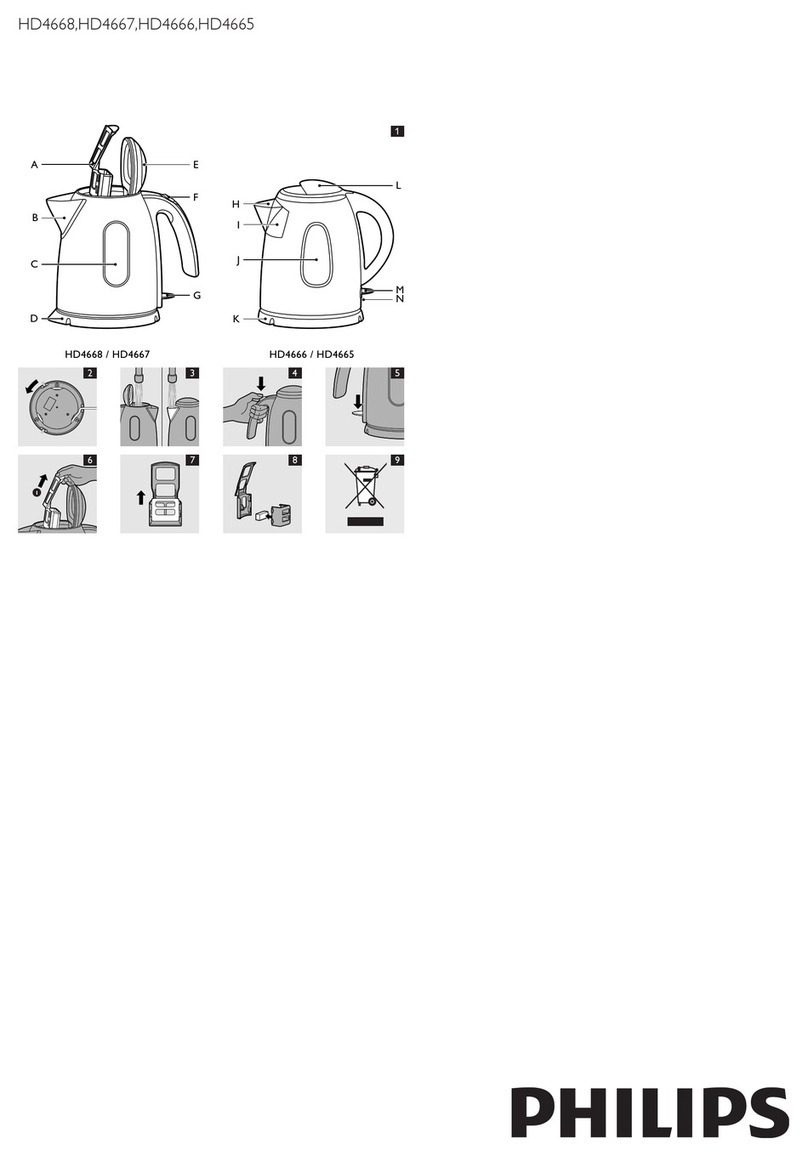
1) Interruttore on/off (I/O)
2) Coperchio
3) Beccuccio
4) Indicatore livello dell'acqua
5) Base (il mod. HD4399 non ha la base)
6) Filtro anticalcare (solo mod. HD4642, HD4629, HD4628 e HD4627)
Importante.
Leggete queste istruzioni con attenzione prima di usare l'apparecchio e conser vatele
per future consultazioni.
◗Prima di collegare l'apparecchio, controllate che la tensione indicata sulla parte
inferiore dell'apparecchio corrisponda a quella della rete locale.
◗Usate sempre il bollitore solo con la base originale.
◗Appoggiate sempre la base e il bollitore su una superficie asciutta, piatta e
stabile.
◗Tenete il cavo, la base e l'apparecchio lontani da superfici bollenti.
◗Non usate l'apparecchio nel caso in cui il cavo di alimentazione, la spina, la base
o l'apparecchio siano danneggiati.
◗Nel caso il cavo fosse danneggiato, dovrà essere sostituito presso un Centro
Autorizzato Philips o comunque da personale debitamente autorizzato, per
evitare situazioni a rischio.
◗Non immergete l'apparecchio o la base in acqua o altri liquidi.
◗Il bollitore deve essere usato esclusivamente per far bollire l'acqua. Non
usatelo per riscaldare minestre o altri liquidi, e neppure cibi in scatola o in
bottiglia.
◗L'acqua bollente può causare gravi ustioni.Fate attenzione quando il bollitore è
pieno di acqua bollente.
◗Quando riempite il bollitore, non superate mai il livello massimo indicato. Nel
caso il bollitore fosse troppo pieno, l'acqua in ebollizione potrebbe fuoriuscire
dal beccuccio e causare scottature.
◗Non aprite il coperchio mentre l'acqua è in ebollizione. Fate attenzione
quando aprite il coperchio dopo aver portato l'acqua a ebollizione: il vapore
che fuoriesce dal bollitore è bollente!
◗Evitate di toccare il corpo del bollitore, che durante l'uso diventa bollente. Per
sollevare il bollitore utilizzate sempre il manico.
◗Tenete l'apparecchio e il cavo lontano dalla portata dei bambini. Fate in modo
che il cavo non penzoli sugli spigoli della tavola o del piano di lavoro. Il cavo in
eccesso può essere avvolto attorno alla base dell'apparecchio.
◗Non riempite mai il bollitore al di sotto del livello minimo per evitare che
l'apparecchio funzioni a vuoto.
◗Alla base del bollitore potrebbe formarsi un po' di condensa.Si tratta di un
fenomeno del tutto normale e non significa che il bollitore sia difettoso.
◗IN base alla durezza dell'acqua nella vostra zona, potrebbero formarsi delle
piccole macchie sulla resistenza del bollitore. Questo fenomeno è causato
dall'accumulo di calcare sulla serpentina e all'interno dell'apparecchio nel corso
del tempo. Più dura risulta l'acqua che utilizzate e più rapidamente il calcare
tende ad accumularsi. Il calcare può avere colori diversi. Pur essendo del tutto
innocuo, il calcare in dosi eccessive può influire sul rendimento del vostro
bollitore. Procedete a una disincrostazione periodica del bollitore, seguendo le
istruzioni riportate nel capitolo "Disincrostazione".
Protezione per il funzionamento senz'acqua
Questo bollitore è provvisto di una protezione per il funzionamento senz'acqua.
Questo dispositivo spegne automaticamente il bollitore nel caso venisse acceso
senz'acqua o con una quantità d'acqua insufficiente. L'interruttore on/off rimarrà in
posizione "on" e la spia, se disponibile, rimarrà accessa. Mettete l'interruttore on/off in
posizione 'O' e lasciate raffreddare il bollitore per 10 minuti. A questo punto il
bollitore sarà nuovamente pronto per l'uso.
Prima di usare l'apparecchio per la prima volta.
◗Togliete gli eventuali adesivi dalla base o dal bollitore.
◗Appoggiate la base su una superficie asciutta, stabile e piatta.
◗Regolate la lunghezza del cavo avvolgendo la parte in eccesso attorno alla
base. Passate il cavo attraverso una delle fessure poste sulla base (fig. 2).
Prima di usare l'apparecchio per la prima volta:
1Risciacquate il bollitore con acqua.
2Riempite d'acqua il bollitore fino al livello massimo e portate l'acqua a
ebollizione una volta (vedere "Come usare l'apparecchio").
3Gettate via l'acqua bollente e risciacquate nuovamente il bollitore.
Come usare l'apparecchio.
1Riempite d'acqua il bollitore, attraverso il beccuccio o il coperchio aperto (fig.
3).
2Chiudete il coperchio.
Controllate che il coperchio sia chiuso correttamente per evitare che durante il
processo di ebollizione l'acqua evapori.
3Appoggiate il bollitore sulla base, inserite la spina nella presa di corrente e
mettete l'interruttore on/off su "I" (fig. 4).
Il bollitore inizia a riscaldarsi.
◗Il bollitore si spegne automaticamente (posizione "O") non appena l'acqua
raggiunge il punto di ebollizione.
◗Potete interrompere il processo di ebollizione in ogni momento,basterà
mettere l'interruttore on/off in posizione "O".
Pulizia e disincrostazione.
Togliete sempre la spina dalla presa prima di pulire l'apparecchio.
Non usate prodotti abrasivi, pagliette ecc. per pulire il bollitore.
Non immergete mai il bollitore o la base nell'acqua.
Come pulire il bollitore.
1Pulite la parte esterna del bollitore con un panno morbido inumidito con
acqua tiepida, aggiungendo un po' di detergente neutro.
Il calcare non è nocivo alla salute ma può dare un sapore sgradevole alle vostre
bevande. Il filtro anticalcare impedisce alle particelle di calcare di finire nelle vostre
bevande. Ricordate di pulire il filtro regolarmente.
2Il filtro può essere pulito (solo mod.HD4642 e HD4628):
◗toglietelo dal bollitore e spazzolatelo delicatamente sotto l'acqua corrente con
uno spazzolino morbido, oppure.. (fig. 5).
◗lasciatelo nel bollitore quando procedete alla disincrostazione dell'apparecchio,
oppure...
◗mettetelo in lavastoviglie.
Disincrostazione del calcare
Con una disincrostazione regolare, il bollitore avrà una durata maggiore.
Nel caso di un uso normale (fino a 5 volte al giorno), si consiglia di eliminare il calcare
con la frequenza sotto riportata:
- Una volta ogni 3 mesi nel caso di acqua dolce (fino a 18 dH)
- Una volta al mese nel caso di acqua dura (oltre a 18 dH)
1Riempite d'acqua il bollitore fino ai tre quarti della sua capacità massima e
portate ad ebollizione.
2Dopo aver spento il bollitore, aggiungete dell'aceto bianco (acido acetico
all'8%) fino a raggiungere il livello massimo.
3Lasciate agire la soluzione per tutta la notte.
4Svuotate il bollitore e risciacquatelo accuratamente.
5Riempite il bollitore con acqua pulita e portate ad ebollizione.
6Svuotate il bollitore e risciacquatelo nuovamente con acqua.
◗Ripetete questa procedura fino alla completa eliminazione del calcare nel
bollitore.
Potete anche usare gli appositi prodotti per la disincrostazione. In questo caso, seguite
le istruzioni ripor tate sulla confezione del prodotto.
Ricambi.
I filtri di ricambio per il vostro bollitore sono disponibili presso il vostro rivenditore
Philips o i Centri Assistenza Philips. La tabella riportata qui sotto indica i filtri indicati
per il vostro bollitore elettrico.
Nel caso in cui il bollitore, la base o il cavo di alimentazione fossero danneggiati,
portate la base o il bollitore presso un CentroAssistenza Philips autorizzato, per le
eventuali riparazioni o per sostituire il cavo, per evitare situazioni a rischio.
Garanzia e Assistenza.
Per ulteriori informazioni o in caso di problemi, vi preghiamo di visitare il sito Philips
su www.philips.com, oppure contattare il Centro Assistenza Clienti Philips del vostro
paese (troverete il numero di telefono sull'opuscolo della garanzia). Qualora nel
vostro paese non ci siano Centri Assistenza Philips, rivolgetevi al rivenditore
autorizzato Philips oppure contattate il Service Department of Philips Domestic
Appliances and Personal Care BV.
PORTUGUÊS
Introdução.
Parabéns pela aquisição do seu novo jarro eléctrico Philips! Neste modo de emprego
encontrará informações impor tantes para poder desfrutar ao máximo e durante
muito tempo do seu jarro.
Descrição geral.
1) Interruptor (I/O)
2) Tampa
3) Bico
4) Indicador do nível de água
5) Base (HD4399 não tem base)
6) Filtro anti-calcário (apenas HD4642, HD4629, HD4628 e HD4627)
Importante.
Antes de se servir do jarro, leia atentamente estas instruções e guarde-as para uma
eventual consulta futura.
◗Antes de ligar, verifique se a voltagem indicada na base do jarro corresponde à
corrente eléctrica do local.
◗O jarro só deve ser utilizado com a sua base original.
◗Coloque sempre a base e o jarro sobre uma superfície seca, plana e estável.
◗Mantenha o fio, a base e o jarro afastados de superfícies quentes.
◗Não se sirva do jarro no caso de o fio, a ficha,a base ou o próprio jarro
estarem danificados.
◗Se o fio estiver estragado,só deverá ser substituído pela Philips, por um
concessionário autorizado pela Philips ou por pessoal igualmente qualificado
para se evitarem situações gravosas para o utilizador.
◗Nunca mergulhe o aparelho ou a base dentro de água ou de qualquer outro
líquido.
◗O jarro destina-se unicamente a ferver água. Não o utilize para aquecer sopa
ou outros líquidos nem alimentos em boiões, engarrafados ou enlatados.
◗A água a ferver pode causar queimaduras sérias.Tenha cuidado ao manusear o
jarro com água quente.
◗Nunca encha o jarro acima da indicação de nível máximo. Se o jarro estiver
muito cheio, a água a ferver pode ser expelida para fora através do bico e
provocar alguma queimadura ou escaldão.
◗Não abra a tampa quando a água estiver a ferver.Tenha cuidado se abrir a
tampa imediatamente a seguir à fervura da água: o vapor que sai do jarro é
muito quente.
◗Evite tocar no corpo do jarro porque aquece bastante durante a utilização.
Segure-o sempre pela pega.
◗Mantenha o jarro e o fio fora do alcance das crianças.Não deixe o fio
pendurado para fora da mesa ou da bancada da cozinha. O fio em excesso
pode ser enrolado na base do jarro.
◗Nunca encha o jarro abaixo do nível mínimo para evitar que funcione a seco.
◗Pode formar-se alguma condensação na base do jarro. É perfeitamente normal
e não significa que o aparelho tenha algum defeito.
◗Dependendo do grau de dureza da água da sua zona de residência, poderão
aparecer algumas manchas na resistência do jarro. Este fenómeno é resultante
da formação de calcário na resistência e no interior do jarro que ocorre ao
fim de algum tempo. Quanto mais dura for a água,mais depressa se formará o
calcário. O calcário pode apresentar-se com diferentes cores. Embora o
calcário seja inofensivo,se existir em quantidade poderá influenciar o
desempenho do jarro.Descalcifique o jarro com regularidade, seguindo as
instruções dadas no capítulo 'Descalcificação'.
Protecção contra funcionamento a seco
Este jarro está equipado com uma protecção contra o funcionamento a seco. Este
dispositivo desliga o jarro automaticamente, no caso de ser ligado acidentalmente
sem ter água ou não tendo água suficiente. O interruptor permanece na posição 'on'
(ligado) e a lâmpada piloto, se disponível, mantém-se acesa. Coloque o interruptor na
posição 'O' e deixe o jarro arrefecer durante 10 minutos. O jarro ficará, então,
pronto a usar de novo.
Antes da primeira utilização.
◗Retire os autocolantes que existirem na base ou no jarro.
◗Coloque a base sobre uma superfície seca, estável e plana.
◗Ajuste o comprimento do fio, enrolando-o na base. Passe o fio por uma das
aberturas da base (fig. 2).
Antes de se servir do jarro pela primeira vez:
1Enxague o jarro com água.
2Encha o jarro com água até à indicação de nível máximo e deixe ferver uma
vez (vidé 'Utilização').
3Deite a água quente fora e volte a enxaguar o jarro mais uma vez.
Utilização.
1Encha o jarro com água, através do bico ou da tampa aberta (fig. 3).
2Feche a tampa.
Certifique-se que a tampa ficou bem fechada para evitar que o jarro perca água e
funcione a seco.
3Coloque o jarro sobre a base, ligue a ficha à tomada eléctrica e regule o
interruptor para a posição 'I' (ligado) (fig. 4).
O jarro começa a aquecer.
◗O jarro desliga-se (posição 'O') automaticamente quando a água atinge o
ponto de fervura.
◗Se quiser interromper a fervura da água, coloque o interruptor na posição 'O'.
Limpeza e descalcificação.
Antes de proceder à limpeza, desligue sempre da corrente.
Não use produtos de limpeza abrasivos,esfregões, etc.para limpar o jarro.
Nunca mergulhe o jarro ou a base dentro de água.
Limpeza
1Limpe o exterior do jarro com um pano macio e humedecido com água
quente e um pouco de detergente líquido suave.
O calcário não é prejudicial à saúde mas pode conferir um sabor desagradável à
bebida. O filtro anti-calcário evita que as partículas de calcário passem para a bebida.
Limpe o filtro com regularidade.
2O filtro pode ser limpo (apenas HD4642 e HD4628):
◗retirando-o para fora e escovando-o suavemente com uma escova de nylon
macia com água corrente, ou .. (fig.5).
◗deixando-o no jarro quando se procede à descalcificação do mesmo, ou ...
◗na máquina da loiça.
Descalcificação
Uma descalcificação regular prolonga a vida do jarro.
No caso de uma utilização normal (até 5 vezes por dia), recomenda-se a seguinte
frequência de descalcificação:
- Uma vez a cada 3 meses nas zonas com água menos dura (até 18 dH).
- Uma vez todos os meses nas zonas onde a água for dura (mais de 18 dH).
1Encha o jarro com água até três quartos do nível máximo e leve a água a
ferver.
2Depois de o jarro se desligar, adicione vinagre (8% ácido acetílico) até ao nível
máximo.
3Deixe esta solução a actuar durante a noite.
4Esvazie o jarro e enxague muito bem.
5Volte a encher o jarro com água limpa e leve-a a ferver.
6Esvazie o jarro e enxague novamente com água limpa.
◗Repita este procedimento até limpar todo o calcário.
Também pode usar um produto de descalcificação próprio. Se for esse o caso, siga as
instruções da embalagem do produto.
Substituição.
Os filtros de substituição do jarro podem ser adquiridos no seu distribuidor Philips
ou num concessionário Philips autorizado. O quadro abaixo indica quais os filtros
adequados para o seu jarro eléctrico.
Se o jarro,a base ou o fio estiverem estragados, leve a base ou o jarro a um
concessionário autorizado pela Philips para que procedam à sua reparação ou
substituição do fio. Evitará,assim, alguma situação comprometedora.
Garantia e assistência.
Se necessitar de informações ou se tiver algum problema, por favor visite o site da
Philips em www.philips.pt ou contacte o Centro de Informação ao Consumidor
Philips do seu país (encontrará os números de telefone no folheto da garantia
mundial). Se não existir um Centro de Informação ao Consumidor no seu país, dirija-
se ao seu agente Philips local ou contacte o Departamento de Service da Philips
Domestic Appliances and Personal Care BV.
Inleiding.
Gefeliciteerd met de aankoop van uw nieuwe Philips waterkoker! In deze
gebruiksaanwijzing vindt u alle belangrijke informatie zodat u zo lang mogelijk
optimaal kunt genieten van uw waterkoker.
Algemene beschrijving.
1) Aan/uitknop (I/O)
2) Deksel
3) Schenktuit
4) Waterniveau-indicator
5) Voet (HD4399 heeft geen voet)
6) Kalkfilter (alleen HD4642, HD4629, HD4628 en HD4627)
Belangrijk.
Lees deze gebruiksaanwijzing zorgvuldig door voordat u het apparaat gaat gebruiken
en bewaar de gebruiksaanwijzing om deze indien nodig te kunnen raadplegen.
◗Controleer of het voltage aangegeven op de voet van de waterkoker
overeenkomt met de plaatselijke netspanning voordat u het apparaat aansluit.
◗Gebruik de waterkoker alleen met de bijbehorende voet.
◗Plaats de voet van de waterkoker op een droge, vlakke en stabiele
ondergrond.
◗Houd het snoer, de voet en het apparaat uit de buurt van hete oppervlakken.
◗Gebruik het apparaat niet als het netsnoer, de stekker of het apparaat zelf
beschadigd is.
◗Indien het netsnoer beschadigd is, moet het vervangen worden door Philips,
een door Philips geautoriseerd servicecentrum of personen met vergelijkbare
kwalificaties om gevaar te voorkomen.
◗Dompel de waterkoker en de voet niet in water of een andere vloeistof.
◗Deze waterkoker is alleen bedoeld voor het koken van water. Gebruik het
apparaat niet om soep of andere vloeistoffen of voedsel in potten,flessen of
blikken op te warmen.
◗Kokend water kan ernstige brandwonden veroorzaken.Wees voorzichtig met
de waterkoker wanneer deze heet water bevat.
◗Vul de waterkoker nooit verder dan het aangegeven maximumniveau.Als er te
veel water in de waterkoker zit, bestaat het risico dat er kokend water uit de
schenktuit naar buiten spat.
◗Open het deksel niet wanneer het water kookt.Wees voorzichtig wanneer u
het deksel opent direct nadat het water gekookt heeft:de stoom die uit de
waterkoker komt is erg heet.
◗Raak de buitenwand van de waterkoker niet aan,aangezien deze erg heet
wordt tijdens gebruik.Til het apparaat alleen op aan het handvat.
◗Houd de waterkoker en het snoer buiten het bereik van kinderen. Laat het
snoer niet over de rand hangen van de tafel of het werkblad waar de
waterkoker op staat.Overtollig snoer kan in of rond om de voet van het
apparaat worden opgeborgen.
◗Vul de waterkoker nooit beneden het minimumniveau om te voorkomen dat
het apparaat droogkookt.
◗Het is mogelijk dat er enige condens ontstaat op de voet van de waterkoker.
Dit is heel normaal en betekent niet dat het apparaat een defect vertoont.
◗Afhankelijk van de hardheid van het water in uw woongebied,kunnen er na
gebruik kleine vlekjes ontstaan op het verwarmingselement van de
waterkoker. Dit verschijnsel is het gevolg van kalkvorming die zich in de loop
van de tijd voordoet op het verwarmingselement en aan de binnenzijde van de
waterkoker. Hoe harder het water, hoe sneller er kalkaanslag zal ontstaan.
Kalkaanslag kan verschillende kleuren hebben.Alhoewel kalk onschadelijk is,
kan het een negatieve invloed hebben op het functioneren van uw waterkoker.
Ontkalk de waterkoker daarom regelmatig en volg daarbij de instructies in het
hoofdstuk 'Ontkalken'.
Droogkookbeveiliging
Deze waterkoker is voorzien van een droogkookbeveiliging. Deze beveiliging schakelt
de waterkoker automatisch uit als deze per ongeluk wordt ingeschakeld zonder dat
er water in zit of als er onvoldoende water in zit. In dat geval blijft de aan/uitknop op
stand 'I' staan en blijft het waarschuwingslampje, indien aanwezig, branden. Zet de
aan/uitknop op stand 'O' en laat het apparaat 10 minuten afkoelen. Daarna kunt u de
waterkoker weer gebruiken.
Voor het eerste gebruik.
◗Verwijder eventueel aanwezige stickers van de voet of de waterkoker.
◗Plaats de voet van de waterkoker op een droge, stabiele en vlakke
ondergrond.
◗Pas de lengte van het snoer aan door het rond de haspel in de voet te
wikkelen.Voer het snoer door een van de openingen in de voet (fig. 2).
Voordat u de waterkoker voor de eerste keer gebruikt:
1Spoel de waterkoker met water.
2Vul de waterkoker met water tot het maximumniveau en laat hem een keer
koken (zie 'Gebruik').
3Giet het hete water uit de waterkoker en spoel hem nog een keer om.
Gebruik.
1Vul de waterkoker via de schenktuit met water of open het deksel om hem te
vullen (fig. 3).
2Sluit het deksel.
Zorg ervoor dat het deksel goed dichtzit om te voorkomen dat het apparaat
droogkookt.
3Plaats de waterkoker op zijn voet, steek de stekker in het stopcontact en zet
de aan/uitknop op stand 'I' (fig. 4).
De waterkoker begint op te warmen.
◗De waterkoker schakelt automatisch uit (aan/uitknop springt terug naar stand
'O') als het water het kookpunt heeft bereikt.
◗U kunt het kookproces onderbreken door de aan/uitknop op 'O' te zetten.
Schoonmaken en ontkalken.
Haal altijd de stekker uit het stopcontact voordat u de waterkoker en de voet gaat
schoonmaken.
Gebruik geen agressieve schoonmaakmiddelen,schuursponsjes e.d. om de
waterkoker te reinigen.
Dompel de waterkoker of de voet nooit in water.
Schoonmaken van de waterkoker
1Maak de buitenkant van het apparaat schoon met een zachte, vochtige doek en
een zacht schoonmaakmiddel.
Kalk is niet schadelijk voor uw gezondheid maar kan uw drank een poederig smaakje
geven. Het kalkfilter voorkomt dat er kalkdeeltjes in uw drank terecht komen. Maak
het filter regelmatig schoon.
2Het filter (alleen HD4642 en HD4628) kan worden gereinigd:
◗door het uit de waterkoker te nemen en voorzichtig met een zachte nylon
borstel onder de lopende kraan schoon te borstelen, of .. (fig. 5).
◗door het in de waterkoker te laten zitten wanneer het hele apparaat wordt
ontkalkt, of ...
◗in de vaatwasmachine.
Ontkalken van de waterkoker
Regelmatig ontkalken verlengt de levensduur van het apparaat.
Bij normaal gebruik (tot 5 keer per dag), wordt u aangeraden de volgende
ontkalkingsfrequentie aan te houden:
- Eén keer per 3 maanden als u zacht water gebruikt (tot 18dH).
- Eén keer per maand als u hard water gebruikt (meer dan 18dH).
1Vul de waterkoker tot driekwart van het aangegeven maximumniveau met
water en breng het water aan de kook.
2Voeg, nadat het waterkoker is uitgeschakeld, schoonmaakazijn (8% azijnzuur)
toe tot aan het maximumniveau.
3Laat het water met de azijn een nacht in de waterkoker staan.
4Schenk het apparaat leeg en spoel de binnenzijde goed uit.
5Vul het apparaat met schoon water en breng het water aan de kook.
6Schenk het apparaat leeg en spoel de binnenzijde nogmaals goed uit.
◗Herhaal deze procedure als er nog steeds kalk in de waterkoker zit.
U kunt ook een hiervoor geschikte ontkalker gebruiken.Volg in dat geval de
instructies op de verpakking van de ontkalker.
Vervanging.
Vervangende filters voor uw waterkoker zijn verkrijgbaar bij uw Philips dealer of een
Philips servicecentrum. De onderstaande tabel laat zien welke filters geschikt zijn voor
welke types.
Indien het netsnoer beschadigd is, moet het vervangen worden door Philips,een
door Philips geautoriseerd servicecentrum of personen met vergelijkbare
kwalificaties om gevaar te voorkomen.
Garantie & service.
Als u informatie nodig heeft of als u een probleem heeft, bezoek dan onze website
(www.philips.com), of neem contact op met het Philips Customer Care Centre in uw
land (u vindt het telefoonnummer in het 'worldwide guarantee' vouwblad). Als er
geen Customer Care Centre in uw land is, ga dan naar uw Philips dealer of neem
contact op met de afdeling Service van Philips Domestic Appliances and Personal
Care BV.
Introducción.
¡Enhorabuena por adquirir la nueva hervidora de Philips! En estas instrucciones de
uso, encontrará toda la información importante para que pueda disfrutar el mayor
tiempo posible de este aparato.
Descripción general.
1) Interruptor marcha/parada (I/O)
2) Tapa
3) Boquilla
4) Indicador del nivel de agua
5) Base (el modelo HD4399 no tiene base)
6) Filtro antical (sólo modelos HD4642, HD4629, HD4628 y HD4627)
Importante.
Antes de usar el aparato, lea atentamente estas instrucciones y consér velas por si
necesitara consultarlas en el futuro.
◗Antes de conectar el aparato, compruebe si el voltaje indicado en la base de la
hervidora se corresponde con el de su hogar.
◗Use la hervidora de agua sólo con su base original.
◗Coloque siempre la base y la hervidora sobre una superficie seca, plana y
estable.
◗Evite que el cable, la base y el aparato entren en contacto con superficies
calientes.
◗No utilice la hervidora si el cable, la clavija, la base o el aparato están dañados.
◗Si el cable está dañado, debe ser sustituido por Philips,un centro de servicio
autorizado por Philips o personal cualificado para evitar situaciones de peligro.
◗No sumerja el aparato o la base en agua o cualquier otro líquido.
◗Esta hervidora está concebida únicamente para hervir agua. No utilice el
aparato para calentar sopa u otro líquido,o comida enlatada o en conserva.
◗El agua hirviendo puede causar serias quemaduras.Tenga cuidado cuando haya
agua caliente en la hervidora.
◗No llene nunca la hervidora por encima de la indicación de nivel máximo. Si la
hervidora se llena en exceso, existe el riesgo de que el agua hirviendo salga
despedida por la boquilla y provoque quemaduras.
◗No quite la tapa mientras hierve agua.Tenga cuidado al quitar la tapa justo
después de que el agua haya hervido, ya que saldrá vapor muy caliente de la
hervidora.
◗Evite tocar el cuerpo de la hervidora, ya que se calienta mucho cuando está en
funcionamiento. Sujete siempre la hervidora por el asa.
◗Mantenga la hervidora y el cable lejos del alcance de los niños. No deje el
cable colgando de la mesa o de la encimera. El exceso de cable de red puede
guardarse en la base del aparato o enrollarse en la misma.
◗No llene nunca la hervidora por debajo de la indicación de nivel mínimo para
evitar que hierva en seco.
◗Puede aparecer cierta condensación sobre la base de la hervidora de agua.
Esto es perfectamente normal y no significa que el aparato tenga algún
defecto.
◗Dependiendo de la dureza del agua de la zona, pueden aparecer pequeñas
manchas en el elemento calefactor de la hervidora al utilizarla. Este fenómeno
es el resultado de la formación continua de incrustaciones de cal en el
elemento calefactor y en el interior de la hervidora de agua. Cuanto más dura
sea el agua, más rápida será la formación de incrustaciones. Las incrustaciones
pueden presentar diferentes colores.A pesar de que las incrustaciones no son
nocivas para la salud, demasiadas incrustaciones pueden influir en el
funcionamiento de la hervidora. Siga las instrucciones del capítulo 'Cómo
eliminar la cal' para limpiar la hervidora.
Protección contra el calentamiento en seco.
Esta hervidora está equipada con una protección contra el calentamiento en seco.
Este dispositivo desconecta automáticamente la hervidora si se conecta
accidentalmente cuando no hay agua o no hay suficiente agua. El interruptor de
marcha/parada permanecerá en la posición de marcha y, si hubiera piloto, éste
permanecerá encendido. Coloque el interruptor de marcha/parada en la posición 'O'
y deje que la hervidora se enfríe durante 10 minutos.Transcurrido este tiempo podrá
volver a usar la hervidora.
Antes de utilizarla por primera vez.
◗Quite las pegatinas de la base o de la hervidora, si las hubiera.
◗Coloque la base en una superficie seca, estable y plana.
◗Ajuste la longitud del cable enrollándolo alrededor del soporte de la base.
Pase el cable por una de las ranuras de la base (fig. 2).
Antes de utilizar la hervidora por primera vez:
1Enjuague la hervidora con agua.
2Llene la hervidora con agua hasta el nivel máximo y deje que hierva una vez
(consulte el apartado 'Cómo usar el aparato')
3Vierta el agua caliente y enjuague la hervidora una vez más.
Cómo usar el aparato.
1Llene la hervidora de agua bien a través de la boquilla o bien abriendo la tapa
(fig. 3).
2Cierre la tapa.
Asegúrese de que la tapa está correctamente cerrada para evitar que hierva en seco.
3Coloque la hervidora sobre la base, conéctela a la red y coloque el interruptor
de marcha/parada en la posición 'I' (fig. 4).
La hervidora de agua empieza a calentarse.
◗La hervidora de agua se desconecta (posición 'O') automáticamente cuando el
agua ha alcanzado el punto de ebullición
◗Puede interrumpir el proceso de ebullición colocando el interruptor de
marcha/parada en la posición 'O'.
Cómo limpiar y eliminar la cal.
Desenchufe siempre el aparato antes de limpiarlo.
No utilice ningún agente limpiador abrasivo,desengrasantes, etc. para limpiar la
hervidora de agua.
No sumerja nunca en agua ni hervidora ni su base.
Cómo limpiar la hervidora
1Limpie la hervidora por fuera con un paño suave humedecido con agua tibia y
un producto de limpieza suave.
La cal no es dañina para la salud, pero puede dar un sabor raro al agua. El filtro antical
evita que las partículas de cal acaben en su vaso. Limpie el filtro antical con frecuencia.
2Para limpiar el filtro (sólo modelos HD4642 y HD4628):
◗saque el filtro de la hervidora y cepíllelo con un cepillo de nylon suave debajo
del grifo, o.. (fig. 5).
◗déjelo dentro de la hervidora cuando elimine la cal de todo el aparato, o...
◗métalo en el lavavajillas.
Cómo eliminar la cal
Al eliminar la cal con frecuencia, prolongará la vida de la hervidora.
En caso de uso normal (hasta 5 veces al día), se recomienda la siguiente frecuencia de
limpieza:
- Una vez cada 3 meses para zonas de agua blanda (hasta 18 dH).
- Una vez al mes para zonas de agua dura (más de 18 dH).
1Llene la hervidora con agua hasta tres cuartos del nivel máximo y ponga el
agua a hervir.
2Después de que la hervidora se haya desconectado, añada vinagre blanco
(ácido acético al 8%) hasta el nivel máximo.
3Deje la solución en la hervidora durante toda la noche
4Vacíe la hervidora de agua y enjuague cuidadosamente el interior.
5Llene la hervidora con agua limpia y póngala a hervir.
6Vacíe la hervidora de agua y vuelva a enjuagarla con agua limpia.
◗Repita el proceso si todavía queda algo de cal en la hervidora.
También puede utilizar un agente descalcificador adecuado. En este caso, siga las
instrucciones que aparecen en la caja del descalcificador.
Sustitución.
Los recambios de los filtros para hervidoras Philips se pueden adquirir en cualquier
distribuidor de Philips o en el Centro de Servicio Philips de su localidad. La tabla
siguiente indica el filtro adecuado para su hervidora eléctrica.
Si la hervidora, la base o el cable están dañados sólo deben ser reparados por un
Servicio Autorizado de Philips para evitar situaciones de peligro.
Garantía y servicio.
Si necesita información o si tiene algún problema, visite la página web de Philips en
www.philips.com o póngase en contacto con el Servicio Philips de Atención al
Cliente de su país (encontrará el número de teléfono en el folleto de la Garantía
Mundial). Si en su país no hay Servicio Philips de Atención al Cliente, diríjase a su
distribuidor local Philips o póngase en contacto con el Service Department of Philips
Domestic Appliances and Personal Care BV.
Filtertype
HD4966
HD4970
HD4960
Waterkokertype
HD4628, HD4627
HD4629
HD4642
Tipo filtro
HD4966
HD4970
HD4960
Tipo bollitore
HD4628, HD4627
HD4629
HD4642
Tipo de filtro
HD4966
HD4970
HD4960
Tipo de jarro
HD4628, HD4627
HD4629
HD4642
Tipo de filtro
HD4966
HD4970
HD4960
Modelo de hervidora
HD4628, HD4627
HD4629
HD4642


