PhoneWatch Domonial User manual

PhoneWatch Ltd., Unit 3/4, Sandyford Park,
Burton Hall Rd, Sandyford Industrial Estate,
Dublin 18.
PW0002 10/13
PhoneWatch Smart Security System
User Manual - Domonial

Thank you for choosing an alarm from
PhoneWatch.
We hope you will have the pleasure of
using your alarm system for many years to
come and that it will keep you, your loved
ones and your home secure.
This user manual will help in your everyday use of the alarm
system. Please take time to read through it, as it gives you
important information and some good tips on using the
system.
If the alarm is activated
If the alarm is activated, the Alarm Receiving Centre will
phone your home or your mobile to check you are ok. If they
make contact, they will ask you for your verication word
to verify you are the genuine user of the alarm system. If
nobody answers or if we are given an incorrect verication
word, we will call keyholders and the emergency services,
if required.
If your alarm system has motion sensors with cameras
tted, images are transmitted to the Alarm Receiving Centre
immediately, where they are veried and the appropriate
action is taken.
Customer Support and
System Maintenance
The alarm system will inform you if there is any fault (see
page 7). If you have any questions, you can simply contact
our Customer Support department during normal business
hours on 1850 753 753 who will help you over the phone or
send an engineer out to investigate.
Note: All of our engineers have PhoneWatch uniforms and
carry PhoneWatch photo ID.
Procedure for transmitted
images
Images which have been transmitted will be treated as
follows:
•The images are used by the PhoneWatch Alarm
Receiving Centre to determine appropriate action.
•The images are processed by authorised expert sta at
our Alarm Receiving Centre.
•All images received remain accessible for up to 21 days.
On the 22nd day, images are routinely deleted.
•The images cannot be passed on to any third party, other
than the Gardaí.
•Handling of the images is in accordance with
requirements set out by the authorities.
PhoneWatch Ltd.
Unit 3/4 Sandyford Park
Sandyford Industrial Estate
Dublin 18
Customer Support: 1850 753 753
Email: info@phonewatch.ie
Your PhoneWatch Alarm Contents
Description of the alarm system Page 4
How to use the keypad and keytag Page 5
How to use the remote control Page 12
How the sensors work Page 14
Maintenance and recommendations Page 16
PhoneWatch Alarm App Page 17
Notes Page 18
23

PROPERTIES
RADIO
•Narrow band FM, 868 MHZ
•Unique identication for every component in the
system, interference from neighbouring systems is not
possible
•Reports interference
ELECTRICS
•220v - 240v ac with battery back-up
•Built-in surge protection
•Monitoring of power supply
ALARM TRANSMISSION
•Built-in alarm transmitter
•Transmission is monitored using periodical testing
FUNCTIONS
•3 settings: Away and Home and O
•Up to 24 sensors
•Alert functions
•Control unit and sensors are tamper-proof
Description of the alarm
system
How to use the keypad
and keytag
The keypad is equipped with a keytag reader allowing users to arm/disarm the alarm
system using either a valid code or keytag.
It also has an internal siren. The keypad can have up to 9 users congured. To add,
remove or congure users, please contact PhoneWatch.
SIREN KEYTAG READER
ARM/DISARM AREA
SYSTEM FAULT
(Light2)
TAMPER
ALERT (Light4)
PANIC BUTTONS
SYSTEM ARMED
(Light1)
ARMING BUTTON FOR
WHOLE SYSTEM (AWAY)
ARMING BUTTON FOR
PART OF SYSTEM (HOME)
ALARM ACTIVATED
(Light3)
LOUD
SPEAKER
KEYTAG
The control unit is the brain of your alarm system. It exchanges information with the
wireless components that are connected. The control unit collects data that is sent by
the sensors, it registers arming and disarming and communicates with the PhoneWatch
Alarm Receiving Centre.
45

ARMING YOUR SYSTEM USING YOUR
USER CODE OR KEYTAG
Press an arming button on the keypad and enter the user code,
or swipe a registered keytag.
4 gure user code or keytag -------------------------------------------- Arms the entire system (Away)
4 gure user code or keytag -------------------------------------------- Arms part of system (Home)
Arming can be done by either using the keypad and your user code or using your keytag.
The keypad will emit code acknowledgement tones, followed by delay tones for exit. If the keypad indicates there
is a contact sensor fault, it could mean one of your windows/doors (which are tted with a sensor) are open, the
system must be disarmed and then all windows/doors checked.
Arming is completed automatically at the end of the arming period for exit (depending on the system conguration).
NOTE:
Always ensure that arming is followed by the code acknowledgement tones.
Arming is not reversed by continuing to hold the keytag in front of the keypad. You must remove the keytag from
the keypad for a moment and then swipe again.
After arming, swiping your keytag a second time during the arming sequence will disararm your system.
IF THERE IS A FAULT
WHEN ARMING THE
SYSTEM
If the system detects a fault on arming, it will allow you to
proceed to arm the alarm system.
The keypad emits a fault tone (rapid succession of
beeps) after the acknowledgement tone.
Check that all doors and windows equipped with
door contacts are closed.
Begin arming the alarm again. If the fault tones
continue contact our Customer Support department.
DISARMING USING YOUR
USER CODE OR KEYTAG
How to disarm the system:
Enter a valid user code or use your keytag.
The keypad gives a disarmed tone and green light
goes out.
Note: The installation engineer will have programmed
an entry delay so you have time to disarm the system on
entry.
EVEN IF THE SIREN IS TURNED OFF, THIS DOES
NOT STOP THE TRANSMISSION OF THE ALARM SIGNAL
TO PHONEWATC H.
NOTE:
Always turn the system o when you enter your home.
Always ensure that disarming is followed by the
disarmed tone.
The status is not reversed by continuing to hold the
keytag in front of the keypad.
You must remove the keytag from the keypad for a
moment and then swipe again.
RESETTING THE SYSTEM
AFTER AN ACTIVATION
If one of the lights on the control unit, 1, 2, 3 or 4, is
blinking slowly, this means that your alarm has been
activated (see page 9 for more details about the lights).
If there is an alarm activation in the memory, the system
cannot be armed until it has been reset.
In order to reset the system, all you need to do is disarm it
by using a valid user code or a keytag. If there is more than
one alarm activation in the memory, repeat this for every
one until lights 1, 2, 3 and 4 have all stopped blinking
slowly.
PROTECTION AGAINST
USE OF THE WRONG
USER CODE
If you enter the wrong user code 5 times in succession
or use non-registered keytags 5 times in succession,
the keypad is locked for 5 minutes and a sound alarm is
triggered.
6 7

PANIC
You can activate a panic alarm at any time, even if the
system is not armed:
Press and hold down and at the same time.
The siren sounds (depending on conguration, this
function can be deactivated).
An activation alarm is sent to the PhoneWatch Alarm
Receiving Centre.
PROGRAMMABLE
FUNCTIONS
WARNING: The system goes out of programming
mode after 20 seconds if you do not press any keys
during this time, and the red light goes o. If this
happens, you must repeat all the steps.
In programming mode, the user can alter the beep tone
level for all sensors connected to the system (only for units
with beep function) and congure the chime function.
Enter programming mode:
Press and hold down and at the same time.
A double beep sounds and lights 1, 2, 3 and 4 start
blinking.
Exit programming mode:
Press twice.
A double beep sounds and lights 1, 2, 3 and 4 stop
blinking.
Adjust beep tone level on keypad:
Enter programming mode.
Press Away arming button the required number
of times to identify the sensor you wish to adjust the
beep tone level of (each sensor gives a beep as soon as
it is selected).
EXAMPLE: If you wish to adjust the beep tone level for
sensor 2 press the button twice. Sensor 2 gives a
beep to conrm that it has been selected.
Lights 1, 2, 3 and 4 start to blink.
Press a button from to to select the beep
tone level (1 = min., 7 = max.)
The selected sensor gives a beep to conrm the beep
tone level.
Exit programming mode.
Turning the chime on/o:
A chime sounds on the keypad every time you open a
contact sensor eg. front door.
Enter programming mode.
Press the Home arming button.
Lights 1, 2, 3 and 4 start to blink and there is a long
beep.
Press to turn the chime on or to turn the
chime o.
There is a long beep.
Exit programming mode.
INDICATOR LIGHTS
The keypad has indicator lights to show the status of the alarm system.
LIGHT 1 LIGHT 2
LIGHT 3 LIGHT 4
Lights 2, 3 and 4 indicate faults that are in the memory. The lights are only active when the system is not active and
during the arming and disarming phases. When the system is armed, the indicator lights go o after a few seconds.
LIGHT 1“SYSTEM ARMED”
ALIGHT: The entire system is armed (Away).
BLINKING SLOWLY: Part of the system is armed (Home).
OFF: System is disarmed.
LIGHT 2“SYSTEM FAULT”
ALIGHT: There is a fault in the system.
Faults include battery or power failure, signal transmission failure, GSM/GPRS failure. If this light
stays on, contact PhoneWatch.
BLINKING SLOWLY: There is a fault registered in the system’s memory that must be reset.
OFF: No fault.
LIGHT 3“ALARM ACTIVATED”
ALIGHT: The alarm has been activated or a sensor in the system has been activated. This
includes opening a door contact, a motion sensor or a smoke alarm sensor.
BLINKING SLOWLY: There is an alarm activation registered in the system’s memory that must
be reset.
OFF: No alarm activation.
LIGHT 4“TAMPER WARNING”
ALIGHT: There is a tamper alarm on the system.
BLINKING SLOWLY: There is a fault registered in the system’s memory that must
be reset.
OFF: No tamper message.
Note: See page 7 for resetting system after activation.
89

KEYPAD TONES
Each time you arm your alarm panel (Away or Home) you
will hear code acknowledgment tones prior to the arming
tone.
Arming
On arming...one beep per second
Arming of the Away function: the beeps continue until the
outer door is closed.
Arming of the Home function: the beeps continue for 30
seconds* until the system is armed.
Activation Completed
After the last door is closed, three rapid beeps
Conrms that the system is armed when the outer door is
closed.
Entry Delay
On entry...one beep per second
This entry tone continues for 30 seconds* after you have
opened the outer door. You must disarm the system
during this time.
*Dened by the user on installation
Disarming
Long, continuous beep
Duration: 2.5 seconds
Conrms that the system has been properly disarmed.
Fault
7 rapid beeps followed by 7 more
This indicates a fault in the system.
Alert
4 beeps in the event of alarm activation sent via the
keypad
Conrms the transmission of an alarm activation to
PhoneWatch.
10
INFORMATION AND
MAINTENANCE
CLEANING THE KEYPAD
Use only a dry cloth (no cleaning products) to clean the keypad/control unit.
11

The remote control can be used to arm or disarm the alarm system, or to activate an
audible or silent alarm.
The remote control is an optional extra.
USING THE
REMOTE CONTROL
with 3 indicator lights
DISARMING AFTER
THE ALARM HAS BEEN
ACTIVATED
If the alarm has been activated during your absence:
When you press the disarm button , all three lights
blink slowly.
The system is not disarmed on the rst attempt (this is
to avoid beep tones sounding which might attract an
intruder’s attention).
To conrm disarming, press the button once again.
The associated light blinks rapidly while
communicating with the control unit and then
remains lit for 3 seconds to conrm disarming.
CHECKING THE STATUS OF
YOUR SYSTEM
To check the status of your system, hold down the
control button for 2 seconds.
All three lights, light several times in succession,
then the light on the remote that indicates armed or
disarmed stays lit for 3 seconds.
PANIC ALARM
You can activate a panic alarm at any time, even if the
system is not armed:
Hold down the buttons and
at the same time for 2 seconds.
Depending on how it is congured, the siren on the
keypad may be activated.
An alarm signal is sent to PhoneWatch.
ARMING ALL OR PART OF
THE SYSTEM
Note that when using this remote control, arming occurs
immediately i.e. there is no delay. Only arm the system
when you are outside the area to be secured.
Arming all or part of the system:
Press the Away button for full arm or the
Home button for part arm.
The associated light blinks while communicating with
the control unit and then remains lit for 3 seconds to
confirm that the system is armed.
The arming tone is given by the control unit.
DISARM
To disarm all or part of the system, press the Disarm
button .
The associated light blinks while communicating with
the keypad/control unit and then remains lit for 3
seconds to conrm the instruction.
The disarmed tone is given by the keypad/control
unit.
12 13

HOW THE SENSORS
WORK
1. DOOR CONTACT
A door contact is a magnetic contact consisting
of two parts. One part is xed to the door frame
and the other to the door itself. When the door or
window is opened, the sensor is activated.
Always ensure that all doors and windows are
closed before you set your alarm.
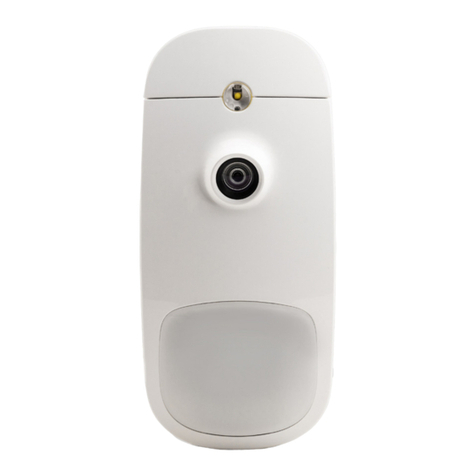
2. MOTION SENSOR WITH
CAMERA
A motion sensor, with a built-in camera, reacts
to temperature uctuations caused by a person
moving around.
When this sensor is activated, it simultaneously
takes photographs that are transmitted to the
PhoneWatch Alarm Receiving Centre.
3. SMOKE ALARM SENSOR
A smoke alarm sensor is tted to the ceiling. It
covers up to 50 square metres in an open area.
This sensor can react to steam/cooking fumes.
Avoid smoking in the vicinity of this sensor.
4. GLASS BREAK SENSOR
A glass break sensor detects the sounds
frequencies emitted when glass is broken.
5. CONTACT SENSOR
A contact sensor detects opening and closing of
doors (and windows if used as a window sensor).
14 15

MAINTENANCE AND
RECOMMENDATIONS
We recommend you test your alarm system weekly. Prior to testing, contact our Customer Support department
during normal business hours on 1850 753 753.
Avoid impacts to the components and ensure especially that you do not drop the wireless remote control.
No component should be immersed in water.
Only use a dry cloth to clean components (not cleaning products).
Keep clean and dry at room temperature.
Used batteries should be disposed of in the correct way.
Avoid prolonged exposure to the sound of the siren.
Do not hide motion sensors behind curtains, furniture etc.
Components must not be painted or papered over.
Do not try to open or move components.
Components are protected against tamper and some could cause electric shock.
THE PHONEWATCH
ALARM APP
For details on how to download and access the PhoneWatch Alarm App, go to www.phonewatch.ie/app.
With the PhoneWatch Alarm App you can see the current status of your alarm, when it was last switched o or on and
you can even arm or disarm it all from the palm of your hand!
Any member of your family with a smartphone can also download and use the App via your login details. Just make sure
you keep them secure and only known to your own trusted users.
FUNCTIONS
Events
Displays the history of when your alarm was armed or disarmed.
Status
Displays the current status of your alarm (armed/disarmed). You can also arm/disarm your alarm from this screen. To arm
click‘Arm’ and to disarm, click‘Disarm’. At each action you will be required to enter your App user code. The screen will
switch from red to green in the case of‘disarm’and vice versa for arming.
Other features
The App includes access to useful FAQs for an alarm and contact details for PhoneWatch Customer Support.
Notications of alarm system events (such as arming and disarming) are sent to your phone (when you’re on 3G or WiFi).
You also have visibility of which keytag was used to arm/disarm.
16 17

NOTESNOTES
18 19
Other PhoneWatch Security System manuals
Popular Security System manuals by other brands

stabo
stabo multifon security II user manual

Alderon Industries
Alderon Industries VersAlarm I/O VLIO-0001 quick start guide

Apricorn
Apricorn Aegis Secure Key quick start guide

DMP Electronics
DMP Electronics DUALCOM Series Compliance Listing Guide

Lorex
Lorex L20WD800 Series instruction manual

Comtronics
Comtronics 246550 installation instructions