Phonic Ear OtiC Instruction Manual

Quick start installation guide for
OtiC counter communication system
System components
MIC
18V DC LOOP Handset
© 2008 Phonic Ear Inc. Phonic Ear and the names of Phonic Ear products are trademarks or registered trademarks of Phonic Ear Inc. in the U.S.and other countries. 921-34-910-00 Rev.A 0508
International +45 3917 7101
MIC
18V DC LOOP Handset
MIC
18V DC LOOP Handset
MIC
18V DC LOOP Handset
Counter
MIC
18V DC LOOP Handset
Continued on the back side
OtiC is a simple counter loop amplifying system developed to improve communication between people with a hearing loss and cus-
tomer service staff in public places (i.e., banks, public transportation terminals). OtiC facilitates communication in places where noise,
reverberation, or other barriers make clear speech difficult. Using OtiC ensures that speech is transmitted directly to the listener’s ear.
The user group for OtiC is both people with and without a hearing aid. People with a hearing aid with a T-function (telecoil) or people
using another inductive receiver (i.e.; HearIt MT) can use the OtiC system directly. People without a hearing aid or with a hearing aid
without a telecoil can use the OtiC system through an amplified handset.
Package content:
Goose neck microphone
Cable to goose neck microphone
OtiC amplifier
Handset
Handset wall bracket with screws
Handset wall outlet
Cable to handset wall outlet
Counter Loop pad
Loop wire and nails
Power supply
Installation/setup
Connect the microphone cable to the
goose neck microphone. Connect the other end of the micro-
phone cable to the connection marked
“Mic” on the OtiC amplifier.
1. 2. 3. Connect the telephone cable to the
connection marked “Handset” on the
OtiC amplifier.
Connect the powerjack to the connec-
tion marked “18V DC” on the OtiC
amplifier.
Install the OtiC amplifier e.g. under
the table.
4. 5. 6.
OtiC amplifier
Handset
Goose neck
microphone
Handset wall outlet
Power supply
Cable to goose neck microphone
Handset wall
bracket with
screws
Cable to handset
wall outlet
Loop wire and nails
Loop wire
Loop wire
Set up the loop wire under the table,
or on the floor under the table.
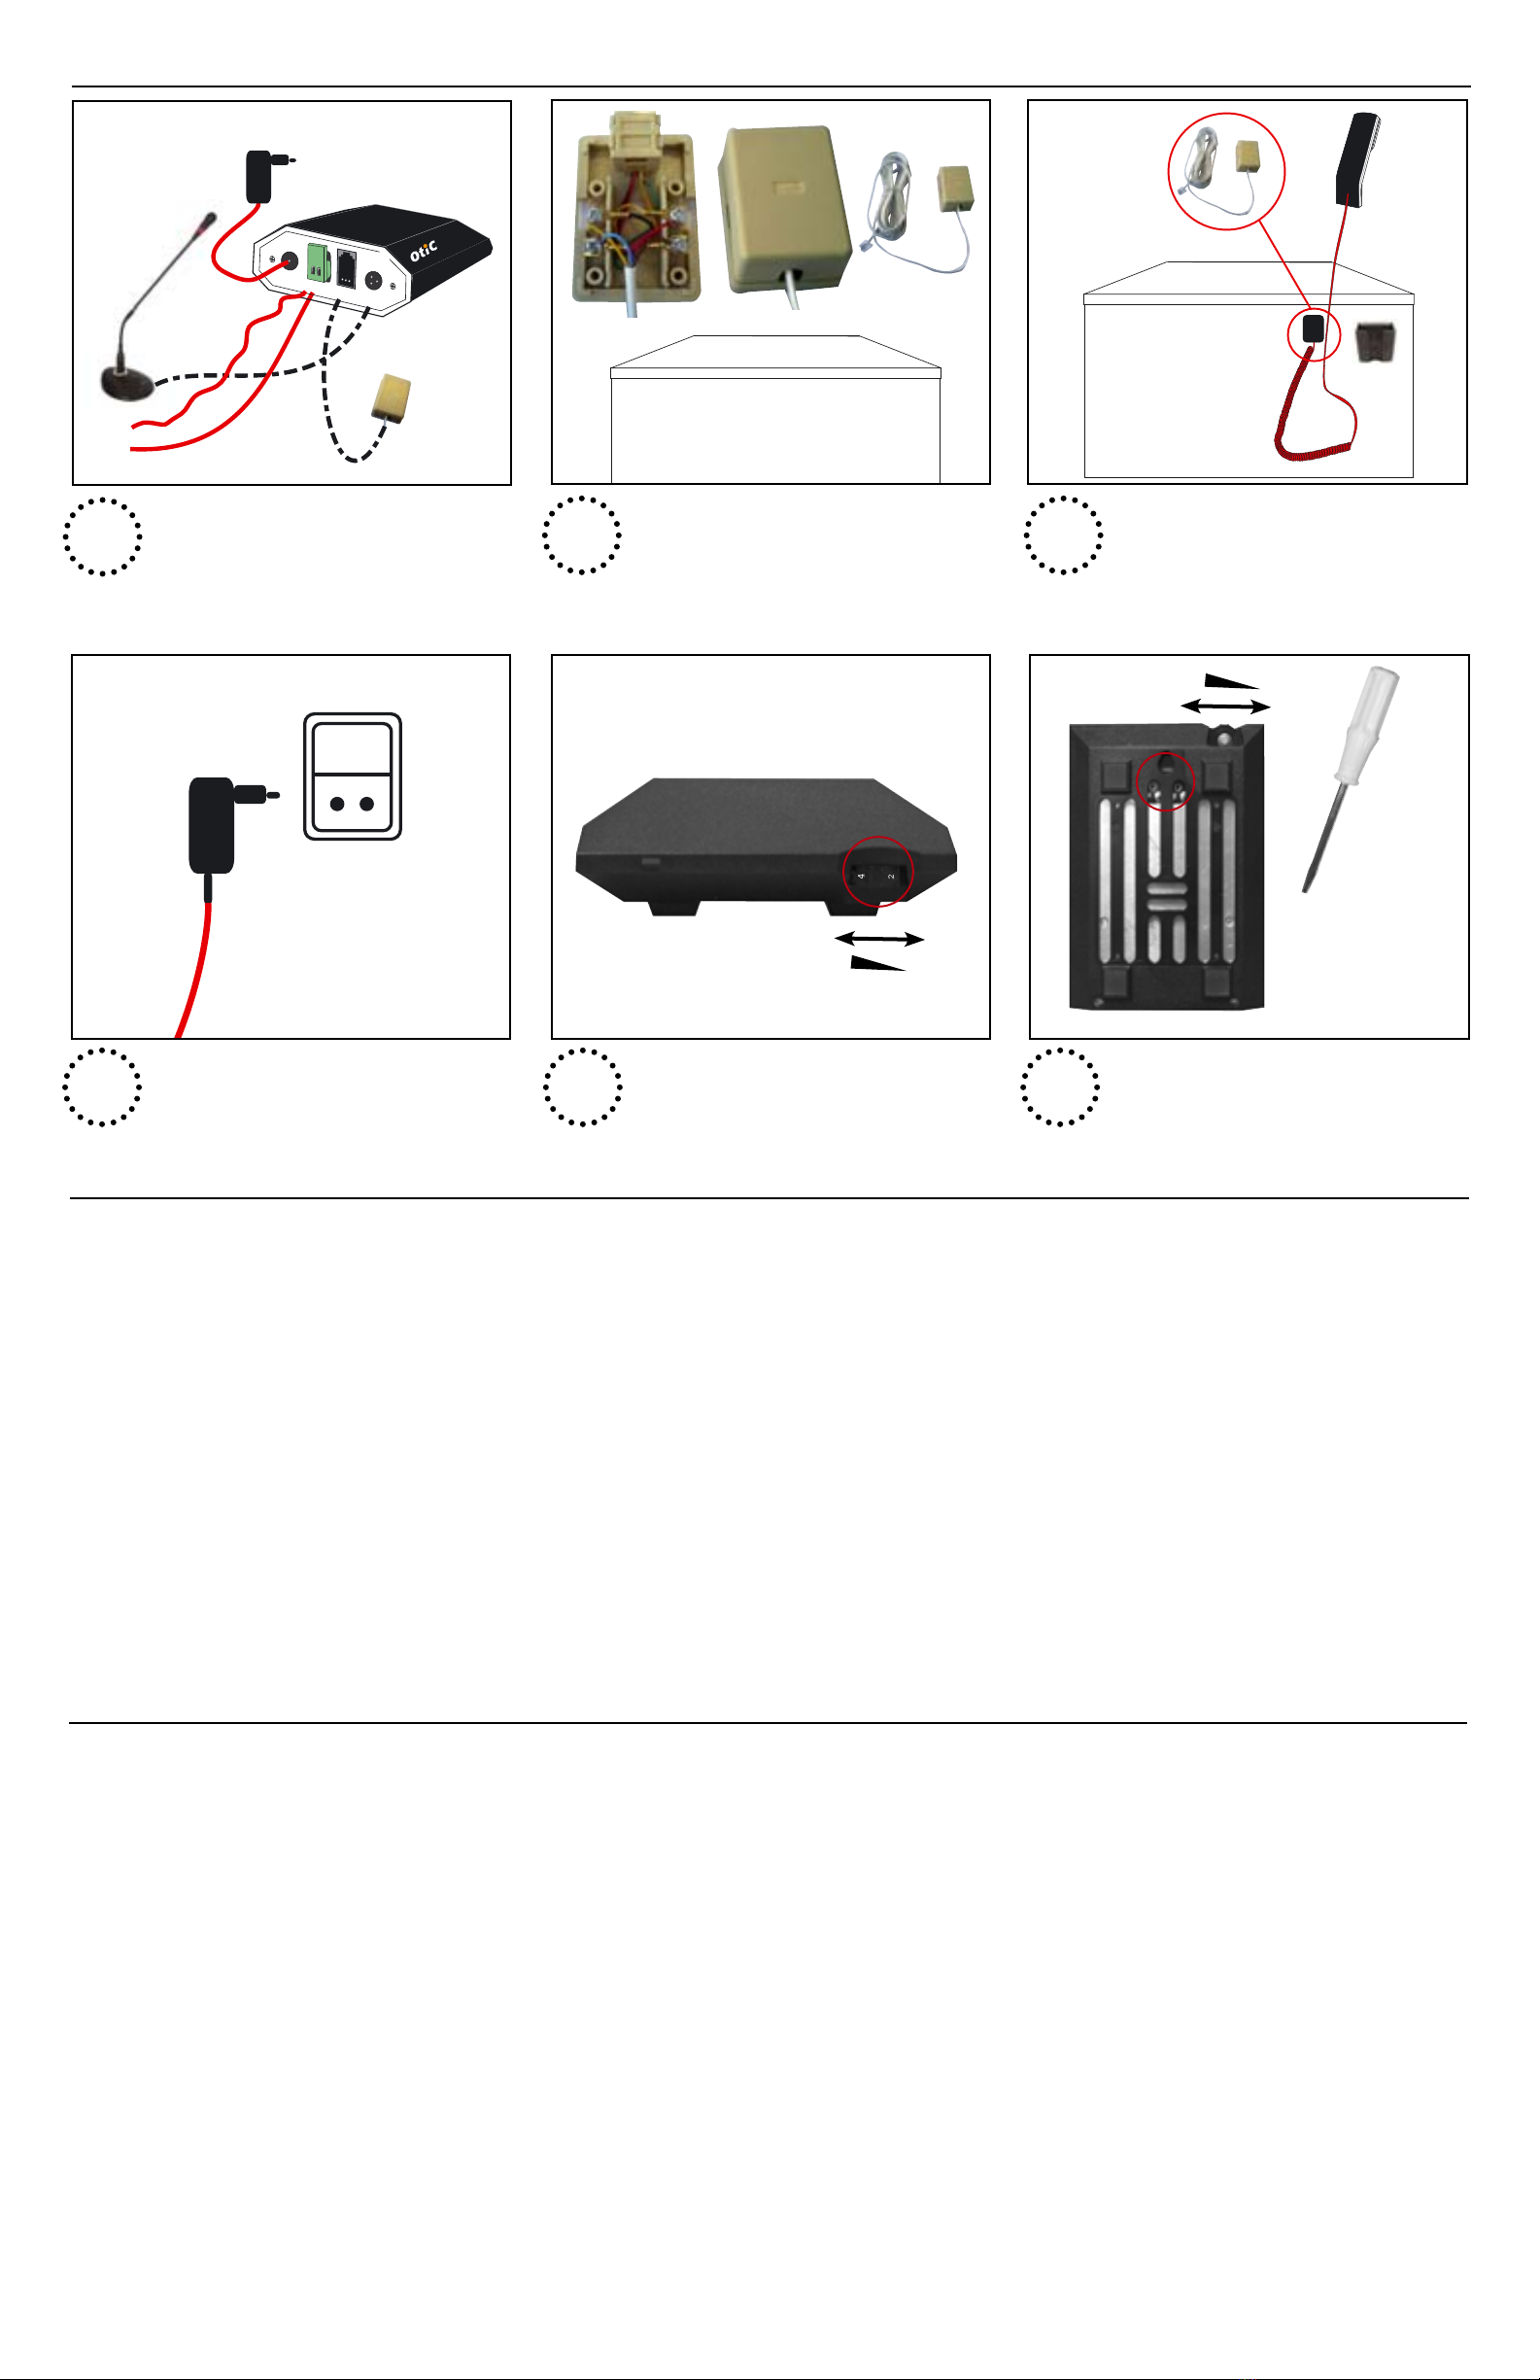
Installation/setup
Install the telephone wall outlet. Screw the
cable inside and click on cover. Note color
coding when attaching telephone cable.
Install telephone wall outlet with telephone
cable entry pointing downwards beside
the handset bracket.
Install the telephone handset bracket
on the wall and connect the handset
cable to the telephone wall outlet.
7. 8. 9.
Electricians
Follow the installation guide above. Make
sure that the amplifying level on the field
box is installed at the right level and that
the customer service does not change this
level. Make sure that they know what to
do, if the level is changed.
Customer service staff (every day users)
OtiC is extremely easy to use. The electri-
cian has to make sure that the amplifying
volume on the field box is adjusted to the
right level. Customer service must
make sure that the system is switched
on. When the customer wants to use the
OtiC system the customer service only has
to switch on the goose neck microphone
and speak clearly and directly into the
microphone. When the conversation is
over, customer service has to switch off the
microphone.
If the customer has a problem hearing
what is being said using the loop mic,
make sure that the customers hearing aid
is in T-position. Another issue could be that
the amplifying level on the field box is not
adjusted to the right level.
Customers with a hearing loss
Put the hearing aid in T-position (Telecoil).
If the hearing aid does not have a Telecoil
or if the users do not have a hearing aid,
use the handset instead.
Connect the power supply to mains. Set the correct volume on the OtiC
amplifier.
10. 11. 12. Flip the amplifier over to adjust the bass
and treble.
Note:
Use the enclosed
screwdriver to make
this adjustment.
Operations
OTICis approved and CE marked in accordance with the relevant
directives.
Phonic Ear A/S
Kongebakken 9
2765 Smørum
Denmark
Test and approval
Electrical and electronic equipment (EEE) contains
materials, components and substances, that could
be dangerous or detrimental to human health and
the environment if waste electrical and electronic
equipment (WEEE) is not disposed of correctly.
Products marked with the crossed-out dustbin shown
below are electrical and electronic equipment. The
crossed-out dustbin indicates that waste electrical
and electronic equipment may not be disposed of
with unsorted household waste and that it must be
collected separately.
In developing and manufacturing your Phonic
Ear product, we used high-quality materials and
components that can be reused. Thus, when
disposing of your waste electrical and electronic
equipment, you must use a collection system
designated for this purpose, regardless of whether
you dispose of your waste at your local waste site or
it is collected from your home. Please contact your
local authority for further information.
A two-year limited warranty is issued to the original consumer of
this product by Phonic Ear.
time period of warranty
This warranty will go into effect upon the date of original
purchase of this equipment, and will remain in effect for five
calendar years from that date as long as the instrument remains
the property of the original consumer.
what is covered by this warranty
Any electronic component which, because of workmanship,
manufacturing, or design defects, fails to function properly under
normal use during the life of this warranty will be replaced or
repaired at no charge for parts or labour when returned to the
factory service center. Transportation in is paid by the customer.
If it is determined that repair is not feasible, the entire unit may
be replaced with an equivalent unit upon
mutual agreement of the manufacturer and customer.
what is not covered by this warranty
1. Malfunctions resulting from abuse, neglect, or accident.
2. Peripheral accessories as itemized within the product
brochure, when such items are returned after 90 days
from the original purchase.
3. Batteries.
4. Instruments connected, installed, used, or adjusted in a
manner contrary to instructions provided by the
manufacturer.
5. Consequential damages and damages resulting from delay
or loss of this instrument. The exclusive remedy under this
warranty is strictly limited to repair or replacement as herein
provided.
6. Products damaged in transit unless investigated by the
shipper and returned to the warrantor with the investigation
report.
Phonic Ear reserves the right to make changes in the design
or construction of any of its instruments at any time without
incurring any obligation to make any changes whatsoever on
units previously purchased. This warranty is in lieu of all other
expressed warranties. All expressed and implied warranties
will terminate upon the expiration of this written warranty. No
representative or person is authorized to represent or assume for
us any liability in connection with the sale or use of our products
other than as set forth above.
The above warranty does not affect any legal rights that you
might have under applicable national legislation governing sale
of consumer goods. Your distributor may have issued a warranty
that goes beyond the clauses of this limited warranty. Please
consult your distributor for further information.
what to do if you need service
If you require service under the terms of this warranty, carefully
package the instrument to prevent damage and return it to your
distributor (see information on back cover). Please provide your
receipt, a detailed description of the problem, your full name,
billing address and telephone number.
Warranty
MIC
18V DC LOOP Handset
Connect the loop mic connector to
the connection marked “Loop” on the
OtiC amplifier.
Table of contents
Other Phonic Ear Hearing Aid manuals

Phonic Ear
Phonic Ear PE 210 User manual

Phonic Ear
Phonic Ear Hearit M User manual

Phonic Ear
Phonic Ear Silhouette User manual

Phonic Ear
Phonic Ear LEXIS User manual

Phonic Ear
Phonic Ear PE 400R User manual

Phonic Ear
Phonic Ear PE 602R User manual

Phonic Ear
Phonic Ear HearIt Media User manual

Phonic Ear
Phonic Ear PE 800R User manual

Phonic Ear
Phonic Ear FTS01 Instruction Manual
Phonic Ear
Phonic Ear sprite PE 800R User manual


