IntriCon Lumen 155 User manual

22980_A
User Manual

Introduction to this booklet
The User Manual guides you in how to use and maintain your new hearing device. Please read the User Manual
carefully. This will help you achieve the full benefit of your new hearing device.
Your hearing healthcare provider has adjusted your hearing device to meet your specific needs. If you have additional
questions or wish to report an unexpected operation or event, please contact your hearing healthcare provider.
Please Note:
The use of hearing devices is only part of hearing rehabilitation; auditory training, lip reading
instruction, and learning to interpret gesture cues may be required as well.
In most cases, infrequent use of hearing devices does not provide full benefit. Once you have become
used to wearing your hearing devices, wear your hearing devices all day every day.
Your hearing devices use the most modern components to provide the best possible sound quality in
every listening situation. However, communication devices such as digital cell phones can create
interference (a buzzing sound) in hearing devices. If you experience interference from a cell phone
being used close by, you can minimize this interference in a number of ways. Switch your hearing
devices to another program, turn you heard in a different direction or locate the cell phone and move
away from it.

Intended Use
Hearing devices are sound-amplifying devices intended to compensate for impaired hearing. A hearing device will not
restore normal hearing, and will not prevent or improve biologic hearing sensitivity resulting from damage.
Hearing Device Purchase & Warranty Information
Left Hearing Device Right Hearing Device
Date Purchased:
Place UDI label or record serial
number here:
Place UDI label or record serial
number here:
NOTE: the FDA’s Universal Device Identification (UDI) system is intended to provide rapid and accurate identification of
medical devices, including hearing aids, using the unique UDI number, and to provide easy access to important
information about the device through the Access GUDID portal located at https://accessgudid.nlm.nih.gov/. Please
retain a copy of your UDI label(s) here.
For more information on warranty for your hearing device(s), please refer to the “Service and Warranty” section.

Table of Contents
Introduction to this booklet .................................................................................................................................................... 2
Intended Use ........................................................................................................................................................................... 3
Hearing Device Purchase & Warranty Information ................................................................................................................ 3
Quick Reference ...................................................................................................................................................................... 5
Your Hearing Device at a Glance ............................................................................................................................................. 6
Turning Your Hearing Device On and Off ................................................................................................................................ 7
Battery ..................................................................................................................................................................................... 8
Low battery indicator .............................................................................................................................................................. 9
Wearing Hearing Device ....................................................................................................................................................... 10
Operating Instructions – Volume Control ............................................................................................................................. 11
Operating Instructions – Program Controls .......................................................................................................................... 12
Maintaining Your Hearing Device ......................................................................................................................................... 13
Maintaining Your Hearing Device with a Thin Tube ............................................................................................................. 14
Maintaining Your Hearing Device with an Earmold .............................................................................................................. 16
Using with Telephones and Cellular Phones ......................................................................................................................... 17
Airplane Mode ...................................................................................................................................................................... 18
Labeling ................................................................................................................................................................................. 19
Optional accessories ............................................................................................................................................................. 20
Optional Accessories: Companion Microphone CM-1 ...................................................................................................... 21
Optional Accessories: Mobile App .................................................................................................................................... 22
Caring for your Hearing Device ............................................................................................................................................. 23
Trouble Shooting ................................................................................................................................................................... 24
Precautions ........................................................................................................................................................................... 25
Warnings ............................................................................................................................................................................... 26
Service and Warranty ............................................................................................................................................................ 27
Compliance Information ....................................................................................................................................................... 28
FCC Information: ............................................................................................................................................................... 31
Information and Description of Symbols .......................................................................................................................... 32
Technical Information ........................................................................................................................................................... 34
Technical Information ........................................................................................................................................................... 35

5
Quick Reference
Battery Size: 312
Changing Battery: Battery Warnings:
On/Off
Device Controls Operations
Low Battery
3 double beeps every 8 minutes
Replace Battery
(Device Shutdown – 8 beeps)
ON/Battery Door Closed OFF/Battery Door Partly Open Fully Open
Program Button
Volume Button

6
Your Hearing Device at a Glance
1. Receiver – The receiver delivers amplified sound through the tubing to the ear canal.
2. Microphone – Sound enters the hearing device through the microphone.
3. Program control – Press to change programs.
4. Volume control – Press the button to increase volume. Once the volume reaches maximum volume, the volume
will reset to the lowest volume setting.
5. Battery door – The battery is inserted here and functions as the on/off switch when operating the device. A (+)
indicator corresponds to the positive side of the battery. A small hole may be filled with a colored plug to be
used as an optional indicator for the right or left ear.
6. Thin tube and Dome tip – Each hearing device comes with a thin tube and dome tip that connects to the hearing
device receiver. Sound travels through the tubing into your ear canal.
7. Retention loop – Keeps the tubing securely in place on or over the ear.
8. Earhook – The hearing device is also available with an earhook that connects to the hearing device receiver.
For additional information on the use and operation of these hearing devices after reviewing
the contents of this instruction guide, contact your hearing healthcare provider, or visit
www.intricon.com.
1 2
3
5
8
6
5
7
4
7
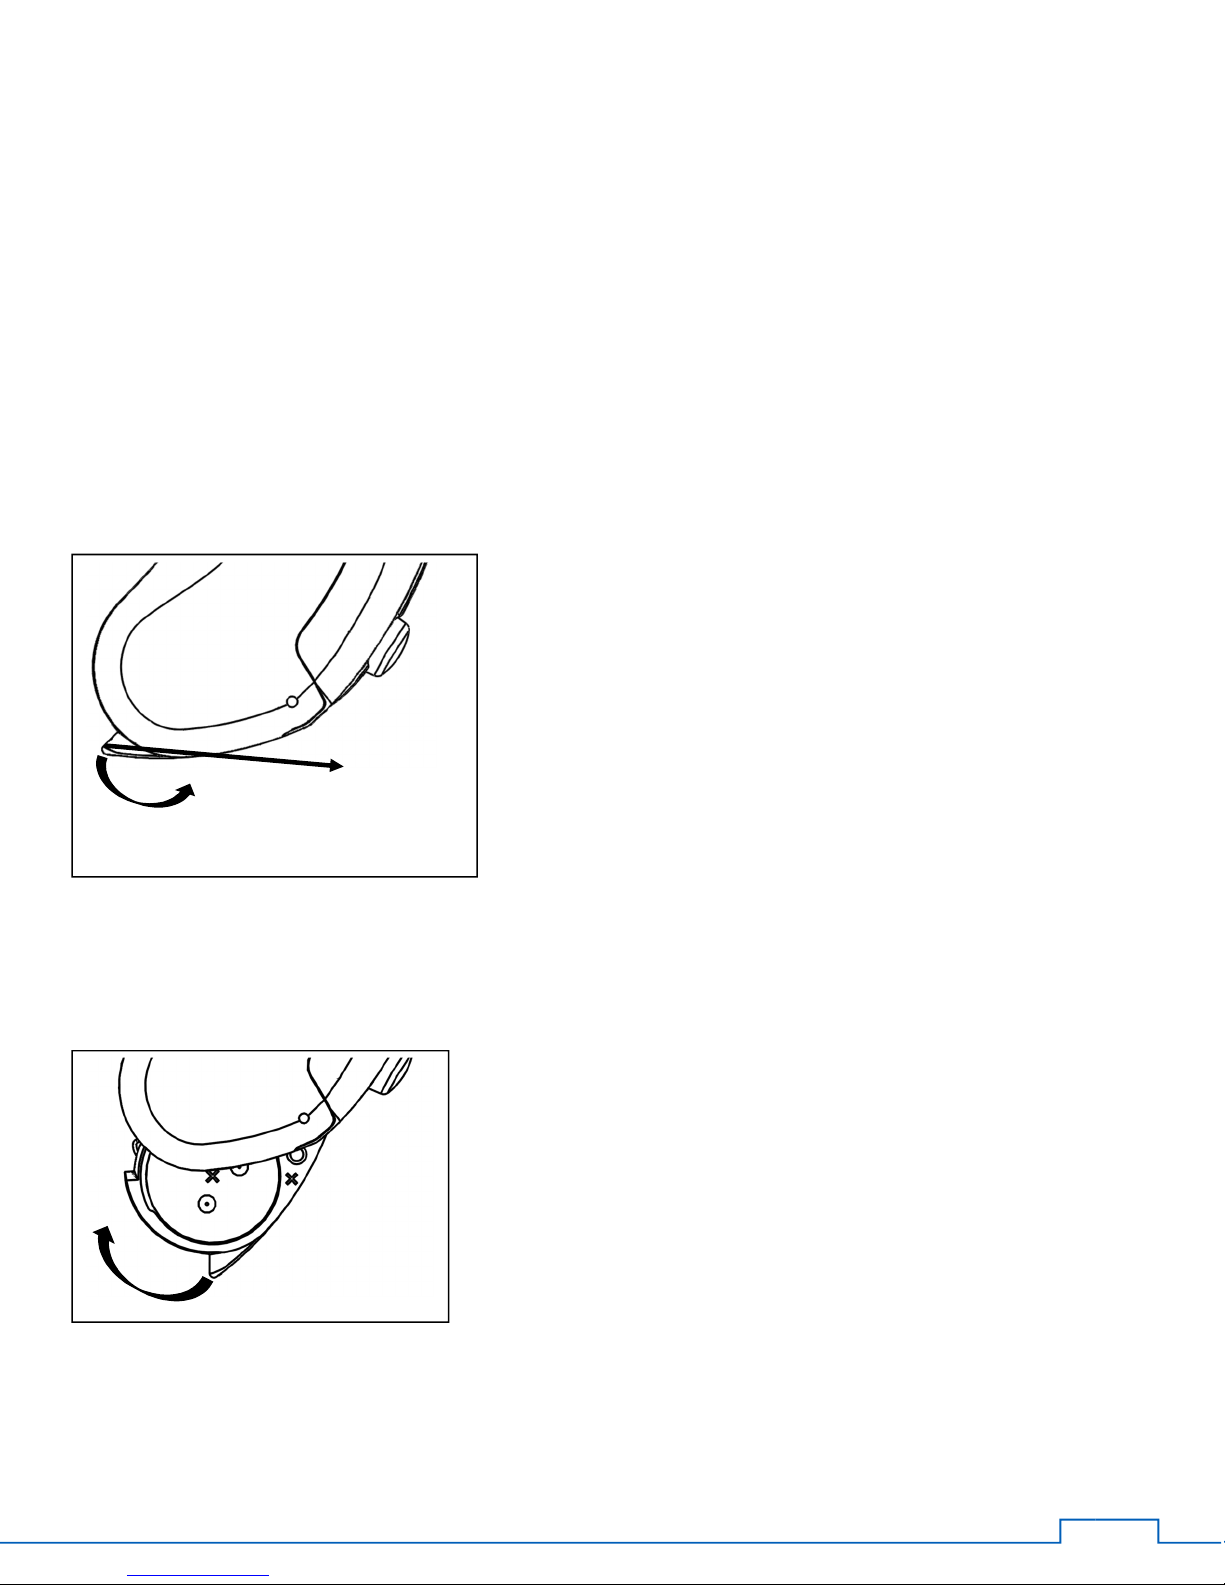
Turning Your Hearing Device On and Off
Your hearing device has a battery door that acts as an on/off switch. When turning your hearing device on and off, grasp
the top and bottom of the device with your index finger and thumb and use your other hand to open the battery door by
pulling out on the finger tab. Close the battery door by gently pushing the door into the device.
ON: Close battery door fully
It may take several seconds before the hearing device turns on
after inserting the battery and closing the battery door.
Each time the hearing device is turned on, the device will attempt
to pair with any accessories that are in pairing mode (refer to page
22 for Pairing Mode).
NOTE: Your hearing healthcare provider can change the startup
delay if required.
OFF: Open the battery door
To turn off the hearing device, the battery door should be at least
half way open before it is turned off.
finger tab
8
Figure shows Step 3 in the directions above.
Battery
The hearing device uses a size 312 battery. The battery life varies, depending on the amount of time the hearing device
is used. Battery life is typically 5-8 days long in hearing device mode.
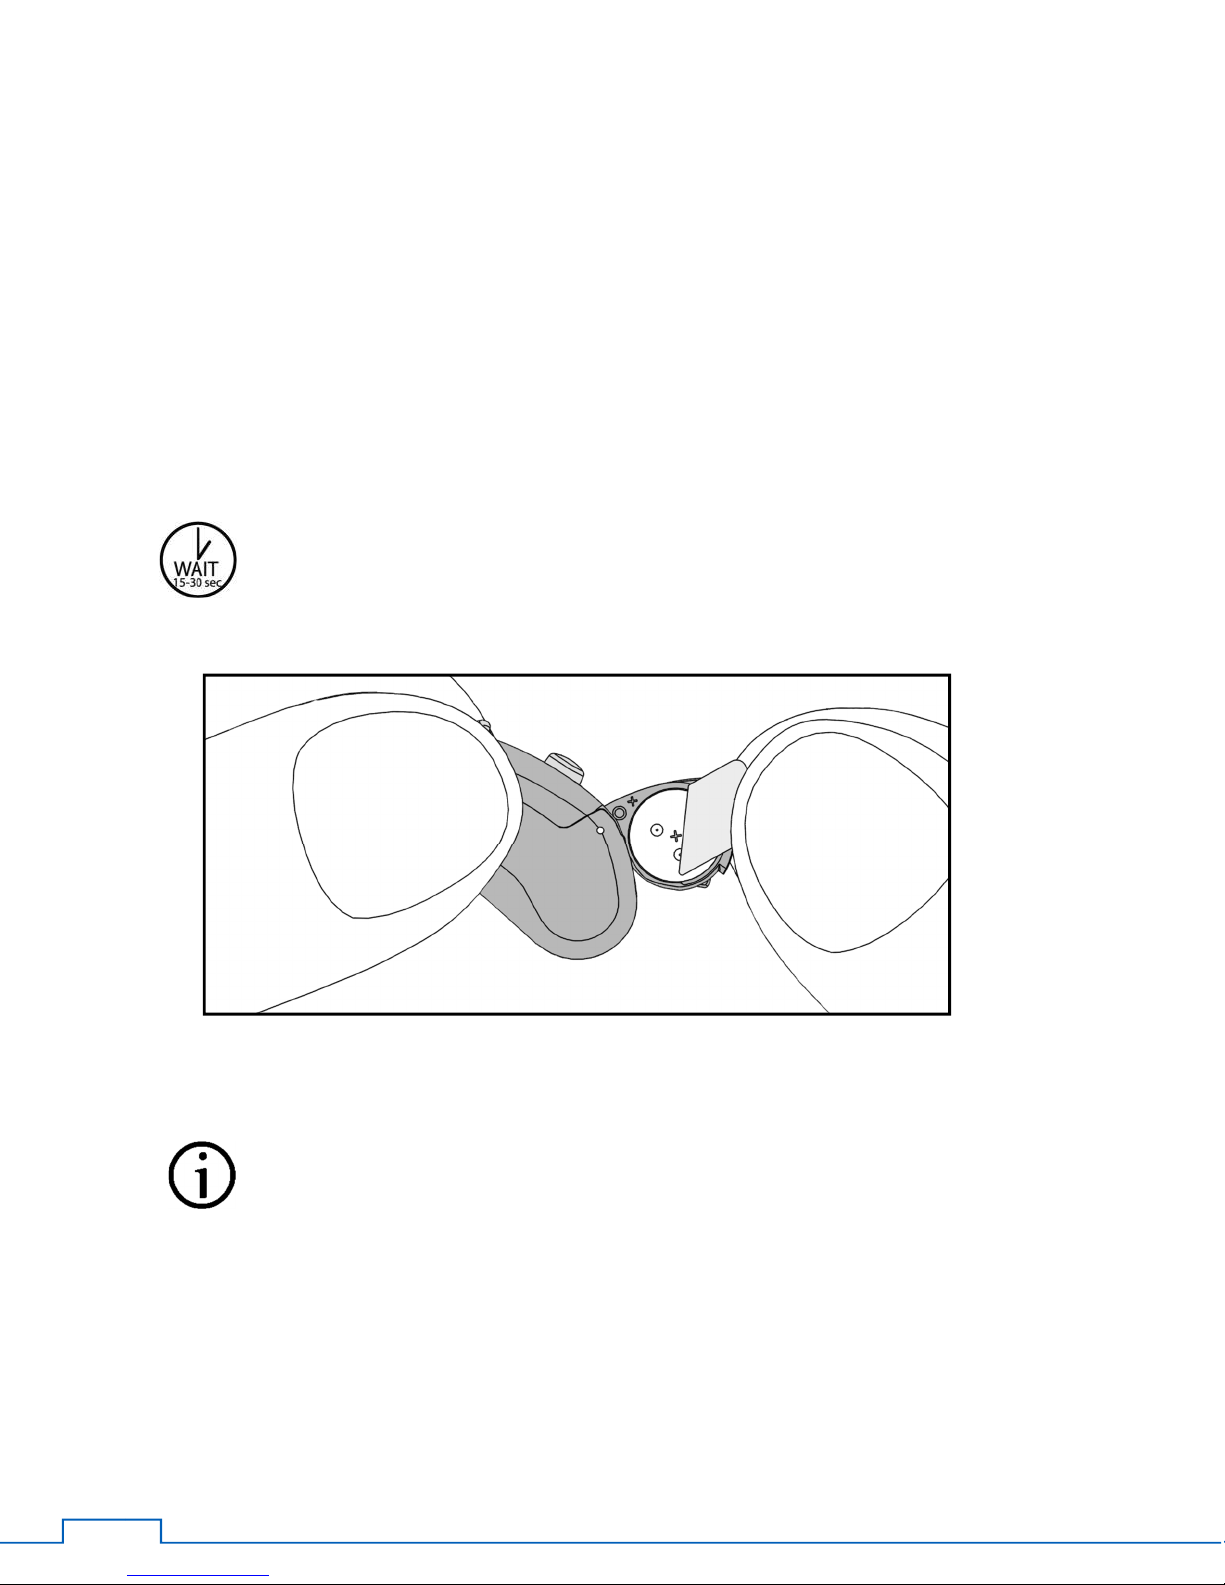
Inserting/replacing the battery:
1. Gently pull open the battery door with your fingernail. Remove the old battery, if present.
2. Insert the new battery into the battery compartment with the (+) sign on the battery facing the same way as the
(+) sign on the battery door. While holding the battery in place, peel off the tab. (As shown in the figure below.)
To ensure best battery performance, wait 15-30 seconds before closing the battery door after
peeling the plastic tab. If the door does not close easily, check to see if the battery was inserted
properly.
3. Close the battery door.
Tip: To prolong battery life, remember to turn your hearing device off when not in use.
Remove the batteries and keep the battery door open will not only conserve the battery’s
life but also allow internal moisture to evaporate.
Tip: Since the battery sits in the battery door, the door should be opened gently and slowly
so that the battery does not fall out.
9
Low battery indicator
The chart below shows the low battery indicator available in your hearing device.
Voice Prompt ON Voice Prompt OFF
When the battery is low, a warning will be repeated
on your hearing device every eight minutes to
indicate that the battery needs to be replaced.
“Low battery” 3 double beeps
If you do not change the battery, you will hear
another warning at which your hearing device will
automatically turn off.
“Replace battery” 6 double beeps
Tip: It is recommended for you to carry spare batteries on hand to make sure that the hearing device(s)
are functional at all times and in all locations.
Tip: Open battery door when your hearing device is not in use in order to save battery life.
Warning: Do not place batteries in your mouth or swallow them under any circumstances. If batteries are
swallowed, contact local poison control center immediately.
Dispose used batteries as you would other electronic waste that potentially contains rare earth metals.
10
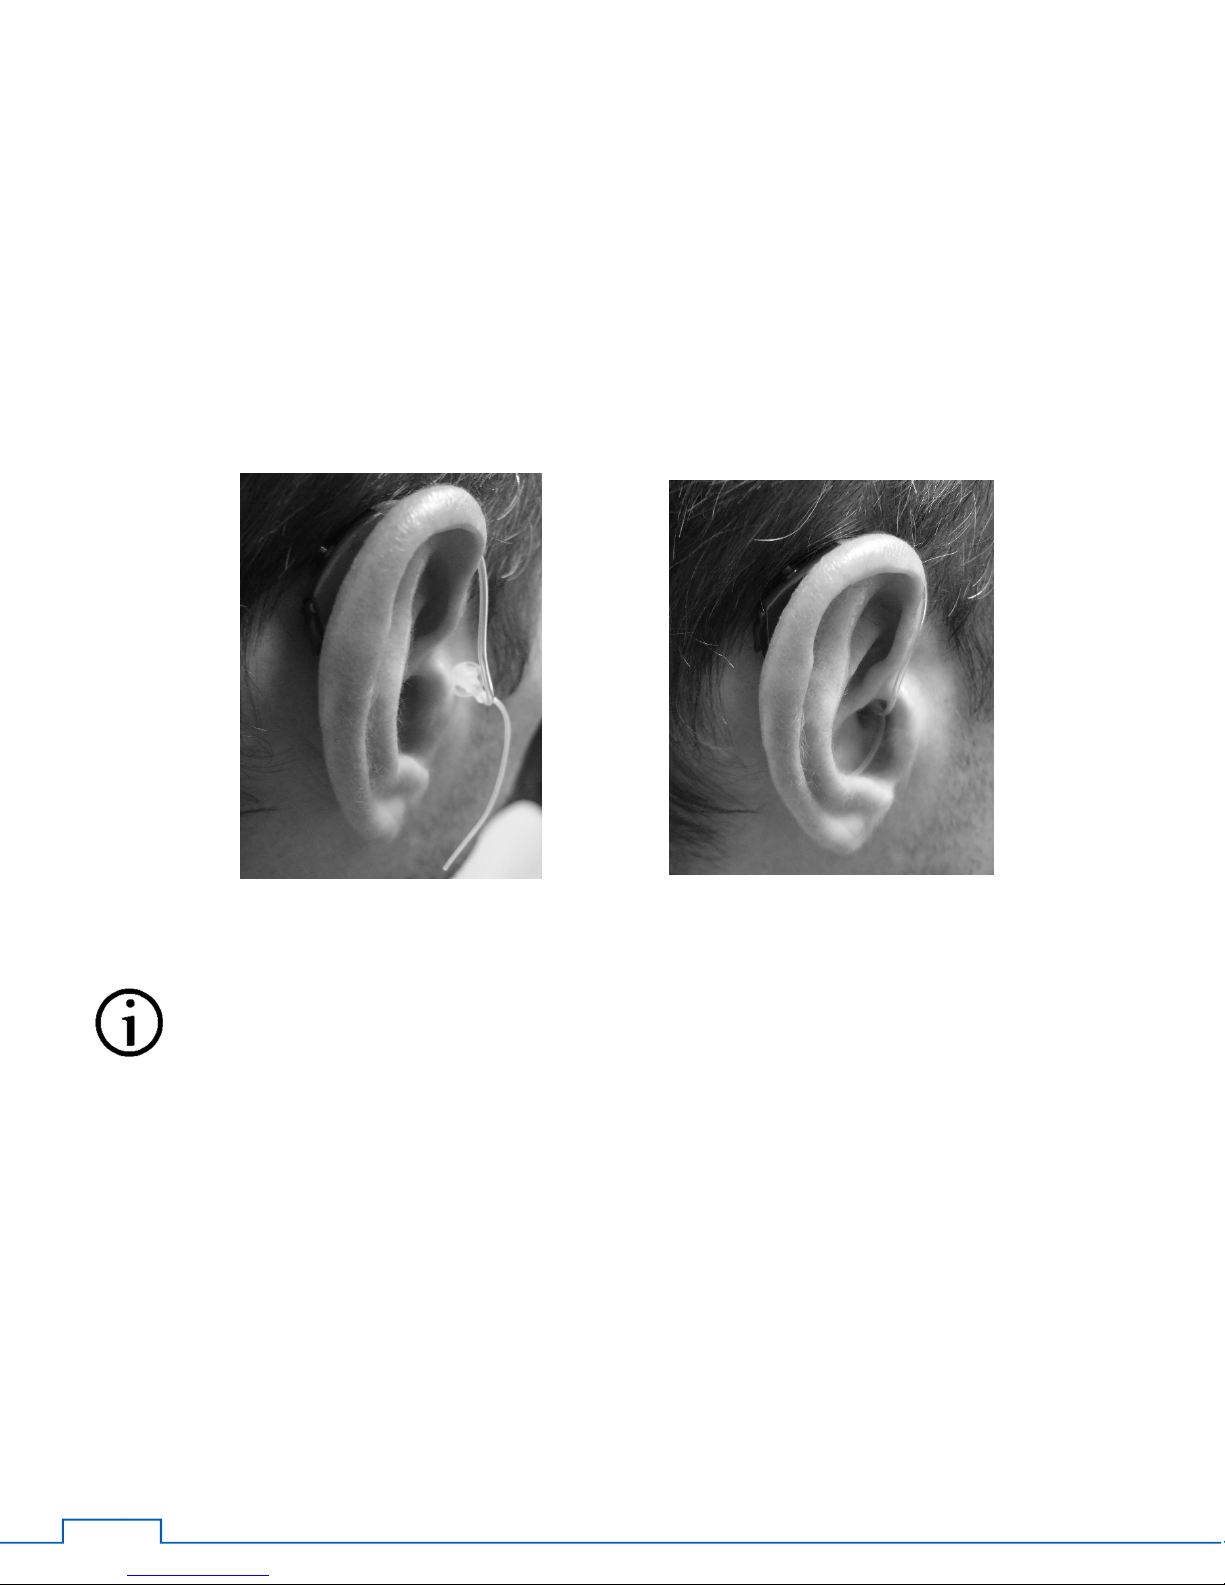
Wearing Hearing Device
1. Place the hearing device behind your ear.
2. Hold the thin tube wire or earmold* between your thumb and index finger with the thin tube ear tip pointing
towards the ear canal.
3. While holding the hearing device in place, insert the ear tip into your ear canal. Curl and tuck the retention loop
along the body of your ear.
* For hearing devices with earmolds, please consult with your hearing health provider about putting it on.
Tip: The ear tip should be completely, or almost completely, in the ear canal. The ear tip cannot touch the
eardrum. Proper insertion of the ear tip is key to getting enough loudness and avoid whistling.
Tip: Pulling up and back on your earlobe may help you insert the thin tube or ear mold into your ear canal
more easily.
Tip: If you wear eyeglasses, put your glasses on first and then put your hearing device on.
11
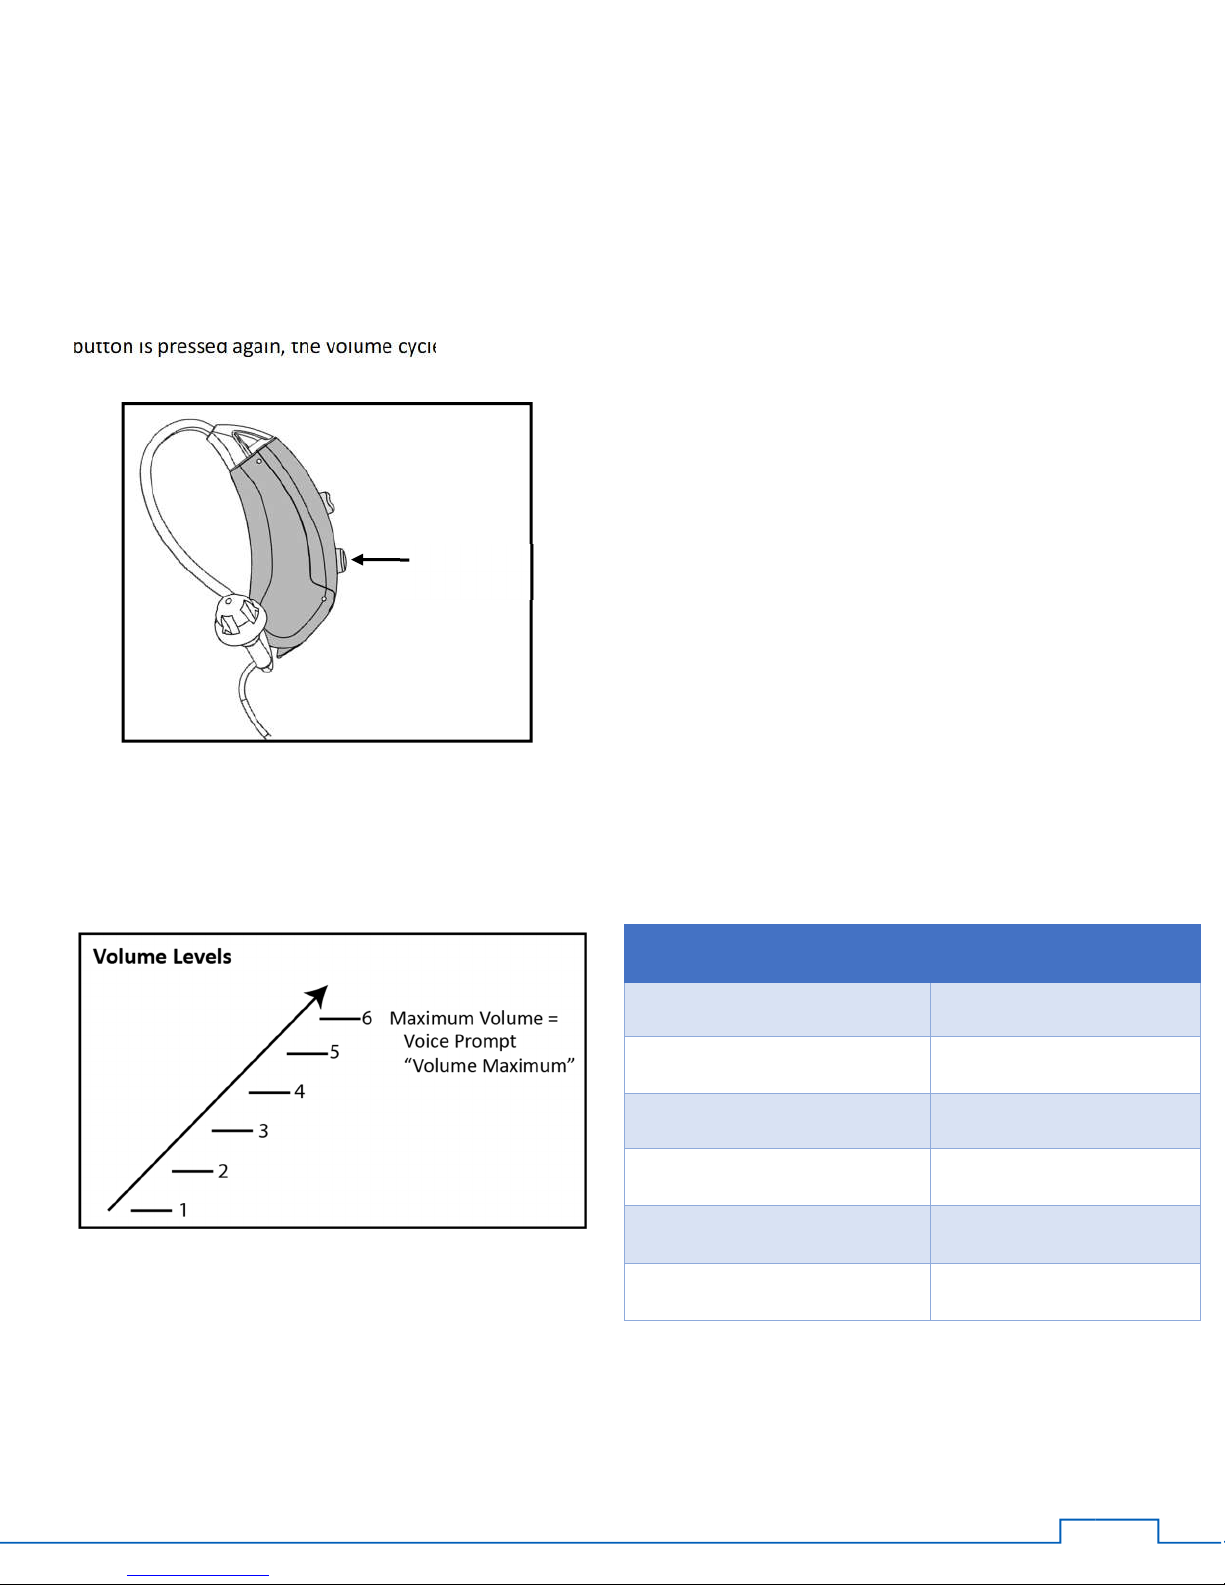
Operating Instructions – Volume Control
The volume control button allows you to increase volume levels. Once the volume reaches maximum volume, if the
button is pressed again, the volume cycle will restart at the minimum volume setting.
If the voice prompts are turned on, you will hear voice prompts when you reach the maximum or minimum volume
setting.
If the voice prompts are turned off, you will hear a single beep signal during each incremental change.
Voice Indicator (Default) Beeps
Beep, “Volume Maximum” 3 Beep ♪♪♪
Beep, “Volume 5” 1 Beep ♪
Beep, “Volume 4” 1 Beep ♪
Beep, “Volume 3” 1 Beep ♪
Beep, “Volume 2” 1 Beep ♪
Beep, “Volume 1” 1 Beeps ♪
Volume
Control
12
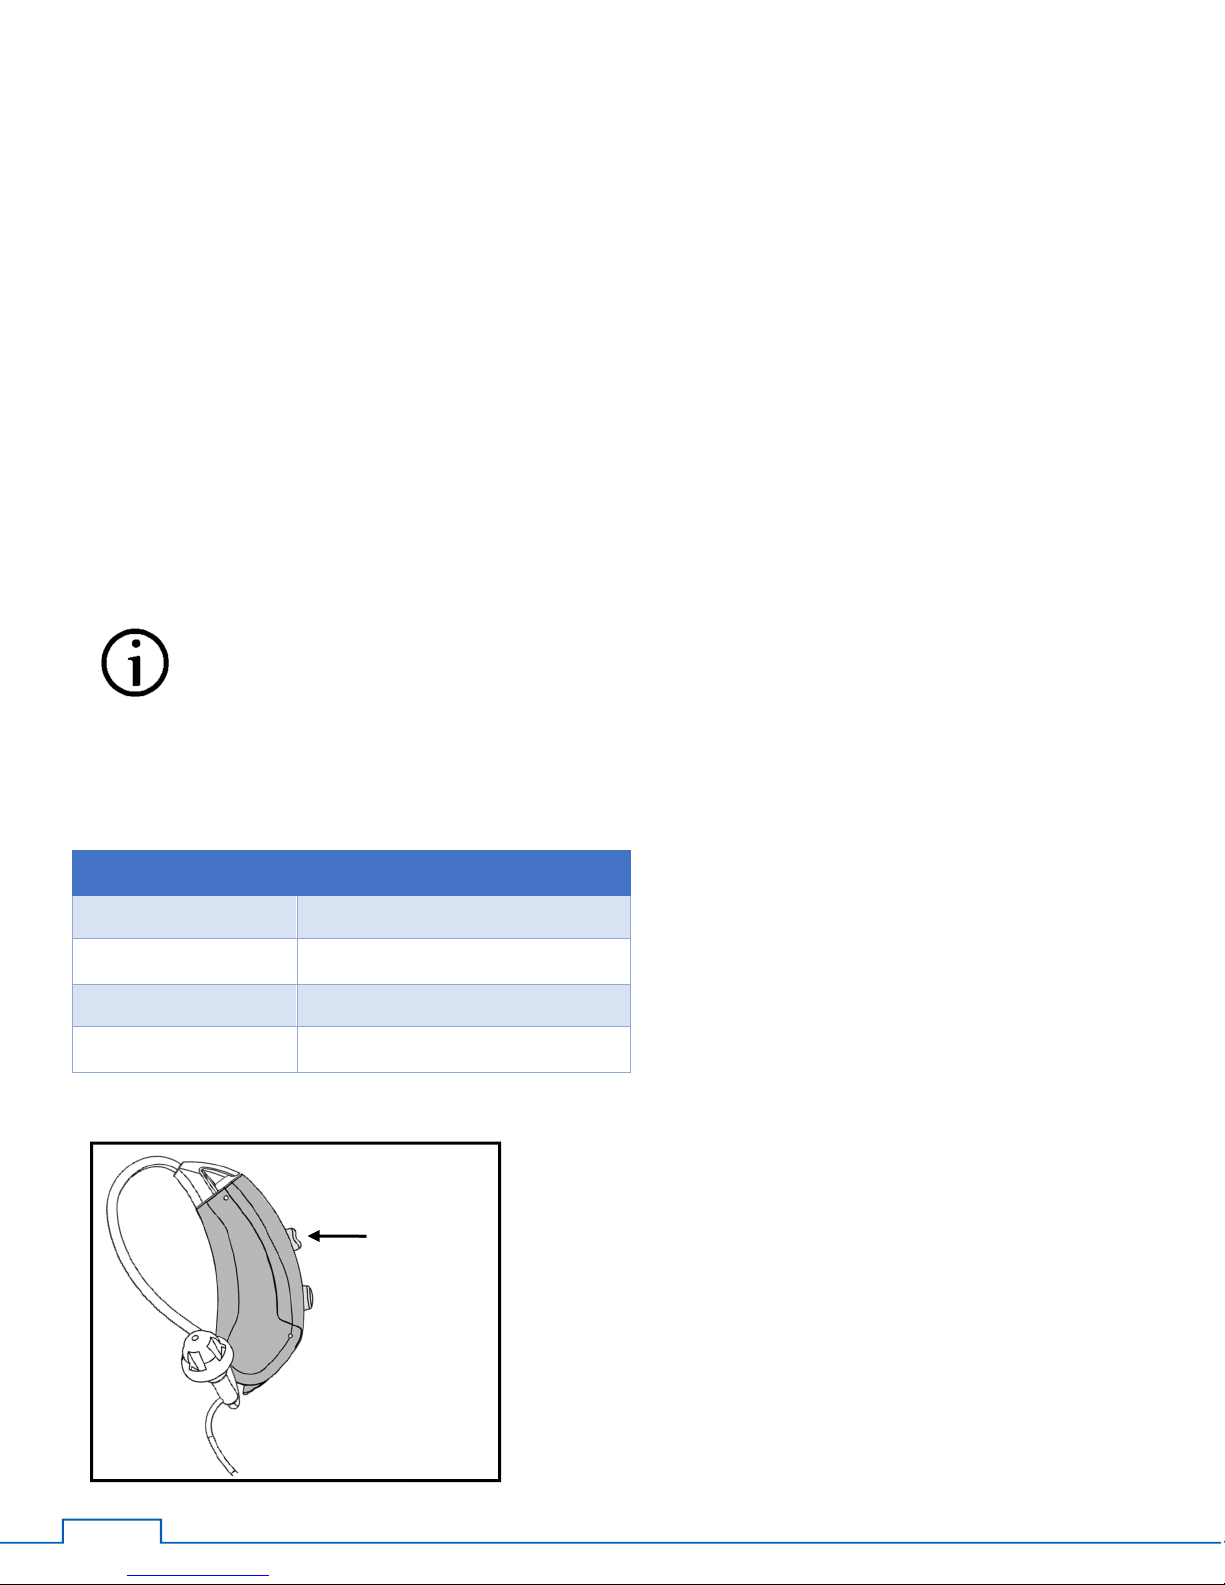
Operating Instructions – Program Controls
The program control allows you to choose between several program settings. Your instrument may have up to four
programs. By pressing the program control button, you advance the program setting as indicated by beeps or voice
prompts. The dome tip or ear mold must be in your ear to hear the beep(s). Use the program that sounds best the
majority of the time.
If the voice prompts are turned on, you will hear voice prompts letting you know which program number you are
advancing into. If you are on Program 2, you will hear “Program 2.”
If the voice prompts are turned off, you will hear the number of beeps to let you know which program has been
selected. If you are on Program 2, you will hear two beeps.
Within each program, you can also use the volume control to make sounds louder or softer.
Tip: For specific features and program settings tailored to your individual use patterns and settings of
interest, speak to your hearing healthcare provider. They are trained to work with you to meet your
communication needs.
Tip: If your device has wireless functionality enabled (by default, Programs 1 and 2), enabling wireless
streaming accessories will allow inputs to be heard.
Voice Indicator Beeps
“Program 1” 1 Beep ♪
“Program 2” 2 Beeps ♪♪
“Program 3” 3 Beeps ♪♪♪
“Program 4” 4 Beeps ♪♪♪♪
Program
Control
Note: When entering a program with streaming
enabled and a paired Companion Microphone
turned on, you will hear a “Connected” prompt
after the program prompt.
(Example: “Program 4” “Connected”)
If the Companion Microphone is shut off while
connected to your hearing device, you will hear
a “Disconnected” prompt in your hearing
device.

13
Maintaining Your Hearing Device
Ear wax is natural and common. For some users, wearing a hearing device will increase the production of ear wax.
Ensuring that your hearing device is free of wax obstruction is an important part of the cleaning and maintenance of
your hearing device.
Depending on your requirements, your hearing device will have a thin tube and dome tip or a conventional earmold
attached to it. Review the warnings below and follow the instructions on next pages.
CAUTION: Not following the list below may cause damage to your hearing device and accessories
Do not immerse your hearing device in water or liquid to clean. Instead, use a soft cloth or tissue
to remove moisture or oil residue.
Do not bend the thin tube and tip back and forth to remove it.
Do not use cleaning wire while the thin tube is connected to the hearing device.
Do not use alcohol to clean your earmold or dome tip.
Do not use sharp tools to dislodge ear wax.
If your physician prescribes ear drops, clean any moisture that may get into the earmold or tubing.
14
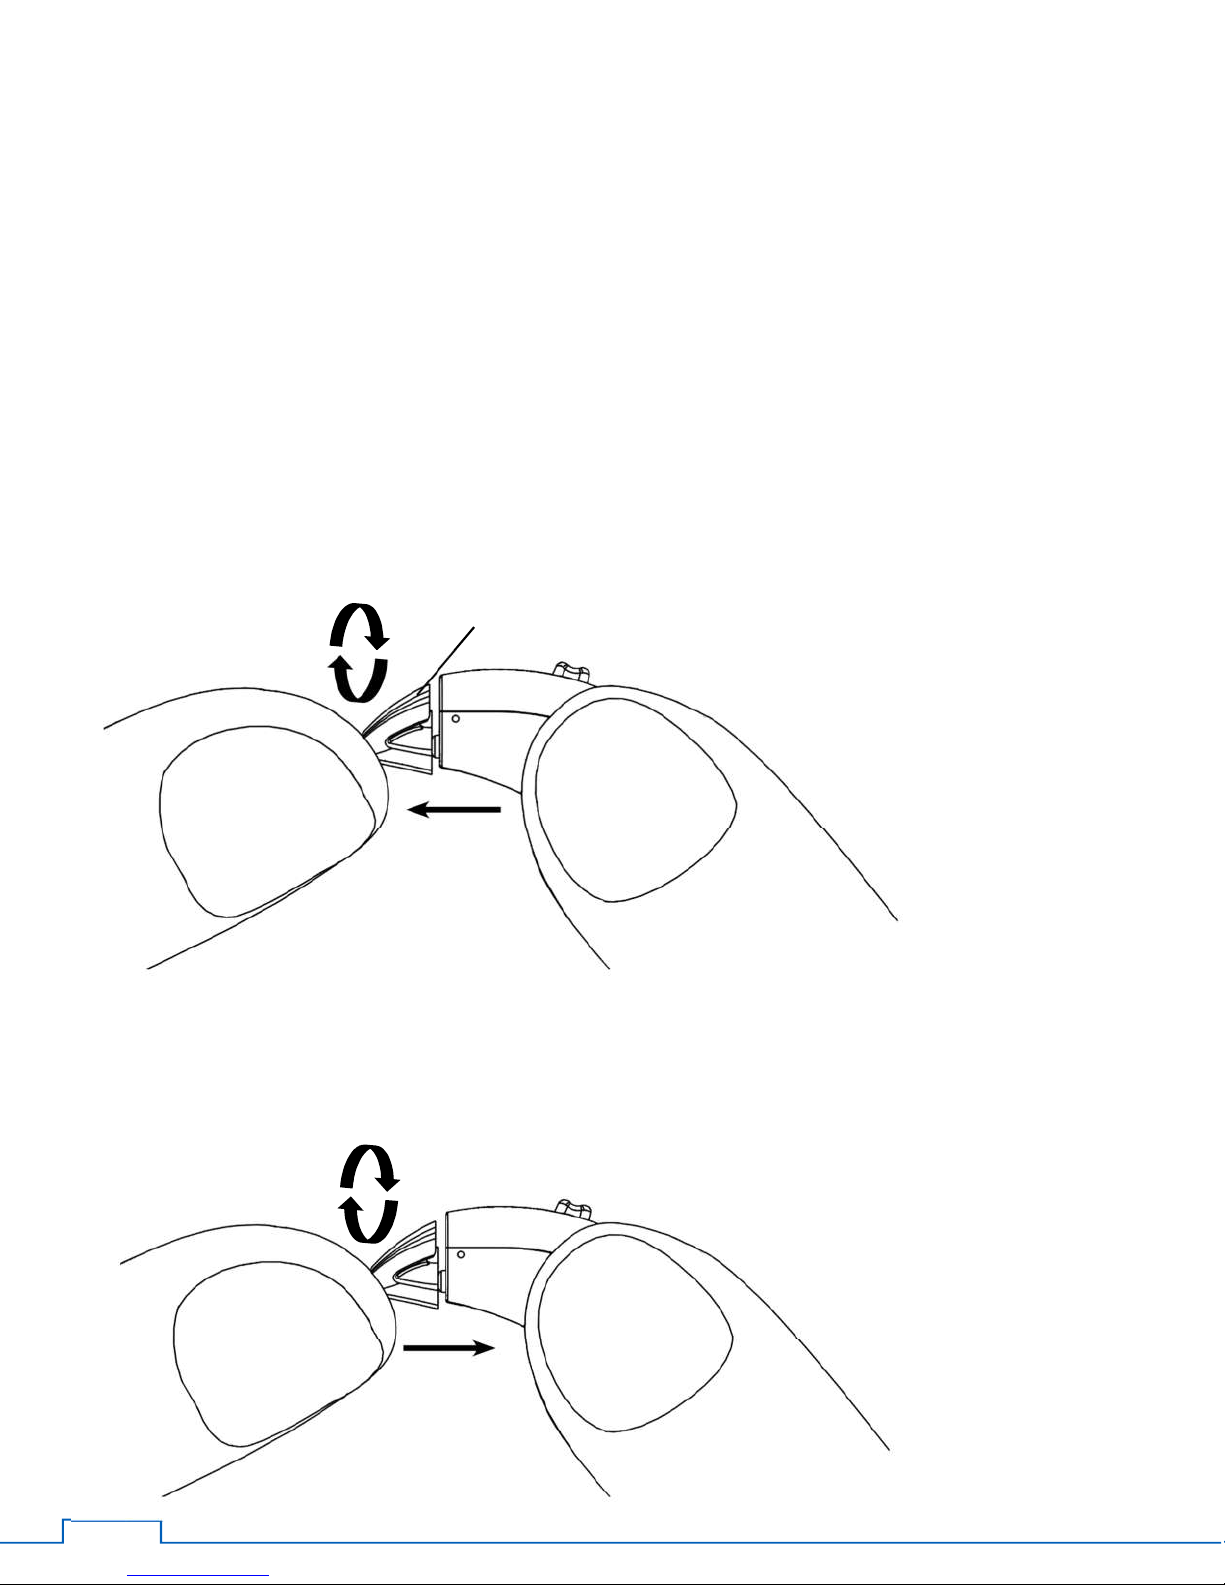
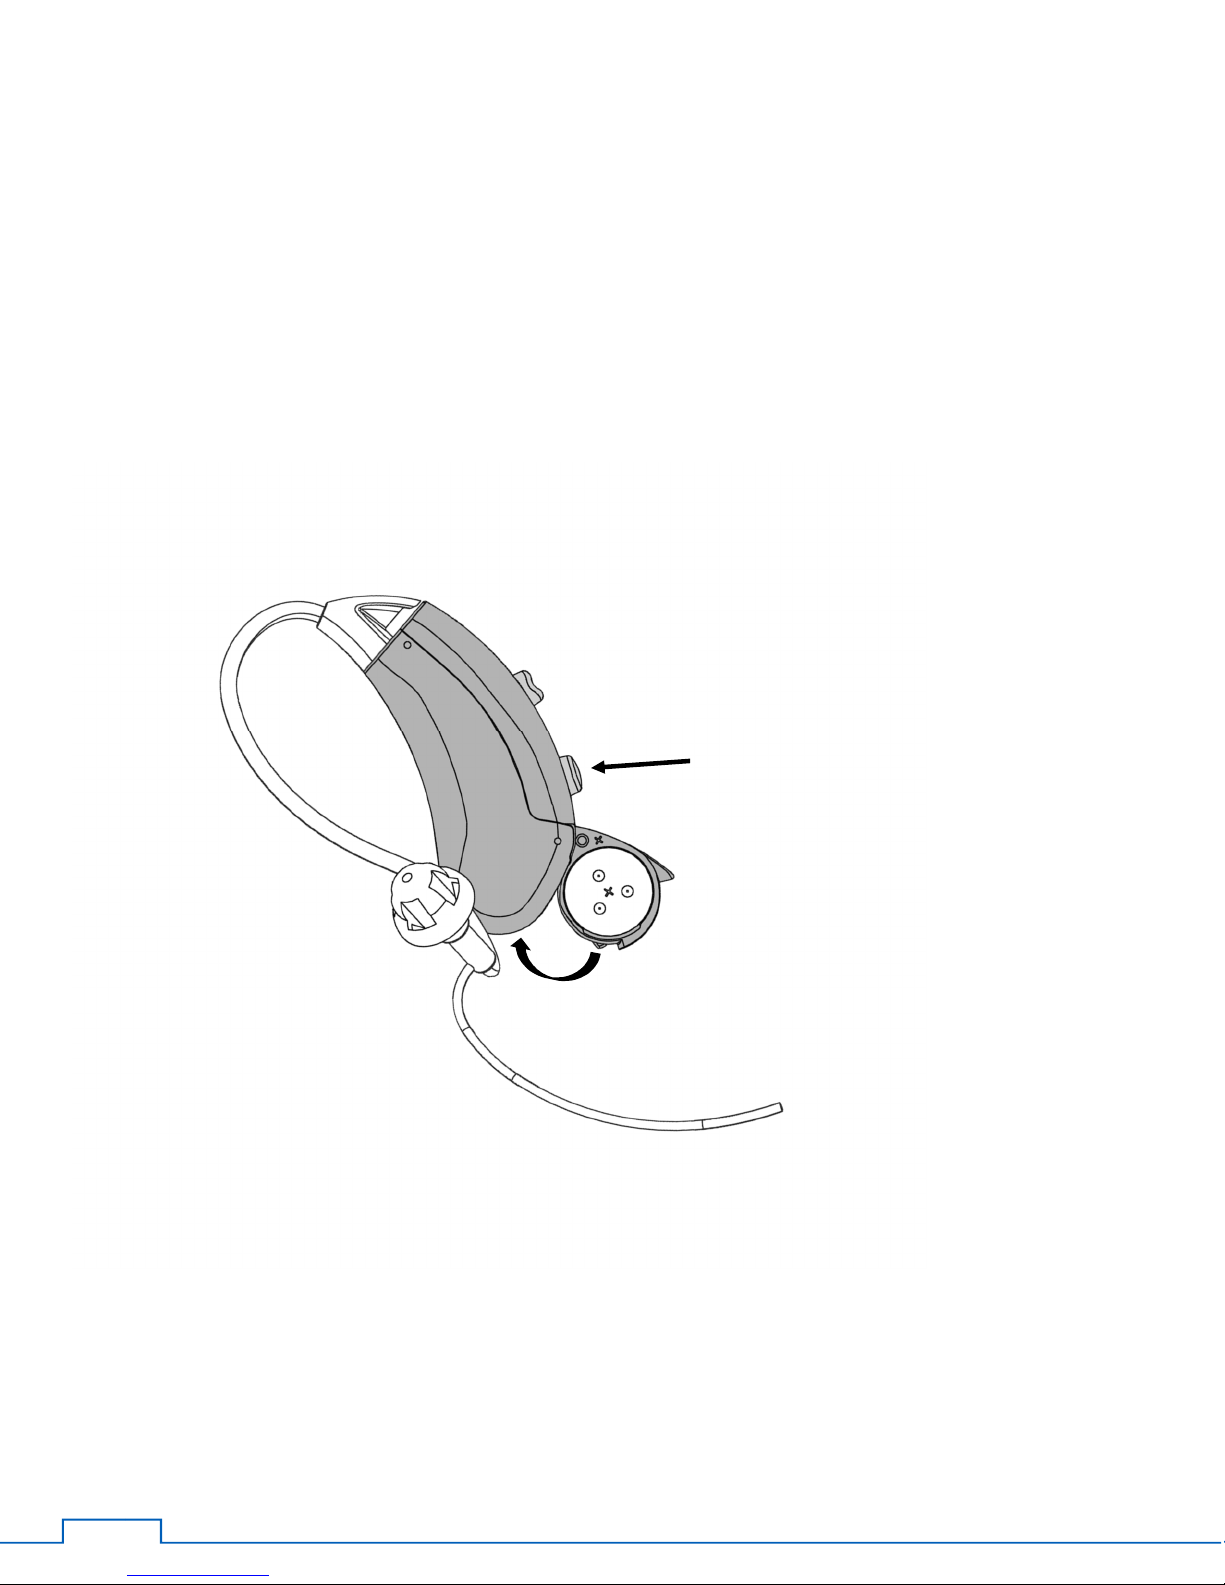
Maintaining Your Hearing Device with a Thin Tube
Replacing thin tube and dome tip:
For optimal performance, replace thin tube and dome tip every three months.
Removing thin tube and dome tip:
Grasp the hearing device end of the thin tube*. Gently turn the hearing device end of the thin tube approximately 90
degrees and pull to remove the ear tube from the hearing device.
Attaching thin tube and dome tip:
Gently push the hearing device end of the thin tube onto the hearing device until it snaps into position and rotate
slightly to lock in place.
*hearing device end of the thin tube

15
Cleaning thin tube and dome tip:
Between replacements, you’ll need to clean the thin tube and dome tip with a cleaning wire to remove any debris or
accumulated ear wax. Remove the thin tube from the hearing device. Insert cleaning wire into thin tube as indicated
below.
16
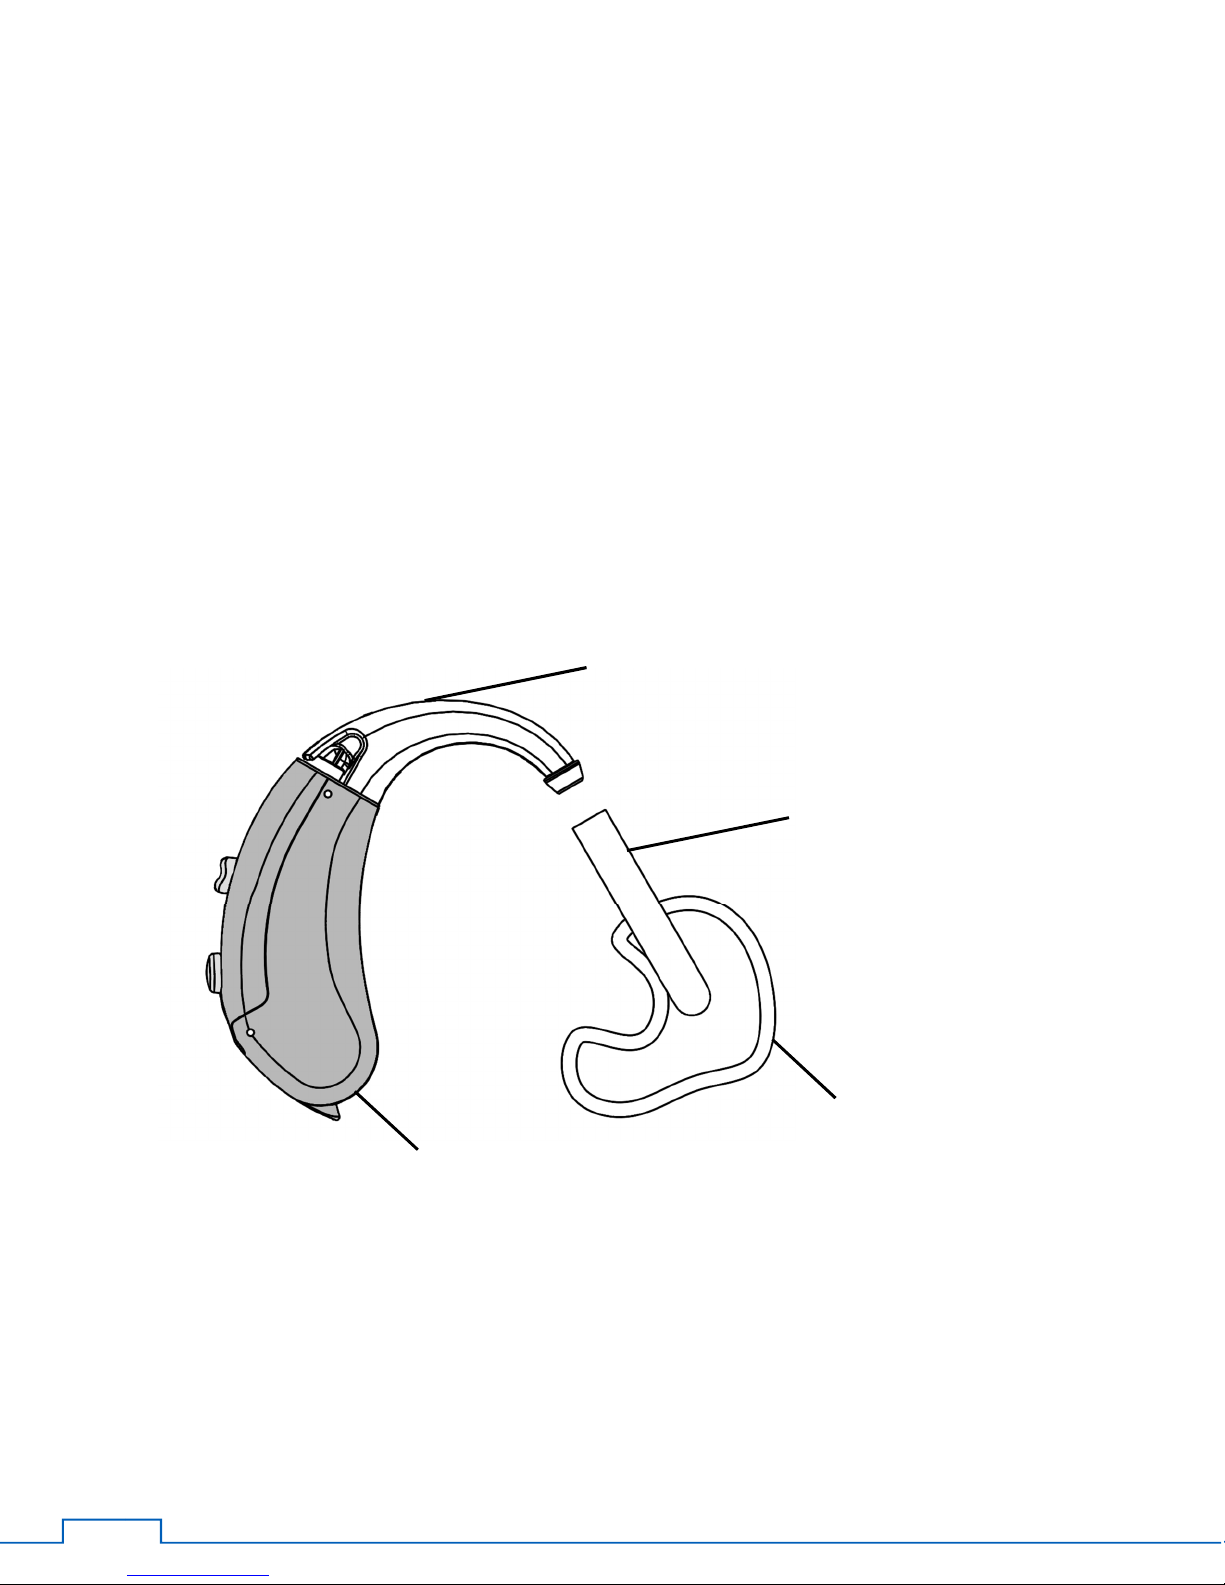
Maintaining Your Hearing Device with an Earmold
Ask your hearing healthcare provider to see if this applies to you.
1. Remove the earmold tube from the earhook
2. Wash the tube with warm soapy water and blow air through the tube to remove any water left inside the tube
3. Leave the earmold and tube out overnight to allow any water left inside to dry
4. After the earmold and tube is dry, reconnect the ear mold tube to the ear hook
earhook
earmold tube
earmold
hearing device

17
Using with Telephones and Cellular Phones
Traditional corded phones, cordless phones, and cellular phones.
First, try to use the phone as you normally would hold it. If you cannot hear well, move the handset to find the position
that sounds best to you. Some users find performance can be improved by tilting the handset towards the hearing
device. It may help to turn the volume up on your phone.
Practice using the telephone with someone familiar to you. Try moving the phone around to get the best sound.
Telecoils
Your device contains a telecoil which needs to be activated by your hearing healthcare provider. The telecoil converts
electromagnetic signals directly from the telephone into sound. To use the telecoil, select the appropriate program
setting, using the push button. The telecoil setting may allow you to hear more clearly on the telephone. After finishing
your phone call, change back to your preferred listening program.
If your phone is labeled “Hearing Device Compatible,” it works with a telecoil.
Other uses of a telecoil
Many people use the telecoil with assistive listening devices called induction loops. If you go to a public event, and the
room is “looped,” then you can use your telecoil. Set your hearing device to the telecoil program. Sound is transmitted
to your hearing device, allowing you to hear the speaker more clearly. After the event, change back to your preferred
listening program.
Note: If you are in a location with an induction loop system, you will notice this symbol. This means the
location you are presently in has special accommodations for the hearing impaired.
18
Airplane Mode
When boarding an airplane or entering an area where radiated radio signals are prohibited, wireless functionality must
be deactivated; airplane mode must be turned on.
The airplane mode is enabled by closing the battery door while pressing the volume button for six seconds.
To disable airplane mode, open and close the battery door.
press down volume button
Close battery door
19
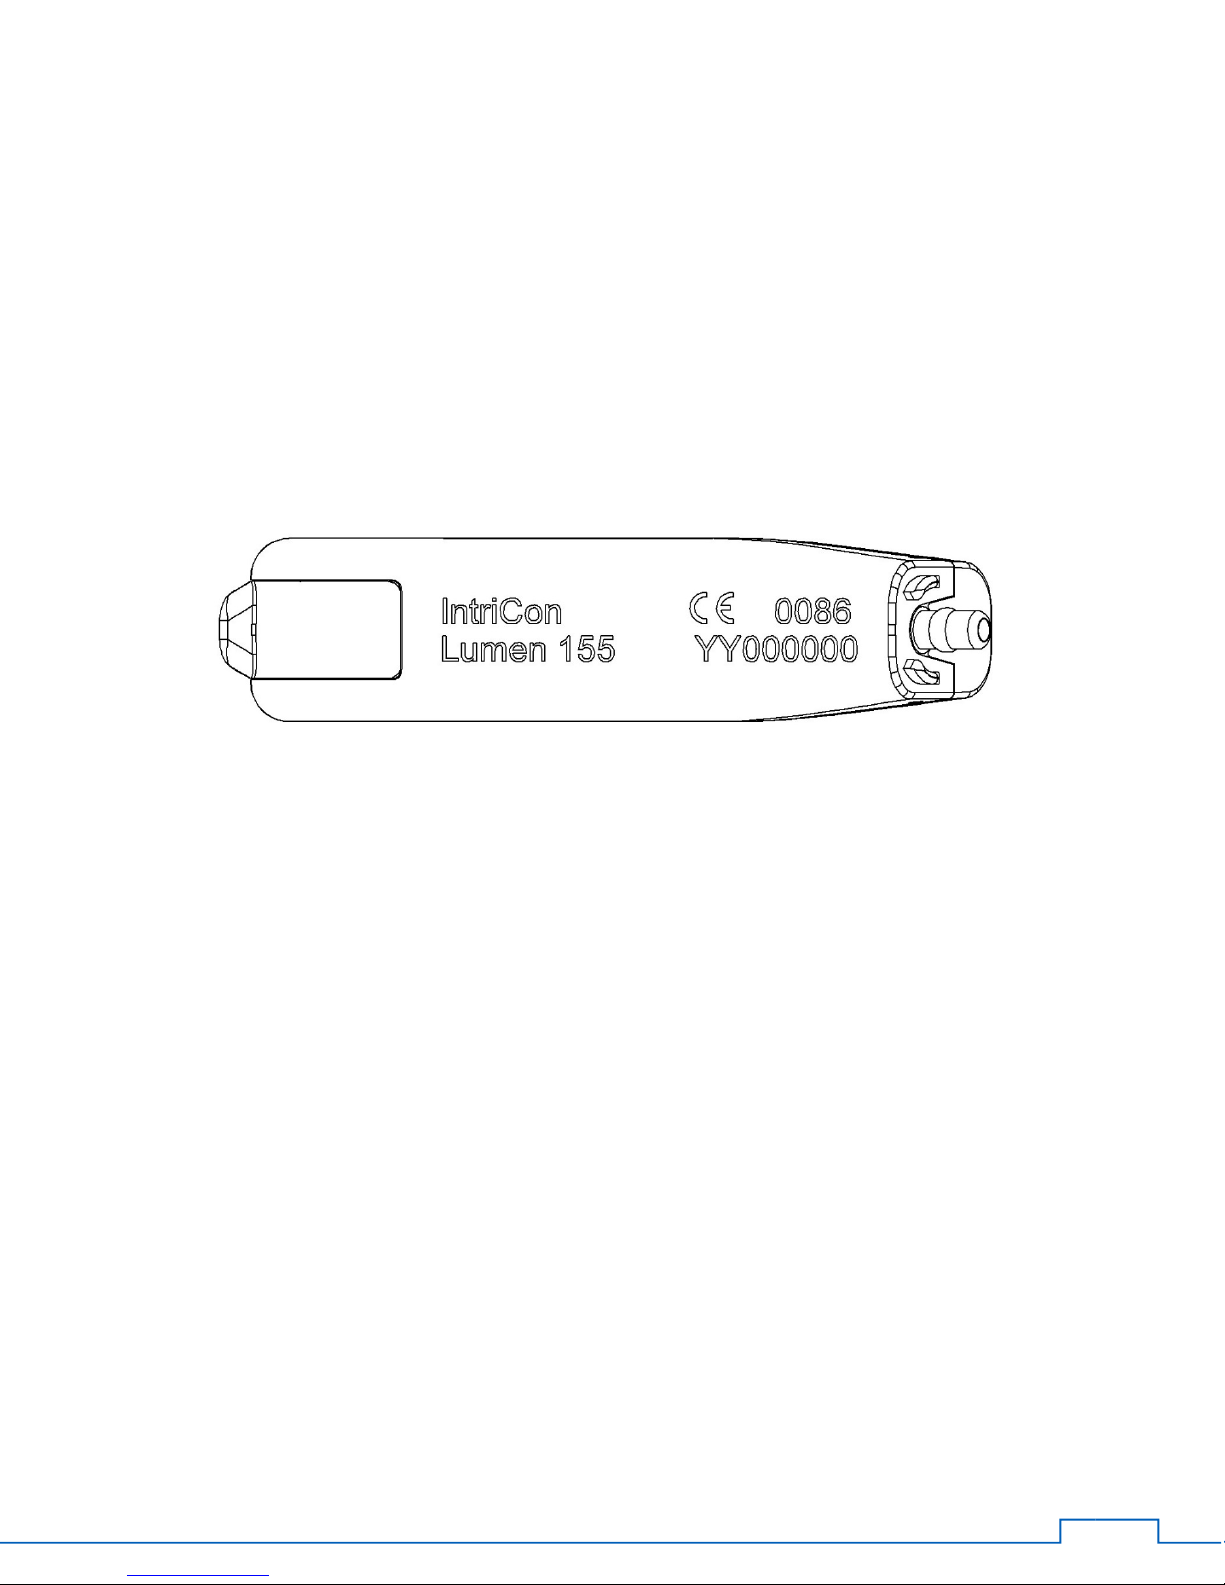
Labeling
The serial number (S/N) is located on the hearing device as an 8-digit number. The first two digits of the S/N represent
the year of manufacture (i.e. “15” refers to 2015). The last six digits is a unique identifier. All eight numbers create the
serial number of the device.

20
Optional accessories
The accessories described on the following pages are optional. Please contact your hearing healthcare provider to learn
more about these accessories.
Table of contents
Other IntriCon Hearing Aid manuals

IntriCon
IntriCon HearingHelp Express APOLLO-6205 User manual

IntriCon
IntriCon HearingHelp express Diplomat Series User manual

IntriCon
IntriCon HearingHelp Express Ranger-7800 Strong User manual

IntriCon
IntriCon Lexie Lumen User manual

IntriCon
IntriCon APT-D User manual

IntriCon
IntriCon HearingHelp express Apollo 6205 User manual

IntriCon
IntriCon HearingHelp express FELIX-8750 ACCU-FIT User manual

IntriCon
IntriCon Hearing Help Express Apollo-6200 Hawk User manual

IntriCon
IntriCon HearingHelp Express Felix-8720 Accu-Fit User manual

IntriCon
IntriCon HearingHelp express Ranger-7600 Energy User manual


