Piezus APZ 2030 User manual

APZ 2030
Operation Manual
2.1.2 You can set spans for the device with control buttons found on the front
panel. See Table 1 for basic and optional spans.
Table 1 - Spans
Basic spans, Pa
-500…+500
-100…+2000
0…7000
Optional spans, Pa
-100…+100
-200…+200
0…100
0…200
0…500
-100…+100
0…100
0…200
0…500
0…1000
0…2000
0…1000
0…1500
0…2000
0…3000
0…5000
Burst pressure, kPa
±10
±30
±80
Burst pressure, kPa
±20
±40
±100
2.1.3 See Table 2 for output signal parameters.
Table 2 - Output parameters
Parameter Value (properties)
Analog outputs:
Number of measuring channels
2
Voltage output
(3-wire) / load resistance
0...10 V / ≥10 kOhm
Current output
(3-wire) / load resistance
4...20 mA / ≤ 500 Ohm
Switch outputs:
Number of switch outputs
2 (independent)
Type of mechanical switch contact
nonbridging
(NC and NO)
Max switching voltage 250 V (AC) / 30 V (DC)
Max switching current (contact type)
5 A (NO)/3 A (NC)
Switched signals (active load):
- DC, voltage of 30 V
- AC, voltage of 250 V
5 A (NO)/3 A (NC)
5 A (NO)/3 A (NC)
Tripping threshold (configurable), % of span
0…100
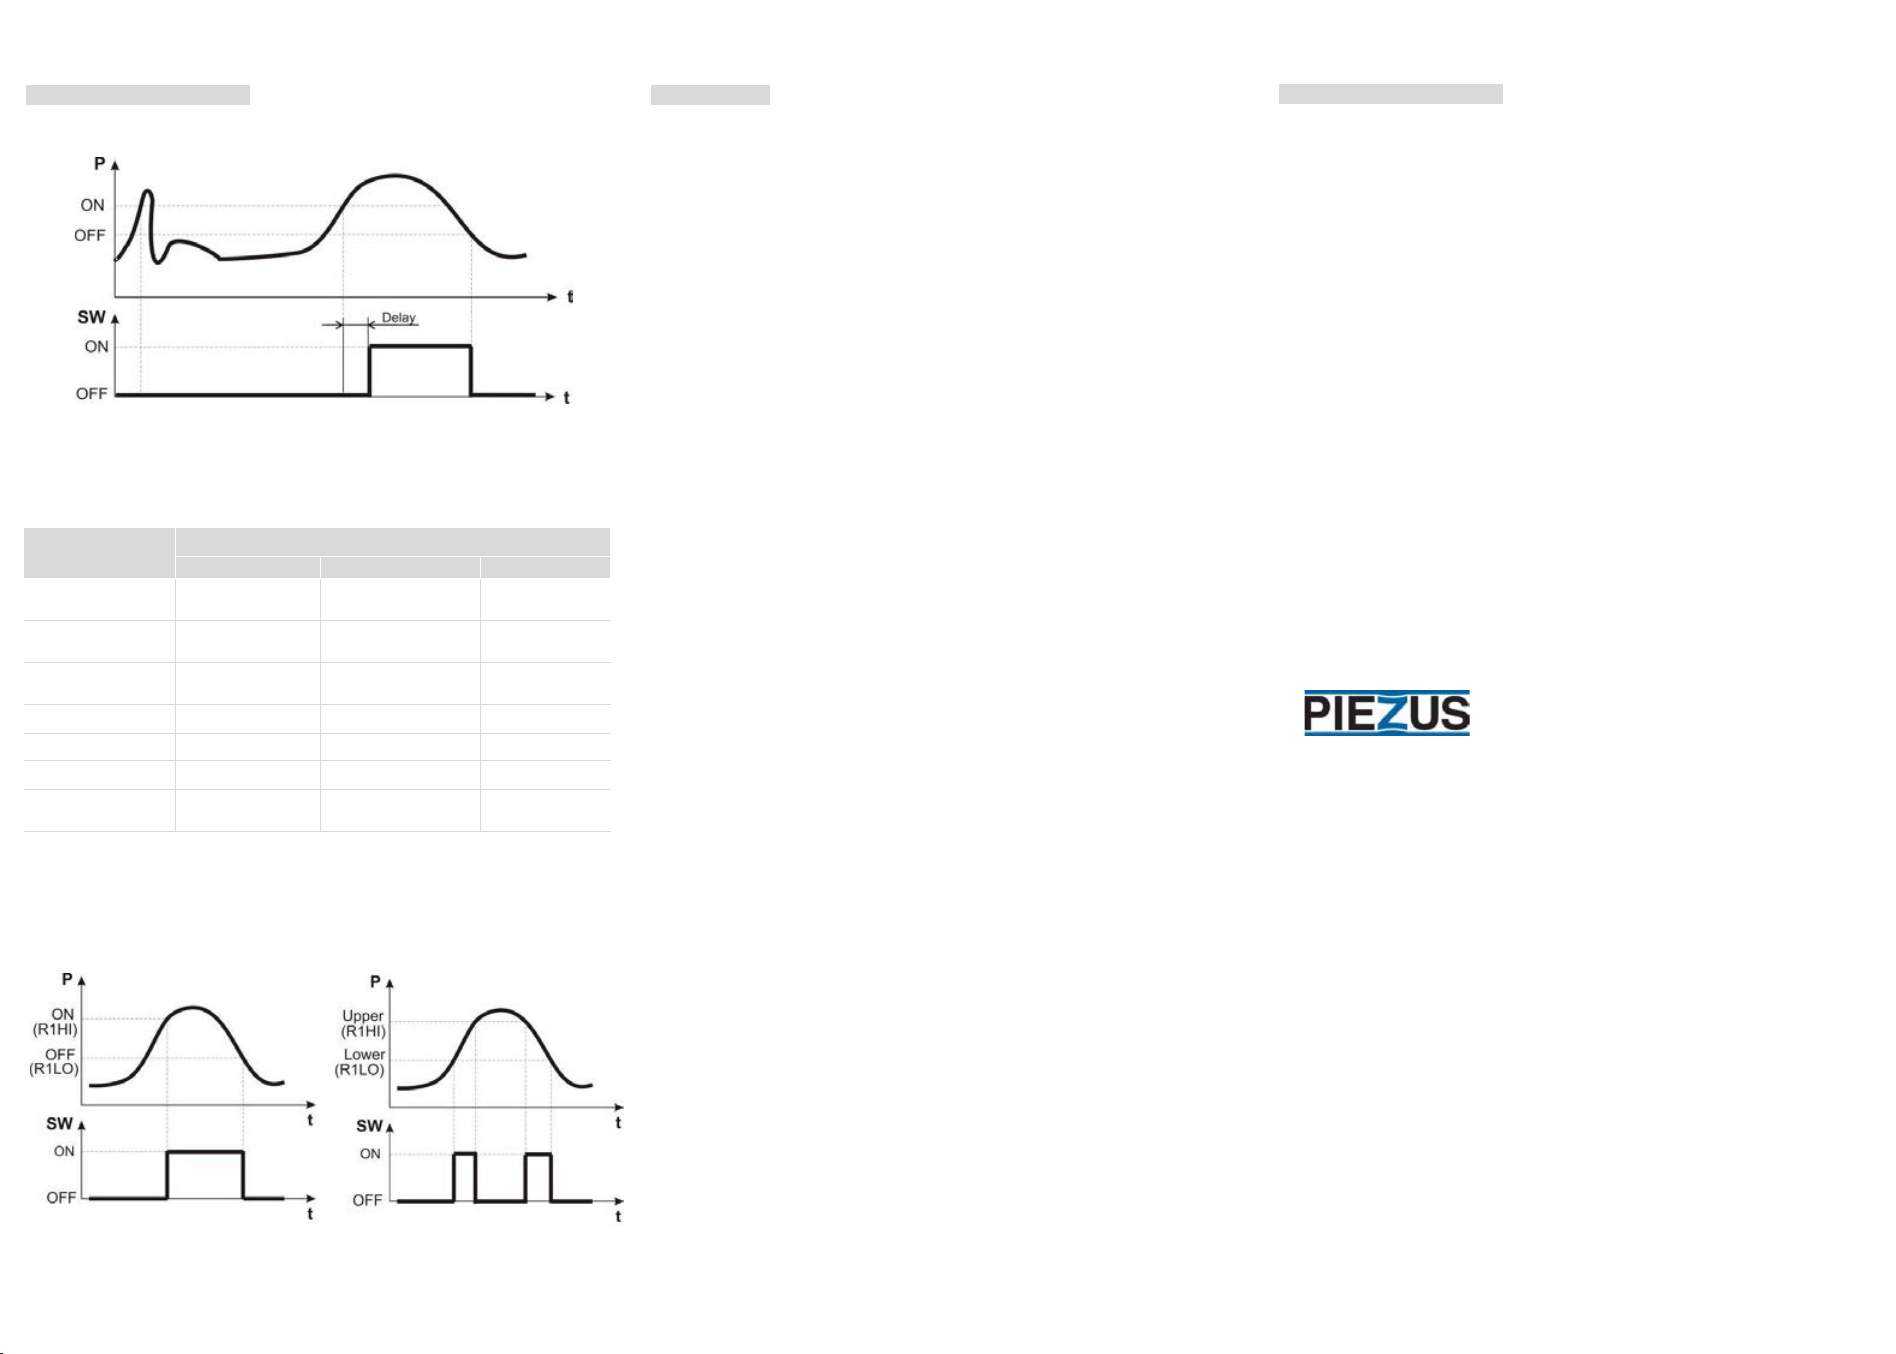
Switch operating modes (configurable)
hysteresis/window
Switching accuracy
±0.7%
2.1.4. The device has a display, see Table 3 for its specifications.
Table 3 - Display specifications
Name Value
Range of displayed values
-19999…+19999
Primary / secondary line height
15/7 mm
Displayed accuracy 0.1% of span ± low-
order digit as % of span
Readings display time, max
0.2 s
2.1.5 DC power supply voltage ranges from 18 to 36 V (rated - 24 V), AC - 24
V ± 10%.
2.1.6 Consumed current/power, max - 100 mA/3.6 W.
2.1.7 Dimensions, max - 106 × 91 × 44 mm (Supplement A).
2.1.8 Weight, max - 0.25 kg.
2.1.9 Housing ingress protection (GOST 14254) - IP66.
2.2. Operating conditions:
2.2.1 The device was designed to operate in the following conditions:
- enclosed explosion-proof spaces free from aggressive vapors and gases;
- ambient temperature from -10 to +50 °С;
- medium temperature from -5 to + 65 °C;
- atmospheric pressure from 84 to 106.7 kPa.
2.2.2 Medium: air, non-flammable and non-aggressive gases.
2.2.3 Resistance to atmospheric pressure puts the device in group R1 under
GOST R 52931 (max height above sea level - 1000 m).
2.2.4 Resistance to mechanical attack puts the device in group N2 under
GOST R 52931.
2.3 Operating limitations:
- medium should be free from crystallizable impurities, contaminations and
dust;
- medium should be free from flammable and aggressive gases and liquids.
3 Safety precautions
3.1 The electric shock hazard class of the device is III (no dangerous voltage);
see GOST 12.2.007.0 for full classification.
3.2 Take measures to prevent moisture from getting into the housing.
3.3 Only qualified specialists that have read and understood this manual are
allowed to mount, connect, adjust, do maintenance on the device.
4Mounting and use
4.1 Mount the device onto a vertical surface through two Ø5 mm holes (see
Supplement A). Make sure its pressure port and cable glands point downwards
(to allow condensate draining).
4.2 See Figure 1 for circuits connection diagram (connected inside the
housing via cable glands).
Figure 1 - Connection diagram; P1, P2 - inlet medium pressure, P1 (+) for
higher pressure, P2 (-) for lower pressure.
This manual covers mounting and operation of APZ 2030 differential pressure
transmitter (hereinafter referred to as "transmitter" or "device"); it contains
technical data, description of design and other information necessary for
proper application and maintenance of the device.
See datasheets at http://piezus.ru for complete specifications.
Production regulated by TOR 4212-000-7722857693–2015.
Terms and abbreviations used in the manual:
Span – measurement range; NC - normally closed (NC contact);
NO - normally open (NO contact); SW1, SW2 - switch contacts.
1 Purpose of the device
1.1 APZ 2030 differential pressure transmitter finds application in monitoring,
protection, alarm and control systems in heat and power installations, air
conditioning systems, various industrial environments and public utilities.
1.2 The device:
- proportionally and linearly converts measured differential pressure and
outputs normalized voltage (0 ... 10 V) and current (4 ... 20 mA) signals;
- compares current pressure value to the preset thresholds and outputs two
switching signals when the monitored parameter crosses those thresholds (as
prescribed by the selected operation algorithm, hysteresis or window);
- shows current pressure value (in selected units) and discrete outputs status
on the integrated digital display. Display and buttons allow quick
reconfiguration of the device and eliminate the need to unmount it for that
purpose.
1.3 Applications - heating, ventilation and air conditioning systems (HVAC/R):
- monitoring of flows in ventilation ducts;
- control of exhaust and discharge fans in air ducts;
- differential pressure control in filters
- air pressure control in clean rooms;
- air supply and fire flaps control;
- overheating protection for ventilation heaters;
- HVAC systems emergency control.
2 Technical specifications
2.1 General technical data
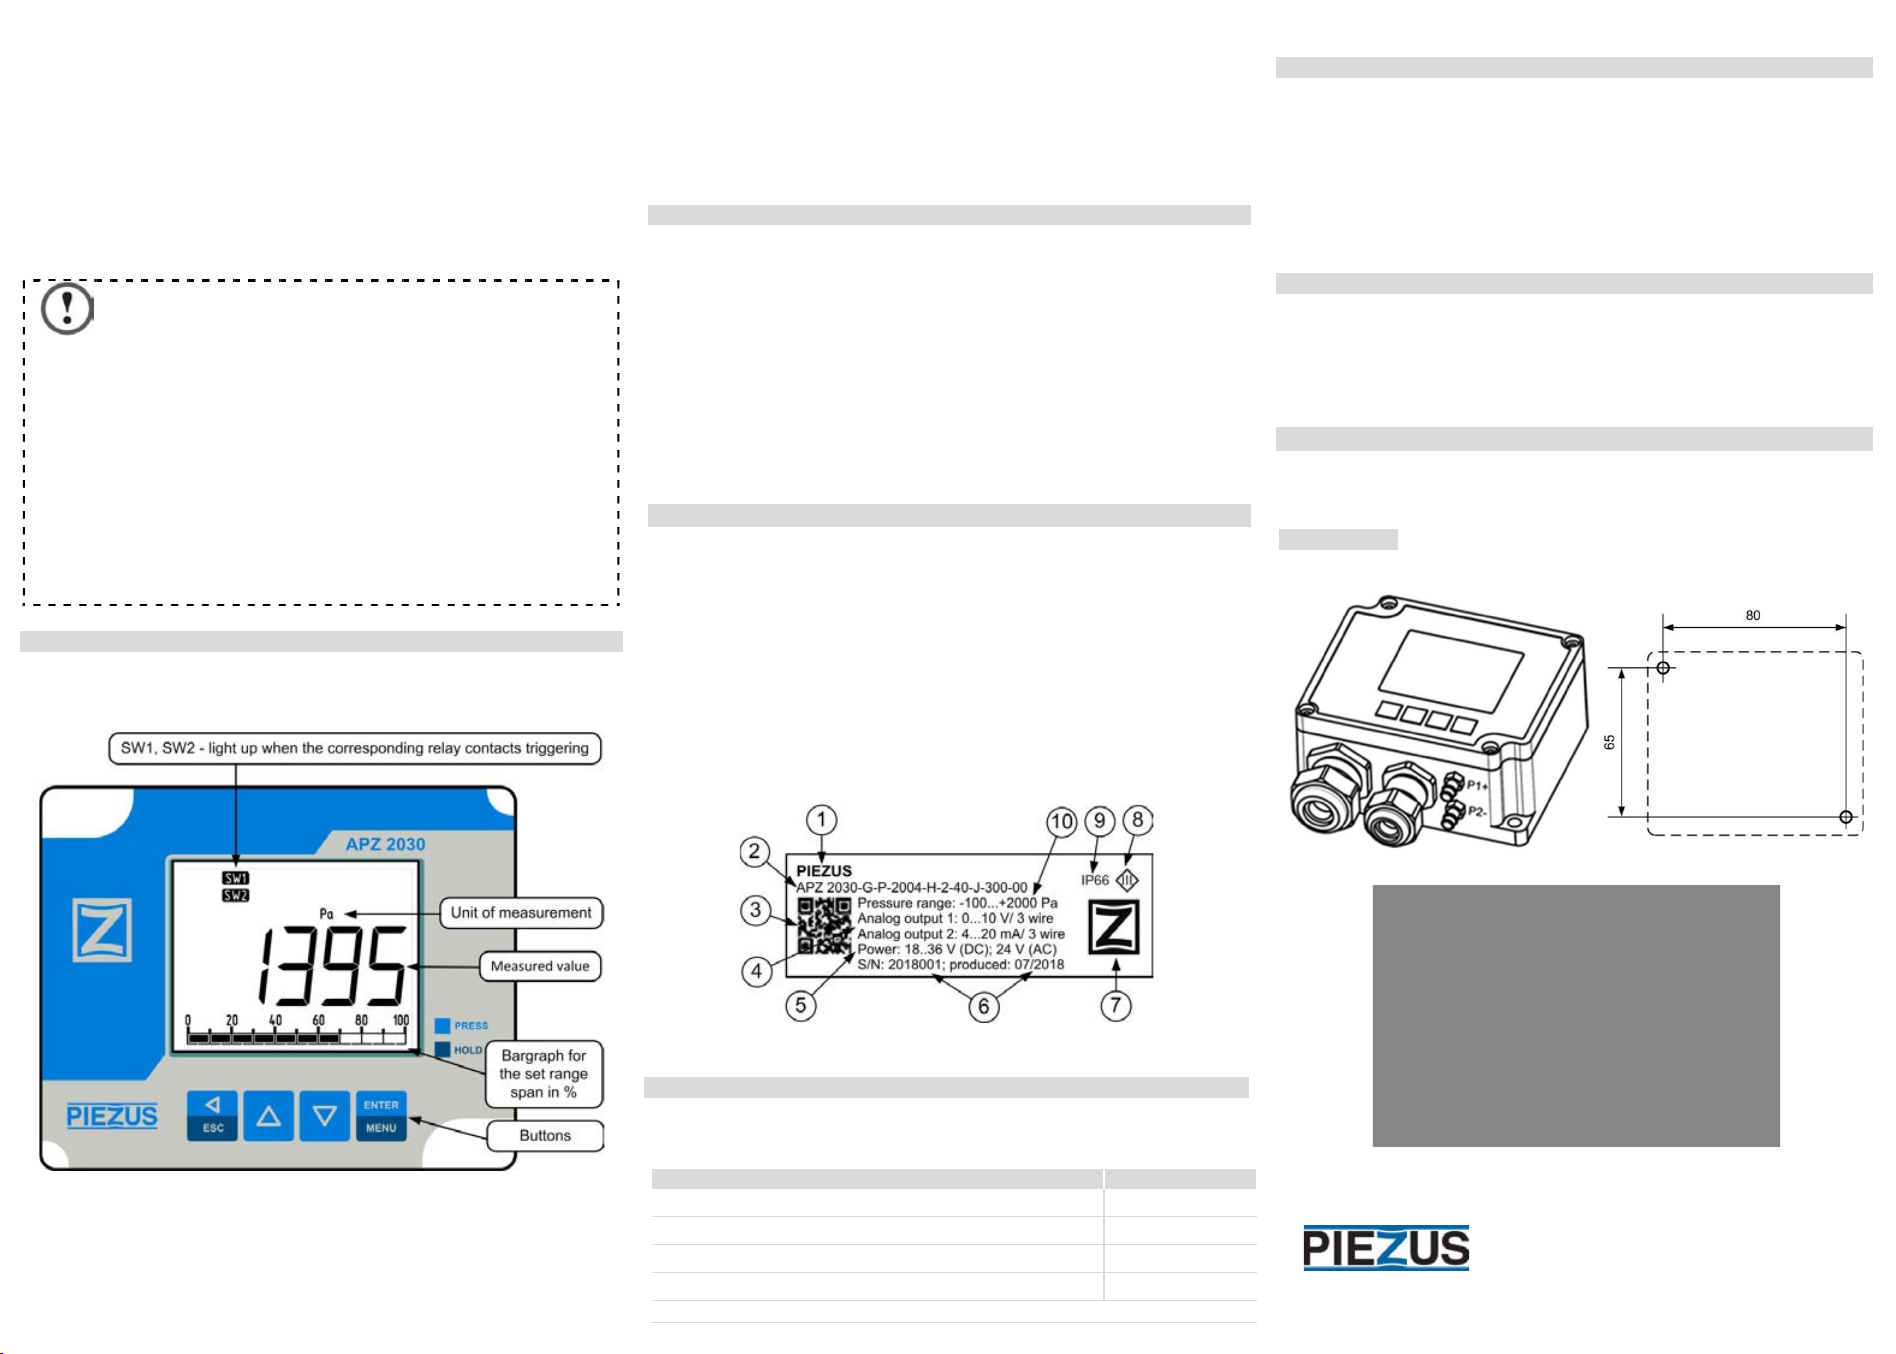
2.1.1 See transmitter's passport and label (sticker) for basic span and accuracy
info.
www.piezus.ru
PRESSURE TRANSMITTER

Note: Always cut off power when connecting the device's circuits.
4.3 Use shielded copper cables (wire cross-section from 0.14 to 1.5 mm2) with
insulating jacket when mounting the device.
4.4 We recommend using a circular cross-section wire to make the cable
gland seal reliable; suggested outside diameters:
- for M16x1.5 - cable Ø6 ... 10 mm (power supply and output signal);
- for M20x1.5 - cable Ø7 ... 12.5 mm (switching lines).
Sealing cable gland with standard rings and gaskets is MANDATORY.
1
2
3
4
5
DO NOT:
allow voltage exceeding maximum specified for the
transmitter;
use any objects to touch or otherwise apply mechanical
force to the diaphragm;
use transmitters bearing visible signs of mechanical
damage;
use transmitters in inappropriate climatic conditions;
allow medium temperatures above or below the limits
specified for the transmitter.
5 Setup
5.1 There is a display and four buttons on the front panel of the device. See
Figure 2 for their description.
Figure 2 - Elements on the front panel of the device
5.2 Buttons allow changing the device's parameters when it is in use. For
example, you can select units the measured pressure is displayed in, set
switch thresholds, change span within the basic measurement range, adjust
(calibrate) measurement results. See Setup instructions for procedures.
5.3 When switched on, the device self-tests. If everything is in working order,
its output current and voltage signals are set linearly matching the measured
pressure.
5.4 Malfunctions (related to data or system) are detected by the integrated
controller. Detection of a system malfunction (at startup or during operation)
results in outputting constant current (see Table 2).
6 Maintenance
Routine maintenance frequency - at least once a year; it includes checking
reliability of mounting and removal of dust and dirt. Do not use chemical
solvents and forced rinsing for cleaning purposes.
Routine checkups of the device in use follow data specified in its passport.
See the device's passport for its calibration interval and manufacturer's
warranty.
Manufacturer refuses all claims, reclamations, complaints related to devices
with damaged manufacturer seals and showing signs of damage resulting
from inappropriate operation, transportation or storage.
All and any repairs are done by the manufacturer exclusively.
7Marking
The device bears a label (sticker on the back of the housing) that contains the
following information (Figure 3):
1) name of the manufacturer;
2) code of the device;
3) bar code (QR code);
4) output signals ranges;
5) supply voltage and its type;
6) serial number and production date;
7) manufacturer's trademark;
8) electrical protection class (GOST 12.2.007.0);
9) ingress protection rate (GOST 14254);
10) measured pressure range.
Figure 3 - Device label
8Package contents
See Table 4 for delivery package contents.
Table 4
- Package contents
Name
Quantity
APZ 2030 differential pressure transmitter
1 pc
Passport
1 copy
User manual (this paper)
1 copy*
Setup Manual
1 copy*
* 1 copy per 10 devices for batch supplies to the same address.
9 Transportation and storage
9.1 Use roofed transport to deliver the device to any destination needed; place
individual packages into shipping containers if required.
9.2 Make sure the devices are protected from impacts and vibrations while in
transit; permissible temperature for products transported in shipping
containers ranges from -10 to +50 °C.
9.3 Store devices in shipping containers in a heated (+5 to 40 °С) ventilated
space.
10 Resource and service life
10.1 Operating mode: continuous.
10.2 Mean time between failures, min – 120,000 h.
10.3 Service life - 12 years (normal working conditions: non-aggressive
medium, temperature at +23 ± 3 °С, no vibrations and shaking).
11 Disposal
11.1 The device contains no precious metals.
11.2 Dispose of as prescribed by regulations adopted by the operator.
Supplement A
Design and dimensions
Figure A.1 - Housing and mounting holes
------------------------------------------------------------------------------------------
©Piezus
http://www.piezus.ru/
Made in Russia

APZ 2030
Setup Manual
This setup manual applies to APZ 2030 differential pressure transmitter. It is a
supplement to the Operation Manual.
Terms and abbreviations used in the manual:
Span - measurement range;
URL - upper range limit;
LRL – lower range limit; SW1, SW2 – switch contacts 1 and 2.
1 General information
Depending on your goals and operating conditions you can change factory
settings accordingly. Buttons described in Table 1 allow selecting operation
algorithm and setting parameters.
Table 1 - Control buttons
Button Action
ENTER / MENU - opens main menu (press and hold for 2 s) /
cycles through main menu items or saves values to memory
Up -
increases numerical values of parameters or changes units
of measurement when in operating mode (Table 2)
Down -
decreases numerical values of parameters or changes
units of measurement when in operating mode (Table 2)
ESC - selects editing mode (values changing) for main menu
items / cancels changes made; hold for 2 s to leave menu
See Table 2 for the available units of measurement.
Table 2 - Units of Measurement
Displayed Unit of measurement
Pa
pascal (Pa) – factory settings
kPa
kilopascal (kPa)
mbar
millibar (mbar)
Bar
bar
mWc
meter of water column (at 20 C)
kgf/cm2
kilogram force per square centimeter
PSI
pounds per square inch
See section 3 of Supplement A for available programming instructions.
2 Factory settings
The standard settings are as follows.
- output signal increases linearly, in proportion to inlet pressure;
- pressure unit of measurement - Pa;
- switch 1 operating mode - WINDOW;
- switch 2 operating mode - HYSTERESIS;
- switch 1 upper level / switch 2 trigger level (switching-on) - 67% / 75% of
span;
- switch 1 lower level / switch 2 trigger level (switching-off) - 33% / 25% of
span;
- switching-on delay (affects both switches) - 0 ms.
To see the settings of the connected transmitter, press and hold ENTER /
MENU button for 2 s. The display will show current settings and switch to the
SET mode. Press the button again to browse the menu.
3 Setting up operation parameters
3.1 Press ENTER / MENU button and hold it for 2 s to enter the setup mode.
3.2 There appears the word SET in the top left corner; top right corner has the
name of the parameter, below it - its code or value (Figure 1).
Figure 1 - Displayed elements
Operation parameters setup mode
(R1HI – signal threshold for SW1 switch contacts activation)
Press ENTER / MENU button to browse the parameters. Press ESC to edit a
parameter; its code or value starts flashing.
Press UP and DOWN buttons to change code/value; press and hold any of them
to have the figure change rapidly in the appropriate direction, release when the
desired value is on the display.
Note: acceleration of the value increase or decrease grows gradually
when you hold UP or DOWN button.
Press ENTER / MENU to save the desired value.
3.3 The device switches back to operation mode automatically after 10
seconds of inactivity.
Supplement A
Setup menu
See Table A.1 for all programmable parameters.
Table A.1 - Programmable parameters
Menu
item Function
PSEL
Span values modification. See Table A.2 for span codes; enter the
appropriate code to set the desired span.
RESP
Response delay (affects both switches) in seconds. Values - from 0
to 9 seconds.
R1Md
Switch 1 mode selection (figure A.2):
0 - disabled; 1 - HYSTERESIS; 2 - WINDOW
R1HI
Switch 1: switching-on threshold / upper limit (contacts SW1).
Values - from 0 to 100% of span.
R1L0
Switch 1: switching-off threshold / lower limit (contacts SW1).
Values - from 0 to 100% of span.
R2Md
Switch 2 mode selection (figure A.2):
0 - disabled; 1 - HYSTERESIS; 2 - WINDOW
R2HI
Switch 2: switching-on threshold / upper limit (contacts SW2).
Values - from 0 to 100% of span.
R2L0
Switch 2: switching-off threshold / lower limit (contacts SW2).
Values - from 0 to 100% of span.
ZERO
Password (123) protects this parameter from accidental change.
The function eliminates asymmetry between channels that can
appear in the long run. ZERO calibration starts with equalizing inlet
pressure: P1+ and P2-
are connected to each other or to
atmospheric pressure or to a fixed pressure source that gives the
value medium pressure should be checked against.
Switch response delay (RESP)
Switch response delay allows filtering out short-term pressure changes. The
switch does not change its state during the delay time after the pressure has
exceeded the threshold (Figure A.1).
Measurement range (PSEL)
Table A.2 contains span codes that can be applied; these spans fall within the
default measurement range the transmitter was given at the factory following
customer's instructions.
www.piezus.ru
PRESSURE TRANSMITTER

Supplement A - Continued
Figure A.1 - Switch response delay (SW contacts), HYSTERESIS mode,
example
Table A.2 - Span codes (depend on the default measurement range set at the
factory following customer's instructions)
PSEL parameter
code
Default measurement range code (see label):
5002
2004
7004
0
-100 ... + 100
Pa
-100 ... + 100 Pa 0 ... 1000 Pa
1
-200 ... + 200
Pa
0 ... 100 Pa 0 ... 1500 Pa
2
-500 ... + 500
Pa
0 ... 200 Pa 0 ... 2000 Pa
3 0 ... 100 Pa 0 ... 500 Pa 0 ... 3000 Pa
4 0 ... 200 Pa 0 ... 1000 Pa 0 ... 5000 Pa
5 0 ... 500 Pa 0 ... 2000 Pa 0 ... 7000 Pa
6
-500 ... + 500
Pa
-100 ... + 2000
Pa
0 ... 7000 Pa
Switches 1, 2 operating modes (R1Md, R2Md)
HYSTERESIS or WINDOW modes are selected separately for each switch from
the special menu. See graphs at Figure A.2 to understand the difference
between these modes.
А) Hysteresis mode B) Window mode
Figure A.2 - Switching outputs operating modes (SW), inlet pressure (P)
changes
See Supplement B for examples explaining the procedure of setting up the
transmitter.
Supplement B
Programming examples
EXAMPLE 1 Changing the set range
1) Press and hold ENTER/MENU to enter the menu;
2) switch to PSEL by pressing ENTER/MENU;
3) press UP and DOWN to enter the span code (numeral from 0 to 6, where 6
is the default measurement range), see Table A.2 for codes descriptions;
4) press ENTER/MENU to save the selected span;
5) press and hold ESC to exit the menu.
EXAMPLE 2 Setting the switch response delay
1) Press and hold ENTER/MENU to enter the menu;
2) switch to RESP by pressing DOWN;
3) enter RESP editing mode by pressing ENTER/MENU;
4) press UP and DOWN to set the delay (in seconds, affects both switches);
5) press ENTER/MENU to save the setting;
6) press and hold ESC to exit the menu.
EXAMPLE 3 Selecting switch operation mode
1) Press and hold ENTER/MENU to enter the menu;
2) press DOWN twice to select R1Md item;
3) enter R1Md editing mode by pressing ENTER/MENU;
4) use UP and DOWN buttons to select switch operation mode (0 - disabled, 1
- HYSTERESIS, 2 - WINDOW);
5) press ENTER/MENU to save the setting;
6) press and hold ESC to exit the menu.
Supplement B - Continued
EXAMPLE 4 Setting upper threshold for switch 1
1) Press and hold ENTER/MENU to enter the menu;
2) press DOWN thrice to select R1HI item;
3) enter R1HI editing mode by pressing ENTER/MENU;
4) press ESC to select digit to edit;
5) press UP and DOWN to set the value;
6) press ENTER/MENU to save the setting;
7) press and hold ESC to exit the menu.
EXAMPLE 5 Zero calibration
1) Press and hold ENTER/MENU to enter the menu;
2) press DOWN eight times to select ZERO item;
3) enter ZERO editing mode by pressing ENTER/MENU - display shows "122";
4) press UP to change it to "123";
5) calibrate zero by pressing ENTER/MENU - display shows "122" again;
6) press and hold ESC to exit the menu.
------------------------------------------------------------------------------------------
©Piezus
http://www.piezus.ru/
Made in Russia
Popular Accessories manuals by other brands

Panasonic
Panasonic ECONAVI CZ-CENSC1 installation instructions

IPMobileNet
IPMobileNet IP Series user manual

PHYWE
PHYWE Cobra SMARTsense Energy operating instructions

Dorner
Dorner AquaGard 7350 Series Installation, maintenance & parts manual

Simrad
Simrad PI REMOTE - REV A Quick reference guide

Philio
Philio PAT12 manual