pigtronix Infinity looper User manual

PigtronixTm
Infinity Looper
User’s Guide
All contents © Absara Audio LLC 2012

Welcome to Infinity
Pigtronix designed this pedal to be easy to use
yet vastly powerful and deeply musical. Think of it
like a foot operated, digital version of a multi-
track tape recorder. Eschewing the quantization
and delayed commands found in other looper
pedals, the Pigtronix approach is to make all
commands instantaneous. The incredible
processing power available in this pedal, allows
for execution of any action with approximately 1
millisecond of latency and high fidelity recording
at 24bits/48kHz. It is a mirror of musical reality...
what you put in is what you get out.
All loop audio on the Infinity Looper is stored to an
on-board memory card and can be accessed
via the USB port located on the front of the unit.
With the easy-to-use computer application that
comes pre-installed on the Infinity Looper pedal,
you will be able to offload audio from and
upload audio to this pedal, via a PC or MAC
computer.
Complementing the state-of-the-art digital
platform of the Infinity Looper is a beautifully
executed analog input and output section that
provides transparent pass-through audio as well
as superior headroom and discreet transistor
based limiting circuitry to prevent digital
distortion, even at extreme signal levels.

To put it succinctly, this looper SOUNDS GREAT! It
will not ruin your tone like so many other looper
pedals that have come before.
Of all the innovative features found in the Infinity
Looper, perhaps the most notable is the SYNC
MULTI function which allows Loop 2 to be a length
multiple of Loop 1. This facilitates greater melodic
and harmonic development and frees the
musician from the limits of their initial loop length.
Coupled with the inclusion of SERIES / PARALLEL
loop operation, AUX output for Loop audio and
INPUT SPLIT capacity for recording different
instruments on separate loops, the Infinity Looper
presets a near limitless set of possibilities for the
creative musician.
The Infinity Looper was many years in the making
and required a great deal of time and resources
to accomplish the goals that were initially set out
for this project. It has been an emotional and
psychologically challenging adventure that has
resulted in a product we are exceptionally proud
to present to the world of musicians interested in
loop based music.
This pedal is dedicated to the memory of the
great Les Paul, inventor of multi-track recording.
Dave Koltai –11/2012

-- QUICK START GUIDE –
Turn on the Infinity, it will load Preset 0 (the blank
canvas) upon power up.
Set the MASTER VOLUME to 3:00 and both LOOP
VOLUME knobs to 12:00
Press Loop 1 footswitch to record (You must
record on Loop 1 first)
Press Loop 1 footswitch again to close the loop
and begin playback
Press Loop 1 footswitch again to open an
overdub on Loop 1.
Press Loop 1 footswitch again to close the
overdub on Loop 1.
Listen to your loop, then press the STOP footswitch
to halt playback.
Press Loop 1 footswitch again to resume
playback.
Press Loop 2 to ARM Loop 2… the ARM light
above Loop 2 will blink, indicating that Loop 2 will
automatically begin recording at the top of the
next pass through the loop cycle.
Loop 2 begins recording in sync with the
beginning of Loop 1 and will automatically close
at the end of Loop 1.

-- QUICK START GUIDE (continued) –
Press Loop 2 footswitch again to open an
overdub on Loop 2.
Press Loop 2 footswitch again to close the
overdub on Loop 2
Now Press Loop 1 footswitch to arm Loop 1.
Press Loop 1 footswitch again to open another
overdub on Loop 1.
Press Loop 1 footswitch again to close the new
overdub on Loop 1.
Press the STOP footswitch to halt playback on
both Loops.
Press and Hold the STOP footswitch to erase both
loops.
--
Press the SERIES MODE switch to put the Infinity
into Series mode.
Press Loop 1 footswitch to record (You must
record on Loop 1 first)
Press the Loop 2 footswitch. This will simultaneously
close Loop 1 and begin recording on Loop 2.
Press the Loop 1 footswitch. This will simultaneously
close Loop 2 and begin playback on Loop 1.
Press and Hold the STOP footswitch stop audio
and erase both loops.

Footswitch Functions:
-- FOOTSWITCHES –
The three footswitches are the principal means of
controlling loop actions. The functionality of the
Loop 1 and Loop 2 footswitches is identical.
Pressing the Loop 1 footswitch at any time will
“ARM” Loop 1, illuminating the corresponding red
LED and indicating that Loop 1 is ready to receive
Play, Stop, Overdub and Undo commands. Loop
1 is armed by default upon power up.
Loop 1 (PLAY / REC / DUB) –If there is no audio
recorded on a loop, pressing the Loop 1
footswitch will begin recording immediately.
Once the loop is recording, pressing the Loop 1
footswitch will close the loop and begin
playback.
During playback pressing the Loop 1 footswitch
will open an overdub layer on Loop 1. Once an
overdub is recording, pressing the Loop 1
footswitch will close that overdub layer and
continue playback.
When a loop has been recorded but is stopped,
pressing the Loop 1 footswitch will begin
playback.
Loop 2 (PLAY / REC / DUB) –Functions the same
way as Loop 1 footswitch (see above).

Stop (Hold = Erase) –Pressing the STOP footswitch
will cause playback to cease on one or both
loops, depending on the ARM or ALL setting (see
below). Holding down the STOP footswitch will
cause loop audio to be erased from one or both
loops, depending on the ARM or ALL setting.
-- ARM / ALL –
Quickly Pressing the STOP MODE switch will
choose between ARM and ALL modes.
In ALL, the STOP footswitch will stop playback on
both Loops. The ALL functionality also applies to
the ERASE command. With ALL selected, holding
down the STOP footswitch will erase both loops.
The ALL functionality also applies to the PLAY
command. Once the loops are stopped, hitting
either loop footswitch will resume playback on
both loops.
In ARM, the STOP footswitch will stop playback
only on the loop that is armed. The ARM
functionality also applies to the ERASE command.
With ARM selected, holding down the STOP
footswitch will erase only the armed loop. To stop
both loops in ARM mode, hit the STOP footswitch
twice within 1 second. The ARM functionality also
applies to the PLAY command. Once the loop(s)
is stopped, pressing a loop footswitch will resume
playback on the currently armed loop only.

Toggle Switch Functions:
-- FULL / TRAIL / FADE --
Holding down the STOP MODE switch will choose
the way in which the loops stop when the STOP
footswitch is pressed.
FULL indicates that the audio will stop
immediately when you push the STOP footswitch.
TRAIL indicates that the audio will stop when it
reaches the end of the current loop cycle.
FADE indicates that the audio will steadily
decrease in volume until the end of the current
loop cycle.
All three stop modes obey the ARM setting and
will be applied to the armed loop only in this
mode.
When audio has been recorded on both Loop 1
and Loop 2, TRAIL and FADE stop modes will use
the length of Loop 2 as the master when the ALL
setting is selected.
-- INPUT SPLIT –
When INPUT SPLIT is OFF, both Loops record stereo
audio coming from IN 1 and IN 2
When INPUT SPLIT in ON, Loop 1 gets audio from IN
1 ONLY and Loop 2 gets audio from IN 2 ONLY.

When nothing is plugged into IN 2, then the audio
from IN 1 becomes the source for IN 2. In this
case, the Input Split function allows you to record
separate loops for the left and right output
channels.
-- SERIES / PARALLEL --
When the SERIES LOOPS is ON, you are in Series
mode. This means that only one of the two loops
can play at any given time. This is handy for verse
/ chorus type song structures.
When the SERIES LOOPS is OFF, you are in Parallel
mode. This means that Loop 1 and Loop 2 can
play together at the same time.
-- SYNC MULTI –
Holding down the SYNC MULTI switch will turn
synchronization between Loop1 and Loop 2 ON
and OFF
Once SYNC MULTI is turned on, quickly pressing
the SYNC MULTI switch will cycle through the
SYNC MULTI values.
When the SYNC MULTI is OFF, none of the sync
multi lights are lit. In this mode, the lengths of the
two loops are unrelated and playback is not
synchronized.

When the SYNC MULTI is ON, the lengths of the
two loops are synchronized. The length of Loop 2
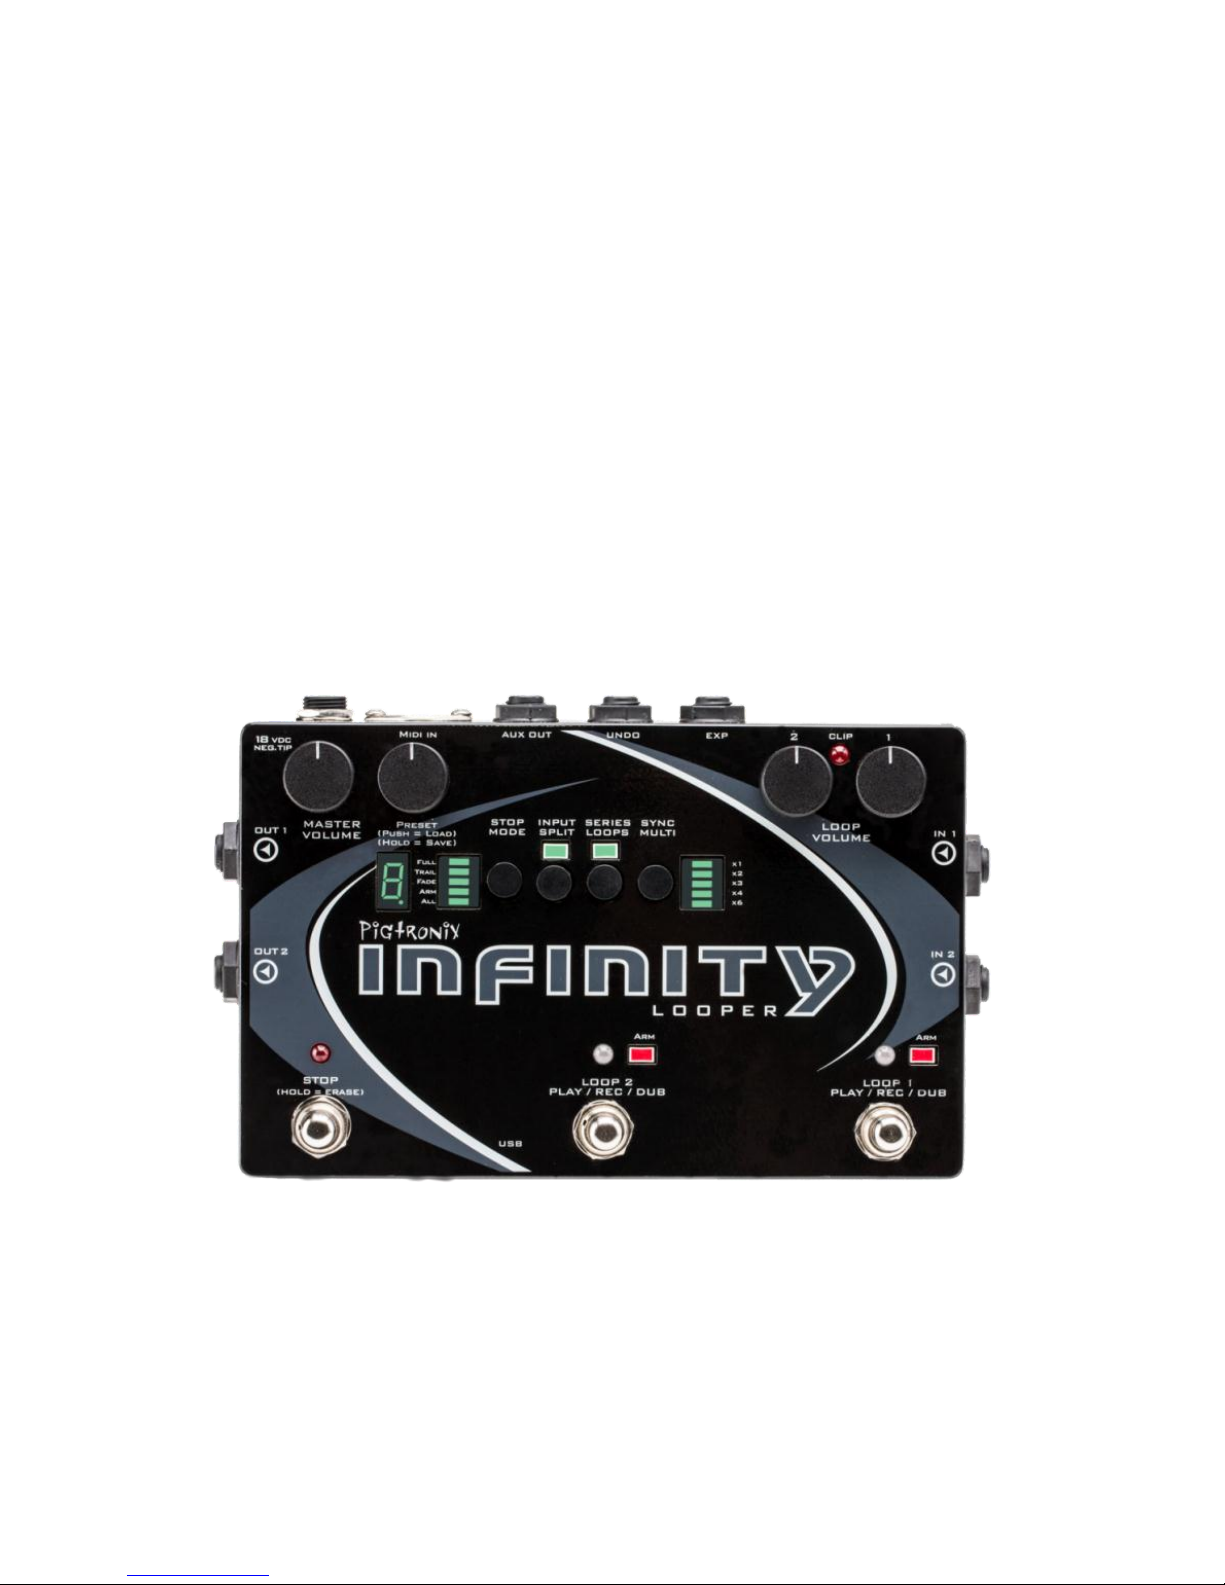
will be a multiple of the length of Loop 1, as set by
the multiplier factor indicated by the LED bar to
the right of the sync multi switch.
Loop 1 sets the initial length. Once recording on
Loop 2 is initiated, the ARM light will blink and it
will wait to begin recording until the top of the
next loop cycle. Loop 2 will automatically stop
recording and begin playback when the proper
length multiple has been reached.
You can alter the synchronization at any time
while recording, by manually closing Loop 2 with
the Loop 2 footswitch. This will cause Loop 2 to
close at the end of the current loop cycle. The
arm light will blink to indicate that Loop 2 is about
to close. To cancel this operation, hit the Loop 2
footswitch again and it will continue recording
until the full multiplier factor has been reached.
Once Loop 2 is recorded, the SYNC is locked to
the multiplier you have selected. It is possible to
turn SYNC on and off at this point, but you must
delete Loop 2 if you want to select a different
multiplier value.
Loop 1 will automatically close once you hit the
maximum allowable length during recording.
Overall recording time for Loop 1 is dependent on
multiplier value you have selected for the current
preset, the size of the memory card you have

installed in your Infinity Looper and the number of
preset slots you have assigned using the PC or
MAC application for the Infinity Looper. See the
table on the next page for maximum recording
times based on these factors.
-- SAVE / LOAD / COPY --
To Load a preset, turn the preset knob to select
the desired bank, the digit will flash. When you
have arrived at the desired destination, push
down the preset knob to enable that bank. To
cancel the load process at any time, hit the STOP
footswitch or simply turn the preset knob to return
to the currently loaded bank.
To Save a preset you have created, push and
HOLD the preset knob for 1 second, until the digit
begins flashing. Turn the preset knob to select the
bank you want to save the loops in and then
push down and HOLD the preset knob for 1
second to finalize the save. To cancel the save
process at any time, hit the STOP footswitch.
You cannot save loops to Preset “0” it is the
“blank canvas.” If you try to save a loop to Preset
0, the digit will show you a “-“ symbol, indicating
that you should turn the preset knob to save this
preset somewhere else.
The decimal point will illuminate to indicate that
audio is present in a Loop bank. When changes

have been made but not saved, the decimal
point will flash. If you want to keep your changes,
simply follow the save process explained above
without changing the selected bank.
To Copy a preset from one bank to another
simply initiate the save process as explained
above on a bank that already contains audio. In
order to copy a loop from one slot to another,
you must make at least one change to the loop.
This can be an audio or mode change.
The decimal point will illuminate to indicate that
audio is present in a Loop bank. When changes
have been made but not saved, the decimal
point will flash. If you want to keep your changes,
simply follow the save process explained above
without changing the selected bank.
In certain instances while saving, the Infinity
Looper may need to copy data from one sector
of the disk to another. When this happens, the
numeric display will show a flashing “C” while the
copy is in process.
The Stop footswitch also functions as an ESC key
when you are in the process of saving or loading
a loop and want to cancel that action.
The Minimum length of a Loop is 2.5 seconds

Loop 1 Maximum Recording Time (in seconds) with 8GB card
Multiplier Value
# of preset
slots
x1
x2
x3
x4
x6
2
1662
1108
831
664
474
3
1107
738
553
442
316
4
830
553
415
332
237
5
664
442
332
265
189
6
552
368
276
221
157
7
473
315
236
189
135
8
414
276
207
165
118
9
368
245
184
147
105
10 (default)
331
220
165
132
94
(All above values are in seconds)
Loop 2 recording time = Loop 1 length x Multiplier Value
8GB card (included) Total Recording Time = Approx. 2
hours
For 16GB card, double all values.
For 32 GB card, quadruple all values.

Infinity Anatomy:
Jacks:
DC POWER 18-VOLTS –Use only the 18-Volt,
300mA, negative tip power supply that came
with your Pigtronix Infinity Looper.
Using the wrong power supply is likely to result
in a damaged pedal.
IN 1 –Looper input, Plug in your instrument
here.
IN 2 –Looper input, Plug in your instrument
here. When nothing is connected to IN 2, the
signal from IN 1 is automatically passed to IN 2.
OUT 1 –Effect output, ¼”TS cable. Amp,
mixer, or DI goes here.
OUT 2 - Effect output, ¼”TS cable. Amp, mixer,
or DI goes here.
AUX OUT –This output contains summed mono
audio of all currently playing loops. This
output is primarily intended for use as a “loop
only” monitor send to a drummer, band mate
for FOH mixer.
UNDO –Connect a momentary remote switch
here using a ¼” TS cable to enable overdub
undo / redo.

EXP - This is the TRS expression pedal input for
controlling the audio output level of both
loops simultaneously. Moving the expression
pedal towards the heel will turn the loop
audio down from the level set by the
individual loop volume knobs. Use a Pigtronix
(or equivalent) expression pedal with a TRS
cable for best results.
MIDI IN - This provides a connection for MIDI
beat clock sync (slave). Infinity Looper will
sync to MIDI whenever a MIDI BEAT CLOCK
signal is preset. The Infinity Looper can also be
configured to obey MIDI START, STOP and
Song Select commands. To enable this
behavior, hold down the SYNC switch when
powering up.
USB –This provides a connection to a PC or
MAC computer for loading and offloading
loop audio as well as preset management
and firmware updates. The Infinity Looper is
“plug and play” device.
When the USB port is connected, the Infinity
boots into USB mode and will not function as a
looper until the USB is disconnected and
rebooted. Save any loop data you wish to
keep before plugging the Infinity in via USB.

Footswitches:
LOOP 1 (ARM / PLAY / REC / DUB) –This
footswitch controls the looping actions for
Loop 1
LOOP 2 (ARM / PLAY / REC / DUB) –This
footswitch controls the looping actions for
Loop 2
STOP (HOLD = ERASE) –Pressing this footswitch
causes looped audio to stop playing. Holding
this footswitch down for 2 seconds causes
loop audio to be erased.
LEDs:
The Loop 1 and Loop 2 Footswitch LEDs share
the same color coding.
RED = Recording | GREEN = Playback |
ORANGE = Overdub
Both Loop 1 and Loop 2 Footswitch LEDs are
accompanied by a red square, “ARM” LED
that indicates which loop is currently armed.
When MIDI Sync is enabled, the ARM LED for
the currently selected Loop will blink at the
top of each measure to indicate that MIDI
sync is active.
STOP LED –The STOP LED will glow red when
loop audio is stopped.

When a delayed command has been
initiated, the relevant footswitch LED will blink
to indicate a pending action and will turn solid
in color once the action is taken.
CLIP LED –This red LED between the Loop
Volume knobs will indicate when the input
signal is reaching the maximum headroom of
the Infinity’s recording engine and begins to
trigger the analog limiter stages. If the CLIP
LED is lighting up solid red, reduce the output
level of your instrument until the CLIP LED is just
beginning to light up at the peaks in your
audio signal.
MULTI-SEGMENT DIGIT –This numeric display
tells the user which preset bank is currently
selected and is also used to confirm firmware
update “F” to indicate copy in progress “C”
and USB active “U” states.
The decimal point located to the right of the
digit lights up to indicate that audio has been
recorded to a preset bank. When changes
have been made to a preset but not saved,
the decimal point will blink. Once the changes
have been saved, the decimal point will
return to solid.
When all audio is erased from a preset, the
digit will blink to indicate a change. Once you
save the preset in this state, the decimal point

will then disappear to indicate that the preset
is now saved as empty.
Toggle Switches:
STOP MODE –Determines the behavior of the
STOP footswitch.
Press quickly to choose between the ARM and
ALL options.
Hold down the STOP MODE switch to toggle
through the FULL, TRAIL and FADE options.
INPUT SPLIT –When INPUT SPLIT is selected, IN 1
is assigned to LOOP 1 only and IN 2 is assigned
to LOOP 2 only. When INPUT SPLIT is turned off,
audio from both channels is recorded on both
loops.
SERIES LOOPS –When SERIES LOOPS is
selected, Loop 1 and Loop 2 run in series.
Series means that only one of the loops can
playback at any given time. When SERIES
LOOPS is turned off, Loop 1 and Loop 2 run in
parallel. Parallel means that both loops can
playback at the same time.
SYNC MULTI –Determines the length
relationship between Loops 1 & 2. When a
multiplier is selected, the length of LOOP 2 is
synchronized to be the chosen length multiple
of LOOP 1.

Press and Hold the SYNC MULTI switch to
toggle between the currently selected SYNC
MULTI value and non-SYNC. When none of the
SYNC MULTI LEDs are lit, the two loops are NOT
SYNCED.
Once SYNC MULTI is turned on, press the SYNC
MULTI switch quickly to cycle through the
different SYNC MULTI values.
If audio has already been recorded on Loop
2, you cannot change the SYNC MULTI value,
but you can press and hold the SYNC MULTI
switch to turn SYNC MULTI on and off.
Knobs:
MASTER VOLUME –This knob functions as a
stereo output control, determining the output
level of both loop audio and pass-through
audio.
When turned fully clockwise, the MASTER
VOLUME knob provides an overall boost of
approximately 3db.
PRESET –This is a rotary push button encoder
that is used to select what loop bank is in use
and to store loop audio.
LOOP VOLUME 1 - Sets the Loop 1 output
volume

LOOP VOLUME 2 - Sets the Loop 1 output
volume
The Loop 1 and Loop 2 Volume knobs are
calibrated so that 12:00 = Unity Gain for Loop
audio. Turning either of the Loop Volume
knobs above 12:00 will result in Loop Audio
that is actually louder than the input signal.
Infinity Rules
Arm:
Arming a loop is done by pressing the footswitch
that corresponds to the desired loop. The Arm
light above the selected loop will glow red
indicating its status as armed. A loop must be
armed in order to accept further commands.
When the Infinity powers up initially, LOOP 1 is
armed by default. Loop 2 cannot be armed until
material is recorded on Loop 1,
Record:
Once a loop is armed, pressing the footswitch for
that loop will begin recording. The corresponding
loop LED will glow red to indicate recording. You
must record to Loop 1 first. You will be able to
record on Loop 2 once there is audio recorded
on Loop 1.
Other manuals for Infinity looper
1