DMX4ALL ArtNet Relais/Analog Interface 4 User manual

ArtNet Relais/Analog Interface 4
User manual

ArtNet Relais/Analog Interface 4 2
For your own safety, please read this user manual and warnings
carefully before installation.
Description
The ArtNet Relais/Analog Interface is designed for several controlling tasks.
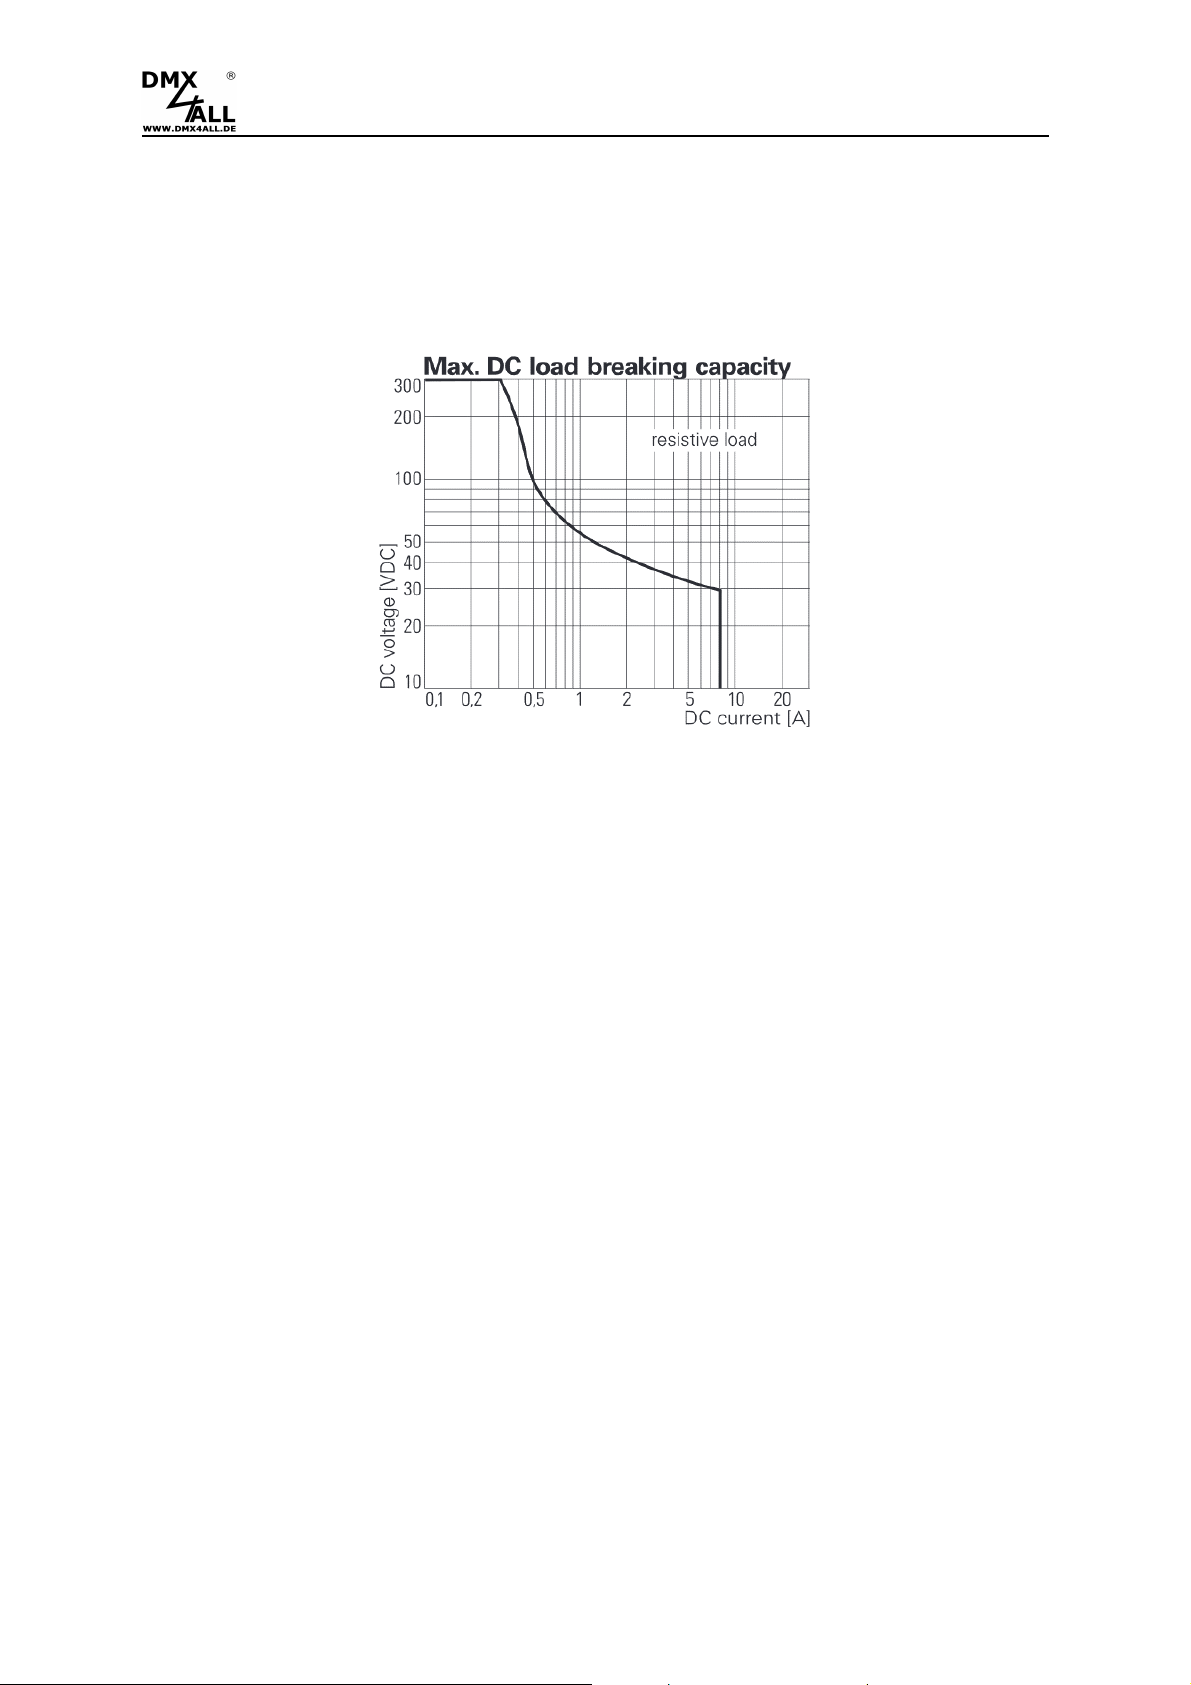
4 switch contacts for direct and alternating voltage
4 potential-free switching outputs (normally open / NO) with up to 8A switching
capacity for switching DC or AC voltage.
4 analog outputs
Four analog outputs with 0-10V vs 1-10V can be used to control systems with analog
inputs.
Analog outputs with 10mA
Each analog output has an output driver with max 10mA available.
For power supply from 12V up to 24V
The ArtNet Relais/Analog Interface runs with supply voltages from 12V up to 24V DC.
DMX, Art-Net or RDM
Optionally the ArtNet Relais/Analog Interface can be controlled via DMX, Art-Net
(DMX over Ethernet) or RDM (Remote Device Control).
RDM support
The ArtNet Relais/Analog Interface allows the configuration via RDM or DMX.
DMX-FAIL Function
An adjustable DMX FAIL function offers the option to get in case of DMX signal loss
the current state (HOLD) or assuming a preset value.
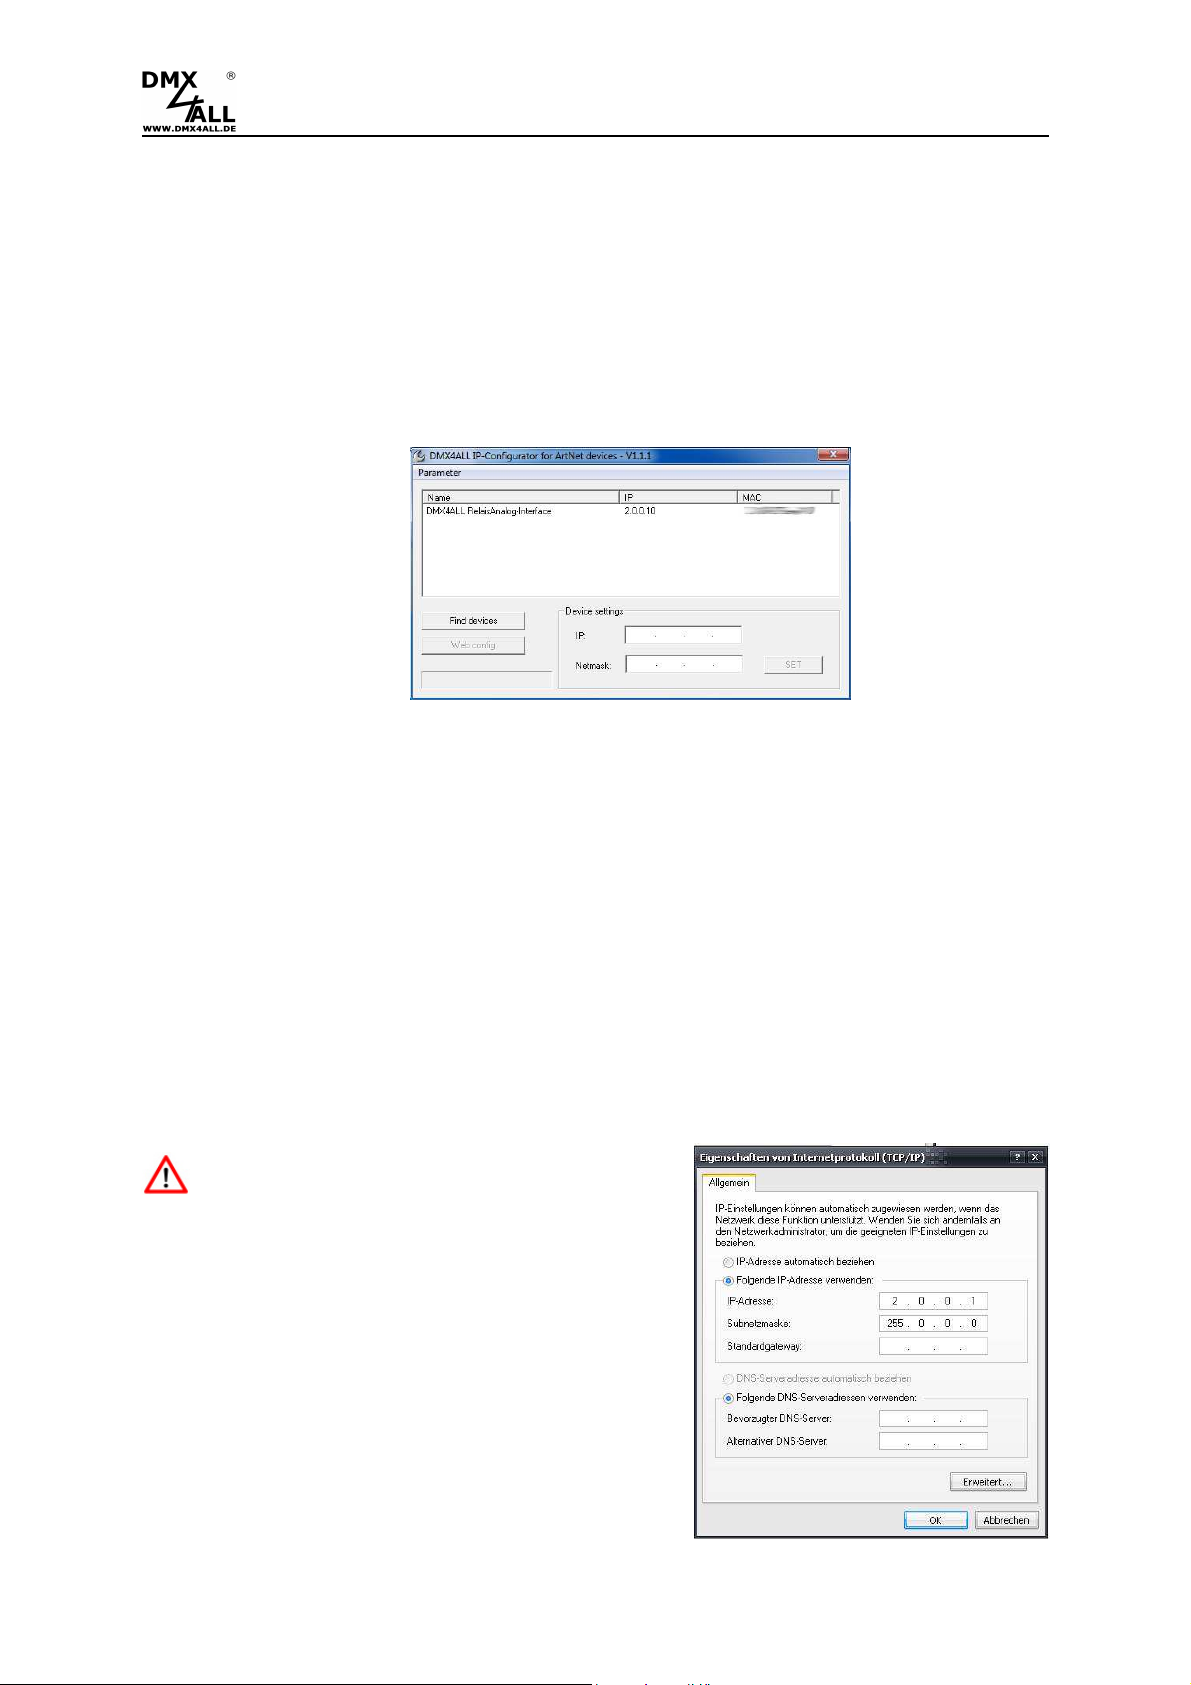
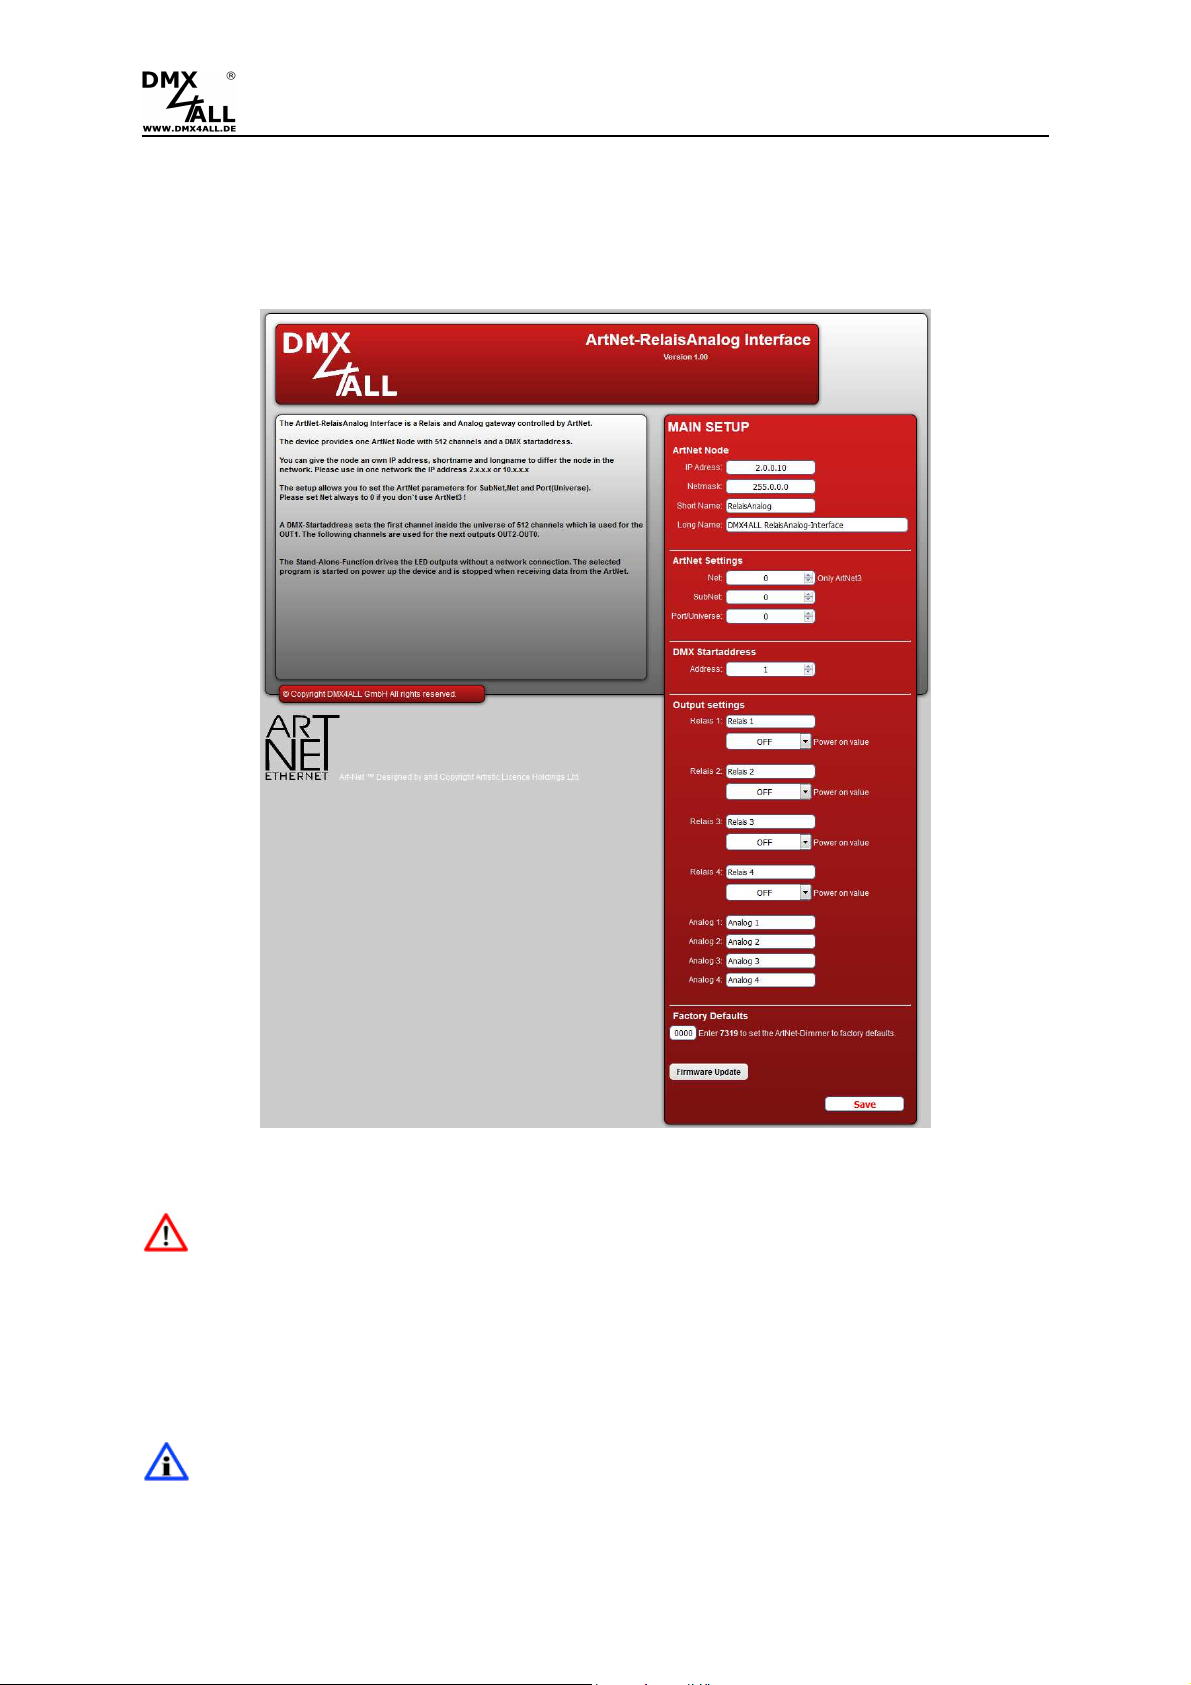
Easy configuration
A user-friendly configuration via a web browser allows a fast and uncomplicated
setting of all parameters.
Power supply for WLAN-Bridge
In addition the ArtNet Relais/Analog Interface has a USB connector providing a
power supply with 5V/500mA for external devices e.x. a WiFi-bridge.
As WLAN-bridge we suggest: TP-Link TL-WR702N or TP-Link TL-WR802N
Control via App
The control of this device is possible by using the free Android-App "DMX Remote".

ArtNet Relais/Analog Interface 4 3
Firmware-Update-Function
In order to take advantage of future features, the ArtNet Relais/Analog Interface has
a firmware update function.
This can be launched from the browser so that no access to the device is necessary!
DMX4ALL-Command interface
The ArtNet Relais/Analog Interface has another TCP communication interface.
This interface uses the DMX4ALL-Commands via TCP packets.
LED status display
The LED status display shows the DMX reception.
Top hat rail mounting available
The DIN rail housing 1050 is available as accessory for the ArtNet Relais / Analog
Interface.

ArtNet Relais/Analog Interface 4 4
Data sheet
Power supply: 12-24V DC
Power consumption: 200mA@12V; 140mA@24V
(without connected load at the analog output)
Ethernet: RJ45
Protocol: DMX512
ArtNet
TM
(downwards compatible)
DMX4ALL Commands
RDM
DMX channels: 4 up to 12 channels
Output: 4x switch contacts (closer / NO)
Each max. 8A / 250V~ (165A@20ms inrush current)
or up to 8A DC (note max. DC load!)
4x analog output 0-10V / 1-10V (max. 10mA)
DMX-FAIL: Hold / 0-100%
Connections: screw terminals
USB-Connection: 5V/500mA
For power supply of externl devices
(e.g. WLAN-Bridge)
Dimension: 99mm x 82mm

ArtNet Relais/Analog Interface 4 5
Max. DC load
The maximum current the switch contacts of the ArtNet Relais/Analog Interface can
switch is shown in the following graph depending on the switching voltage:
(Quelle: Data sheet RTS3T012)

ArtNet Relais/Analog Interface 4 6
Connection
Operation with DMX:
ArtNet Relais/Analog Interface
ADDRESS
DMX OUT
12 3 4
POWER 12-24V
DMX IN
POWER
POWER
max. 10mA
ANALOG OUT
Operation with ArtNet:
ArtNet Relais/Analog Interface
ADDRESS
12 3 4
POWER 12-24V
POWER
POWER
max. 10mA
ANALOG OUT
Ethernet

ArtNet Relais/Analog Interface 4 7
LED Display Codes
The integrated LED is a Multi-functional-display.
In the normal DMX-mode the LED flashes non-stop. In this case the device is
working. If the LED is permanently dark, there is no DMX512-signal at the entry.
Also the LED signalled the operation status. In this case the LED lights up in short
pitches and then turns into off modus. The Number of flashing signals is equal to the
number of the error status.
Error
Status
Error
Description
1 No DMX There is no DMX-signal at the entry
2 Address error Please check the adjusted starting address
DMX-Addressing
The DMX-starting address is adjustable via switch 1to 9.
Thereby switch 1 has the valency 2
0
(=1), switch 2 the valency 2
1
(=2) and so on until
switch 9 has the valency 2
8
(=256).
The sum of the values of the switches showing ON correspond to the starting
address.
Address
Switch Address
Switch
1
... ...
2
508
3
509
4
510
5
511
If switches 1-9 are OFF, the DMX start address set via the web interface is
used!

ArtNet Relais/Analog Interface 4 8
Set the IP with IP-Configurator
The IP-Configurator allows the setting of the IP-Address and net mask also, if the
network settings of the PC are not in the IP-Range of the ArtNet Relais/Analog
Interface.
-Install the program IP-Configurator
-Connect the ArtNet Relais/Analog Interface to network and turn on the device.
-Start the program IP-Configurator
-The ArtNet Relais/Analog Interface is shown in the list
-Select the entry (click)
-Enter the new IP and net mask
-Click SET
Set the IP with web browser
The assigned IP-Address which will be used for the web-interface as well as for the
ArtNet is within the delivery status 2.0.0.10 .
Set the network card of your PC to this IP-Range to call the IP-Address 2.0.0.10
via the web browser.
The PCs network settings must be the IP-
Address 2.0.0.1 and the subnet mask
must be 255.0.0.0.
Please take further details from the ArtNet-
specifications.

ArtNet Relais/Analog Interface 4 9
Device Configuration
Call, via the address task at the web browser, the IP of the ArtNet Relais/Analog
Interface (Delivery state: 2.0.0.10) to get the following configuration site:
Each ArtNet-Node needs an own
IP
-
Address,
so the assignment in the
network is clear. Use in accordance to the ArtNet-Specification the IP-Address
2.x.x.x or 10.x.x.x .
The Net mask is according to the ArtNet-Specification 255.0.0.0 .
Each other IP-Address can also be used for a better distinction, e.g.
192.168.1.10 . In this case the net mask must be adapted to 255.255.255.0 !

ArtNet Relais/Analog Interface 4 10
For a better distinction any name can be used for the ArtNet-Node.
The Short-name is limited to 18 signs and the Long-name is limited to 64 signs.
Under the ArtNet-Settings you can carry out the settings for the Subnet, Net and
Port/Universe.
The DMX-Start Address shows the Channels within the according DMX-Universe
from whence the outputs should be appealed.
Thereby the DMX-Starting address complies to relay 1 and the following addresses
comply to relay 2-4 followed by the analog outputs 1-4.
If a DMX-Starting address is adjusted via the switches this address is regarding prior.
Note, that the channel assignment can differ with placed MODE-Jumper !
Within the output settings for each relay and for each analog output individual names
can be entered.
Furthermore, after turning on (Power on value) the conditions for the relays can be
defined. Turning on the relays can occur delayed.
The Factory Settings will be restored by entering the number 7319.
SAVE stored the configurations respectively restored the Factory Settings.

ArtNet Relais/Analog Interface 4 11
Switching relays with an analog value higher 0V
This Mode uses no separated for the relays DMX-Channels. The relay switches as
soon as the analog value is higher than 0V respectively the DMX-value for the analog
output is higher than 0.
Via MODE-Jumper 1 this mode is activatable:
In this case the DMX-Channel assignment is as following:
DMX-Channel assignment by 8 Bit: DMX-Channel assignment by 10 Bit:
Analog+Relais 1
Analog+Relais 2
Analog+Relais 3
Analog+Relais 4
Analog+Relais 1 H
Analog+Relais 1 L
Analog+Relais 2 H
Analog+Relais 2 L
Analog+Relais 3 H
Analog+Relais 3 L
Analog+Relais 4 H
Analog+Relais 4 L
Relais and Analog separate
controllable
Relay witches by an analog value
higher than 0V
Start address Start address

ArtNet Relais/Analog Interface 4 12
Set resolution of analog outputs
The analog output resolution will be adjusted via the MODE-Jumper 2.
The analog outputs are operable with a resolution of 8 Bit (256 steps) or 10 Bit (1024
steps).
Depending on the resolutions setting the analog output there is needed per output
one or two DMX-channels, as shown in the following picture.
DMX channel configuration with 8 Bit: DMX channel configuration with 10 Bit:
Relais 1
Relais 2
Relais 3
Relais 4
Analog 1
Analog 2
Analog 3
Analog 4
Relais 1
Relais 2
Relais 3
Relais 4
Analog 1 HIGH
Analog 1 LOW
Analog 2 HIGH
Analog 2 LOW
Analog 3 HIGH
Analog 3 LOW
Analog 4 HIGH
Analog 4 LOW
8 Bit
(256
Steps
)
10 Bit (1024 Steps)
Start address Start address

ArtNet Relais/Analog Interface 4 13
Set the output voltage 0-10V / 1-10V
The analog outputs output voltage is adjustable via the MODE-Jumper 3:
DMX-FAIL Function
The ArtNet Relais/Analog Interface has a DMX-FAIL Function which stores the last
value in the case of a DMX-signal (HOLD) loss or uses a value set with RDM before.
The HOLD function can be activated via RDM or switch 10.
Switch 10 ON DMX-HOLD active
Switch 10 OFF DMX-HOLD not active
If HOLD is switched on (switch 10 = ON), the last received DMX values are kept in
case of a DMX signal failure.
If HOLD is switched off (switch 10 = OFF), the DMX values are replaced with a value
set by RDM in case of DMX signal failure. In delivery state this value is 0, so the
relays switch off.
In case of a power failure the held DMX values are rejected!
A value set by RDM is deleted when HOLD is selected.
After switching off the HOLD function the default value 0 is used!
0-10V
1-10V

ArtNet Relais/Analog Interface 4 14
DMX4ALL-Command support
The ArtNet Relais/Analog Interface has another communication interface which
receives data via TCP-packages at Port 10001.
TCP-Control
For controlling the interface directly via TCP-connection please use the set web
browser IP-address and use Port 10001. The sent and received data are RAW-data
packages.
Please take the potential DMX4All-Commands from the separated DMX4ALL-
Command description.
VCP-Control
For controlling via a COM-Port a TCP-VCP-program must be installed, providing a
virtual Com Port (VCP).
We recommend the tool Serial to Ethernet Connection tested by us. This tool is
available as download within the support area.
It is needed to enter a password
during the installation (see adjacent
figure).
After the installation start the tool
„Centos SEC“ being on the desktop.
Add a VCP with Add and specify the
parameters for this VCP-Port as per
margin.
Please mind to use the IP which is
entered via the web browser.

ArtNet Relais/Analog Interface 4 15
Finally click Update all in the main
menu to activate the VCP.
Now the status Available is shown
and the COM-Port is displayed in
the device manager.

ArtNet Relais/Analog Interface 4 16
RDM
RDM is the short form for Remote Device Management.
As soon as the device is within the system, device-dependent settings can occur
remotely via RDM command due to the uniquely assigned UID. A direct access to the
device is not necessary.
If the DMX start address is set via RDM, all address switches at the ArtNet
Relais/Analog Interface must be set to OFF ! A DMX start address set by the
address switches is always prior !
This device supports the following RDM commands:
Parameter ID
Discovery
Command
SET
Command
GET
Command
ANSI/
PID
DISC_UNIQUE_BRANCH
E1.20
DISC_MUTE
E1.20
DISC_UN_MUTE
E1.20
DEVICE_INFO
E1.20
SUPPORTED_PARAMETERS
E1.20
PARAMETER_DESCRIPTION
E1.20
SOFTWARE_VERSION_LABEL
E1.20
DMX_START_ADDRESS
E1.20
DEVICE_LABEL
E1.20
MANUFACTURER_LABEL
E1.20
DEVICE_MODEL_DESCRIPTION
E1.20
IDENTIFY_DEVICE
E1.20
FACTORY_DEFAULTS
E1.20
DMX_PERSONALITY
E1.20
DMX_PERSONALITY_DESCRIPTION
E1.20
DMX_FAIL_MODE
E1.37
SERIAL_NUMBER
1)
PID:
0xD400
1) Manufacturer depending RDM control commands (MSC - Manufacturer Specific Type)

ArtNet Relais/Analog Interface 4 17
Manufacturer depending RDM control commands:
SERIAL_NUMBER
PID: 0xD400
Outputs a text description (ASCII-Text) of the device serial number.
GET Send: PDL=0
Receive: PDL=21 (21 Byte ASCII-Text)

ArtNet Relais/Analog Interface 4 18
Factory Reset
It is possible to reset the ArtNet Relais/Analog Interface into the delivery status.
Please proceed as follows:
-Turn off the device
-Place the MODE-Jumper J1 to J2 as shown
-Turn on the device
-The reset executes and the LEDs at the RJ45-connection
light up 3x simultaneously as confirmation
Alternatively, you can generate the delivery status via the web browser:
-Open the Main Settings within the web browser
-Enter the code „7319“ in Factory Defaults
-Click Save
Subsequently wait at least 10 seconds

ArtNet Relais/Analog Interface 4 19
Execute Update
The ArtNet Relais/Analog Interface has an Update-Function which allows to
transfer prospective Firmware-Updates.
Please proceed as follows:
-Turn off the device
-Place the MODE-Jumper J2 to J3 as shown
-Turn on the device
-The yellow LED lights up
-Occur a connection between PC and network
-Start the Update-Software DMX4ALL LAN-Updater
-Select the ArtNet Relais/Analog Interface from the list
-Click Firmware-Update
-Select the Firmware-Data (.bin) and confirm
-Wait until the Update has finished
-Set the MODE-Jumper to the original condition
If during the Update occurs an error you can start the Update again any time.
Alternatively, the Firmware Update can be activated via web browser:
-Open the Firmware Update within the web browser
-Enter the shown code “1379” in the entry field and click Send
-Start the DMX4ALL LAN-Updater
-Select the ArtNet Relais/Analog Interface from the list
-Click Firmware-Update
-Select the Firmware-Data (.bin) and confirm
-Wait until the Update has finished
-Click Back in the web browser

ArtNet Relais/Analog Interface 4 20
Dimensions
(all details in mm)
Table of contents
Other DMX4ALL Recording Equipment manuals

DMX4ALL
DMX4ALL DMX Relais/Analog Interface 1 User manual

DMX4ALL
DMX4ALL DMX-Audio Unit User manual

DMX4ALL
DMX4ALL Pixelkonig Wireless ArtNet-DMX STAGE-PROFI... User manual

DMX4ALL
DMX4ALL NanoDMX USB Interface User manual

DMX4ALL
DMX4ALL Art-Net DMX-UNIVERSE 4.1 User manual

DMX4ALL
DMX4ALL DMX UNIVERSE DR1.1 RDM User manual

DMX4ALL
DMX4ALL DMX-Relais/Analog Interface 4 User manual

DMX4ALL
DMX4ALL ArtNet-DMX-UNIVERSE 4.1 User manual

DMX4ALL
DMX4ALL ArtNet-DMX STAGE-PROFI 1.1 User manual

DMX4ALL
DMX4ALL Art-Net DMX STAGE-PROFI 1.1 RDM User manual