Pilot Power E22 User manual

Before using the gun, please read this manual thoroughly.
Improper use of the gun can cause damage or a fatal injury.
Conformity to
European Standards
E22
INSTRUCTION MANUAL
Electric
Spray Gun
50 Hz 550 W220-240V~

32
18
25
26
17
18
7
6E
6D
6A
6
5
4
3
2
1
9
10
11
18
18 30
28
29
12
34
33
24
23
22
21
16
15 27
31
13
14
8
19
20
35
36

3. Function:
Suitable for painting furniture, fences, doors, windows,
walls, ceiling, and for automobile use, high altitude
operation etc.
1. Exploded View:
Sr Part Name Part Sr Part Name Part
No. Number No. Number
1 Air Cap Locking Nut 22001 18 Screw 22019
2 Air Cap 22002 19 Trigger Complete 22020
3 Nozzle 22003 20 Trigger Pin 22021
4 Baffle Ring 22004 21 Stopper 22022
5 Nozzle Seal 22005 22 Motor Cover 22023
6 Needle Complete 22006 23 Motor 22024
6A Needle 22006A 24 Damper 22025
6D Seal 22006D 25 Switch Spring 22026
6E O Ring 22006E 26 Switch Plunger 22027
7 Needle Spring 22007 27 Switch Complete 22028
8 Spray Housing 22009 28 Cable 22029
9 Suction Tube 22010 29 Grommett 22030
10 Cup Washer 22011 30 Cable Anchorage 22031
11 Cup 22012 31 Drive Housing Left Cover 22032
12 Spray Housing O Ring 22013 32 Drive Housing Right Cover 22033
13 Spreader Control Knob Complete 22014 33 Filter 22035
14 Spray Housing Left Cover 22015 34 Drive Housing Back Cover 22036
15 Lock Spring 22016 35 Spanner 22037
16 Lock Catch 22017 36 Viscocity Cup 22038
17 Spray Housing Right Cover 22018
2. Technical Parameters:
Model: E22
Rated power: 550W Spray distance: 200-250mm
Rated Voltage: 220-240V Width: 200-300mm
Frequency: 50HZ Viscosity: 8-12s
Rated speed: 30000RPM Paint capacity: 800ml
Air flow: 160L/MIN Wire length: 1.8m
Paint flow: 100-200ml/min

4. How to Use:
Before using the electric spray gun, material preparation is the first stage.
Please refer to the thinning chart and picture.
Material Run out time (Sec)
Oil Enamel 25-60
Oil based primer. 30-60
Oil stain no thinning required
Clear sealer no thinning required
Polyurethane no thinning required
Varnish 20-60
Lacquer sanding sealer 25-35
Lacquer 25-35
Automotive finishes 20-40
Latex 45-90
4-2) Adjust the suction tube.
Suction Tube
4-1) Unscrew the paint container from the spray gun.
a) If spray in in upward direction, the angled
end of the suction tube should be pointing
toward the rear of the gun.

4-4) Remove the motor
a) Hold the gun with your hand to align the slot on
the gun with the slot on the motor and insert it
(as shown in the figure).
b) Hold the motor handle with your hand, rotate it
right hand clockwise 90°.
c) When the gun and host are parallel, it is locked.
b) If spray in a downward direction, the angled
end of the suction tube should be pointing
towards the front of the gun.
4-3) Pour material into container, make sure not to
exceed 800ml
Suction Tube
a) Hold the gun with your hand and press the latch in
the direction of the arrow.
b) At the same time hold the motor handle with your
hand and rotate it counter clockwise 90°.
c) Pull out to remove the motor from the gun.
4-5) Connect gun body with motor.

a) Adjust the screw to left to decrease paint
volume, lower paint thickness
b) Adjust the screw to right to increase paint
volume, increase paint thickness Adjusting Screw
a) The gun spray patterns can be changed from a horizontal oval fan pattern to a round
b) Detailed pattern to a vertical fan pattern by adjusting the nozzle.
Length control knob
VERTICAL HORIZONTAL
4-9) Open the power switch, pull trigger, the paint will spray from the nozzle.
4-6) Adjust the needle adjusting screw to meet your requirement.
4-7) Spray length adjustment: Turn this knob to adjust the
round shape from vertical to horizontal.
Adjust the required length according to the spraying environment, reduce waste and save material.
a) The counter clockwise rotation shortens the length, and when it rotates to the stop position,
it is sprayed with the largest circle.
b) Adjust the screw to right to increase paint volume, increase paint thickness
4-8) Adjusting spray patterns

When disassembling the nozzle, please pull the trigger first, then press and remove the nozzle.
a) As shown in the figure, rotate to remove the needle
b) As shown in the figure, rotate to set up the needle
Incorrect:
Do not flex wrist while spraying.
EVEN COAT THROUGHOUT
Correct:
Keep stroke smooth and at even speed.
5. How to Spray Properly:
6. Replace Nozzle and Needle:

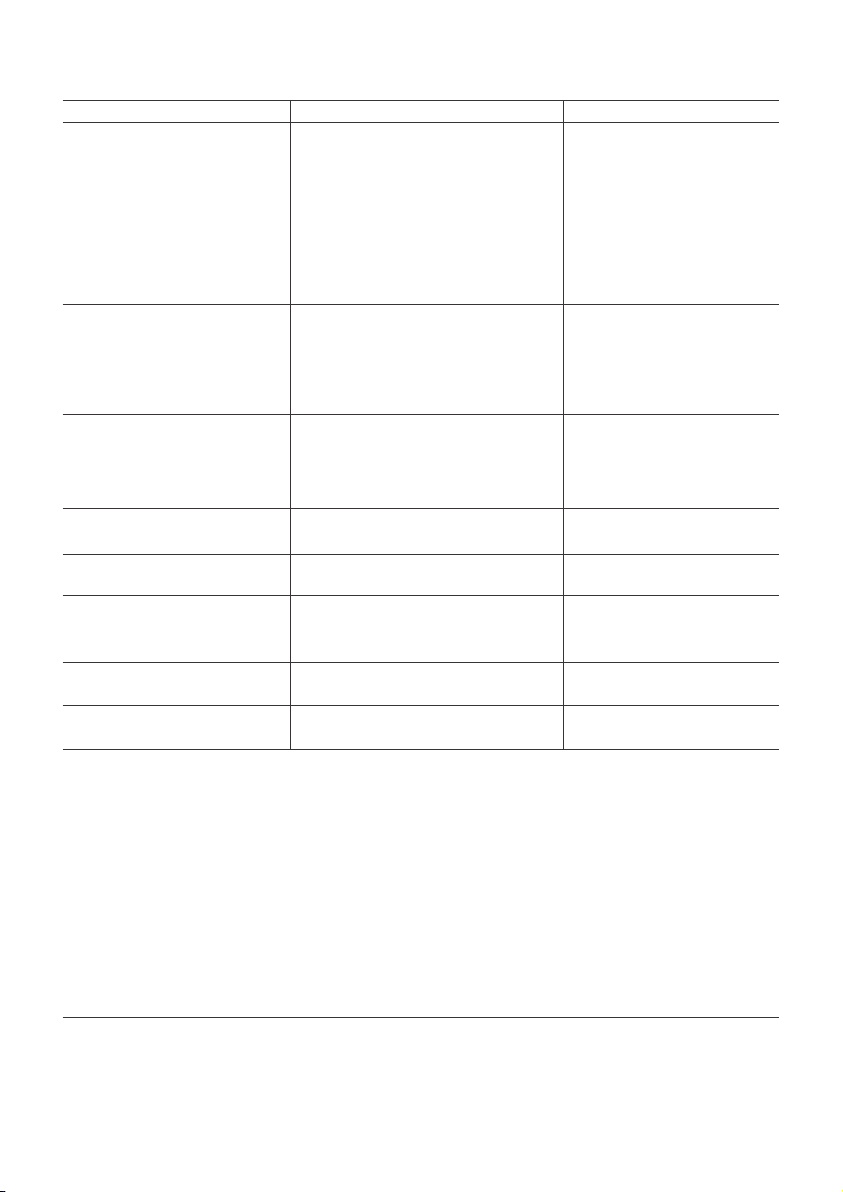
Problem Cause Solution
A. little or no material flow 1. nozzle clogged 1. clean
2. suction tube clogged 2. clean
3. material volume setting may have
turned too far to the right 3. turn to the left
4. suction tube loose 4. insert
5. material is too thick 5. check viscosity
6. inconsistent paint 6. strain paint
7. container is loose 7. tighten the container
B. material leaking 1. nozzle loose 1. tighten
2. nozzle worn 2. replace
3. nozzle seal worn 3. replace
4. material build-up on spray pattern
dial and nozzle 4. clean
C. atomization is too coarse 1. viscosity of material too high 1. thin the material
2. material volume too large 2. turn to the right
3. nozzle clogged 3. clean
4. too little pressure build-up in container 4. tighten container
D. spray jet pulsates 1. material in container running out 1. refill
2. material is too thick 2. check viscosity
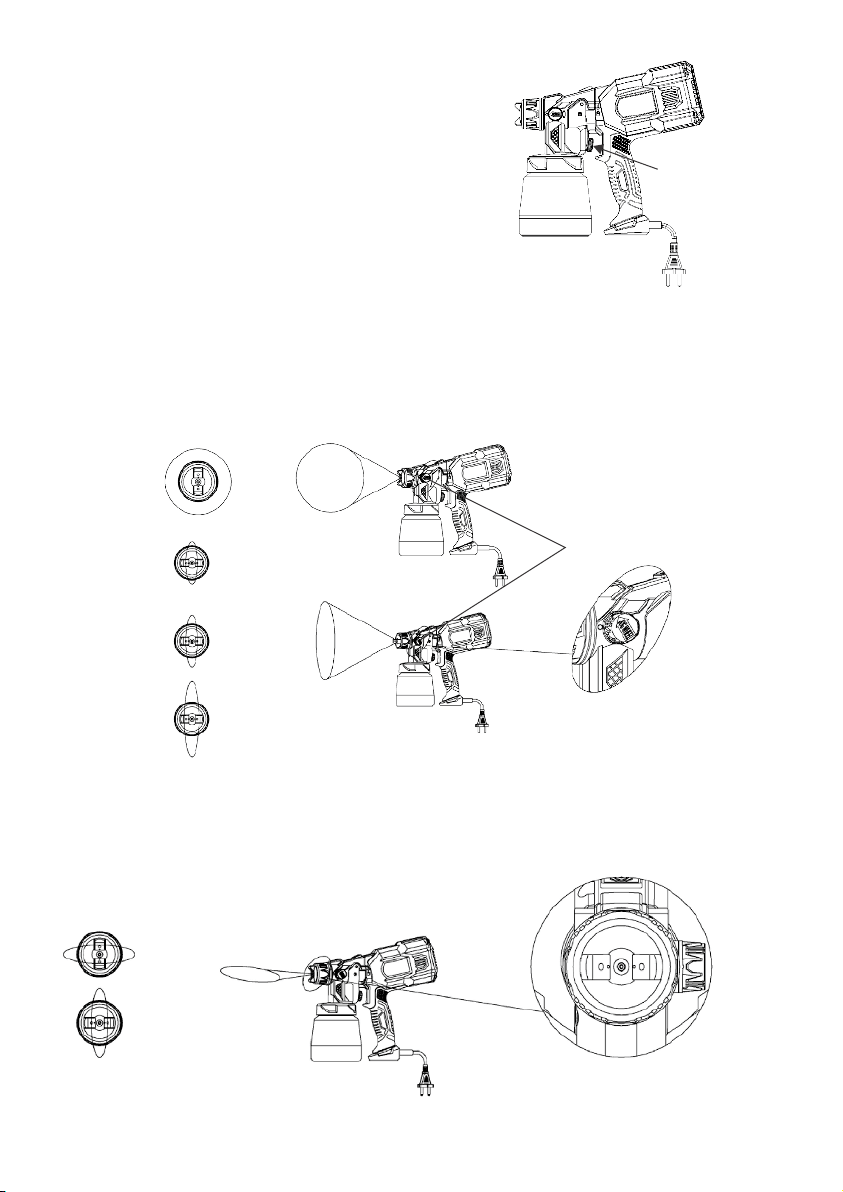
E. pattern runs or sags 1. applying too much material 1. adjust material flow or increase
movement of spray gun
F. too much over-spray 1. gun too far from spray object 1. reduce distance
2. too much material applied 2. turn material volume setting
to right
G. pattern is very light and splotchy 1. moving the spray gun too fast 1. adjust material flow or decrease
movement of spray gun
H. large cloud of paint 1. gun too close to surface 1. move gun away from surface
and reduce paint flow
1. Keep your workplace clean and tidy, never use the tool in hazardous areas that contain
flammable liquids, gases or dust.
2. Only use paints, solvents or other materials with a flash point of 73 °F(22C) or higher.
3. Never point the spray gun at other person or animal. In the event of an injury, seek immediate
medical attention.
4. Always read the paint manufacturer's thinning instructions before use.
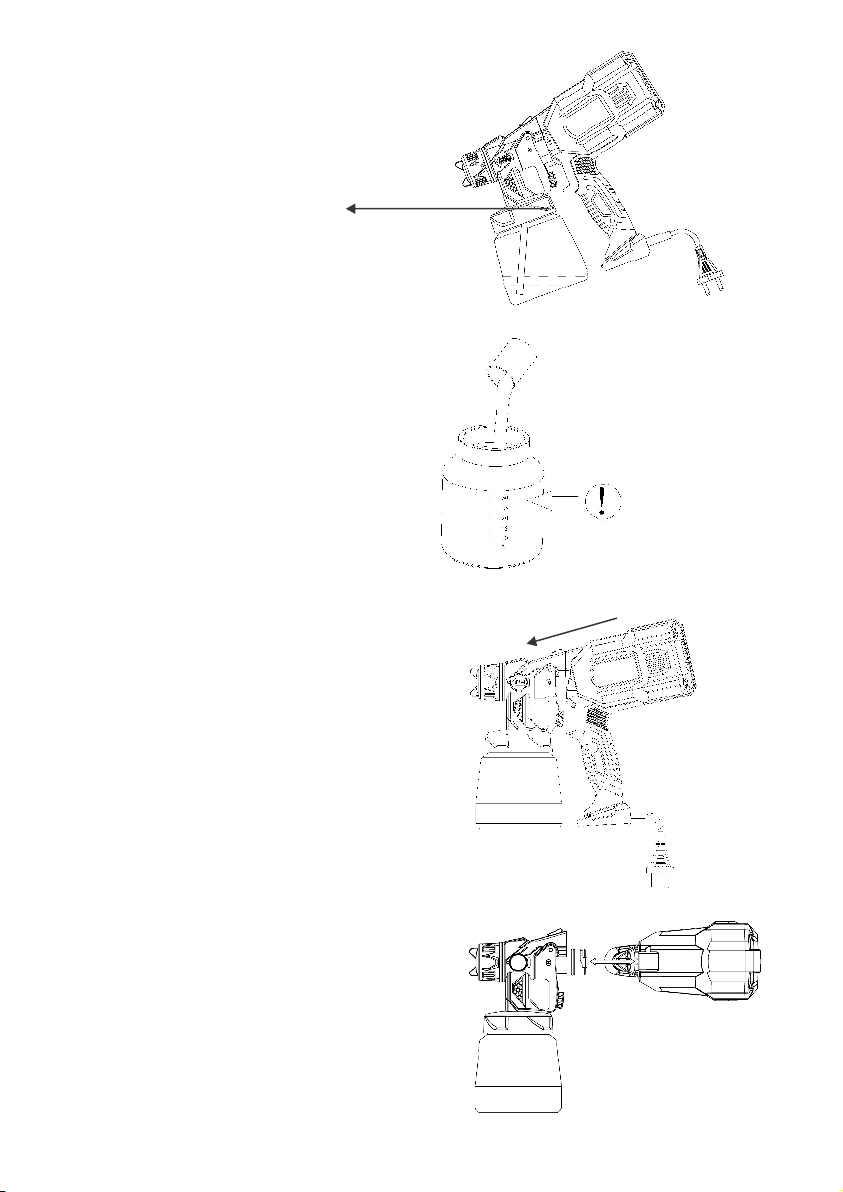
5. You must clean the spray gun thoroughly after each use.
6. Do not pull the power cord to move this tool.
7. Troubleshooting:
8. Warning!
Marketed by :
Manik Radiators Pvt. Ltd.
Shed No.3, Plot No. 126/1 2B, Village Horale, Khopoli Pen Road,
Khalapur, Raigad 410203, Maharashtra, INDIA Tel.: +91 22 660 47 000
E-mail: [email protected] • www.pilotindia.com
multiprintindia.com
Table of contents
Other Pilot Power Paint Sprayer manuals
Popular Paint Sprayer manuals by other brands

Campbell Hausfeld
Campbell Hausfeld DH5700 operating instructions

Tregaskiss
Tregaskiss SR-500 Technical guide

Chicago Electric
Chicago Electric 44677 Assembly and operating instructions

Unimac
Unimac HVLP user manual

Central Pneumatic
Central Pneumatic 60314 Owner's manual & safety instructions

Graco
Graco ProMix PD manual