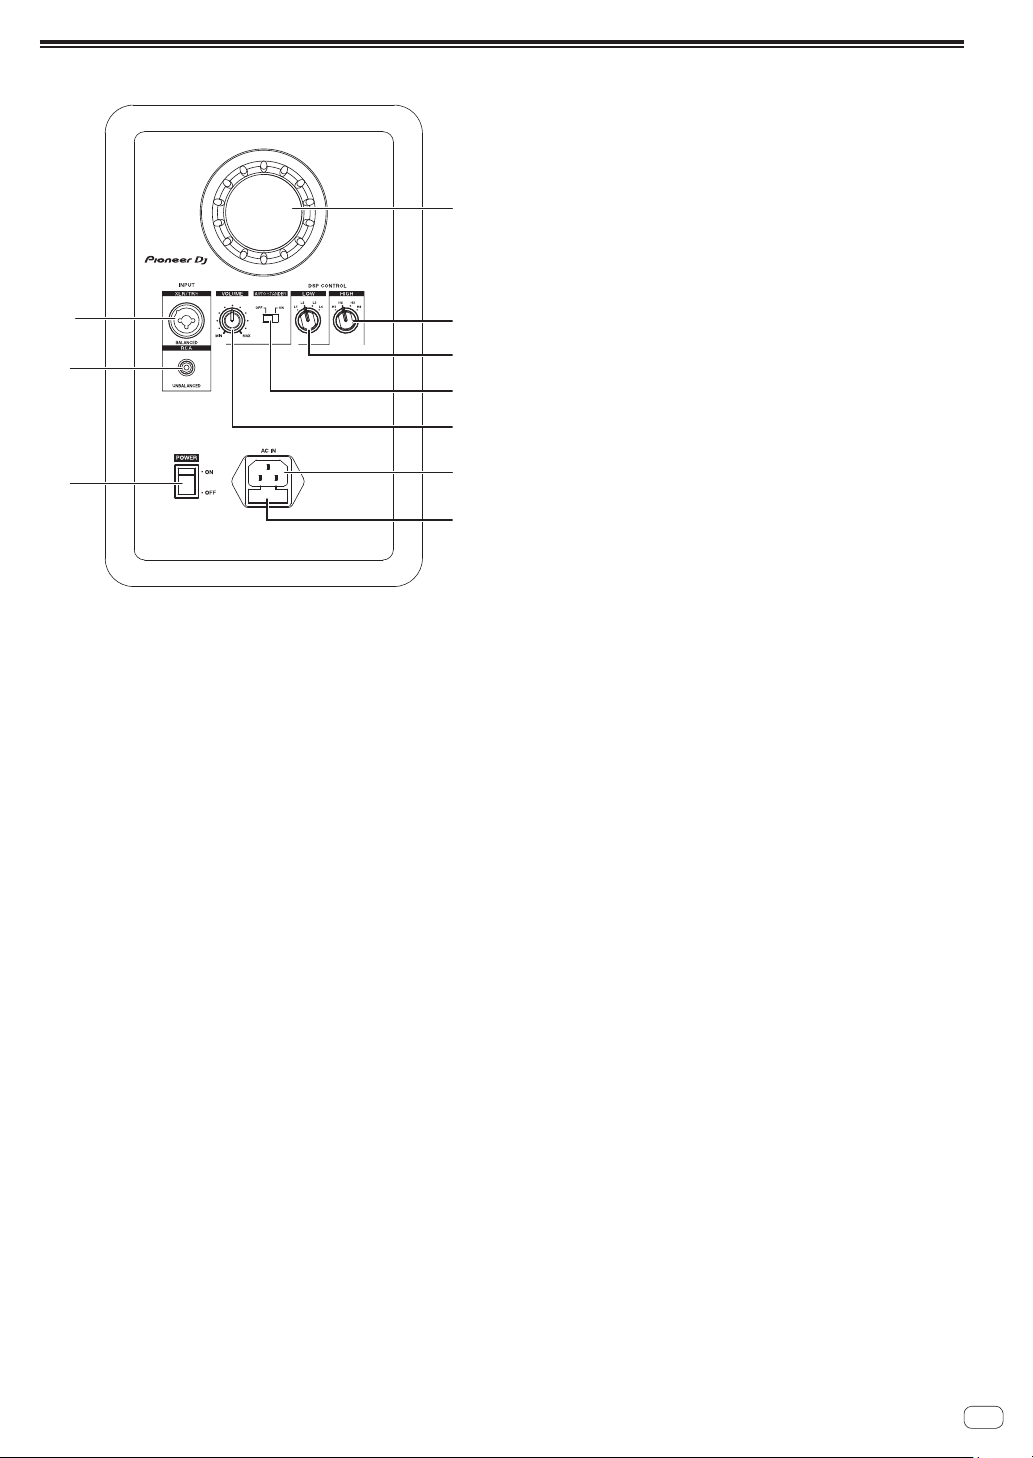
PIONEER DJ VM-50 User manual

2
Introduction
Main Features
• “Vortexbassaccelerator”structuretoachieveafastresponserichbasssound.
• ConstantdirectivityHorntoachievepowerfulmediumandhighrangesoundandbroaduniformlisteningspace.
• Rigidaluminumfrontbaffletoreduceunwantedvibrations.
• ClassDamplifierwith96kHzsamplingtoenablewidebandwidthsoundreproduction.
• “DSPcontrol”toenable16-bandadjustmentinaccordancewiththeuse,roomacousticproperties,andpreferences.
Confirm All Accessories
• Powercord×1
• Bottomcushionx1(4pcs/1sheet)
• PrecautionsforUse×1
• InstructionManual(thisdocument)
• Warranty(forsomeregions)*
*OnlyproductsinEurope.
ThecontentsofthewarrantyfortheUnitedStatesandCanadaareprovidedonthelastpagesoftheinstructionsinEnglishand
French.
Names and Functions of Parts
Front Panel Facilities
1
2
3
4
5
6
1 Aluminum front baffle
Reducesunwantedvibrations.
2 1-inch high-resolution soft dome tweeter
3 Tweeter protective guard
4 Constant directivity Horn
Achievesuniformlisteningspace.
5 POWER/STANDBY indicator
Lightsupinwhitewhenturningthepowersupplyon.During
standbyitislitinred.
6 Aramid fiber woofer
Lightandextremelyrigidconesprovidesthebestbass
response.

3
Rear Panel Facilities
1
8
9
a2
3
4
7
5
6
1 Bass-reflex duct
“Vortexbassaccelerator”structureofthebass-reflexductto
achievehigh-speeddeepbassreproduction.
2 Switch for switching HIGH EQ
UsetoswitchbetweenfourtypesofEQsetting:ROOM1,
FLAT,ROOM2,andBRIGHTTREBLE.Fordetailssee
“DSPCONTROL”onpage4.
3 Switch for switching LOW EQ
UsetoswitchbetweenfourtypesofEQsetting:ROOM1,
FLAT,ROOM2,andCLUBBASS.Fordetailssee“DSP
CONTROL”onpage4.
4 AUTO STANDBY switch
Usetoturntheautostandbyfunctiononoroff.
Whentheautostandbyfunctionisturnedon,thespeakers
automaticallyenterstandbymodeifnoinputsignalis
receivedforacertainperiodoftime(approximately25
minutes)andpowerconsumptioncanbereduced.Whenan
inputsignalisreceivedwhilethespeakersareinstandby
mode,thespeakerswillautomaticallyresumefromstandby
mode.
•ThePOWERindicatoronthefrontpanelislitinredduring
standbymode.
•Whentheinputsignalisweakerthanacertainlevel,the
speakersmaynotautomaticallyresumefromstandby
mode.Insuchcases,turnoffthe[AUTOSTANDBY]switch
tousethespeakers.
•Toforcethespeakerstoresumefromstandbymode,turn
offthe[POWER]switchontherearpanelonce,andturnit
backonafterafewseconds.
5 VOLUME dial
Usetoadjustthesoundlevel(volume).
6 AC IN
ConnecttheaccessorypowercordhereandtoanAC
poweroutlet.Donotpluginthepowercorduntilallother
connectionshavebeencompleted.Useonlythefurnished
accessorypowercord.
7 Fuse holder
8 POWER switch
Usetoturnthepoweronandoff.
9 RCA INPUT jack
RCApin-typeunbalancedinputjacks.
a XLR/TRS INPUT jack
BothXLRjack(balanced)and1/4”TRS(balancedtype
PHONO)aresupported.TheXLRjackarrangementisPin1
Ground,Pin2Hot,andPin3Cold.

4
DSP CONTROL
Thisunithasafunctionforadjustingthefrequencycharacteristicsinaccordancewiththeinstallationlocationorenvironment.Carry
outtheadjustmentusingacombinationofthetwodialsontherearpanel.Atthetimeofshipmentfromthefactoryitissetsothatflat
propertiescanbeobtainedinananechoicchamber,soperformtheadjustmenttosuittheinstallationenvironment.
LOW EQ
Usethisforadjustingthebass,inaccordancewiththe
installationlocationandpurposeofuse.
• L1:ROOM1
Tonequalitywithbassminimized.Thisiseffectivewhen
installednearwalls,etc.,andthevolumeofthebassistoo
loud,orwhenyoudonotwantthebassreverberatingatnight
time.
• L2:FLAT
Flatfrequencycharacteristicsthatfaithfullyreproducesthe
inputsound.
• L3:ROOM2
Tonequalitywithhighbassvolume.Thisiseffectivewhen
thereverberationinaroomistoosmallandthebassis
insufficient.
• L4:CLUBBASS
Basswithextrapunch,foraclub-likesound.Thisiseffective
whenthebassisinsufficient.
HIGH EQ
Usethisforadjustingthetreble,inaccordancewiththe
installationlocationandpurposeofuse.
• H1:ROOM1
Tonequalitywithtrebleminimizedacertainamount.Thisis
effectivewhenusedinaroomwherethevolumeofthetreble
istooloudduringaliveevent.
• H2:FLAT
Flatfrequencycharacteristicsthatfaithfullyreproducesthe
inputsound.
• H3:ROOM2
Soundwithhightreblevolumewiththeimageofbrightwide
spaces.Thisiseffectivewhenthetrebleisinsufficient.
• H4:BRIGHTTREBLE
Thesoundofthemusicalinstrumentscanbeclearlyheard.
Forexampletheoutlinesofthesoundofguitars,cymbals,
trumpets,etc.,areclear.
Installation and Connections
How to Install
Aspeaker’splaybacksoundisdelicatelyinfluencedby
conditionsinthelisteningroom.Toproduceoptimumlistening
conditions,takedueconsiderationoftheconditionsofyour
installationlocationbeforebeginningactualinstallation.
• Placethespeakersatearlevel.
• Foranaturalstereoeffect,therightandleftspeakersshould
beinstalledinsymmetricalandequidistantpositionsfromthe
listeningposition.
• Topreventsliding,applythefurnishedcushionstothe
bottomofthemainunit.
WARNING
Store small parts out of the reach of
children and infants. If accidentally
swallowed, contact a doctor
immediately.
D41-6-4_A1_En
• Speakersshouldideallybelocatedat30°anglesfromthe
listeningposition(togetherformingatotal60°angle),and
rotatedinwardtofacethelisteningposition.
50 °~ 60 °
VENTILATION CAUTION
When installing this unit, make sure to leave space around the
unit for ventilation to improve heat radiation (at least
15 cm at top, 15 cm at rear
, and 15 cm at each side).
W
ARNING
Slots and openings in the cabinet are provided for ventilation to
ensure reliable operation of the product, and to protect it from
overheating.
To prevent fire hazard, the openings should never
be blocked or covered with items (such as newspapers,
table-cloths, curtains) or by operating the equipment on thick
carpet or a bed.
D3-4-2-1-7b*_A1_En

5
Connections
• Whenmakingorchangingconnections,alwaysturnoffthe
poweranddisconnectthepowercordfromitsoutlet.
• Also,besuretoreadtheoperatinginstructionsfortheother
componentstowhichyouareconnectingthesespeakers.
• Donotpluginthepowercorduntilallotherconnectionshave
beencompleted.
• Useonlythefurnishedaccessorypowercord.
• Makesuretosetthesoundlevelatanappropriatelevel
astheinputsignalstotheXLRINPUTconnector(orTRS
INPUTjack)andRCAINPUTjackwillbemixedtogether,
affectingthesoundlevel.
Additional Information
Troubleshooting
• Checkthefollowingitemswhenyouthinkthereisaproblem.Also,checktheequipmentconnectedtotheunit.Ifitisstillnot
operatingproperly,contactyourdealer.
• Onoccasion,theunitmayfailtooperateproperlyduetostaticelectricityorotherexternalconditions.Inthisevent,disconnect
thepowercordandwaitforfiveminutesormore,thenreconnectthepowercordandcheckforproperoperation.
Symptom Items to Check Remedy
Nopower Ispowercordconnectedproperly? Connectpowercordtooutlet.
Nosoundfromconnectedaudiodevices,or
soundisverysmall.
Hasconnectedaudiodevicebeensetproperly? Setdevice’sexternalinputandsoundvolumeproperly.
Isconnectioncableconnectedproperly? Connectcablesproperly.
Areconnectorsorplugsdirty? Cleanconnectorsandplugsbeforeconnecting.
Isthesoundvolumesetproperly? Turnthe[VOLUME]dialontherearpanelclockwiseandturnupthe
volume.
Isthepowerturnedon? Turnonthe[POWER]switchontherearpanel.
Istheautostandbyfunctionon? Turnoffthe[POWER]switchontherearpanelonce,waitafew
seconds,andthenturnitbackon.
ThePOWERindicator(white)doesnotlight. Isthepowerturnedon? Turnonthe[POWER]switchontherearpanel.
Istheautostandbyfunctionon? Turnoffthe[POWER]switchontherearpanelonce,waitafew
seconds,andthenturnitbackon.
Speakersdonotresume(turnon)from
standbymode.
Istheleveloftheinputsignallow? Increasetheleveloftheinputsignal.
Turnoffthe[AUTOSTANDBY]switchontherearpanelandturnoffthe
autostandbyfunction.
Soundisdistorted. Isthesoundvolumesetproperly? Slowlyturnthe[VOLUME]dialontherearpanelcounterclockwiseand
turndownthevolume.
Istheoutputleveloftheconnectedaudiodeviceset
properly?
Adjusttheoutputleveloftheconnectedaudiodeviceproperly.
Feedback(continuoushowlingsound) Isthesoundvolumesetproperly? Slowlyturnthe[VOLUME]dialontherearpanelcounterclockwiseand
turndownthevolume.
Trademarks and Registered Trademarks
• “PioneerDJ”isatrademarkofPioneerCorporation,andisusedunderlicense.
• Otherlistedcompanynamesandaproductnamearetheregisteredtrademarkofthecompaniesortrademarks.

6
Specifications
VM-50/VM-50-W VM-70 VM-80
Type Bi-amp2-wayactivespeaker
Amplifier
Amplifiertype ClassDwithDSP
LFamplifier 30W 70W 90W
HFamplifier 30W 30W 30W
Inputconnectors(balancedinput) XLR/TRScombo×1
Inputconnectors(unbalancedinput) RCA×1
Inputimpedance 10kΩ
Speaker
Enclosure Bassreflex
Enclosurematerial MDFvinyllaminate
Woofer(LFdriver) 5.25"(133mm)cones 6.5"(165mm)cones 8"(203mm)cones
Tweeter(HFdriver) 1"(25mm)softdome
Reproductionfrequencyband 40Hz–36kHz 37Hz–36kHz 34Hz–36kHz
Powerunit/other
Supportedvoltages AC110V–240V,50Hz/60Hz
Powerconsumption 30W 45W 60W
Powerconsumptionduringstandbymode 0.3Worless
Externaldimensions(W×H×D) 197×299×265mm 228×340×312mm 266×399×325mm
Weight 5.5kg 7.7kg 9.7kg
Thespecificationsanddesignofthisproductaresubjecttochangewithoutnotice.

AT_001_all_01
6F, Yokohama i-Mark Place, 4-4-5 Minatomirai, Nishi-ku, Yokohama, Kanagawa 220-0012 JAPAN
〒220-0012神奈川県横浜市西区みなとみらい 4丁目4番5号横浜アイマークプレイス6階
6F, Йокогама i-Mark Place, 4-4-5 Минатомирай, Ниси-ку, Йокогама, Канагава 220-0012 ЯПОНИЯ
Artemis Building, Odyssey Business Park, West End Road, South Ruislip, Middlesex, HA4 6QE, U.K. TEL: +44-203-7617-220
2050 W. 190th Street, Suite 109, Torrance, CA 90504, U.S.A. TEL: +1 (424) 488-0480
<DRI1692-A>
© 2020 AlphaTheta Corporation.All rights reserved.
Other manuals for VM-50
1
This manual suits for next models
5
Table of contents
Other PIONEER DJ Speakers manuals

PIONEER DJ
PIONEER DJ XPRS2 Series User manual

PIONEER DJ
PIONEER DJ DM-40D User manual

PIONEER DJ
PIONEER DJ DM-50D-BT User manual

PIONEER DJ
PIONEER DJ XPRS2 Series User manual

PIONEER DJ
PIONEER DJ DM-40-W User manual

PIONEER DJ
PIONEER DJ DM-40BT User manual

PIONEER DJ
PIONEER DJ DM-40BT-W User manual

PIONEER DJ
PIONEER DJ VM-50 User manual

PIONEER DJ
PIONEER DJ DM-50D User manual

PIONEER DJ
PIONEER DJ DM-40D-BT User manual