PIONEER DJ DM-40D-BT User manual

2
Before you start
How to read this manual
Thank you for choosing this Pioneer DJ product.
Be sure to read this manual, the “Quick Start Guide” and the “Precautions for Use” which are also included with this product. These
documents include important information that you should understand before using the speakers.
What's in the box
• Power cord × 1
• Audio converter cable (3.5 mm stereo mini plug to RCA) × 1
• Speaker cord × 1
• Bottom cushion × 2 (4pcs / 1 sheet)
• Quick Start Guide × 1
• Precautions for Use
• Warranty (for some regions) *
* Only products in Europe.
Products in North America and Japan include warranty information in the “Precautions for Use”.
Part names
Front panel
1
7
8
9
2
4
5
6
a
3
1 3/4 inch soft dome tweeters
2 POWER indicator
Lights up when the power is turned on. The indicator is off in
Standby mode.
3 Diffusers
Improve the sound directivity of high frequencies and provide
spacious sound.
4 LEVEL knob
Adjusts the volume.
5 Pairing button
Pairs the speakers with a Bluetooth device.
Plays/pauses a track played on a Bluetooth device.
For details, refer to “Listening to the music of a Bluetooth
device” (Page 5).

3
Rear panel
2
3
4
5
6
1
1 RCA INPUT terminals
These are RCA pin type unbalanced input terminals.
2 STEREO MINI INPUT terminal
This is a 3.5 mm stereo mini jack type unbalanced input
terminal.
3 Speaker connection connectors
Connect the left and right speakers using the supplied cord.
Do not connect these speakers to an amplifier other than that
of this system. Doing so may cause a damage or fire.
4 POWER switch
Turns the power for the speakers on and off.
5 AC IN
Connect to a power outlet with the supplied power cord.
Connect the power cord after all the connections are
complete.
Use the supplied power cord.
6 SOUND MODE switch
Switches between the DJ mode and PRODUCTION mode.
DJ mode: For a punchy sound suited for DJ applications.
PRODUCTION mode: For flat frequency response that
accurately reproduces the input sound.
CAUTION
The POWER switch on this unit will not completely shut off all
power from the AC outlet. Since the power cord serves as the main
disconnect device for the unit, you will need to unplug it from the
AC outlet to shut down all power. Therefore, make sure the unit has
been installed so that the power cord can be easily unplugged from
the AC outlet in case of an accident. To avoid fire hazard, the power
cord should also be unplugged from the AC outlet when left unused
for a long period of time (for example, when on vacation).
D3-4-2-2-2a*_A1_En
CAUTION
• This product is provided with an auto standby function. If a state
of no sound continues for a set time (approximately 10 hours)
during use, the product automatically turns off the POWER
indicator and enters Standby mode with low power consumption
regardless of whether there is a
Bluetooth
connection.
• If the product enters Standby mode when there is a
Bluetooth
connection, the
Bluetooth
connection is disconnected and the
Pairing indicator also turns off.
• When an audio signal is input from the input terminals in
Standby mode, the product automatically enters Power-on
mode. Furthermore, the product also enters the Power-on mode
if the
Bluetooth
pairing button is pressed while in Standby mode.
• This auto standby function cannot be disabled.
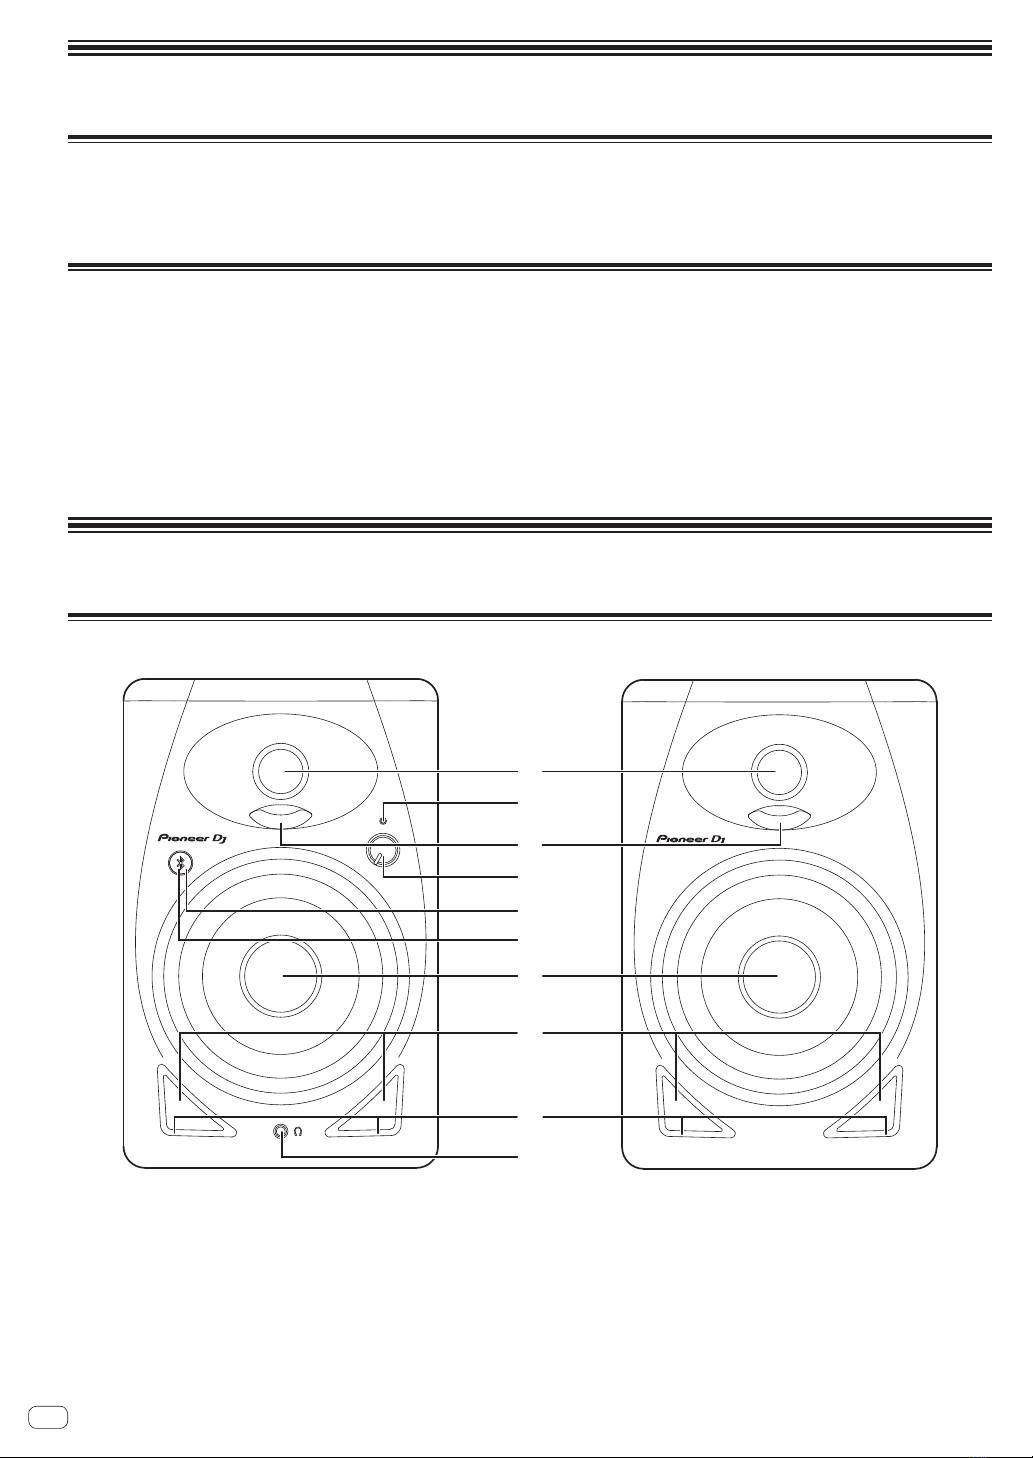
6 Pairing indicator (Page 5)
When flashing: Pairing operation is performed or waiting to
connect
When lit: Connected with a Bluetooth device
7 4 inch glass fiber woofers
8 Bass reflex ducts
9 Grooves
Adjust the airflow of the bass reflex ducts to radiate low
frequencies smoothly.
aHeadphone terminal
This is a 3.5 mm stereo mini jack type output terminal.
Connecting headphones mutes the sound output from the
speakers and outputs the sound only from the headphones.

4
Installation and connections
How to install
A speaker’s playback sound is delicately influenced by
conditions in the listening room. To produce optimum listening
conditions, take due consideration of the conditions of your
installation location before beginning actual installation.
• Place the speakers at ear level.
• For a natural stereo effect, the right and left speakers should
be installed in symmetrical and equidistant positions from the
listening position.
• To prevent sliding, apply the supplied cushions to the bottom
of the speakers.
WARNING
Store small parts out of the reach of
children and infants. If accidentally
swallowed, contact a doctor
immediately.
D41-6-4_A1_En
• The speakers should ideally be placed at an angle of 30° to
the left and right (for a total of 60°) from the listening position,
and facing inward.
60 °
VENTILATION CAUTION
When installing this unit, make sure to leave space around the
unit for ventilation to improve heat radiation (at least
15 cm at top, 15 cm at rear
, and 15 cm at each side).
W
ARNING
Slots and openings in the cabinet are provided for ventilation to
ensure reliable operation of the product, and to protect it from
overheating.
To prevent fire hazard, the openings should never
be blocked or covered with items (such as newspapers,
table-cloths, curtains) or by operating the equipment on thick
carpet or a bed.
D3-4-2-1-7b*_A1_En
Connections
• Disconnect the power cord before making or changing
connections.
• Read the instruction manuals for the devices you are going
to connect with the speakers.
• Connect the power cord after all the connections are
complete.
• Use the supplied power cord.
• The input signals to the RCA, STEREO MINI input terminals
and the input signals from Bluetooth are mixed, so please
beware of the volume level.
Connecting cords
Connect the supplied speaker cord to the speakers.
1 Strip about 1 cm of the head of the supplied speaker
cord and twist and remove the exposed insulator.
After removing the insulator, thoroughly twist the core wires.
2 Connect the supplied speaker cord to the speaker
terminals on the LEFT and RIGHT sides.
3 Insert the core wires into the terminals while pressing
the claw on the speaker terminal.
Connect the speaker cord with the red line into the + terminal
side (red) and the speaker cord without the red line into the -
terminal side (black).
Red +
Black
-
The cord with the red line

5
CAUTION
• After connecting to the terminals, lightly pull the speaker cord to make sure that heads of the speaker cord are securely connected to the
terminals. A loose connection might cause audio output to be interrupted or noise to be output.
• When connecting the speaker cord, thoroughly twist the core wires, and make sure that the core wires are not protruding out of the speaker
terminals. Core wires protruding out of the speaker terminals may come into contact with the rear panel or with each other. This may cause an
excessive load to be placed on the amplifier which results in operation stopping or a malfunction.
• If a mistake is made with the polarities (+, -) on the LEFT and RIGHT sides when connecting the LEFT and RIGHT speaker cord, normal
stereo effect can no longer be obtained.
Listening to the music of a Bluetooth device
These speakers allow you to wirelessly enjoy tracks saved to a Bluetooth device.
When using the speakers connected with a Bluetooth device for the first time or when connected with another Bluetooth device, you
need to pair the speakers and a Bluetooth device.
Pairing (device mutual registration) is the operation required to connect a Bluetooth device and the speakers.
Pairing and connection procedure
1 Turn on the [POWER] switch on the speaker.
• The Paring indicator flashes for approximately 30 seconds and the speakers enter Pairing mode.
• If the Pairing indicator is off, press and hold the pairing button for at least 2 seconds to switch to Pairing mode again.
2 Perform the pairing procedure on a Bluetooth device.
Perform the pairing procedure on a Bluetooth device while the speakers are in paring mode. For details, see the instruction
manual of your Bluetooth device.
3 The Pairing indicator on the speaker stops blinking and lights up when the connection is complete.
The Pairing indicator turns off if the speakers can’t pair with a Bluetooth device within 30 seconds.
• A Bluetooth device that has already been paired can be connected by performing the connection procedure on the Bluetooth device side if
the speakers are powered on.
Playback
When you play music on a connected Bluetooth device, the music playing on the Bluetooth device is output from the speakers.
• You can play/pause a track playing on a Bluetooth device by pressing the pairing button. (same function as the pause/play button on the
Bluetooth device).
CAUTION
• When pairing (connecting), move the
Bluetooth
device close to the speakers.
• Loud sound may be output when the playback operation is performed for the first time after connecting completes so we recommend lowering
the volume before playback.
• The pause/play operation may not be possible with the pairing button depending on the application used.
• Connecting with the speakers may not be possible depending on the
Bluetooth
device.
• If you wish to pair the speakers with a different
Bluetooth
device, turn off the
Bluetooth
function of the currently connected
Bluetooth
device or
disconnect the connection before performing the pairing operation.
• The speakers store the pairing information of up to eight
Bluetooth
devices, and attempt to connect to the last paired device if the pairing
button is pressed in the state of no connection with a
Bluetooth
device.

6
Additional information
Troubleshooting
If you think something is wrong with the speakers, check the information below and refer to the [FAQ] for the DM-40D-BT at the URL
below.
pioneerdj.com/support/
• Inspect devices connected with the speakers.
• The speakers may restore proper operation after you turn it off and on.
If the problems continue, read the “Precautions for Use” and consult an authorized service company or your dealer.
Problem Check Measures
The power is not turned on. Is the power cord properly connected? Plug in the power cord to an AC outlet.
No sound is output or the sound is low. Is the connected device set properly? Set the devices external input and volume properly.
Is the volume set to the proper position? Turn the [LEVEL] knob on the front panel of the speaker clockwise to
increase the volume.
Is the power turned on? Turn on the [POWER] switch on the rear panel of the speaker.
The POWER indicator (white) does not light. Is the power turned on? Turn on the [POWER] switch on the rear panel of the speaker.
Are the speakers in Standby mode? Turn off the [POWER] switch on the rear panel of the speaker and then
turn it back on after a few seconds. Or press the pairing button on the
front panel of the speaker.
The speakers wouldn't recover (power-on)
from Standby mode.
Is the input signal level low? Increase the input signal level.
The sound is affected by distortion. Is the volume set to the proper position? Turn the [LEVEL] knob on the front panel of the speaker counterclockwise
to reduce the volume.
Is the level for input from the connected device
appropriate?
Adjust the output level of the connected device properly.
Unwanted noise is heard. (It continues
sounding loud.)
Is the volume set to the proper position? Turn the [LEVEL] knob on the front panel of the speaker
counterclockwise to reduce the volume.
The sound is only output from the left
speaker.
Is the speaker cord connected properly? Connect the left and right speakers properly.
The power turns off (Standby mode)
automatically.
Did a state of no sound continue for approximately 10
hours or longer?
Input signals from the RCA or stereo mini plug input terminal.
Or press the pairing button on the front panel of the speaker.
Is the input signal level low? Increase the input signal level.
When connected via the RCA or STEREO MINI input terminals
Problem Check Measures
No sound is output from the connected
device or the sound is low.
Are the connection cables properly connected? Connect the connection cables properly.
Are the terminals and plugs dirty? Clean the terminals and plugs before making connections.
The sound is only output from one speaker. Is the device connected properly? Connect the device to both the left and right input terminals.
The sound is interrupted or unwanted noise
can be heard.
Is there a contact problem with the connection
cables?
Reconnect the connection cables.

7
When connected via Bluetooth
Problem Check Measures
Cannot connect or the sound is interrupted,
or unwanted noise can be heard.
Is there a device producing electromagnetic waves
in the 2.4 GHz band (microwave oven, wireless LAN
device, other Bluetooth device, etc.) near to the
speakers?
Either install the speakers away from such devices or stop using them.
Is the distance from the Bluetooth device too far? Or
is there a wall or an obstacle that blocks radio waves
between the speakers and the device?
Move this unit and the connected Bluetooth device close to each other.
Or change the position of the Bluetooth device or the speakers.
Is an application other than a music playback
application running on the Bluetooth device?
Exit any application on the Bluetooth device other than the music
playback application.
Does the Bluetooth device you wish to connect
support A2DP?
Use a Bluetooth device that supports A2DP.
Has pairing with the Bluetooth device been
performed properly?
Turn the power of the speakers and Bluetooth device off and back on,
and then perform pairing again.
Trademarks and registered trademarks
• The Bluetooth®word mark and logos are registered trademarks owned by Bluetooth SIG, Inc. and any use of such marks by
AlphaTheta Corporation is under license. Other trademarks and trade names are those of their respective owners.
• Other product, technology and company names, etc. mentioned herein are trademarks or registered trademarks of their
respective owners.

8
Specifications
Type............................................................................................................................................................... 2-Way Active Speaker
Amplifier
Amplifier type ........................................................................................................................................................ Class D with DSP
Amplifier output.............................................................................................................................. Lch:19W/4Ω,Rch:19W/4Ω
Input terminals (unbalanced input)........................................................................... RCA pin jacks × 1, 3.5 mm stereo mini jack × 1
Input impedance ......................................................................................................................................................................10kΩ
Output terminal ......................................................................................................................................3.5 mm stereo mini jack × 1
Speaker
Enclosure.........................................................................................................................................................................Bass reflex
Enclosure material .............................................................................................................................................. MDF vinyl laminate
Woofer (LF driver)............................................................................................................................................... 4″(102mm)cones
Tweeter (HF driver)...................................................................................................................................... 3/4″(19mm)softdome
Bluetooth
Version............................................................................................................................................. Bluetooth Specification Ver. 5.0
Maximum transmission distance ..................................................................... Approximately 10 m* in unobstructed circumstances
Frequency used ................................................................................................................................................................... 2.4 GHz
Modulation ...............................................................................................................FH-SS (Frequency Hopping Spread Spectrum)
Supported Bluetooth profiles.......................................................................................................................................A2DP, AVRCP
Supported Codec..............................................................................................................................................................SBC, AAC
Power unit / other
Supported voltages........................................................................................................................ AC 110 V – 240 V, 50 Hz / 60 Hz
Power consumption ..................................................................................................................................................................20 W
Power consumption during standby mode ....................................................................................................................0.3 W or less
Max. dimensions
............................. (W×H×D)Lch:146×227×223mm/5.75″×8.94″×8.78″,Rch:146×227×212mm/5.75″×8.94″×8.35″
Weight..............................................................................................................................Lch: 2.5 kg / 5.5 lbs., Rch: 2.2 kg / 4.9 lbs.
* Transmission distances are a guideline. Transmission distance may change depending on the surrounding environment.
• The specifications and design of this product are subject to change without notice.

AT_001_all_01
6F, Yokohama i-Mark Place, 4-4-5 Minatomirai, Nishi-ku, Yokohama, Kanagawa 220-0012 JAPAN
〒220-0012神奈川県横浜市西区みなとみらい 4丁目4番5号横浜アイマークプレイス6階
6F, Йокогама i-Mark Place, 4-4-5 Минатомирай, Ниси-ку, Йокогама, Канагава 220-0012 ЯПОНИЯ
Artemis Building, Odyssey Business Park, West End Road, South Ruislip, Middlesex, HA4 6QE, U.K. TEL: +44-203-7617-220
2050 W. 190th Street, Suite 109, Torrance, CA 90504, U.S.A. TEL: +1 (424) 488-0480
<DRI1764-A>
© 2022 AlphaTheta Corporation.All rights reserved.
This manual suits for next models
1
Table of contents
Other PIONEER DJ Speakers manuals

PIONEER DJ
PIONEER DJ DM-40BT User manual

PIONEER DJ
PIONEER DJ DM-50D User manual

PIONEER DJ
PIONEER DJ DM-40D User manual

PIONEER DJ
PIONEER DJ DM-50D-BT User manual

PIONEER DJ
PIONEER DJ VM-50 User manual

PIONEER DJ
PIONEER DJ DM-40BT-W User manual

PIONEER DJ
PIONEER DJ VM-50 User manual

PIONEER DJ
PIONEER DJ XPRS2 Series User manual

PIONEER DJ
PIONEER DJ DM-40-W User manual

PIONEER DJ
PIONEER DJ XPRS2 Series User manual