Starke sound Halo Series User manual

Halo
Owner’s Manual
seriesHalo
Owner’s Manual
seriesHalo
Owner’s Manual
seriesHalo
Owner’s Manual
series

There are numerous brands in the world today.
What makes STARKESOUND so unique?
We are the Only brand that uses Uniquely huge satellite speakers,
with an unbelievably wide dynamic range and a sleek midrange.
Utilizing the MTM array design, we want to inherit the concept
and strive to improving our product. Our speakers has exceeded
the industry standard that is built with the highest quality and
most accurate sound that is unparalleled in the industry. Our
product is able to withstand high power input, thus giving
tremendous dynamics. Among others, Starkesound halo series has
a unique midrange driver designed to giving a totally dierent feel
from other competitors' speaker systems.
STARKESOUND has developed a varieties of applications for the needs
of all discerning audiophiles, oering in-cabinet, in-wall(in-ceiling)
and in-room(lifestyle) series. Starkesound is committed to delivery
the best result that technology has to oer. We are constantly
evaluating new technologies to improving our products. We pledge
to evolve with times and one thing that will never change is our
faith to producing only the highest quality products!
IC-H5CIC-H5CIC-H5CIC-H5C

Owner’s Manual
Specifications IC-H5C Elite
Max SPL output(1m)
Frequency response (±2dB)
Recommended amplifier power
Nominal impedance
Sensitivity (2.83v at 1m)
Drivers
Tweeter
Midrange
Bass driver
Cabinet Structure
Input terminals
Crossover
Crossover points
Tweeter option
Boundary compensation
Grille
Finish
Color options
Full size
Weight
Shipping size
Shipping weight
Warranty
125dB
32Hz-40kHz
60-500W
4 ohms
92dB
1 inch / (2) 4 inch / (2) 8 inch
1 inch custom made softdome tweeter (Elite)
LMF® technology inside*
Dual 4 inch carbon fiber cone with phase plug
LMF® technology inside*
Dual 8 inch paper cone with aluminum driver baskets
LMF® technology inside*
Sealed
Binding posts, 2 pairs
Banana plug, Y plug and bare wire supported
3 way
290 Hz / 3000 Hz
+2db, 0db, -2db
Yes
None
Aluminum and Piano Lacquer
Black Satin/Piano blue
93lbs (42kg) / each
L 38 x W 17 x H 14.6 inches
L 965 x W 432 x H 370mm
102lbs (46.5kg) / each
10 years (from original purchase date)
IC-H5 Elite
Dynamics, Balance, Detail: You Can Have It All
Called "Sapphire" for its brilliant blue color and sharp edges, this speaker's exterior
truly resembles that of a rare gem. The floor standing speaker towers over 1200mm
complete with three 8 inch bass drivers. If that wasn't enough we added a 12 inch
carbon fiber passive bass driver. The passive driver technology utilizes a very special
honeycomb structural assembly to increase its strength and rigidity. This superior
speaker possesses a flat response from low frequency to high frequency with fast, rich
details and a large dynamic range. IC-H5 is the perfect speaker for Hi-end Stereo sound
and multi-channel home theater.
IC-H5C Elite
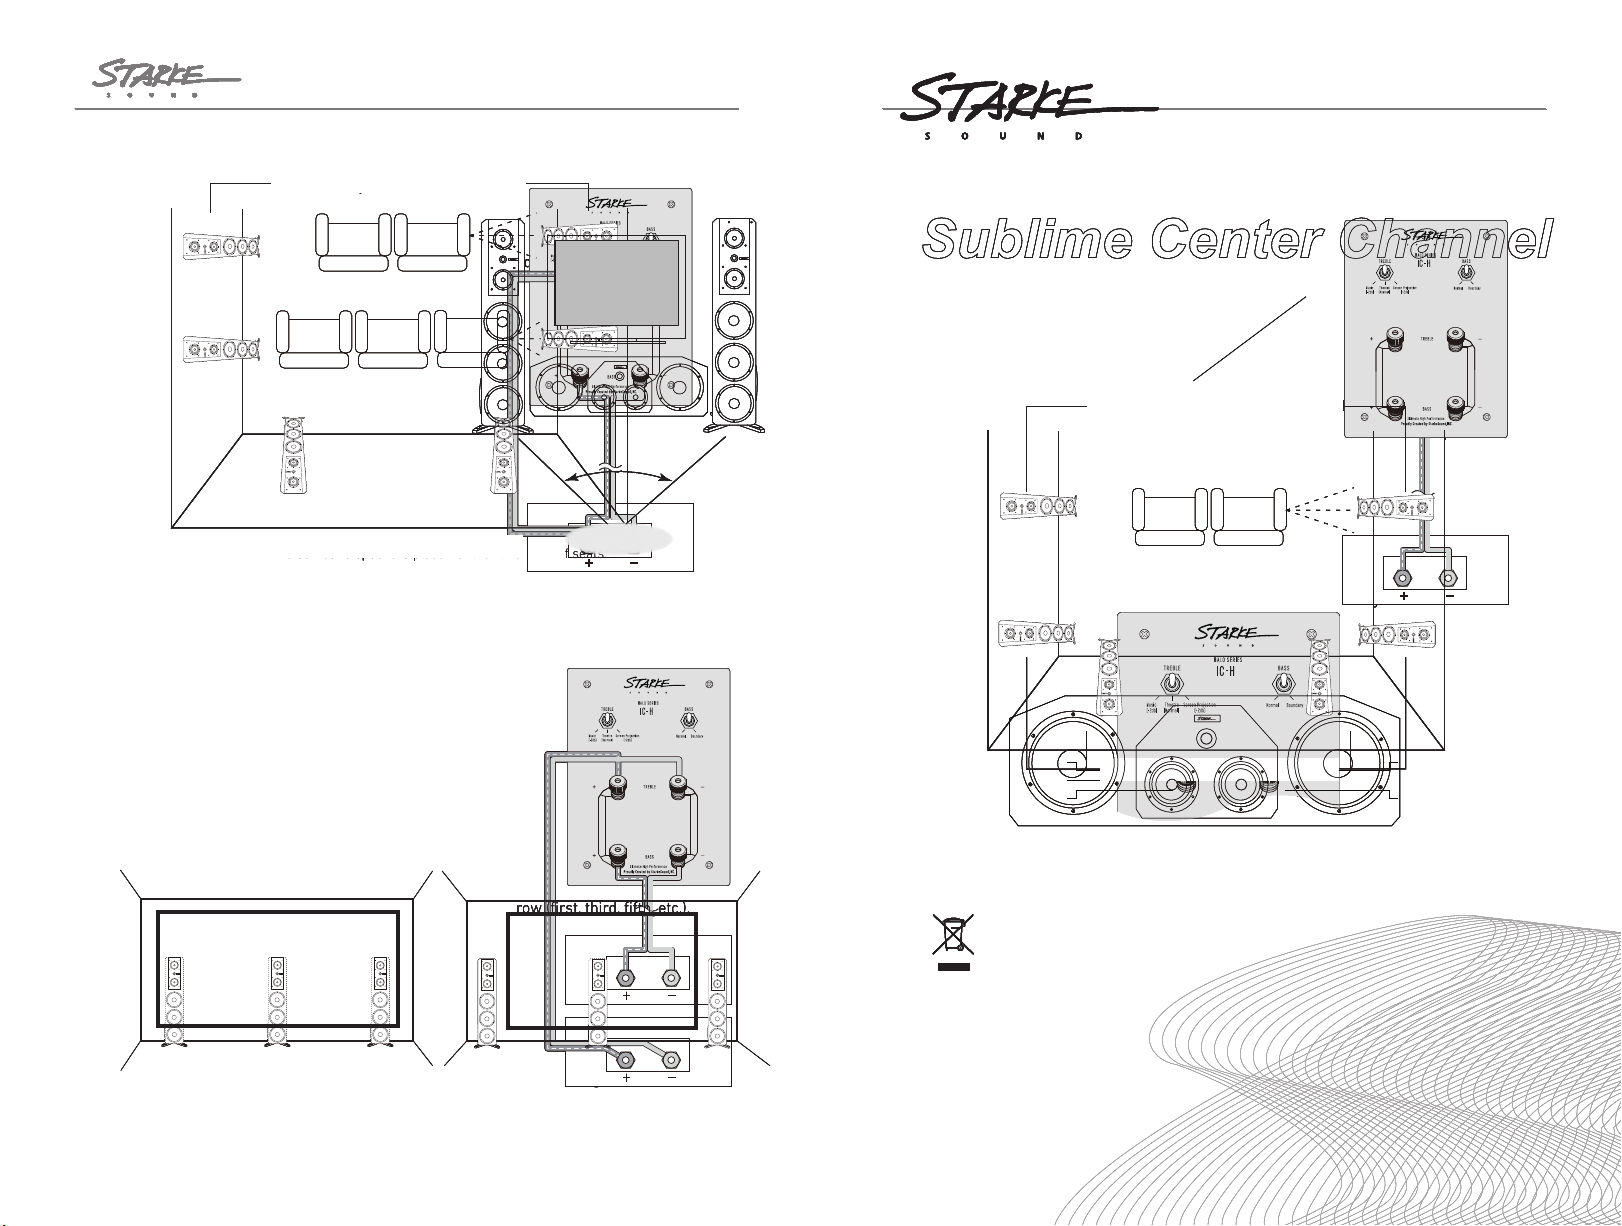
Sublime Center Channel
Our multi-channel experience would not be complete without our center console IC-H5C
Elite. Designed to be displayed and admired the real beauty of the IC-H5C Elite is on the
inside. In order to compliment the IC-H5 Elite L/R speakers we specially engineered the
IC-H5C to utilize the same IC-H5 drivers - beryllium tweeters, carbon fiber midrange,
along with two 8 inch bass drivers - all of which possess our patented LMF Driver
technology. We've also implemented a brand new crossover technology so the IC-H5C
can reach the same frequency response as the IC-H5 speakers. With all of Starke
Sound's newly developed technologies the IC-H5C Elite delivers a very low distortion,
high dynamic center console speaker that provides a powerful, fully textured voice
*LMF is a patented loudspeaker driver technology of Starke Sound INC.
*Custom paint and grilles are available for an extra charge
Owner’s Manual
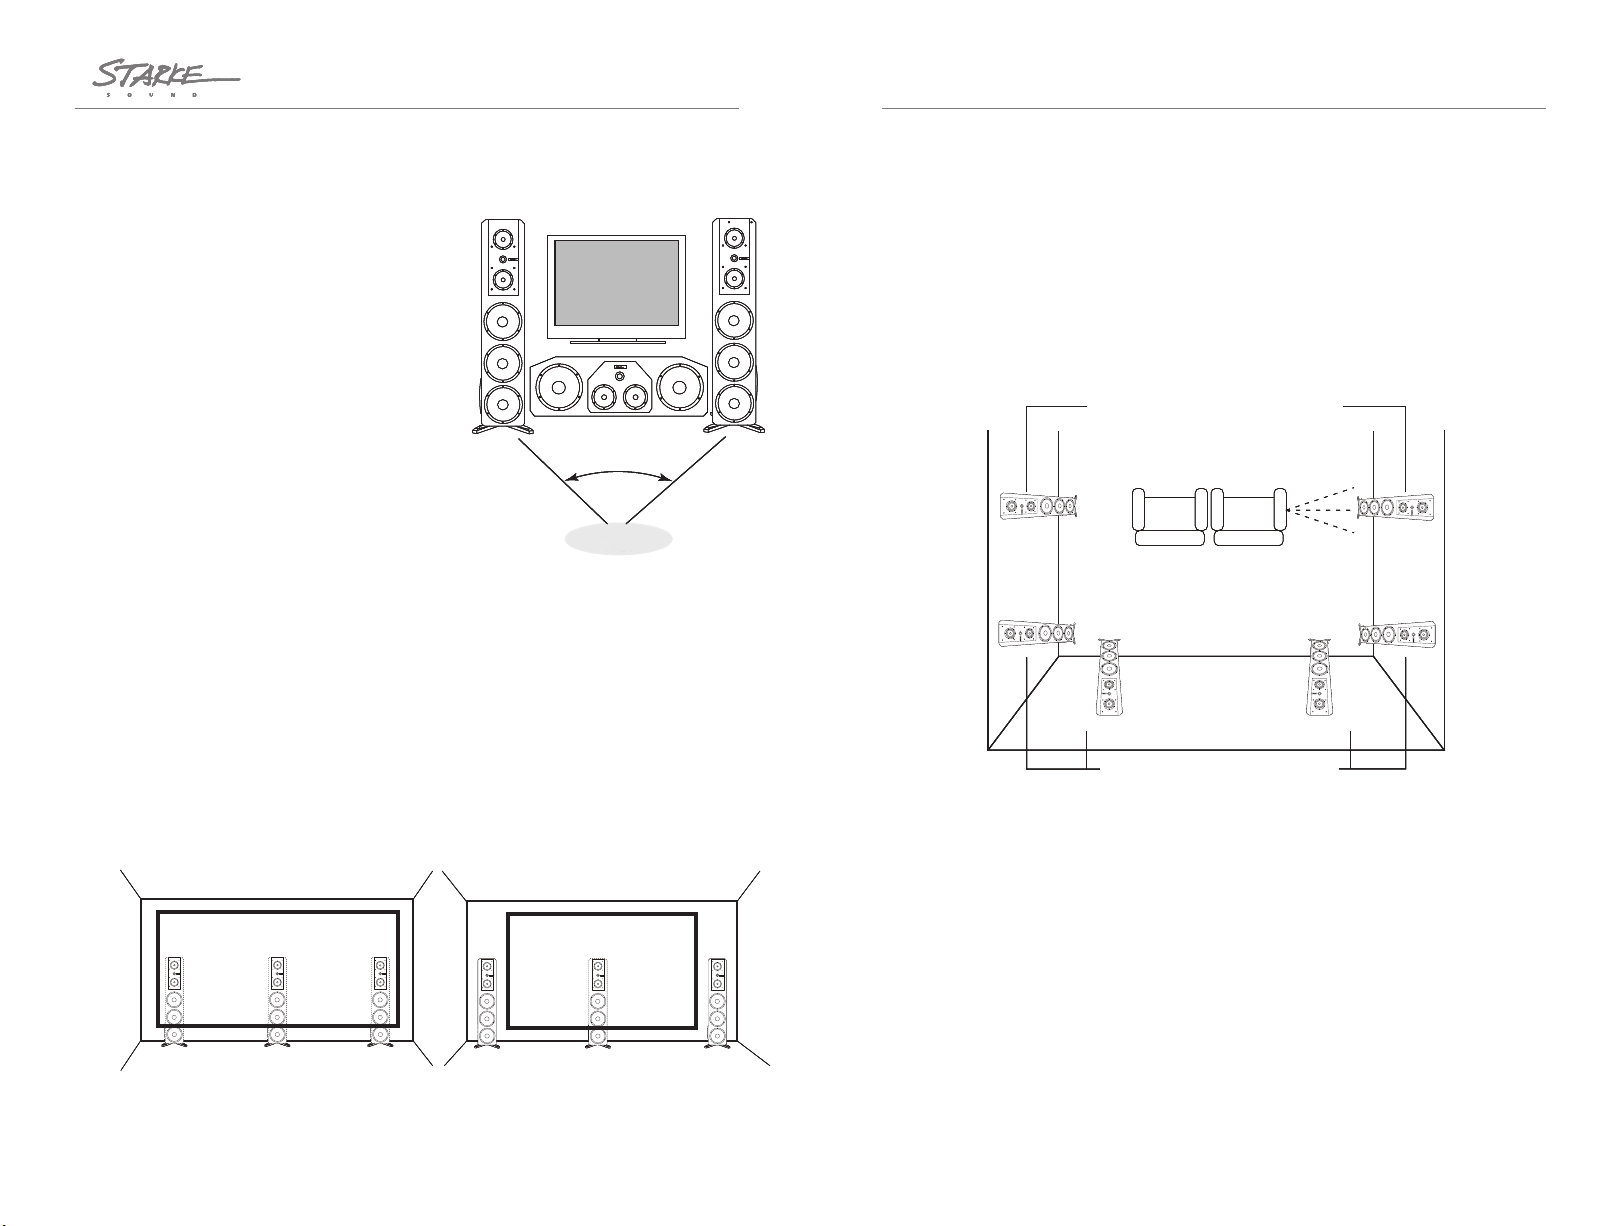
Location of Front Channel Speakers
Three loudspeakers are to be placed across in the
front of the listening room for the home theater
system. The width of the stereo image is
determined by the distance between the left and
right speakers. The image will be too narrow if the
speakers are placed too close together and,
conversely, if placed too far apart, the blend will
suer creating a void in the middle section.
Your speakers should create a continuous "virtual
image" when properly placed from left to right.
As a result an illusion of sound outside, in front of,
and behind the speaker systems will be created.
STARKESOUND recommends a 45 degree to 60
degree angular separation when viewed from
above. The distance between the speakers is 75% of
the distance from the speakers to the listener at the
minimum 45° separation. At the maximum 60°
separation the distance between the speakers is
equal to the distance from the speakers to the
listener.
In order to create a seamless sound image across the front of the speakers one must
carefully consider location and placement.
Optimally, there should an equal distance from the left, right, and center channel
speakers to the listener location.
The height of the midrange/tweeter module of the front channel speakers should be
installed as close as possible to the height of a seated listener's ears. The front channel
tweeters should be located within two vertical feet of that height.
Location of Surround Speakers
STARKESOUND has provided the following information for the placement of surround
speakers. Although there are many opinions regarding placement and location of
surround speakers STARKESOUND has provided the following recommendations based
on thorough research, academics, and our experience with many installations. Note: The
choice of models used in the illustration below is arbitrary. The information described in
the illustrations can be applied to both the IW and the IC series covered in this manual
and in any of the surround locations. However, please keep in mind that the
midrange/tweeter array in the IC-H5 Elite and IW-H5 Elite must always be vertically
oriented.
If two surrounds are used in a standard 5.1 configuration (not 7.1 or EX), they are best
mounted directly to the sides of the primary seating location, preferably within ±15° (see
illustration). This placement is the preferred method over back wall mounting for a few
reasons: 1. the placement of the surround speakers are located where the ear's ability to
discriminate left from right is optimum. This produces the maximum sense of
"envelopment" being surrounded by sound, 2. Mounting the rear speakers behind the
listener increases the angle between the front and rear speakers. This results in
reducing the chance that there will be a continuous front-to-rear sound image, lastly, 3.
Since our ability to discriminate the front-to-rear location of a sound source is not very
strong, locating surround speakers to the side of the listener will improve the listening
experience. 7.1 or EX systems that use side and rear speakers together overcome all of
these obstacles and give both maximum envelopment and a more continuous surround
eect.
.+56'0+0)
#4'#
삵삵
15°
15°
Alternate Surround Speaker Locations
Preferred Surround Speaker Locations
Picture 1:Recommended LCR speakers placement for screen size greater than 150".
Picture 2:Recommended LCR speakers placement for screen size smaller than 150".
① ②
Owner’s Manual
Location of Front Channel Speakers
Three loudspeakers are to be placed across in the
front of the listening room for the home theater
system. The width of the stereo image is
determined by the distance between the left and
right speakers. The image will be too narrow if the
speakers are placed too close together and,
conversely, if placed too far apart, the blend will
suer creating a void in the middle section.
Your speakers should create a continuous "virtual
image" when properly placed from left to right.
As a result an illusion of sound outside, in front of,
and behind the speaker systems will be created.
STARKESOUND recommends a 45 degree to 60
degree angular separation when viewed from
above. The distance between the speakers is 75% of
the distance from the speakers to the listener at the
minimum 45° separation. At the maximum 60°
separation the distance between the speakers is
equal to the distance from the speakers to the
listener.
In order to create a seamless sound image across the front of the speakers one must
carefully consider location and placement.
Optimally, there should an equal distance from the left, right, and center channel
speakers to the listener location.
The height of the midrange/tweeter module of the front channel speakers should be
installed as close as possible to the height of a seated listener's ears. The front channel
tweeters should be located within two vertical feet of that height.
Location of Surround Speakers
STARKESOUND has provided the following information for the placement of surround
speakers. Although there are many opinions regarding placement and location of
surround speakers STARKESOUND has provided the following recommendations based
on thorough research, academics, and our experience with many installations. Note: The
choice of models used in the illustration below is arbitrary. The information described in
the illustrations can be applied to both the IW and the IC series covered in this manual
and in any of the surround locations. However, please keep in mind that the
midrange/tweeter array in the IC-H5 Elite and IW-H5 Elite must always be vertically
oriented.
If two surrounds are used in a standard 5.1 configuration (not 7.1 or EX), they are best
mounted directly to the sides of the primary seating location, preferably within ±15° (see
illustration). This placement is the preferred method over back wall mounting for a few
reasons: 1. the placement of the surround speakers are located where the ear's ability to
discriminate left from right is optimum. This produces the maximum sense of
"envelopment" being surrounded by sound, 2. Mounting the rear speakers behind the
listener increases the angle between the front and rear speakers. This results in
reducing the chance that there will be a continuous front-to-rear sound image, lastly, 3.
Since our ability to discriminate the front-to-rear location of a sound source is not very
strong, locating surround speakers to the side of the listener will improve the listening
experience. 7.1 or EX systems that use side and rear speakers together overcome all of
these obstacles and give both maximum envelopment and a more continuous surround
eect.
.+56'0+0)
#4'#
삵삵
15°
15°
Alternate Surround Speaker Locations
Preferred Surround Speaker Locations
Picture 1:Recommended LCR speakers placement for screen size greater than 150".
Picture 2:Recommended LCR speakers placement for screen size smaller than 150".
① ②

Owner’s Manual
Another factor that one must consider is the evenness of sound coverage over the
listening area. As most surround processors have the ability to set the balance of all
channels, it is wise to adjust a circulating noise signal in each channel until the apparent
or measured sound level is even. Alternatively, the listener can move to another seat and
the resultant shift will be balance somewhat. Surround speakers placed properly will
minimize the level variation from seat to seat. Increasing the distance of the surround
speakers from the listening area is the best way to improve evenness. Mounting the
speakers high on the side walls or in the ceiling will improve the listening experience.
Surround speakers should be mounted at a minimum of one foot (305 mm) above the
height of a standing listener. Note: In the event of ceiling-mounted speakers, be sure to
place the speakers close to the side walls well away from an overhead position.
If you are planning a large theater room with three or more rows of seating, one needs to
consider that there should be more than one pair of surround speakers in order to give
more even coverage and a more diuse sound field. STARKESOUND recommends that a
pair of surround speakers be used for every other seating row (first, third, fifth, etc.). This
method mimics the standard for most cinema applications.
Speaker Connection
Prior to wiring STARKESOUND recommends that you plan
and layout the wiring paths from the speakers to the
amplifier. For runs up to 25 feet STARKESOUND
recommends a 16-gauge wire and for runs longer a
14-gauge wire is recommended. Take care to ensure that
the integrity of the speaker wire is not threatened or
compromised by resting/rubbing against any sharp or
pointed objects. Before setting the wire in position be sure
to allow approximately an extra foot (305 mm) of wire at
the speaker location to ensure an easy connection the
speaker.
For standard single wire connections, unscrew one set of
the terminal knobs (rotate counter-clockwise). Remove
approximately 1/2" (12mm) of the wire insulation from the
two wire conductors and twist the wire strands into a tight
bundle. Insert the wire into the terminal shaft hole and
rotate the terminal knob clockwise to secure the wire in
place. Take care that there are no stray or loose strands of
wire that could touch the other terminal shaft.
Confirm that both the positive and negative speaker terminals of the
amplifier are in connection with the corresponding + (red) and - (black) terminals at the
speakers. If you look closely you will see that all wire is marked in some way to trace their
respective connections. The two conductors will striped or ridged insulation in order to
identify them. Alternatively the conductors may be color coded to ensure their identity.
Wires with pin lugs or spade lugs are also accepted by the terminals. In addition, dual
banana plugs can be plugged into the rear of the terminals.
Series/parallel wiring should be used when connecting more than two speakers per
amplifier channel. Make certain in all cases that the total impedance does not fall below
the amplifier's rating. If there is any question be sure to contact your STARKESOUND
dealer.
15°
15°
15°
15°
Preferred Surround Speaker Locations
Recommended surround speakers placement for two rows of seats.
5
Elite

5
Elite
5
Elite
Owner’s Manual
Tri-Wiring
Similarly with bi-wiring,but this time you should remove all
connections between the speakers terminals.
This method involves connecting three sets of wires between
the amplifier and the speakers.
Be sure to use equal lengths of the appropriate wire for
Tri-wiring the speakers. Consult your STARKESOUND dealer
for dierent cable options.
See illustration for amplifier to speakers connections.
Be sure to use equal lengths of the appropriate wire for
bi-wiring the speakers. Consult your STARKESOUND dealer
for dierent cable options.
See illustration for amplifier to speakers connections.
5
Elite
Boundary and Tweeter Control Settings
The connection terminal cup has two switches that enable you to fine tune adjustments
to the response of the speakers. These can be utilized to achieve the best possible
performance from your speakers in a variety of installation situations.
Boundary Switch If you find it necessary to install the speakers in a situation where they
may not produce the best overall sound balance then one can adjust the Boundary
switch to improve the overall performance of the speakers. For instance, in order get the
best sound image, the speakers must be installed close to a corner or a large object that
forms a corner. Examples could include a fireplace or a large column. This can result in
an uneven response in the upper bass and lower midrange which produces a “thick” or
“heavy” sound. In vocal reproduction this is particularly noticeable. To control this there
is a Boundary Switch located above the connection terminals.
When speakers are located less than 12"-18" (300-450mm) from a corner or other large
object, adjust the Boundary Position switch setting. STARKESOUND recommends using
strong vocal source material to see if this setting produces smoother, more natural
sound.
Tweeter Level Switch
The IC-H7 and IW-H7 series speakers have a three-position switch to adjust the output
level of the tweeter. In most situations, the middle "0dB" position will produce the best
sound. In rooms that have high acoustical absorbing properties such as plush carpeting
and heavily upholstered furniture try the switch in the "+2dB" position. In rooms that
have highly reflective surfaces such as stone or hard wood paneling, try the "-2dB"
position.
+2dB
0 dB
-
2 dB
Normal
Boundary
Bi-Wiring
Bi-wiring the speakers can oer benefits for high
performance audio systems. This method
involves connecting two sets of wires between
the amplifier and the speakers. You must first
remove the terminal straps by loosing the
terminal knobs and sliding the straps to the side.
Be sure to use equal lengths of the appropriate
wire for bi-wiring the speakers. Consult your
STARKESOUND dealer for dierent cable options.
See illustration for amplifier to speakers
connections.
5
Elite
5
Elite
Owner’s Manual
Tri-Wiring
Similarly with bi-wiring,but this time you should remove all
connections between the speakers terminals.
This method involves connecting three sets of wires between
the amplifier and the speakers.
Be sure to use equal lengths of the appropriate wire for
Tri-wiring the speakers. Consult your STARKESOUND dealer
for dierent cable options.
See illustration for amplifier to speakers connections.
Be sure to use equal lengths of the appropriate wire for
bi-wiring the speakers. Consult your STARKESOUND dealer
for dierent cable options.
See illustration for amplifier to speakers connections.
5
Elite
Boundary and Tweeter Control Settings
The connection terminal cup has two switches that enable you to fine tune adjustments
to the response of the speakers. These can be utilized to achieve the best possible
performance from your speakers in a variety of installation situations.
Boundary Switch If you find it necessary to install the speakers in a situation where they
may not produce the best overall sound balance then one can adjust the Boundary
switch to improve the overall performance of the speakers. For instance, in order get the
best sound image, the speakers must be installed close to a corner or a large object that
forms a corner. Examples could include a fireplace or a large column. This can result in
an uneven response in the upper bass and lower midrange which produces a “thick” or
“heavy” sound. In vocal reproduction this is particularly noticeable. To control this there
is a Boundary Switch located above the connection terminals.
When speakers are located less than 12"-18" (300-450mm) from a corner or other large
object, adjust the Boundary Position switch setting. STARKESOUND recommends using
strong vocal source material to see if this setting produces smoother, more natural
sound.
Tweeter Level Switch
The IC-H7 and IW-H7 series speakers have a three-position switch to adjust the output
level of the tweeter. In most situations, the middle "0dB" position will produce the best
sound. In rooms that have high acoustical absorbing properties such as plush carpeting
and heavily upholstered furniture try the switch in the "+2dB" position. In rooms that
have highly reflective surfaces such as stone or hard wood paneling, try the "-2dB"
position.
+2dB
0 dB
-
2 dB
Normal
Boundary
Bi-Wiring
Bi-wiring the speakers can oer benefits for high
performance audio systems. This method
involves connecting two sets of wires between
the amplifier and the speakers. You must first
remove the terminal straps by loosing the
terminal knobs and sliding the straps to the side.
Be sure to use equal lengths of the appropriate
wire for bi-wiring the speakers. Consult your
STARKESOUND dealer for dierent cable options.
See illustration for amplifier to speakers
connections.
Owner’s Manual
Power Handling and Listening Levels
STARKESOUND recommends reasonable power output settings for the amplifier so it
operates in a way that will not result in distortion. Even a modest amplifier, if producing
distortion, can damage speakers. Turn down the volume if you hear a gritty noise or
other signs of strain. Prolonged or repeated operation of your speakers with a distorted
signal can cause damage that is not covered by the warranty. Note that it is imperative
you do not overdrive the bass capability of smaller speakers. Listen for noises, such as
pops, caused by the music's bass line. Use of the loudness control and/or full bass boost
at louder volumes is likely to overdrive the woofer. Use such controls sparingly.
How to Care for your Speakers
Slightly dampen a soft terry cloth towel with water, glass cleaner, or a diluted mild
detergent and then carefully clean the speakers. The towel should be just damp enough
to wipe the surface clean without leaving a trail of moisture. Do not, under any
circumstances, use abrasive cleaners or any cleaner containing chemicals harsher than
those found in glass cleaner.
Limited warranty
STARKESOUND will repair for the original owner any defect in materials or
workmanship that occurs in normal use of the speaker system, without charge for
parts and labor for ten years from the date of purchase.
It is your responsibility to use the product according to the instructions supplied, to
provide safe and secure transportation to an authorized Starke Sound service
representative, and to present proof of purchase from an authorized Starke Sound
dealer in the form of your sales slip when requesting service.
Damage that results from abuse, misuse, accidents, shipping,
repairs, or modifications by anyone other than an authorized Starke Sound service
representative is excluded from this warranty. This warranty is void if the serial
number has been removed or defaced.
This warranty gives you specific legal rights, and you may also have other rights that
vary from state to state.
If Service Seems Necessary
Contact the dealer from whom you purchased the speaker system. If that is not
possible, email us at.
E-mail:service@starkesound.com
or write to: STARKESOUND,INC. California,USA
17810 S. Main Street Unit B Gardena, CA 90428
We will promptly advise you of what action to take. If it is necessary to return your
speaker system to the factory, please ship it prepaid in the original factory packaging.
Please note that Starke Sound will not be held liable for shipping damage due to
improper packaging. After it has been repaired, we will return it freight prepaid in the
U.S. or Canada.
for Europe Customers only
This symbol found on the product indicates that the product must
not be disposed of with household waste. Instead, it may be placed
in a separate collection facility for electronic waste or returned to a
retailer when purchasing similar product. The producer paid to
recycle this product. Doing this contributes to reuse and recycling,
minimizes adverse eects on the environment and human health
and avoids any fines for incorrect disposal.
5
Elite
5
Elite
Owner’s Manual
Tri-Wiring
Similarly with bi-wiring,but this time you should remove all
connections between the speakers terminals.
This method involves connecting three sets of wires between
the amplifier and the speakers.
Be sure to use equal lengths of the appropriate wire for
Tri-wiring the speakers. Consult your STARKESOUND dealer
for dierent cable options.
See illustration for amplifier to speakers connections.
Be sure to use equal lengths of the appropriate wire for
bi-wiring the speakers. Consult your STARKESOUND dealer
for dierent cable options.
See illustration for amplifier to speakers connections.
5
Elite
Boundary and Tweeter Control Settings
The connection terminal cup has two switches that enable you to fine tune adjustments
to the response of the speakers. These can be utilized to achieve the best possible
performance from your speakers in a variety of installation situations.
Boundary Switch If you find it necessary to install the speakers in a situation where they
may not produce the best overall sound balance then one can adjust the Boundary
switch to improve the overall performance of the speakers. For instance, in order get the
best sound image, the speakers must be installed close to a corner or a large object that
forms a corner. Examples could include a fireplace or a large column. This can result in
an uneven response in the upper bass and lower midrange which produces a “thick” or
“heavy” sound. In vocal reproduction this is particularly noticeable. To control this there
is a Boundary Switch located above the connection terminals.
When speakers are located less than 12"-18" (300-450mm) from a corner or other large
object, adjust the Boundary Position switch setting. STARKESOUND recommends using
strong vocal source material to see if this setting produces smoother, more natural
sound.
Tweeter Level Switch
The IC-H7 and IW-H7 series speakers have a three-position switch to adjust the output
level of the tweeter. In most situations, the middle "0dB" position will produce the best
sound. In rooms that have high acoustical absorbing properties such as plush carpeting
and heavily upholstered furniture try the switch in the "+2dB" position. In rooms that
have highly reflective surfaces such as stone or hard wood paneling, try the "-2dB"
position.
+2dB
0 dB
-
2 dB
Normal
Boundary
Bi-Wiring
Bi-wiring the speakers can oer benefits for high
performance audio systems. This method
involves connecting two sets of wires between
the amplifier and the speakers. You must first
remove the terminal straps by loosing the
terminal knobs and sliding the straps to the side.
Be sure to use equal lengths of the appropriate
wire for bi-wiring the speakers. Consult your
STARKESOUND dealer for dierent cable options.
See illustration for amplifier to speakers
connections.
Owner’s Manual
Another factor that one must consider is the evenness of sound coverage over the
listening area. As most surround processors have the ability to set the balance of all
channels, it is wise to adjust a circulating noise signal in each channel until the apparent
or measured sound level is even. Alternatively, the listener can move to another seat and
the resultant shift will be balance somewhat. Surround speakers placed properly will
minimize the level variation from seat to seat. Increasing the distance of the surround
speakers from the listening area is the best way to improve evenness. Mounting the
speakers high on the side walls or in the ceiling will improve the listening experience.
Surround speakers should be mounted at a minimum of one foot (305 mm) above the
height of a standing listener. Note: In the event of ceiling-mounted speakers, be sure to
place the speakers close to the side walls well away from an overhead position.
If you are planning a large theater room with three or more rows of seating, one needs to
consider that there should be more than one pair of surround speakers in order to give
more even coverage and a more diuse sound field. STARKESOUND recommends that a
pair of surround speakers be used for every other seating row (first, third, fifth, etc.). This
method mimics the standard for most cinema applications.
Speaker Connection
Prior to wiring STARKESOUND recommends that you plan
and layout the wiring paths from the speakers to the
amplifier. For runs up to 25 feet STARKESOUND
recommends a 16-gauge wire and for runs longer a
14-gauge wire is recommended. Take care to ensure that
the integrity of the speaker wire is not threatened or
compromised by resting/rubbing against any sharp or
pointed objects. Before setting the wire in position be sure
to allow approximately an extra foot (305 mm) of wire at
the speaker location to ensure an easy connection the
speaker.
For standard single wire connections, unscrew one set of
the terminal knobs (rotate counter-clockwise). Remove
approximately 1/2" (12mm) of the wire insulation from the
two wire conductors and twist the wire strands into a tight
bundle. Insert the wire into the terminal shaft hole and
rotate the terminal knob clockwise to secure the wire in
place. Take care that there are no stray or loose strands of
wire that could touch the other terminal shaft.
Confirm that both the positive and negative speaker terminals of the
amplifier are in connection with the corresponding + (red) and - (black) terminals at the
speakers. If you look closely you will see that all wire is marked in some way to trace their
respective connections. The two conductors will striped or ridged insulation in order to
identify them. Alternatively the conductors may be color coded to ensure their identity.
Wires with pin lugs or spade lugs are also accepted by the terminals. In addition, dual
banana plugs can be plugged into the rear of the terminals.
Series/parallel wiring should be used when connecting more than two speakers per
amplifier channel. Make certain in all cases that the total impedance does not fall below
the amplifier's rating. If there is any question be sure to contact your STARKESOUND
dealer.
15°
15°
15°
15°
Preferred Surround Speaker Locations
Recommended surround speakers placement for two rows of seats.
5
Elite
Owner’s Manual
Location of Front Channel Speakers
Three loudspeakers are to be placed across in the
front of the listening room for the home theater
system. The width of the stereo image is
determined by the distance between the left and
right speakers. The image will be too narrow if the
speakers are placed too close together and,
conversely, if placed too far apart, the blend will
suer creating a void in the middle section.
Your speakers should create a continuous "virtual
image" when properly placed from left to right.
As a result an illusion of sound outside, in front of,
and behind the speaker systems will be created.
STARKESOUND recommends a 45 degree to 60
degree angular separation when viewed from
above. The distance between the speakers is 75% of
the distance from the speakers to the listener at the
minimum 45° separation. At the maximum 60°
separation the distance between the speakers is
equal to the distance from the speakers to the
listener.
In order to create a seamless sound image across the front of the speakers one must
carefully consider location and placement.
Optimally, there should an equal distance from the left, right, and center channel
speakers to the listener location.
The height of the midrange/tweeter module of the front channel speakers should be
installed as close as possible to the height of a seated listener's ears. The front channel
tweeters should be located within two vertical feet of that height.
Location of Surround Speakers
STARKESOUND has provided the following information for the placement of surround
speakers. Although there are many opinions regarding placement and location of
surround speakers STARKESOUND has provided the following recommendations based
on thorough research, academics, and our experience with many installations. Note: The
choice of models used in the illustration below is arbitrary. The information described in
the illustrations can be applied to both the IW and the IC series covered in this manual
and in any of the surround locations. However, please keep in mind that the
midrange/tweeter array in the IC-H5 Elite and IW-H5 Elite must always be vertically
oriented.
If two surrounds are used in a standard 5.1 configuration (not 7.1 or EX), they are best
mounted directly to the sides of the primary seating location, preferably within ±15° (see
illustration). This placement is the preferred method over back wall mounting for a few
reasons: 1. the placement of the surround speakers are located where the ear's ability to
discriminate left from right is optimum. This produces the maximum sense of
"envelopment" being surrounded by sound, 2. Mounting the rear speakers behind the
listener increases the angle between the front and rear speakers. This results in
reducing the chance that there will be a continuous front-to-rear sound image, lastly, 3.
Since our ability to discriminate the front-to-rear location of a sound source is not very
strong, locating surround speakers to the side of the listener will improve the listening
experience. 7.1 or EX systems that use side and rear speakers together overcome all of
these obstacles and give both maximum envelopment and a more continuous surround
eect.
.+56'0+0)
#4'#
삵삵
15°
15°
Alternate Surround Speaker Locations
Preferred Surround Speaker Locations
Picture 1:Recommended LCR speakers placement for screen size greater than 150".
Picture 2:Recommended LCR speakers placement for screen size smaller than 150".
① ②
IC-H5C
There are numerous brands in the world today.
What makes STARKESOUND so unique?
We are the Only brand that uses Uniquely huge satellite speakers,
with an unbelievably wide dynamic range and a sleek midrange.
Utilizing the MTM array design, we want to inherit the concept
and strive to improving our product. Our speakers has exceeded
the industry standard that is built with the highest quality and
most accurate sound that is unparalleled in the industry. Our
product is able to withstand high power input, thus giving
tremendous dynamics. Among others, Starkesound halo series has
a unique midrange driver designed to giving a totally dierent feel
from other competitors' speaker systems.
STARKESOUND has developed a varieties of applications for the needs
of all discerning audiophiles, oering in-cabinet, in-wall(in-ceiling)
and in-room(lifestyle) series. Starkesound is committed to delivery
the best result that technology has to oer. We are constantly
evaluating new technologies to improving our products. We pledge
to evolve with times and one thing that will never change is our
faith to producing only the highest quality products!
Halo
Owner’s Manual
series
Owner’s Manual
Power Handling and Listening Levels
STARKESOUND recommends reasonable power output settings for the amplifier so it
operates in a way that will not result in distortion. Even a modest amplifier, if producing
distortion, can damage speakers. Turn down the volume if you hear a gritty noise or
other signs of strain. Prolonged or repeated operation of your speakers with a distorted
signal can cause damage that is not covered by the warranty. Note that it is imperative
you do not overdrive the bass capability of smaller speakers. Listen for noises, such as
pops, caused by the music's bass line. Use of the loudness control and/or full bass boost
at louder volumes is likely to overdrive the woofer. Use such controls sparingly.
How to Care for your Speakers
Slightly dampen a soft terry cloth towel with water, glass cleaner, or a diluted mild
detergent and then carefully clean the speakers. The towel should be just damp enough
to wipe the surface clean without leaving a trail of moisture. Do not, under any
circumstances, use abrasive cleaners or any cleaner containing chemicals harsher than
those found in glass cleaner.
Limited warranty
STARKESOUND will repair for the original owner any defect in materials or
workmanship that occurs in normal use of the speaker system, without charge for
parts and labor for ten years from the date of purchase.
It is your responsibility to use the product according to the instructions supplied, to
provide safe and secure transportation to an authorized Starke Sound service
representative, and to present proof of purchase from an authorized Starke Sound
dealer in the form of your sales slip when requesting service.
Damage that results from abuse, misuse, accidents, shipping,
repairs, or modifications by anyone other than an authorized Starke Sound service
representative is excluded from this warranty. This warranty is void if the serial
number has been removed or defaced.
This warranty gives you specific legal rights, and you may also have other rights that
vary from state to state.
If Service Seems Necessary
Contact the dealer from whom you purchased the speaker system. If that is not
possible, email us at.
E-mail:service@starkesound.com
or write to: STARKESOUND,INC. California,USA
17810 S. Main Street Unit B Gardena, CA 90428
We will promptly advise you of what action to take. If it is necessary to return your
speaker system to the factory, please ship it prepaid in the original factory packaging.
Please note that Starke Sound will not be held liable for shipping damage due to
improper packaging. After it has been repaired, we will return it freight prepaid in the
U.S. or Canada.
for Europe Customers only
This symbol found on the product indicates that the product must
not be disposed of with household waste. Instead, it may be placed
in a separate collection facility for electronic waste or returned to a
retailer when purchasing similar product. The producer paid to
recycle this product. Doing this contributes to reuse and recycling,
minimizes adverse eects on the environment and human health
and avoids any fines for incorrect disposal.
5
Elite
5
Elite
Owner’s Manual
Tri-Wiring
Similarly with bi-wiring,but this time you should remove all
connections between the speakers terminals.
This method involves connecting three sets of wires between
the amplifier and the speakers.
Be sure to use equal lengths of the appropriate wire for
Tri-wiring the speakers. Consult your STARKESOUND dealer
for dierent cable options.
See illustration for amplifier to speakers connections.
Be sure to use equal lengths of the appropriate wire for
bi-wiring the speakers. Consult your STARKESOUND dealer
for dierent cable options.
See illustration for amplifier to speakers connections.
5
Elite
Boundary and Tweeter Control Settings
The connection terminal cup has two switches that enable you to fine tune adjustments
to the response of the speakers. These can be utilized to achieve the best possible
performance from your speakers in a variety of installation situations.
Boundary Switch If you find it necessary to install the speakers in a situation where they
may not produce the best overall sound balance then one can adjust the Boundary
switch to improve the overall performance of the speakers. For instance, in order get the
best sound image, the speakers must be installed close to a corner or a large object that
forms a corner. Examples could include a fireplace or a large column. This can result in
an uneven response in the upper bass and lower midrange which produces a “thick” or
“heavy” sound. In vocal reproduction this is particularly noticeable. To control this there
is a Boundary Switch located above the connection terminals.
When speakers are located less than 12"-18" (300-450mm) from a corner or other large
object, adjust the Boundary Position switch setting. STARKESOUND recommends using
strong vocal source material to see if this setting produces smoother, more natural
sound.
Tweeter Level Switch
The IC-H7 and IW-H7 series speakers have a three-position switch to adjust the output
level of the tweeter. In most situations, the middle "0dB" position will produce the best
sound. In rooms that have high acoustical absorbing properties such as plush carpeting
and heavily upholstered furniture try the switch in the "+2dB" position. In rooms that
have highly reflective surfaces such as stone or hard wood paneling, try the "-2dB"
position.
+2dB
0 dB
-
2 dB
Normal
Boundary
Bi-Wiring
Bi-wiring the speakers can oer benefits for high
performance audio systems. This method
involves connecting two sets of wires between
the amplifier and the speakers. You must first
remove the terminal straps by loosing the
terminal knobs and sliding the straps to the side.
Be sure to use equal lengths of the appropriate
wire for bi-wiring the speakers. Consult your
STARKESOUND dealer for dierent cable options.
See illustration for amplifier to speakers
connections.
Owner’s Manual
Another factor that one must consider is the evenness of sound coverage over the
listening area. As most surround processors have the ability to set the balance of all
channels, it is wise to adjust a circulating noise signal in each channel until the apparent
or measured sound level is even. Alternatively, the listener can move to another seat and
the resultant shift will be balance somewhat. Surround speakers placed properly will
minimize the level variation from seat to seat. Increasing the distance of the surround
speakers from the listening area is the best way to improve evenness. Mounting the
speakers high on the side walls or in the ceiling will improve the listening experience.
Surround speakers should be mounted at a minimum of one foot (305 mm) above the
height of a standing listener. Note: In the event of ceiling-mounted speakers, be sure to
place the speakers close to the side walls well away from an overhead position.
If you are planning a large theater room with three or more rows of seating, one needs to
consider that there should be more than one pair of surround speakers in order to give
more even coverage and a more diuse sound field. STARKESOUND recommends that a
pair of surround speakers be used for every other seating row (first, third, fifth, etc.). This
method mimics the standard for most cinema applications.
Speaker Connection
Prior to wiring STARKESOUND recommends that you plan
and layout the wiring paths from the speakers to the
amplifier. For runs up to 25 feet STARKESOUND
recommends a 16-gauge wire and for runs longer a
14-gauge wire is recommended. Take care to ensure that
the integrity of the speaker wire is not threatened or
compromised by resting/rubbing against any sharp or
pointed objects. Before setting the wire in position be sure
to allow approximately an extra foot (305 mm) of wire at
the speaker location to ensure an easy connection the
speaker.
For standard single wire connections, unscrew one set of
the terminal knobs (rotate counter-clockwise). Remove
approximately 1/2" (12mm) of the wire insulation from the
two wire conductors and twist the wire strands into a tight
bundle. Insert the wire into the terminal shaft hole and
rotate the terminal knob clockwise to secure the wire in
place. Take care that there are no stray or loose strands of
wire that could touch the other terminal shaft.
Confirm that both the positive and negative speaker terminals of the
amplifier are in connection with the corresponding + (red) and - (black) terminals at the
speakers. If you look closely you will see that all wire is marked in some way to trace their
respective connections. The two conductors will striped or ridged insulation in order to
identify them. Alternatively the conductors may be color coded to ensure their identity.
Wires with pin lugs or spade lugs are also accepted by the terminals. In addition, dual
banana plugs can be plugged into the rear of the terminals.
Series/parallel wiring should be used when connecting more than two speakers per
amplifier channel. Make certain in all cases that the total impedance does not fall below
the amplifier's rating. If there is any question be sure to contact your STARKESOUND
dealer.
15°
15°
15°
15°
Preferred Surround Speaker Locations
Recommended surround speakers placement for two rows of seats.
5
Elite
Owner’s Manual
Location of Front Channel Speakers
Three loudspeakers are to be placed across in the
front of the listening room for the home theater
system. The width of the stereo image is
determined by the distance between the left and
right speakers. The image will be too narrow if the
speakers are placed too close together and,
conversely, if placed too far apart, the blend will
suer creating a void in the middle section.
Your speakers should create a continuous "virtual
image" when properly placed from left to right.
As a result an illusion of sound outside, in front of,
and behind the speaker systems will be created.
STARKESOUND recommends a 45 degree to 60
degree angular separation when viewed from
above. The distance between the speakers is 75% of
the distance from the speakers to the listener at the
minimum 45° separation. At the maximum 60°
separation the distance between the speakers is
equal to the distance from the speakers to the
listener.
In order to create a seamless sound image across the front of the speakers one must
carefully consider location and placement.
Optimally, there should an equal distance from the left, right, and center channel
speakers to the listener location.
The height of the midrange/tweeter module of the front channel speakers should be
installed as close as possible to the height of a seated listener's ears. The front channel
tweeters should be located within two vertical feet of that height.
Location of Surround Speakers
STARKESOUND has provided the following information for the placement of surround
speakers. Although there are many opinions regarding placement and location of
surround speakers STARKESOUND has provided the following recommendations based
on thorough research, academics, and our experience with many installations. Note: The
choice of models used in the illustration below is arbitrary. The information described in
the illustrations can be applied to both the IW and the IC series covered in this manual
and in any of the surround locations. However, please keep in mind that the
midrange/tweeter array in the IC-H5 Elite and IW-H5 Elite must always be vertically
oriented.
If two surrounds are used in a standard 5.1 configuration (not 7.1 or EX), they are best
mounted directly to the sides of the primary seating location, preferably within ±15° (see
illustration). This placement is the preferred method over back wall mounting for a few
reasons: 1. the placement of the surround speakers are located where the ear's ability to
discriminate left from right is optimum. This produces the maximum sense of
"envelopment" being surrounded by sound, 2. Mounting the rear speakers behind the
listener increases the angle between the front and rear speakers. This results in
reducing the chance that there will be a continuous front-to-rear sound image, lastly, 3.
Since our ability to discriminate the front-to-rear location of a sound source is not very
strong, locating surround speakers to the side of the listener will improve the listening
experience. 7.1 or EX systems that use side and rear speakers together overcome all of
these obstacles and give both maximum envelopment and a more continuous surround
eect.
.+56'0+0)
#4'#
삵삵
15°
15°
Alternate Surround Speaker Locations
Preferred Surround Speaker Locations
Picture 1:Recommended LCR speakers placement for screen size greater than 150".
Picture 2:Recommended LCR speakers placement for screen size smaller than 150".
① ②
IC-H5C
There are numerous brands in the world today.
What makes STARKESOUND so unique?
We are the Only brand that uses Uniquely huge satellite speakers,
with an unbelievably wide dynamic range and a sleek midrange.
Utilizing the MTM array design, we want to inherit the concept
and strive to improving our product. Our speakers has exceeded
the industry standard that is built with the highest quality and
most accurate sound that is unparalleled in the industry. Our
product is able to withstand high power input, thus giving
tremendous dynamics. Among others, Starkesound halo series has
a unique midrange driver designed to giving a totally dierent feel
from other competitors' speaker systems.
STARKESOUND has developed a varieties of applications for the needs
of all discerning audiophiles, oering in-cabinet, in-wall(in-ceiling)
and in-room(lifestyle) series. Starkesound is committed to delivery
the best result that technology has to oer. We are constantly
evaluating new technologies to improving our products. We pledge
to evolve with times and one thing that will never change is our
faith to producing only the highest quality products!
Halo
Owner’s Manual
series
5
Elite
5
Elite
Owner’s Manual
Tri-Wiring
Similarly with bi-wiring,but this time you should remove all
connections between the speakers terminals.
This method involves connecting three sets of wires between
the amplifier and the speakers.
Be sure to use equal lengths of the appropriate wire for
Tri-wiring the speakers. Consult your STARKESOUND dealer
for dierent cable options.
See illustration for amplifier to speakers connections.
Be sure to use equal lengths of the appropriate wire for
bi-wiring the speakers. Consult your STARKESOUND dealer
for dierent cable options.
See illustration for amplifier to speakers connections.
5
Elite
Boundary and Tweeter Control Settings
The connection terminal cup has two switches that enable you to fine tune adjustments
to the response of the speakers. These can be utilized to achieve the best possible
performance from your speakers in a variety of installation situations.
Boundary Switch If you find it necessary to install the speakers in a situation where they
may not produce the best overall sound balance then one can adjust the Boundary
switch to improve the overall performance of the speakers. For instance, in order get the
best sound image, the speakers must be installed close to a corner or a large object that
forms a corner. Examples could include a fireplace or a large column. This can result in
an uneven response in the upper bass and lower midrange which produces a “thick” or
“heavy” sound. In vocal reproduction this is particularly noticeable. To control this there
is a Boundary Switch located above the connection terminals.
When speakers are located less than 12"-18" (300-450mm) from a corner or other large
object, adjust the Boundary Position switch setting. STARKESOUND recommends using
strong vocal source material to see if this setting produces smoother, more natural
sound.
Tweeter Level Switch
The IC-H7 and IW-H7 series speakers have a three-position switch to adjust the output
level of the tweeter. In most situations, the middle "0dB" position will produce the best
sound. In rooms that have high acoustical absorbing properties such as plush carpeting
and heavily upholstered furniture try the switch in the "+2dB" position. In rooms that
have highly reflective surfaces such as stone or hard wood paneling, try the "-2dB"
position.
+2dB
0 dB
-
2 dB
Normal
Boundary
Bi-Wiring
Bi-wiring the speakers can oer benefits for high
performance audio systems. This method
involves connecting two sets of wires between
the amplifier and the speakers. You must first
remove the terminal straps by loosing the
terminal knobs and sliding the straps to the side.
Be sure to use equal lengths of the appropriate
wire for bi-wiring the speakers. Consult your
STARKESOUND dealer for dierent cable options.
See illustration for amplifier to speakers
connections.
5
Elite
5
Elite
Owner’s Manual
Tri-Wiring
Similarly with bi-wiring,but this time you should remove all
connections between the speakers terminals.
This method involves connecting three sets of wires between
the amplifier and the speakers.
Be sure to use equal lengths of the appropriate wire for
Tri-wiring the speakers. Consult your STARKESOUND dealer
for dierent cable options.
See illustration for amplifier to speakers connections.
Be sure to use equal lengths of the appropriate wire for
bi-wiring the speakers. Consult your STARKESOUND dealer
for dierent cable options.
See illustration for amplifier to speakers connections.
5
Elite
Boundary and Tweeter Control Settings
The connection terminal cup has two switches that enable you to fine tune adjustments
to the response of the speakers. These can be utilized to achieve the best possible
performance from your speakers in a variety of installation situations.
Boundary Switch If you find it necessary to install the speakers in a situation where they
may not produce the best overall sound balance then one can adjust the Boundary
switch to improve the overall performance of the speakers. For instance, in order get the
best sound image, the speakers must be installed close to a corner or a large object that
forms a corner. Examples could include a fireplace or a large column. This can result in
an uneven response in the upper bass and lower midrange which produces a “thick” or
“heavy” sound. In vocal reproduction this is particularly noticeable. To control this there
is a Boundary Switch located above the connection terminals.
When speakers are located less than 12"-18" (300-450mm) from a corner or other large
object, adjust the Boundary Position switch setting. STARKESOUND recommends using
strong vocal source material to see if this setting produces smoother, more natural
sound.
Tweeter Level Switch
The IC-H7 and IW-H7 series speakers have a three-position switch to adjust the output
level of the tweeter. In most situations, the middle "0dB" position will produce the best
sound. In rooms that have high acoustical absorbing properties such as plush carpeting
and heavily upholstered furniture try the switch in the "+2dB" position. In rooms that
have highly reflective surfaces such as stone or hard wood paneling, try the "-2dB"
position.
+2dB
0 dB
-
2 dB
Normal
Boundary
Bi-Wiring
Bi-wiring the speakers can oer benefits for high
performance audio systems. This method
involves connecting two sets of wires between
the amplifier and the speakers. You must first
remove the terminal straps by loosing the
terminal knobs and sliding the straps to the side.
Be sure to use equal lengths of the appropriate
wire for bi-wiring the speakers. Consult your
STARKESOUND dealer for dierent cable options.
See illustration for amplifier to speakers
connections.
Owner’s Manual
Another factor that one must consider is the evenness of sound coverage over the
listening area. As most surround processors have the ability to set the balance of all
channels, it is wise to adjust a circulating noise signal in each channel until the apparent
or measured sound level is even. Alternatively, the listener can move to another seat and
the resultant shift will be balance somewhat. Surround speakers placed properly will
minimize the level variation from seat to seat. Increasing the distance of the surround
speakers from the listening area is the best way to improve evenness. Mounting the
speakers high on the side walls or in the ceiling will improve the listening experience.
Surround speakers should be mounted at a minimum of one foot (305 mm) above the
height of a standing listener. Note: In the event of ceiling-mounted speakers, be sure to
place the speakers close to the side walls well away from an overhead position.
If you are planning a large theater room with three or more rows of seating, one needs to
consider that there should be more than one pair of surround speakers in order to give
more even coverage and a more diuse sound field. STARKESOUND recommends that a
pair of surround speakers be used for every other seating row (first, third, fifth, etc.). This
method mimics the standard for most cinema applications.
Speaker Connection
Prior to wiring STARKESOUND recommends that you plan
and layout the wiring paths from the speakers to the
amplifier. For runs up to 25 feet STARKESOUND
recommends a 16-gauge wire and for runs longer a
14-gauge wire is recommended. Take care to ensure that
the integrity of the speaker wire is not threatened or
compromised by resting/rubbing against any sharp or
pointed objects. Before setting the wire in position be sure
to allow approximately an extra foot (305 mm) of wire at
the speaker location to ensure an easy connection the
speaker.
For standard single wire connections, unscrew one set of
the terminal knobs (rotate counter-clockwise). Remove
approximately 1/2" (12mm) of the wire insulation from the
two wire conductors and twist the wire strands into a tight
bundle. Insert the wire into the terminal shaft hole and
rotate the terminal knob clockwise to secure the wire in
place. Take care that there are no stray or loose strands of
wire that could touch the other terminal shaft.
Confirm that both the positive and negative speaker terminals of the
amplifier are in connection with the corresponding + (red) and - (black) terminals at the
speakers. If you look closely you will see that all wire is marked in some way to trace their
respective connections. The two conductors will striped or ridged insulation in order to
identify them. Alternatively the conductors may be color coded to ensure their identity.
Wires with pin lugs or spade lugs are also accepted by the terminals. In addition, dual
banana plugs can be plugged into the rear of the terminals.
Series/parallel wiring should be used when connecting more than two speakers per
amplifier channel. Make certain in all cases that the total impedance does not fall below
the amplifier's rating. If there is any question be sure to contact your STARKESOUND
dealer.
15°
15°
15°
15°
Preferred Surround Speaker Locations
Recommended surround speakers placement for two rows of seats.
5
Elite
Owner’s Manual
Location of Front Channel Speakers
Three loudspeakers are to be placed across in the
front of the listening room for the home theater
system. The width of the stereo image is
determined by the distance between the left and
right speakers. The image will be too narrow if the
speakers are placed too close together and,
conversely, if placed too far apart, the blend will
suer creating a void in the middle section.
Your speakers should create a continuous "virtual
image" when properly placed from left to right.
As a result an illusion of sound outside, in front of,
and behind the speaker systems will be created.
STARKESOUND recommends a 45 degree to 60
degree angular separation when viewed from
above. The distance between the speakers is 75% of
the distance from the speakers to the listener at the
minimum 45° separation. At the maximum 60°
separation the distance between the speakers is
equal to the distance from the speakers to the
listener.
In order to create a seamless sound image across the front of the speakers one must
carefully consider location and placement.
Optimally, there should an equal distance from the left, right, and center channel
speakers to the listener location.
The height of the midrange/tweeter module of the front channel speakers should be
installed as close as possible to the height of a seated listener's ears. The front channel
tweeters should be located within two vertical feet of that height.
Location of Surround Speakers
STARKESOUND has provided the following information for the placement of surround
speakers. Although there are many opinions regarding placement and location of
surround speakers STARKESOUND has provided the following recommendations based
on thorough research, academics, and our experience with many installations. Note: The
choice of models used in the illustration below is arbitrary. The information described in
the illustrations can be applied to both the IW and the IC series covered in this manual
and in any of the surround locations. However, please keep in mind that the
midrange/tweeter array in the IC-H5 Elite and IW-H5 Elite must always be vertically
oriented.
If two surrounds are used in a standard 5.1 configuration (not 7.1 or EX), they are best
mounted directly to the sides of the primary seating location, preferably within ±15° (see
illustration). This placement is the preferred method over back wall mounting for a few
reasons: 1. the placement of the surround speakers are located where the ear's ability to
discriminate left from right is optimum. This produces the maximum sense of
"envelopment" being surrounded by sound, 2. Mounting the rear speakers behind the
listener increases the angle between the front and rear speakers. This results in
reducing the chance that there will be a continuous front-to-rear sound image, lastly, 3.
Since our ability to discriminate the front-to-rear location of a sound source is not very
strong, locating surround speakers to the side of the listener will improve the listening
experience. 7.1 or EX systems that use side and rear speakers together overcome all of
these obstacles and give both maximum envelopment and a more continuous surround
eect.
.+56'0+0)
#4'#
삵삵
15°
15°
Alternate Surround Speaker Locations
Preferred Surround Speaker Locations
Picture 1:Recommended LCR speakers placement for screen size greater than 150".
Picture 2:Recommended LCR speakers placement for screen size smaller than 150".
① ②
IC-H5CIC-H5C
There are numerous brands in the world today.
What makes STARKESOUND so unique?
We are the Only brand that uses Uniquely huge satellite speakers,
with an unbelievably wide dynamic range and a sleek midrange.
Utilizing the MTM array design, we want to inherit the concept
and strive to improving our product. Our speakers has exceeded
the industry standard that is built with the highest quality and
most accurate sound that is unparalleled in the industry. Our
product is able to withstand high power input, thus giving
tremendous dynamics. Among others, Starkesound halo series has
a unique midrange driver designed to giving a totally dierent feel
from other competitors' speaker systems.
STARKESOUND has developed a varieties of applications for the needs
of all discerning audiophiles, oering in-cabinet, in-wall(in-ceiling)
and in-room(lifestyle) series. Starkesound is committed to delivery
the best result that technology has to oer. We are constantly
evaluating new technologies to improving our products. We pledge
to evolve with times and one thing that will never change is our
faith to producing only the highest quality products!
Halo
Owner’s Manual
seriesHalo
Owner’s Manual
series
This manual suits for next models
1
Table of contents
Other Starke sound Speakers manuals


