manuals.online logo
Brands
  1. Home
  2. •
  3. Brands
  4. •
  5. Pioneer
  6. •
  7. Cassette Player
  8. •
  9. Pioneer CT-520 User manual

Pioneer CT-520 User manual

FULL
LOGIC
CONTROL
STEREO
CASSETTE
TAPE
DECK
T-520
HE
Operating
Instructions
This
operation
manual
is
written
in
four
languages.
The
English
is
from
page
1
to
page
14,
the
Ger-
man
from
page
15
to
page
28,
the
French
from
page
29
to
page
42
and
the
Italian
from
page
43
to
page
56.
Please
read
the
pages
in
your
language
to
learn
to
use
this
product
correctly.
Diese
Bedienungsanleitung
ist
in
vier
Sprachen
abgefa&t.
Der
englische
Text
reicht
von
Seite
1
bis
Seite
14,
der
deutsche
Text
von
Seite
15
bis
Seite
28,
der
franzdsische
Text
von
Seite
29
bis
Seite
42
und
der
italienische
Text
von
Seite
43
bis
Seite
56.
Lesen
Sie
bitte
die
Seiten
in
Ihrer
Muttersprache
aufmerksam
durch,
um
sich
mit
diesem
Produkt
gut
vertraut
zu
machen.
Ce
manuel
d’utilisation
a
été
rédigé.
en
quatre
langues.
La
version
anglaise
va
de
la
page
1
a
la
page
14,
la
version
allemande
de
la
page
15
a
la
page
28,
la
version
frangaise
de
la
page
29
a
la
page
42
et
la
version
italienne
de
la
page
43
a
la
page
56.
Veuillez
lire
les
instructions
dans
la
langue
qui
vous
intéresse
pour
apprendre
a
utiliser
correctement
ce
produit.
Questo
manuale
d’istruzioni
per
I’uso
é
redatto
in
quattro
lingue.
L’inglese
é
da
pag.
1
a
pag.
14,
il
tedesco
da
pag.
15
a
pag.
28,
il
francese
da
pag.
29
a
pag.
42
€e
I’italiano
da
pag.
43
€
pag.
56.
Leg-
gere
attentamente
le
istruzioni
nella
propria
lingua
per
usare
correttamente
questo
prodotto.
dW)
PIONEER’
LINE-VOLTAGE
VARIATIONS
You
will
find
the
line
voltage
selector
switch
on
rear
panel.
This
switch
has
positions
for
220V
and
240V_
power
sources.
Before
your
cassette
tape
deck
is
shipped
from
the
factory,
the
switch
is
set
to
the
power
requirements
of
the
destina-
tion;
nevertheless,
you
should
check
that
it
is
set
properly
before
plugging
the
power
cord
into
the
outlet.
lf
the
voltage
is
not
properly
set
or
if
you
move
to
an
area
where
the
voltage
requirements
differ,
adjust
the
selector
switch
as
follows.
After
adjusting,
connect
the
power
cord.
1.
Use
a
Phillips
screwdriver
to
loosen
mounting
screw,
then
remove
selector
plug.
2.
Reinstall
the
selector
plug
with
its
cut
out
section
exposing
the
correct
voltage
indication.
3.
Tighten
mounting
screw.
Selector
plug
Phillips
screwdriver
Mounting
screw
IMPORTANT
To
prevent
electric
shock,
do
not
remove
cover.
No
user
serviceable
parts
inside,
refer
servicing
to
qualified
service
personnel.
Always
disconnect
all
the
equipment
from
the
mains
supply
when
disconnecting
the
signal
leads.
The
power
cord
should
be
connected
last,
make
sure
that
the
power
switch
is
off.
Unplug
the
set
from
the
wall
socket
when
it
is
not
to
be
used
for
an
extended
period
of
time.
WONNCCHONG
s-5:2-0
0
ane
wag
emir
Soe
ewe)
3
Cassette
Tapes
............0
00000
fab
seated
&
12
Front
Panel
Facilities.................0..
4
Dolby
Noise
Reduction
System
.............
13
Tape
Recording
.................000004
5
SPECITICANONS
6
06-54
a
Se
he
Sa
aah
ar
13
Tape
Playback
....................22.4.
8
Troubleshooting.
.........0
000
ee
eens
14
Recording
and
Playback
Using
the
Timer.......
10
Maintenance.............
0.0.0.0.
0c
eae
11
—
CONTENTS
CONNECTIONS
If
you
intend
to
hook
up
PIONEER
system
components,
refer
to
the
CONNECTIONS
section
in
the
Operating
Instructions
of
the
stereo
amplifier.
The
section
will
help
you
connect
the
equipment
more
easily.
|
Rear
panel
connections
|
Recording
cord
connec-
<P
©:
@
«ct
(C)
i
>
:.©®
@'a
tions
©.
@'<
Connect
the
INPUT
terminal
of
the
tapedeck
to
the
TAPE
GE
terminal
of
the
amplifier.
Playback
cord
connec-
tions
Connect
the
OUTPUT
Stereo
amplifier’s
terminals
TAME
<P
@
@|
ap
Tape
deck
Power
cord
connections
Insert
the
power
plug
into
an
auxiliary
AC
OUTLET
(SWITCHED)
on
the
ampli-
fier
or
into
a
household
PLAY)
terminal
of
the
ta
;
>
©
©
<a>
ower
outlet.
ae
the
TAPE
Gust)
Recording
eens)
esicanee
Dre
ee
=
terminal
of
the
amplifier.
mendeestans
eee
Headphone
connections
Connect
the
plug
to
the
NOTES:
nee
y
saat.
Kipitabs
ieaurtes
headphone
jack
on_
the
@Connect
the
white
plug
inane
rune
sce
DEE
Sa
yrevetet!
i
i
stereo
rack.
to
the
left
(L)
channel
oo
slg
a
21M
|
3
and
the
red
plug
to
the
ae
ere
Ve
z
NOTES:
right
(R)
channel.
@Make
sure
that
all
the
plugs
are
pushed
into
the
jacks
as
far
as
they
will
go.
Stereo
amplifier
e/nsert
the
plug
into
the
jack
as
far
as
it
will
go.
If
the
optional
stereo
rack
is
provided
with
a
head-
phone
jack,
connect
the
rack’s
headphone
_
cord
(with
pin
plug)
with
this
jack.
Front
panel
connections
Microphone
connections
Insert
the
plug
into
the
unit's
MIC
jacks.
NOTES:
@
Connect
the
left
channel
microphone
to
the
L
jack,
and
the
right
chan-
nel
microphone
to
the
R
jack.
e/nsert
the
plug
into
the
jack
as
far
as
it
will
go.
Right
channel
Left
channel
Microphones
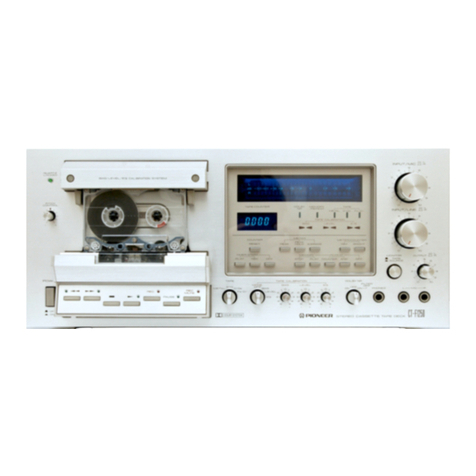
FRONT
PANEL
FACILITIES
COUNTER
mt
Toool
@
A298
9339398993505955
|
08-20
10-7
-5-3
OO
=
ee
Ceo]
c=
en
ype
TAPE
DECK
CT:
S20
(1)
POWER
switch
Used
to
switch
the
unit's
power
on
and
off.
Power
is
ON:
Meter
lights.
Power
is
OFF:
Meter
goes
off.
(2)
TIMER
start
switch
Used
for
unattended
recording
and
wake-up
playback
opera-
tions.
(For
details,
turn
to
page
10.)
Normally,
this
switch
is
kept
at
the
OFF
position.
OFF:
For
normal
tape
play
and
recording.
REC:
For-
unattended
recording.
PLAY:
For
wake-up
playback.
(3)
EJECT
button
and
cassette
holder
The
cassette
tape
is
housed
in
this
holder
(for
details,
turn
to
page
5.)
To
open
the
holder:
Depress
the
EJECT
button.
To
close
the
holder:
Push
the
holder
by
hand.
NOTE:
Do
not
depress
the
EJECT
button
while
the
tape
is
traveling.
(4)
Tape
COUNTER
and
RESET
button
The
figures
on
the
tape
counter
increase
or
decrease
in
line
with
the
forward
or
reverse
movement
of
the
tape.
If
the
counter
is
set
to
“O00”
at
the
start
of
recording,
it
will
be
easy
to
find
the
recording
start
position
when
you
want
to
listen
to
the
program
again
at
a
later
date.
(5)
TAPE
SELECTOR
switches
Use
these
switches
in
line
with
the
tapes
being
used.
For
normal
tapes:
©
Set
the
left-side
switch
to
the
NORM
-S&©
(out)
position.
®
The
right-side
switch
position
is
not
used.
For
chrome
tapes:
®
Depress
the
left-side
switch
to
the
HIGH
-m
(in)
position.
®
Set
the
right-side
switch
to
the
CrO,
-m&L
(out)
position.
For
metal
tapes:
©
Depress
the
left-side
switch
to
the
HIGH
—-m_
(in)
position.
©
Depress
the
right-side
switch
to
the
METAL
—m
(in)
position.
*
(6)
DOLBY
NR
switch
Set
to
the
depressed
ON
position
when
recording
and
this
will
reduce
the
amount
of
tape
hiss
(turn
to
page
13).
Also
set
to
ON
when
playing
a
tape
which
has
been
recorded
using
the
Dolby
noise
reduction
system.
@
MS
switch
Set
to
ON
when
automatically
searching
the
start
of
a
program.
(For
details,
turn
to
page
9.)
Normaily,
this
switch
is
kept
at
the
OFF
position.
Function
switches
Rewind
switch
(
<<
):
Depress
to
rewind
the
tape.
Fast
forward
switch
(
>>
):
Depress
to
fast
forward
the
tape.
Stop
switch
(=
):
Depress
to
stop
the
playback,
recording,
fast
forward
and
rewind
operations.
PLAY
switch
(>
):
Depress
to
start
tape
play.
PAUSE
switch:
Depress
to
temporarily
suspend
recording
or
to
adjust
the
recording
level.
(For
details,
turn
to
page
6.)
Depress
the
PAUSE
switch
to
resume
recording.
NOTE:
The
tape
will
not
stop
even
if
this
switch
is
depressed
when
you
are
performing
a
rewind
or
fast
forward
operation.
REC
switch:
Depress
to
start
recording
operations.
REC
MUTE
switch:
Push
to
create
unrecorded
blanks
between
tape
programs.
(For
details,
turn
to
page
7.)
When
the
switch
is
kept
pushed
during
recording,
no
sound
is
recorded
for
as
long
as
the
switch
is
in
the
depressed
position
(thereby
creating
an
unrecorded
blank).
NOTE:
@When
the
POWER
switch
is
set
to
the
OFF
position,
all
the
function
switches
are
released
to
the
OFF
mode.
(9)
Recording/playback
level
meter
This
indicates
the
strength
of
the
sound
being
played
back
or
the
sound
about
to
be
recorded.
MIC
jacks
Plug
the
microphone(s)
into
these
jacks
when
recording
using
microphones.
(For
details,
turn
to
page
to
6).
“L'':
Left.channel
jack,
‘‘R’’:
Right
channel
jack
(1)
INPUT
recording
level
controls
Rotate
these
controls
while
observing
the
level
meter
when
adjusting
the
strength
of
the
sound
that
is
to
be
recorded.
(For
details,
turn
to
page
6.)
The
strength
is
increased
when
the
controls
are
rotated
clockwise
from
the
‘‘0’’
minimum
position.
Front
control:
For
left
channel
adjustments
Rear
control:
For
right
channel
adjustments
The
controls
normally
rotate
together.
To
rotate
only
one
con-
trol,
hold
the
other
so
that
it
will
not
move.
—
Aa-—
TAPE
RECORDING
Recording
Preparations
Set
up
the
stereo
amplifier
and
the
program
source
(record
or
FM
broadcast)
unit
whose
sound
is
to
be
recorded.
TAPE
2/
LOUDNESS
anaeToRn
OFF
m
OFF
ON
m
ON
4
Depress
the
POWER
switch
to
ON.
the
record.
TUNER
ia
TUNER
PHONO
TAPE
1
aux,
VIDEO)
Depress
the
switch
to
TUNER
or
PHONO
for
recording
FM
broadcast
or
alone
Rotate
the
VOLUME
Senance
contro!
to
check
re-
cording
the
program
source.
FUNCTION
Tuner
Operate
the
tuner
and
tune
in
the
FM
sta-
tions.
ey
10?
“3
\
see
wewesZDFSF
Set
the
TIMER
switch
to
OFF.
REC
OFF
!
|
OFF
>
BLay
ra
l
i
i
—=—=—=
Depress
the
POWER
switch
to
ON.
Depress
Provide
the
record
for
playback.
Set
the
DOLBY
NR
switch
either
to
ON
or
OFF.
Set
the
switch
to
ON
when
recording
the
program
source
with
the
Dolby
noise
reduc-
tion
system.
poLsy
I
Morr
mm
ON
Set
the
TAPE
SELECTOR
switches
to
the
appropriate
positions.
3-3-8
Select
the
position
in
accord-
ance
with
the
type
of
tape
which
is
to
be
played.
(Refer
to
the
section
on
cassette
tapes
on
page
12.)
Inserting
the
cassette
tape.
—
Depress
the
EJECT
button
to
open
the
tape
holder.
(Q)
Insert
the
tape
into
the
holder.
Load
the
tape
with
the
ex-
posed
strip
of
tape
at
the
bot-
tom
and
the
side
to
be
re-
corded
facing
you.
(3)
Close
the
holder.
Push
the
holder
by
hand
until
it
is
back
in
position.
NOTES:
e
Do
not
load
the
cassette
with
the
exposed
strip
of
tape
at
the
top
instead
of
bottom
since
this
may
result
in
trouble.
@On
rare
occasions
the
cassette
is
not
secured
properly
when
the
tape
holder
is
pushed
back.
In
cases
like
this,
take
out
the
tape,
rotate
the
tape
reels
slightly
and
then
reload
the
tape.
e/f
the
tape
is
half
wound
up
or
wound
up
on
the
right
reel,
rewind
the
tape
onto
the
left
reel
following
the
instructions
given
for
rewinding
the
tape.
e
Always
depress
the
STOP
switch{
a
)
to
the
stop
mode
before
loading
or
ejecting
the
tape.
ee
with
===10]
NOTES:
e
Accidental
erasure
prevention
tabs
can
be
found
on
the
top
edge
of
the
cassette
tape.
If
these
tabs
have
been
broken
out,
the
program
source
cannot
be
recorded.
e7o
record
the
program
source
onto
a
tape
without
the
tabs,
stick
a
piece
of
cellophane
tape
over
the
opening.
(Turn
to
page
12.)
Recording
FM
Broadcast
or
Records
Play
the
program
source
which
is
to
be
recorded.
Play
the
record
on
the
turntable
if
you
are
recording
the
records.
Operate
the
tuner
and
turn
in
the
station
whose
program
is
to
be
-recorded
if
you
are
recording
an
FM
broadcast.
Depress
the
REC
switch
after
the
PAUSE
switch
has
been
depressed.
PAUSE
REC
[I
]
Set
the
recording
level.
Observe
the
recording
level
meter
and
rotate
the
INPUT
tevei
controls.
®
Adjust
within
the
following
range
for
a
relatively
loud
sound
Distortion
and
noise
are
increased
with
the
following
adjust-
ments.
e@
Noise
increases
with
play
if
the
level
is
too
low.
(Between
around
[—20]
and
[—10]
)
=
———
—
1
———
|
dB
-20
107
--o-+3
O
LL
—
om
e
Distortion
increases
with
play
if
the
level
is
too
high.
({+8]
lights
continuously)
When
using
any
tape
(except
metal
tape)
+3+5+8
at.
_¥_¥__¥_
Yan
Gen Gen
Vm
en
dB
-20
10-7
-5-3
O-}
+3+5+8
LC
a
ed
ee
oe oe
oe
7
7
—h
When
using
metal
tape
e@
Use
dynamic
electret
microphones.
e
Make
sure
that
the
cord
is
not
longer
than
§
meters
if
you
are
using
high-impedance
microphones.
e
Use
the
microphones
at
a
distance
from
the
speakers
since
TAPE
RECORDING
@A
leader
tape
which
cannot
be
recorded
is
provided
at
the
beginning
and
end
of
the
tape.
e
Before
recording,
take
up
the
leader
onto
the
right-hand
real
fallow
the
tape
to
travel
for
about
10
seconds
in
the
play
mode).
[4]
Set
the
tape
counter
to
“000”.
Depress
Depress
the
RESET
button
to
set
to
000".
COUNTER
RESET
Start
recording
As
soon
as
the
PAUSE
switch
is
depressed,
the
tape
moves
from
left
to
right
and
recording
begins.
PAUSE
Depress
Q]
ie
6]
When
stopping
recording
or
using
the
PAUSE
function
e
Depress
the
STOP
switch
(
m
).
This
releases
the
recording
mode
and
the
tape
stops
traveling.
e
Depress
the
PAUSE
switch.
U
The
tape
stops
traveling
but
the
recording
mode
is
not
released.
ie!
e
To
resume
recording,
depress
the
s
PAUSE
switch.
Recording
is
completed.
The
tape
stops
automatically
when
it
is
fully
wound.
1.
Plug
the
microphones
into
the
unit's
jacks.
2.
The
subsequent
operations
are
the
same
as
[2]
through
for
recording
FM
broadcast
and
records.
‘howl
(a
prolonged
wailing
sound)
may
be
heard
when
monitor-
ing
and
sound
through
the
speakers.
e@
There
will
be
no
howl
if
you
monitor
the
recording
with
your
headphones.
elf
you
are
using
a
metal
tape,
set
the
TAPE
SELECTOR
switch
to
the
METAL
position
and
erase
the
sound.
e
When
program
is
recorded
onto
a
pre-recorded
tape,
the
previous
recording
will
be
automatically
erased.
Recording
with
the
REC
MUTE
Function
Proceed
as
follows
when:
e
Creating
unrecorded
blanks
which
are
used
by
the
unit's
MS
function
(this
comes
in
handy
for
cutting
out
the
commercials
while
recording
an
FM
broadcast
and
leaving
the
unrecorded
Creating
unrecorded
blanks
for
MS
function
4
Push
the
REC
MUTE
switch
for
about
5
seconds
after
you
have
recorded
one
program.
No
signals
will
be
recorded
only
while
this
switch
is
in
the
depressed
position.
(Once
REC
MUTE
the
switch
is
released,
re-
cording
will
resume.)
Depress
Depress
the
PAUSE
switch
with
the
REC
MUTE
switch
in
the
depressed
position.
The
tape
has
stopped
traveling.
Now
wait
for
the
part
of
recor
Ghee
the
program
whose
recording
0
is
not
required
to
end.
(The
sound
will
be
heard
through
the
speakers
but
it
will
not
be
recorded.)
=
Depress
Once
the
part
of
the
program
which
is
not
required
has
ended,
depress
the
PAUSE
switch
and
recording
resumes.
pause
Depress
[I
ie
“mole
nama
|
Eliminating
the
noise
with
record
play
|
Push
the
REC
MUTE
switch
immediately
before
Fe
Leave
off
your
finger
from
the
switch
immediately
TAPE
RECORDING
Set
the
INPUT
level
controls
to
the
“0”
position
(by
rotating
them
to
the
leftmost
position.)
Depress
the
REC
switch
to
start
recording.
As
the
tape
travels,
the
recorded
sound
is
erased
and
the
tape
will
be
unrecorded.
Depress
sections
as
blanks
of
about
5
seconds).
e
Eliminating
the
noise
heard
when
the
stylus
descends
onto
the
record
during
the
recording
of
the
record.
1}
SPSS
SBaBrr3a9
mw
2O
0
Oe
\
waawwaeaaITII7IT
—-_
ee
the
stylus
descends
onto
the
record.
REC
MUTE
Push
before
play
begins
after
the
stylus
has
descended
onto
the
record.
Release
TAPE
PLAYBACK
Playback
Preparations
|
Set
up
the
stereo
amplifier
for
tape
play.
|
Depress
the
POWER
switch
to
ON.
—_—~
Depress
the
TAPE
function
2
switch.
Tape
deck
preparations
Set
the
TIMER
START
switch
to
the
OFF
position.
toON.
Load
the
cassette
tape.
Depress
the
POWER
switch
It
takes
about
four
seconds
after
the
POWER
switch
has
been
set
to
ON
before
the
function
switches
are
fully
operative.
Set
the
TAPE
SELECTOR
‘Select
the
position
in
accord-
switches
to
the
appropriate
ance
with
the
type
of
tape
positions.
which
is
to
be
played.
(Refer
to
section
on
cassette
tapes
on
page
12.)
Set
the
DOLBY
NR
switch
either
to
ON
or
OFF.
Set
the
switch
to
ON
when
playing
back
the
tape
with
the
Dolby
noise
reduction
system;
otherwise
set
it
to
OFF.
Rewinding
the
tape
(
<<
).
When
the
tape
is
half
wound
up
on
the
right-hand
reel
or
fully
wound
up,
rewinding
the
tape
serves
to
bring
the
tape
back
to
the
initial
position.
mmaaaaa
Cec)
The
tape
travels
at
high
speed
from
right
to
left
(no
sound
is
heard).
©
Depress
the
REWIND
switch
(
<<
).
The
tape
stops
automatically
when
it
is
completely
wound
up
on
the
left-side
reel.
a
Stopping
rewinding
Depress
the
STOP
switch
(
®
).
‘e
Depress
4
|
Depress
the
PLAY
switch
(
>).
The
tape
travels
from
left
to
right
and
play
begins.
Left
side
Depress
Fast
forwarding
the
tape
(
>>
).
When
the
tape
has
been
partially
played,
fast
forwarding
serves
to
wind
up
the
tape
fully.
The
tape
travels
at
high
speed
from
left
to
right
(no
sound
is
heard).
>
>
e
Depress
the
FAST
FORWARD
switch
(
>>
).
The
tape
stops
automatically
when
it
is
completely
wound
up
on
the
right-side
reel.
a
Stopping/fast
forwarding
ie!
panies
Depress
the
STOP
switch
(
@
).
Adjust
the
tone
and
volume
of
the
sound
using
the
controls
on
the
stereo
amplifier.
When
play
ends
The
tape
automatically
stops
when
it is
completely
wound
up
on
the
right-hand
reel.
(The
POWER
switch
is
not
set
to
OFF.)
Stopping
play
Depress
the
STOP
switch
(
@
).
Depress
Music
Search
(MS)
Function
and
Tape
Play
The
music
search
function
automatically
locates
the
unrecorded
blanks
lasting
more
than
4
seconds
between
the
programs
on
the
tape
and
it
starts
play
from
the
beginning
of
the
desired
pro-
gram.
Make
use
of
this
function
when:
©
Selecting
a
program
which
you
want
to
listen
to
e
Listening
to
the
same
program
again
from
the
start
e
Skipping
the
program
now
being
heard
to
listen
to
the
follow-
ing
(or
previous)
program.
Depress
the
REWIND
<<
>
Stopped
and
play
begins.
(
<<
)
switch.
Once
the
tape
has
been
fully
rewound
to
the
start
of
the
program,
the
rewinding
operation
is
automatically
stopped
and
play
begins.
To
listen
to
a
program
much
further
back
on
the
tape,
repeat
this
operation
(the
number
of
repeats
should
be
equivalent
to
‘the
number
of
programs
recorded
before
the
desired
program
is
reached).
NOTES:
e
For
these
operations,
make
sure
that
you
are
using
a
tape
with
unrecorded
blanks
lasting
at
least
4
seconds
between
the
programs.
e
The
MUSIC
SEARCH
function
does
not
work
with
the
following
tapes:
e
Tapes
with
recorded
conversations
where
the
sound
breaks
off
over
3
seconds.
@
Tapes
where
the
sound
is
low
level
for
more
than
3
seconds.
This
deck
comes
with
a
function
(known
as
REC
MUTE)
which
makes
it
possible
to
create
unrecorded
blanks
on
the
tape
during
recording
quite
easily.
(Turn
to
page
7
for
details.)
Depress
the
MS
switch
MS
to
ON.
Payee
Stopped
ord
play
begins.
ici
Depress
the
FAST
FOR-
Once
the
tape
has
been
WARD
(
p>
)
switch.
fast
forward
ed
tothe
po-
sition
where
the
next
program
begins,
the
fast
forward
operation
§
is
automatically
stopped
and
play
begins.
To
listen
to
a
program
much
further
forward
on
the
tape,
repeat
this
operation
(the
number
of
repeats
should
be
equivalent
to
the
number
of
programs
recorded
until
the
desired
program
is
reached).
Always
set
the
MS
switch
to
OFF
when
MS
operation
is
not
carried
out.
RECORDING
AND
PLAYBACK
USING
THE
AUDIO
TIMER
“Unattended
recording”,
‘Wake-up
playback”
and
‘Sleep
operations”
may
be
performed
if
the
equipment
is
connected
as
shown
in
the
figure
below.
For
this,
obtain
an
optional
timer
(such
as
the
DT-510
by
PIONEER).
|
EERE.
Unattended
Recording
FM
programs
can
be
recorded
while
you
are
out.
Turn
the
stereo
amplifier’s
volume
control
to
the
minimum
position.
NOTE:
Remember
to
turn
down
the
stereo
amplifier’s
volume
control
so
that
the
sound
from
the
speaker
systems
is
not
too
loud
while
you
are
out.
Set
the
timer.
Set
the
timer
so
that
the
power
is
switched
on
at
the
desired
time
(by
referring
to
the
timer’s
Operating
Instructions).
Once
the
timer
has
been
set,
the
power
to
the
unit,
stereo
ampli-
fier
and
tuner
is
switched
off.
Set
the
timer
so
that
the
power
is
switched
off
after
all
the
tape
has
been
wound
up.
Depress
the
REC
switch
after
the
PAUSE
switch
has
been
depressed.
Operate
the
tuner
and
tune
in
the
broadcasting
station
whose
program
you
wish
to
record.
6
|
‘Set
the
TIMER
START
switch
to
the
REC
position.
Set
the
recording
level.
The
power
will
be
supplied
at
the
time
set
by
the
timer
and
recording
will
start
in
4
seconds’
time.
Wake-up
Playback
——_———
Tape
play
can
be
made
to
start
at
the
desired
time.
NOTE:
Make
sure
that
the
volume
is
not
too
high
when
play
begins
(adjust
this
with
the
stereo
amplifier’s
volume
control).
Depress
the
REWIND
switch
(
<<
).
[4]
Set
the
timer.
Set
the
timer
so
that
the
power
is
supplied
at
the
desired
time
(by
referring
to
the
Operating
Instructions
of
the
timer).
Once
the
timer
is
set,
the
power
to
the
unit
and
the
stereo
ampli-
fier
is
switched
off.
15.
Set
the
TIMER
START
switch
to
the
PLAY
position.
The
pcwer
is
switched
on
at
the
time
set
by
the
timer
and
play
Adjust
the
volume
using
the
control
on
the
:
stereo
amplifier.
‘
rae
aoe”
tape
has
been
completely
wound
up,
it
auto-
Sleep
Operation
This
functions
allows
you
to
doze
off
to
sleep
while
listening
Set
the
timer.
to
your
favorite
music.
1
Set
the
timer
so
that
the
power
will
be
switched
off
in
30
to
60
minutes.
(Refer
to
Operating
Instructions
of
the
timer.)
Depress
the
PLAY
switch
(>
)
and
start
play.
The
power
is
switched
on
at
the
time
set
by
the
timer
and
play
the
time
set
by
the
timer.
MAINTENANCE
Cleaning
the
head
section
e
Clean
the
head
section
regularly
(about
once
a
week)
using
clean-
ing
sticks
and
commercially
available
head
cleaner
from
your
audio
dealer.
(PIONEER
offers
a
cleaning
kit
as
an
option.)
@
The
heads,
pinch
roller
and
capstan
are
all
very
susceptible
to
dirt.
Once
dirty,
the
high
range
response
drops
off,
the
volume
of
sound
in
the
left
and
right
channels
differs
and
the
sound
becomes
distorted.
How
to
clean
Depress
the
EJECT
button
and
open
the
tape
holder.
a
A
3
Pull
up
the
window
and
then
pull
it
toward
you
to
remove
it.
Tape
holder
Window
Clean
the
heads.
Clean
off
the
dirt
with
cleaning
sticks
dipped
in
the
cleaning
fluid.
Close
the
tape
holder.
Set
the
POWER
switch
to
ON
and
depress
the
PLAY
switch
(
>
).
>
POWER
|
:
=
The
capstan
and
pinch
roller
now
rotate.
6
|
Clean
the
capstan
and
pinch
roller
Bring
the
cleaning
stick
into
contact
with
the
capstan
and
pinch
roller
and
clean
off
the
dirt
while
they
rotate.
Do
not
force
the
stick
against
these
parts
or
they
will
stop
rotating
and
make
it
impossible
to
clean
them.
Depress
the
EJECT
button
to
open
the
tape
holder
and
reattach
the
window.
Proceed
following
the
steps
in
[%)
in
reverse.
NOTE:
Do
not
insert
a
tape
until
the
cleaning
fluid
has
dried
(it
takes
2
or
3
minutes)
after
cleaning.
Panel
and
window
maintenance
e
When
dust
and
dirt
have
adhered:
Wipe
off
with
a
polishing
cloth
or
soft
dry
cloth.
e
When
stains
cannot
easily
be
removed:
Dip
a
soft
cloth
into
a
neutral
detergent
diluted
with
5
or
6
times
the
amount
of
water,
wring
it
out
and
clean
off
the
stains.
Then
use
a
soft
dry
cloth
to
wipe
off
all
the
moisture.
e
Do
not
use
chemicals
of
furniture
wax:
Do
not
clean
off
dirt
with
furniture
wax,
thinners,
benzene
or
other
chemicals
since
they
will
discolor
and
disfigure
the
surface
finish.
e
Do
not
spray
insecticides:
This
will
discolor
the
surface
finish
or
result
in
cloudiness.
Demagnetizing
the
heads
The
recording
head
may
become
magnetized
when
used
for
long
periods
of
time.
This
causes
the
treble
to
fall
off
during
recording
and
playback
and
generates
noise.
Obtain
a
head
eraser
and
de-
magnetize
the
heads
regularly.
For
details,
refer
to
the
Instructions
_accompaying
the
head
eraser.
-
CASSETTE
TAPES
@Classification
by
performance
High-performance
type
e@
Metal
tapes
Normal
type
e
Low-noise
tapes
e
Normal
tapes
e@
Low-noise
high-
output
tapes
e
Dynamic
tapes
e
Chrome
tapes
NOTE:
Although
all
cassette
cases
are
the
same
size,
the
playing
and
recora-
ing
time
differs
according
to
the
length
(thickness)
of
the
tape.
The
C-60
and
C-90
tapes
are
most
often
used
today.
C-120
tapes
are
not
recommended
because
their
mechanical
and
electrical
charac-
teristics
undergo
change.
LISTING
OF
TAPES
®Classification
by
play
(recording)
time
Recording
time
(min.)
_
15
30
23
46
30 60
45
90
Name
of
cassette
tape
This
table
shows
the
proper
settings
of
the
tape
selector
for
all
leading
brands
of
tapes.
Brands
released
Tape
selector
PIONEER
SONY
|
TDK
FUJI
|
scores
MAXELL
|
DENON|
BASF
AMPEX
AGFA
PHILIPS
NORM
position
for
N1-60
HF
D
DR
LH
LN
DX-3
|
LH
STUDIO
LH
-
normal
tape
QUALITY
N1-90
AHF
OD
ER
CRYSTAL
UD
Dx-1
|
LN
SUPER
HIGH
N2-60
BHF
ED
FX
M-12
UL
LH
SUPER|
PLUS
DYNAMIC
Tare
SERIES
N2-90
CHF
AD
Range
2|
MASTER
|
UDXL
1
SLH-1
HIGH
«
Range
4
XL
1
MET,
a.
Range
6
Set
the
both
switches
to
TAPE
NORM
Hey
ness
@Playing
sides
of
cassette
tapes
Every
cassette
tape
has
two
playing
sides,
A
(front)
and
B
(back).
Recording
is
also
possible
on
both
sides.
When
loading
the
tape
into
the
cassette
holder,
the
side
which
is
facing
you
will
be
played
(or
recorded).
®Cassette
tape
maintenance
Keep
the
cassette
tapes
in
their
cases.so
that
no
dust
or
dirt
can
adhere
to
the
tape
surfaces
after
use
and
so
that
tape
slack
is
pre-
vented.
Store
the
tapes
in
a
location
whichis
not
affected
by
dirt,
dust,
oil,
or
magnetism
(on
top
of
speakers
or
TV
sets,
etc.).
©
Accidental
erasure
prevention
tabs
Cassette
tapes
are
provided
with
accidental
erasure
prevention
tabs
on
the
top
surface
(
1
each
for
side
A
and
side
B)
so
that
you
can
preserve
your
recordings.
When
these
tabs
are
broken
out
with
a
screwdriver,
the
unit's
sensing
mechanism
works
to
prevent
any
recording
on
the
tape.
HIGH
and
CrO,
C1-60
CR
KR UR
M-7
CR
DX-7
|
CHROM
[_
_
CrQO2
position
for
DIOXID
chrome
tape
C1-90
JHE
SA
Range
MASTER
II
UDXL
Il
Depress
4X
TAPE
SA-X
XL
SCR
NORM
HIG
ae
HIGH
and
M1-46
METALIC|
MA
SUPER
|
METAFINE
MX
DXM
—
METAL
position
RANGE
for
metal
tape
M1-60
MA-R
Depress
Depress
Break
out
the
tabs
when
preserving
recorded
material.
The
tabs
can
be
broken
out
separately
for
side
A
and
side
B.
To
re-record
material
onto
tapes
whose
tabs
have
been
broken
out,
attach
a
piece
of
cellophane
tape
over
the tab
opening.
Attach
the
tape
here.
Tab
for
side
B
—12—
DOLBY
NOISE
REDUCTION
SYSTEM
This
unit
comes
with
a
Dolby
noise
reduction
system
that
greatly
reduces
tape
hiss
which
is
inherent
to
tapes
during
recording.
It
works
tike
this:
since
the
tape
hiss
has
a
high
frequency,
the
high-
frequency
signals
are
emphasized
at
a
low
level
and
recorded;
when
these
emphasized
parts
are
attenuated
during
playback,
the
noise
is
reduced
by
an
amount
equivalent
to
the
attenuated
part
for
a
good-quality
recording
with
minimal
distortion.
SPECIFICATIONS
Precautions
when
using
Dolby
@
Basically,
the
recording
level
adjustment
is
the
same
as
when
the
Dolby
NR
system
is
not
used.
e
Always
play
back
tapes
which
have
been
recorded
using
the
Dolby
NR
system.
@
The
original
sound
will
not
be
reproduced
if
a
normally
recorded
tape
is
played
back
with
the
Dolby
system
or
if
a
tape
recorded
with
the
Dolby
system
is
played
back
normally.
e
Noise
Reduction
System
manufactured
under
license
from
Dolby
Laboratories
Licensing
Corporation.
e
Dolby”
and
the
double-D
D0
symbol
are
trade
marks
of
Dolby
Laboratories
Licensing
Corporation.
Tape
Deck
Section
SYSteM
soc
eS
ee
we
ees
Compact
cassette,
2-channel
stereo
Motor
........2.00005
DC
servo
motor
x
1
Heads?
29:6.
oeae
coal
3
eo
Sk:
w
“Hard
Permalloy’’
recording/play-
back
head
x
1
Ferrite’
Erasing
head
x
1
Fast
Winding
Time
.......
Approximately
100
seconds
(C-60
tape)
Wow
and
Flutter
........
No
more
than
0.05%
(WRMS)
Frequency
response
No
more
than
0.17%
(DIN)
—20
dB
recording:
Normal,
LH
tapes
......
20
to
15,000
Hz
(30
to
14,000
+3
dB)
20
to
17,000
Hz
(30
to
16,000
Hz
+3
dB)
Metal
tape............
20
to
18,000
Hz
(30
to
17,000
Hz
+3
dB)
Chromium
dioxide
tape
....
O
GB
recording:
Chromium
dioxide
tape
...
30to8,000
Hz
+3dB
Metal
tape.
..........
30
to
12,500
Hz
+3
dB
Signal-to-Noise
Ratio
Dolby
NR
OFF........
More
than
58
dB
Dolby
NRON
........
More
than
68
dB
(over
5
kHz)
Harmonic
Distortion.
.....
No
more
than
1.2%
(0
dB)
Input
(Sensitivity/Maximum
allowable
input/Impedance)
MIC(L,R)
..........
0.3
mV/57
mV/10
kQ,
6
mm
diam.
jack
(Reference
MIC
impedance;
250
2
to
10
kQ)
LINE
(INPUT)
........
50
mV/25
V/75
kQ,
Pin
jack
Output
(Reference
level/Load
impedance)
LINE
(OUTPUT).......
450
mV/50
kQ,
Pin
jack
Subfunctions
Dolby
NR
system
(ON/OFF)
MS
(Music
Search)
system
Stand-by
mechanism
with
unattended
recording
REC
muting
function
Auto
start/Auto
stop
IC
logic
control
3
position
tape
selecter
(NORM/CrO,
/METAL)
Fluorescent
display
peak
level
meter
(-20
to
+8
dB)
One
touch
recording
system
Miscellaneous
Power
requirements
......
AC
220
V/240
V
(switchable)
50/60
Hz
Power
Consumption
......
20
watts
Dimension.
...........
420
(W)
x
100
(H)
x
244.5
(D)
mm
16-9/16
(W)
x
3-15/16
(H)
x
9-5/8
(D)
in.
Weight
(without
package)
.
.
.
4.0
kg
(8
Ib
13
oz)
Furnished
Parts
Connection
cord with
Pinplugs............
2
Operating
instructions
....
1
Note:
Specifications
and
the
design
subject
to
possible
modifications
without
notice
due
to
improvements.
NOTES:
1.
Reference
Tapes:
Normal
&.LH:
DIN
45513/BLATT6
or
equiv.
CrO,
DIN
45513/BLATT7
(CrO,)
or
equiv.
2.
Reference
Recording
Level:
Meter
0
dB
indicating
lele!
(160
nwb/m
magnetic
level
=
Philips
cassette
reference
level)
3.
Reference
Signal:
333
Hz
4.
Wow
&
Flutter:
e
JIS
[3
kHz,
with
accustic
compensation
(weighted)
rms
value]
DIN
[3,150
Hz,
with
acoustic
com-
pensation
(weighted)
PEAK
value];
DIN
45507
5.
Frequency
Response:
@
Measured
at
—20
dB
level,
DOLBY
NR
OFF,
level
deviation
is
+6
dB
without
indication.
6.
Signal
to
Noise.
Ratio:
@
Measured
at
the
third
harmonic
dis-
tortion
3%
level,
weighted
(DIN
45513/BLATT7).
7.
Sensitivity:
Input
level
(mV)
required
for
reference
recording
level
with
inptu
(REC)
controls
set
to
maximum.
8.
Maximum
Allowable
Input:
While
decreasing
settings
of
input
(REC)
level
controls
and
increasing
level
at
input
jacks,
this
is
the
maximum
input
level
(mV)
at
the
point
where
recording
amplifier
output
waveform
becomes
clipped.
9.
Reference
Output
Level:
Playback
output
level
when
meter
indicates
0
dB.
TROUBLESHOOTING
Apparent
malfunctions
are
often
caused
by
faulty
or
incorrect
operation.
If
you
think
that
something
has
gone
wrong
with
your
unit,
check
out
the
pcints
in
the
list
below.
The
trouble
may
lie
in
another
component.
Check
the
stereo
amplifier,
speaker
and
other
appliances
being
used.
If
the
trouble
is
not
remedied
after
checking
the
points
below,
contact
your
dealer
and
ask
for
the
serviceman.
Symptom
Possible
cause
No
tape
travel
(no
playback
or
recording)
1.
Disconnected
power
cord.
2.
Tape
is
wound
up.
3.
PAUSE
switch
at
ON.
1.
No
sound
recorded
on
tape.
2.
Incorrect
amplifier
operation.
3.
Incorrect
connections
with
amplifier.
1.
Tape
tabs
broken
out.
2.
Incorrect
connections
with
amplifier.
1.
Distorted
sound
recording
on
tape.
2.
Old
worn
tape.
3.
Tape
recorded
using
the
Dolby
NR
system
is
being
played
with
the
DOLBY
NR
switch
at
OFF.
4.
Heads
are
dirty
or
magnetized.
1.
Heads
are
dirty
or
magnetized.
2.
TAPE
SELECTOR
switch
position
does
not
match
tape
type.
A
tape
recorded
without
the
Dolby
NR
system
is
being
played
back
with
the
DOLBY
NR
switch
at
ON.
—14—
2
Remedy
Re-connect
cord.
Rewind
tape
(see
page
8).
.
Depress
PAUSE
switch
and
release.
(see
page
6).
Replace
with
pre-recorded
tape.
Set
amplifier's
POWER
and
TAPE/
ADAPTOR
(TAPE
monitor)
switches
to
ON.
Refer
to
page
3
and
re-connect
equip-
ment.
Replace
tape
or
cover
tab
openings
(see
page
12).
Refer
to
page
3
and
re-connect
equip-
ment.
Re-adjust
recording
level
properly
and
re-recorded
(see
page
6).
Replace
with
new
tape.
Set
DOLBY
NR
switch
to
ON.
Clean
or
demagnetize
heads
(see
page.
11),
Clean
or
demagnetize
heads
(see
page
11).
TAPE
SELECTOR
switch
in
line
with
type
of
tape
being
used
(refer
to
table
on
page
12).
Set
the
DOLBY
NR
switch
to
OFF.

Other manuals for CT-520

1

Other Pioneer Cassette Player manuals

Pioneer CT-F850 User manual

Pioneer

Pioneer CT-F850 User manual

Pioneer XR-A770 User manual

Pioneer

Pioneer XR-A770 User manual

Pioneer KEH-P6025 User manual

Pioneer

Pioneer KEH-P6025 User manual

Pioneer CT-W505R User manual

Pioneer

Pioneer CT-W505R User manual

Pioneer CT-S910 User manual

Pioneer

Pioneer CT-S910 User manual

Pioneer KEH-P5011 User manual

Pioneer

Pioneer KEH-P5011 User manual

Pioneer FH-P6600R User manual

Pioneer

Pioneer FH-P6600R User manual

Pioneer SUPERTUNER KEH-1050QR User manual

Pioneer

Pioneer SUPERTUNER KEH-1050QR User manual

Pioneer CT-W503R User manual

Pioneer

Pioneer CT-W503R User manual

Pioneer CT-W205R User manual

Pioneer

Pioneer CT-W205R User manual

Pioneer S-EV1000V User manual

Pioneer

Pioneer S-EV1000V User manual

Pioneer XR-A880 User manual

Pioneer

Pioneer XR-A880 User manual

Pioneer CT-S670D User manual

Pioneer

Pioneer CT-S670D User manual

Pioneer CT-43 User manual

Pioneer

Pioneer CT-43 User manual

Pioneer CT-91a User manual

Pioneer

Pioneer CT-91a User manual

Pioneer CT-W510 User manual

Pioneer

Pioneer CT-W510 User manual

Pioneer RX-P840 User manual

Pioneer

Pioneer RX-P840 User manual

Pioneer CT-W830R User manual

Pioneer

Pioneer CT-W830R User manual

Pioneer SUPER TUNER III User manual

Pioneer

Pioneer SUPER TUNER III User manual

Pioneer CT-S99WR User manual

Pioneer

Pioneer CT-S99WR User manual

Pioneer XR-A660 User manual

Pioneer

Pioneer XR-A660 User manual

Pioneer KEH-1960 User manual

Pioneer

Pioneer KEH-1960 User manual

Pioneer CT-W606DR - Dual Cassette Deck User manual

Pioneer

Pioneer CT-W606DR - Dual Cassette Deck User manual

Pioneer CT-S210 User manual

Pioneer

Pioneer CT-S210 User manual

Popular Cassette Player manuals by other brands

Clarion ARX7370R owner's manual

Clarion

Clarion ARX7370R owner's manual

Tascam 688 Midistudio owner's manual

Tascam

Tascam 688 Midistudio owner's manual

Teac V-870 Service manual

Teac

Teac V-870 Service manual

Panasonic RX-5090 operating instructions

Panasonic

Panasonic RX-5090 operating instructions

Sony TCM-450DV operating instructions

Sony

Sony TCM-450DV operating instructions

Sanyo MCD-Z150F instruction manual

Sanyo

Sanyo MCD-Z150F instruction manual

Sony Walkman WM-EX600 operating instructions

Sony

Sony Walkman WM-EX600 operating instructions

Philips D 8288 user manual

Philips

Philips D 8288 user manual

Sony TC-RX60ES operating instructions

Sony

Sony TC-RX60ES operating instructions

Philips AQ6345 brochure

Philips

Philips AQ6345 brochure

Nakamichi 482 Service manual

Nakamichi

Nakamichi 482 Service manual

Reflexion CCR8014 user manual

Reflexion

Reflexion CCR8014 user manual

Eurotops Versand EP664 instructions

Eurotops Versand

Eurotops Versand EP664 instructions

Philips DCC 130 owner's manual

Philips

Philips DCC 130 owner's manual

Yamaha KX-650 RS owner's manual

Yamaha

Yamaha KX-650 RS owner's manual

Clarion PU-1680A Service manual

Clarion

Clarion PU-1680A Service manual

Tascam 102MKII owner's manual

Tascam

Tascam 102MKII owner's manual

Technics RS-TR313 operating instructions

Technics

Technics RS-TR313 operating instructions

manuals.online logo
manuals.online logoBrands
  • About & Mission
  • Contact us
  • Privacy Policy
  • Terms and Conditions

Copyright 2025 Manuals.Online. All Rights Reserved.