PirTec Piraya automatic 42V User manual

Piraya Pool Cleaner
Transport Trolley
Floating Cable
Filter
Mains Power Cable
Remote
USER MANUAL
Piraya automatic 42V

!
Bumper
Trolley safety distance
2 m
You might need to place
the trolley at the center of
the pool’s long side for the
floating cable to reach.
2
SAFETY
• Only connect the unit using a RCD
protected power outlet!
• All maintenance must be done with
the pool cleaner disconnected from the
power supply.
• Do not leave the pool cleaner in the
pool whilst not in use.
• No persons are to be in the pool
when the pool cleaner is used.
2Uncoil the floating cable
and stretch it out by the pool.
3Lower the Piraya
at the starting point, see page 3-4.
Hold the floating cable so the bumper
is facing the pool wall.
1Lift off the Piraya
by grasping the handle located inside the filter bag.
Move and turn the Piraya, so the bumper goes free from
it’s safety locking against the transport trolley.
PREPARATION

START
2 m
In the slope the Piraya
is maneuvered with
the remote control.
Pickup location
START
3
AUTO PROGRAMS
Piraya has two automatic programs
In both programs the Piraya moves in parallel lanes to the left.
For optimal functionality, the pool’s bottom and walls should be
flat without any obstacles.
Program 1
For rectangular pools.
The Piraya moves
between two parallel
walls.
Normally you start in the
right corner of the pool.
The program finishes
with the Piraya positioning
itself at the pickup location
and turns off automatically.
Program 2
In beach shaped pools,
start the Piraya at a
sufficient depth so
the floating cable can
float above the Piraya.
The Piraya turns off
automatically if the
water is too shallow.
More info on page 4.
START
START
Pools with slope
may need to be divided.
The auto program is used in
he deep and the shallow end.
The start position shall be
such that the slope is to the
right of the Piraya.
25x12 m
Approx. 1 h
Cleaning time
50x25 m
Approx. 3 h

FORWARD -Press
STOP - Press quickly
BACK -Press when going
forward
For drive uphill or obstacle.
Stop and then press a few
seconds.
START Max 12 m
2 m
Maneuver the Piraya to the
center of the pool with the
remote and press stop. Press
forward to start the program.
4
AUTO PROGRAMS
Program 2
For round- or freeform
pools. The Piraya
measures the distance
from the start location
and the wall.
The Piraya uses the
measurement to
calculate each route
and program length.
It is normal with some
course deviation when
using Program 2.
1Connect the plug
3Turn on the switch
and the Piraya starts
immediately in the
selected auto program.
4With the remote you can
easily maneuver the Piraya.
When forward is pressed the
selected auto program will
always restart.
2Select auto program
START

!
5
PICKUP GUIDE
1Use the remote control if the Piraya
needs to be moved to the pickup location. Back up the
bumper against the pool wall. Then turn off the Piraya.
1Unplug the power first
In worst case,
always turn off
the Piraya first,
then pull the
Piraya backwards.
Avoid pulling in the Piraya by the
floating cable. The Piraya can tip
over and damage the filter!
3Lift off the hood
and rinse off to avoid
corrosion!
2Unscrew the filter holder
and open the filter by hand and
rinse. When needed machine
wash 60°.
4Remove belts and brushes
to be able to clean the brush holder mounts, see arrows.
Always clean the Piraya directly after each use!
Never disconnect the floating
cable when the machine is on!
MAINTENANCE

Always reconnect the
floating cable after you
are done to protect
the connectors.
Small wheel
Pump wheel
6
MAINTENANCE
Lift the Piraya
in the filter holder handle and
put it back on the transport
trolley.
9
5Turn the Piraya
upside down and rinse
off the small wheel.
6Check that
the Pump wheel and
the Small wheel is free
from litter.
7Reassemble
the brushes, brush belts,
hood and filter.
8Coil up the floating cable
clockwise on the transport
trolley. To counteract
twisting you can spin the
Piraya in a circle during
the process or release the
floating cable.

7
180o
Correct Incorrect
Verify the power outlet phase sequence
by turning the Piraya upside down so you can see the
pump wheel through the hole in the bottom.
Connect the plug to a power outlet and start. The pump
wheel will spin shortly before it automatically shuts down.
2If the phase sequence is wrong
you can easily change it with a screwdriver
or your fingers to toggle the pins position.
Check that the
phase sequence/
rotation is in the
direction of the
arrow.
TROUBLESHOOTING
3-phase plug
1

12
6
9
12
6
9
8
TROUBLESHOOTING
The Piraya shuts down incorrectly
The Piraya is not in the water......................
The floating cable connector is unplugged.
The pump wheel is blocked.........................
Phase sequence is wrong..........................
Linerpool.....................................................
Put it down in the water
Insert floating cable plug
See page 6, No. 6
See page 7, No. 1-2
See page 9
Does not manage to auto-turn
Litter in the brush mounts...........................
Too low drive power...................................
Linerpool.....................................................
See page 5, No. 4
See page 9
See page 9
Runs a short distance and then auto-turns
Program 2 is selected..................................
5th LED does not blink when driving.........
Linerpool.....................................................
If the problem persists............................. Contact Piraya service
Select program 1
Check small wheel
See page 9
Deviates from the course in a rectangular pool
The drive wheels are worn/slippery............
Floating cable is twisted.............................
Wheels must be replaced
Straighten it out
Program 1 does not get carried out properly
Too high drive power..................................
The Piraya is started at wrong location......
Program 2 is selected.................................
See page 9
See page 3
Select program 1
LED:s indicate
1. Power to the left drive wheel is on
2. Power to the right drive wheel is on
3. Forward drive is on
Stop Mode
4. Reverse drive is on
5. Flashes when driving
6. Pump current is too high
(Lit only for 5 seconds)
Advanced settings
Adjustment for drive power
Adjustment for auto-turning
(Use a small screwdriver
Never turn past 12 or 6)

9
Drive power and Auto-turn
Adjustments can be necessary depending on the pools bottom
surface. The factory settings is adjusted for tiles, which counts
as slippery surface. If the pool is made of concrete it counts
as a rough surface. Even liner, stainless steel and aluminum
can be counted as rough surfaces, but the roughness can be
different between pools with the same type of bottom surface.
Algae can make all surfaces slippery.
To have a low wear, it is important that the drive power is not
higher than necessary.
The effects from obstacles in the pool, such as valves sticking
up or slopes, should not be mistaken for a rough surface, even
if they can cause similar symptoms as too low drive power.
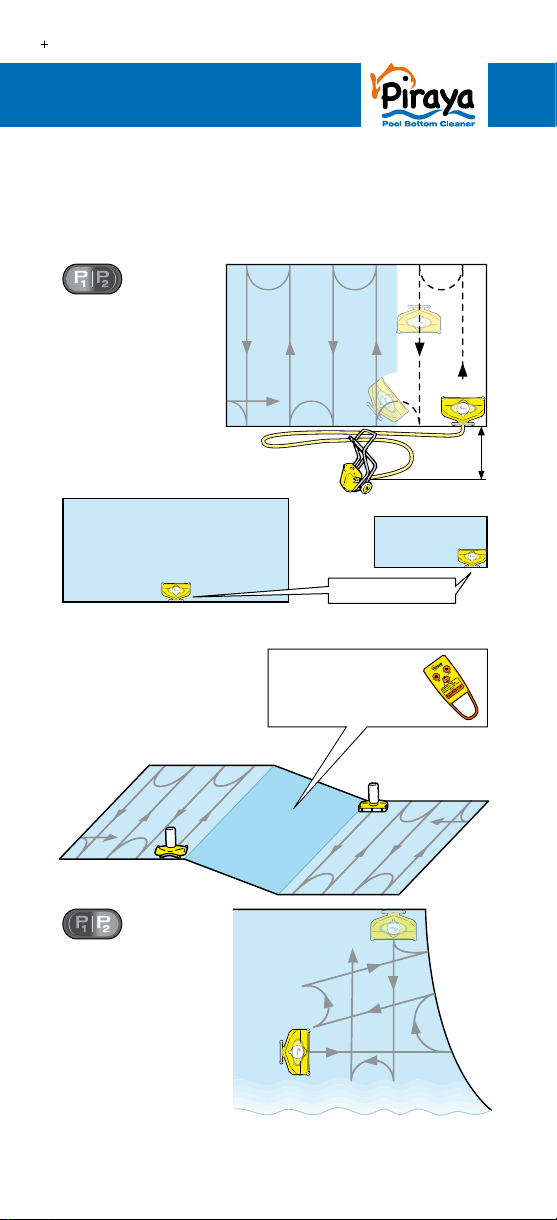
The program selector should be set to P1 to avoid confusing
symptoms when adjusting.
Symptoms of too high drive power:
1. The Piraya stands for more than 1 second against the wall
instead of alternating left/right drive to align itself.
2. The Piraya does not go back to the pickup position.
3. The drive wheels gets worn/slippery quickly in tile pools.
Action: Reduce the drive power by turning the dial counter-
clockwise in small steps until the Piraya does not manage to
auto-turn. Then turn it up a millimeter clockwise. See page 8.
Symptoms of too low drive power:
1. The Piraya does not manage to auto-turn or starts to auto-turn
when manuevering with the remote control.
If this symptom occurs after a period of use in a particular
pool, the first measure is to follow the steps on page 5, No. 4.
Action: Increase the drive power by turning the dial clockwise
in small steps until the Piraya manages to auto-turn (Normal
setting for tile surfaces is: 7 – 9. For concrete surfaces: 9 – 10).
See page 8.
Auto-turn setting:
The Piraya should do a perfect half turn (180°).
Reduce or increase the auto-turn by adjusting
the dial counterclockwise or clockwise.
See page 8.
Problem with linerpool:
The Piraya can shut off/get stuck
if the liner gets sucked up
against the Piraya.
Action: Turn the brush holder
upside down, so the skirt is turned
upwards instead of downward.
SPECIAL INFO
180o

ENVIRONMENT
10
Industrivägen 21
151 38 Södertälje
SWEDEN
Tel +46 8-503 879 61
www.pirtec.se
TECHNICAL DATA
Model ........................................................
Suction width ............................................
Suction capacity ......................................
Rotating brushes ......................................
Filter ..........................................................
Cleaning Capacity ....................................
Weight .......................................................
Weight in water ........................................
Measurements (L×W×H) .........................
Speed ........................................................
Maximum operating depth ......................
Remote control ........................................
Floating Cable Length .............................
Mains cable length ...................................
Mains voltage ...........................................
Electric power ..........................................
Operating voltage ....................................
Optional .....................................................
Piraya automatic 42V
63 cm
48 m3/h, 800 l/min
138 RPM
105 µm
350 m2/h
15 kg
10 kg
41 × 63 × 33 cm
0,2 m/s
10 m
Radio or 30 m wire
40 m or 25 m
10 m
400 V 3~ 50 Hz
900 W
42 V AC
Filter 50 / 210 µm
Outlet hose adapter
Contact us and we’ll take care
of the machine for proper recycling.
Table of contents
Popular Swimming Pool Vacuum manuals by other brands

poolstar
poolstar FASTER user manual

iRobot
iRobot Scooba 300 series quick start guide

enviropro
enviropro ADMIRAL manual

Zodiac Pool Systems
Zodiac Pool Systems Polaris ATLAS owner's manual

Maytronics
Maytronics Dolphin CLASSIC 7+ User instructions

Rainbow Pool Products
Rainbow Pool Products RBX operating instructions

SolarPool
SolarPool Solar-Breeze owner's manual

ubbink
ubbink Robotclean Accu XL Pro Operating manual and parts list

Del ozone
Del ozone Big Dipper EC-AG1U Installation & operation manual

GRE
GRE R44SC operating instructions

STA-RITE
STA-RITE Calypso GW7000 owner's manual

SmartPool
SmartPool PT4i Operation manual