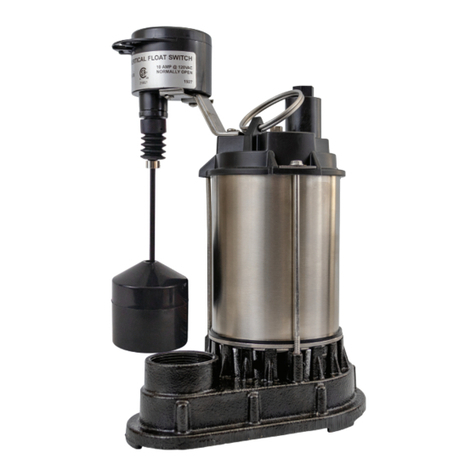
Pit Boss 3174 User manual

STAINLESS STEEL
SUBMERSIBLE
SUMP PUMP
SSBOS34
INSTALLATION AND OPERATING INSTRUCTIONS
SPECIFICATIONS
A RICHTECH INDUSTRIES PRODUCT
IMPORTANT!
READ ALL INSTRUCTIONS CONTAINED IN THIS MANUAL BEFORE USING THIS PRODUCT.
Save these instructions for future reference. Failure to read and follow the warnings and instructions
within this instruction manual could result in property damage, serious injury or death.
Power Supply Requirements 120 VAC, 60Hz
Motor Single Phase – Insulating Oil Filled
Horsepower 3/4 HP
Amp Rating 5.2 Amps
Liquid Temperature Range 40°F to 120°F
Circuit Requirements 15 Amp (Minimum)
Pump Dimensions 11” High x 8-3/4” Base
Discharge 1-1/2” NPT
Minimum Basin Diameter 10” Diameter
PUMP PERFORMANCE
15'
LIFT
10'
LIFT
5'
LIFT
3174
GALLONS/HR
3702
GALLONS/HR
4134
GALLONS/HR

©2022 RICHTECH INDUSTRIES 1.800.677.7791 RICHTECHINDUSTRIES.COM
2
1. Set the pump on a solid, level surface in the bottom of the sump pit. If necessary, use bricks / blocks to provide a solid base. Avoid
placing the pump on loose gravel, earth or sand.
2. Install discharge plumbing according to state and local codes. It is highly recommended that rigid PVC is used for the discharge
line. Installing a union in the discharge line will make it easier to remove the sump pump for maintenance. The discharge line must
be sloped downward away from the foundation to ensure that the water properly drains away and that the discharge line will not
freeze during cold spells.
3. Install a check valve in the discharge line. The check valve may be positioned just above the sump basin for ease of service and/or
replacement.
4. Assemble switch to the discharge line using the attached hose clamp. Position the switch so that when the oat is at its lowest
position it is at least 3” above the base of the pump (just above the inlet). Make sure that the switch is positioned where the oat
can move up and down freely.
5. Secure all power cords and switch cords to the discharge pipe using cable ties to prevent switch entanglement.
6. This pump uses a “piggyback” type switch to allow for the easy removal and replacement of the switch and to aid in troubleshooting
switch / pump problems. Plug the pump into the back of the switch plug.
7. Plug the switch into a ground fault circuit interrupter (GFCI) protected outlet.
8. Fill the sump basin with water until the oat rises and starts the pump cycle. The pump will stop when the water level falls to the
switch’s off position. Repeat this several times to ensure proper operation and that the switch operates freely.
9. Install the sump basin gasket / cover.
INSTALLATION
This pump is not designed to handle salt water, brine, laundry discharge, water
softener discharge or any other application which may contain caustic chemicals.
Damage to the pump may occur and will void the pump’s warranty.
NOTICE
SAFETY FIRST!
This instruction manual contains very important information for you to know and understand. This information
is provided for your safety and to help prevent equipment problems from occurring. Please observe all safety
information labeled danger, warning, caution, and notice.
RISK OF ELECTRIC SHOCK. TO REDUCE THIS RISK, OBSERVE THE FOLLOWING WARNINGS:
WARNING! To reduce the risk of electrical shock, this pump must be properly grounded in accordance with the National
Electric Code (NEC) and all applicable state and local codes and ordinances. The receptacle should be protected with a
Ground Fault Circuit Interrupter (GFCI).
WARNING! To reduce the risk of electrical shock, always disconnect the pump from the power source
BEFORE handling or servicing.
WARNING! Never remove the ground prong from the plug, or use an adapter that eliminates the ground prong.
WARNING! Never plug this pump into an electric outlet while standing on a wet surface.
WARNING! Cable should be protected at all times to avoid punctures, cuts and abrasions that may result in exposed
wiring. Never handle connected power cords with wet hands.
WARNING! This Submersible Sump Pump has not been investigated for use in or around swimming pools, marine areas,
recreational water installations, decorative fountains or any installation where human contact with the pumped uid is common.
WARNING! Do not use an extension cord. Extension cords could present a safety hazard if not properly sized, become
damaged or the connection falls into the sump pit.
RISK OF EXPLOSION. TO REDUCE THIS RISK, OBSERVE THE FOLLOWING WARNINGS:
WARNING! Do not use to pump ammable or explosive liquids such as gasoline, fuel oil, kerosene, etc.
WARNING! Do not use in a ammable or explosive atmosphere.
NOT SUITED FOR POTABLE WATER APPLICATIONS.
WARNING! Do not use this pump to transfer water that will be used for potable (drinking) water. This pump is only to be
used in applications for which it is designed.
TO REDUCE THE RISK OF HAZARDS THAT CAN CAUSE INJURY OR PROPERTY DAMAGE,
OBSERVE THE FOLLOWING WARNINGS:
CAUTION! Do not block or restrict discharge hose. Discharge hose may whip under pressure. It is strongly
recommended to use rigid piping and ttings to secure the pump in the sump basin to reduce movement.
CAUTION! Do not install the pump if it has been damaged in any way.
CAUTION! Do Not carry or lift the pump by the power cord. Use the pump’s lift ring.
WARNING INDICATES A POTENTIALLY HAZARDOUS
SITUATION WHICH, IF NOT AVOIDED, COULD RESULT IN
DEATH, SERIOUS INJURY OR MAJOR PROPERTY DAMAGE.
WARNING
CAUTION INDICATES A POTENTIALLY HAZARDOUS SITUATION WHICH, IF
NOT AVOIDED, MAY RESULT IN MINOR INJURY OR PROPERTY DAMAGE.
CAUTION

©2022 RICHTECH INDUSTRIES 1.800.677.7791 RICHTECHINDUSTRIES.COM 3
TROUBLESHOOTING
CAUTION! Always disconnect the pump from the electrical power source BEFORE handling or servicing.
PROBLEM POTENTIAL CAUSE POSSIBLE SOLUTION
Pump Will Not Run 1.Blown fuse, tripped breaker or tripped GFCI
2.Low Line Voltage
3.Switch obstructed
4.Insufcient water level
5.Motor Failure
6.Switch Failure
1.Check all electrical connections. Check for blown fuses, tripped
GFCI or tripped circuit breaker.
2.Contact a licensed electrician.
3.Remove obstruction and check for free movement.
4.Water needs to rise to a level that activates the switch
5.Replace switch
Pump Cycles too frequently 1.Switch Failure
2.Check valve not present or not operating properly
1.Replace switch
2.Install or replace the check valve
Pump Shuts off and turns
on independent of switch
(trips thermal overload
protector). CAUTION! Pump
may start unexpectedly.
Disconnect power supply.
1.Low line voltage
2.Impeller jammed, worn or damaged
3.Inlet blocked or discharge blocked
4.Excessively high water temperature entering
the sump pit
1.Contact a licensed electrician.
2.Replace Impeller.
3.Clean pump inlet. Check and remove any obstructions from the
pump discharge line.
4.Pump should not be used for water above 120° F
Pump runs continuously 1.Switch failure
2.Switch obstructed
3.Inlet blocked or discharge blocked
4.Excessive inow or pump not properly sized
1.Replace switch
2.Remove obstruction and check for free movement.
3.Clean pump inlet. Check and remove any obstructions
from the pump discharge line.
4.Recheck all sizing calculations to determine proper size
Pump operates noisily or
vibrates excessively
1.Impeller obstructed or damaged
2.Piping attachments too rigid or too loose to
building structure
1.Clean and / or replace impeller
2. Install a rubber coupling to isolate pump vibration for discharge line.
Pump runs but delivers
insufcient capacity
1.Low line voltage
2.Impeller obstructed, worn or damaged
3.Inlet blocked or discharge blocked
4.Pump undersized for application
5.Check valve stuck closed of installed backwards
1.Contact a licensed electrician
2.Clean and / or replace impeller
3.Clean pump inlet. Check and remove any obstructions
from the pump discharge line.
4.Recheck all sizing calculations to determine proper size
5.Remove and examine check valve for proper installation
and free operation
Regular maintenance of your pump system is critical to ensuring its reliable operation. A lack of routine maintenance as prescribed
below will void the warranty. Your entire pump system should be inspected at least once a year and a record of this maintenance must
be retained during the warranty period.
WARNING
MAKE SURE YOUR PUMP IS UNPLUGGED / DISCONNECTED FROM AC POWER PRIOR TO PERFORMING ANY MAINTENANCE.
WARNING
LET THE PUMP COOL FOR A MINIMUM OF 2 HOURS BEFORE MAINTENANCE OR SERVICE.
Your pump is oil lled and with normal operation may be hot and under pressure.
• Check the position of the pump for movement and reposition if necessary, so that the oat switch has no obstructions in traveling up and
down freely.
• Visually inspect the pump and remove any debris that may have built up on the pump inlet.
• Remove any loose debris in the sump that could obstruct the oat switch from its normal operation or clog the pump inlet.
• Make sure the system is plugged in to a working ground fault circuit interrupter (GFCI) outlet and the cord is in good shape. In
damp areas, GFCI breakers may trip, effectively shutting off the sump pump. Check in on your sump pump and reset the GFCI if
necessary. Replace pump if GFCI continues to trip.
• Pour a bucket of water into the pit to make sure the AC pump starts automatically, and the water drains quickly once the pump is on.
If the pump doesn’t start, have it serviced or replaced.
• Replace your check valve every year. A leaking check valve will cause water previously removed from the sump to re-enter triggering
the pump to run and try to remove the same water again.
• Depending on the activity of your pump, the oat switch will need to be replaced to ensure reliable operation. If you are not able to track
your activity with a monitoring system, the switch should be replaced minimally every 3 years.
ROUTINE MAINTENANCE REQUIREMENTS
MAINTENANCE LOG
DUTIES PERFORMED PERFORMED BY DATE
This manual suits for next models
2
Table of contents
Other Pit Boss Water Pump manuals
Popular Water Pump manuals by other brands

Seepex
Seepex BW 10 Operating and maintenance instructions

Wilden
Wilden PS 8 Stallion Metal Engineering, operation & maintenance

Simer
Simer 2700 owner's manual

Pfeiffer Vacuum
Pfeiffer Vacuum ES 25S operating instructions

CleanCraft
CleanCraft GP 1105 C operating instructions

HALE
HALE SB-156 QUICK REPAIR GUIDE