Pitney Bowes OFFICERIGHT DI200 User manual

Operating Guide
Folding/
Inserting
System
© Pitney Bowes Limited, 2002
We have made every reasonable effort to assure the accuracy and usefulness of
this guide, however we cannot assume responsibility for errors or omissions or
liability for the misuse or misapplication of our products.
FOR SERVICE AND SUPPLIES:
The Pinnacles, Harlow,
Essex, CM19 5BD, U.K.
Form No. SDC486 RevA (10-02) Printed in England
Operating Guide

1
Contents
1. Introduction
Safety … … … … … … … … … … … … … … … … … … … … … … … … 2
About your machine … … … … … … … … … … … … … … … … … … … 3
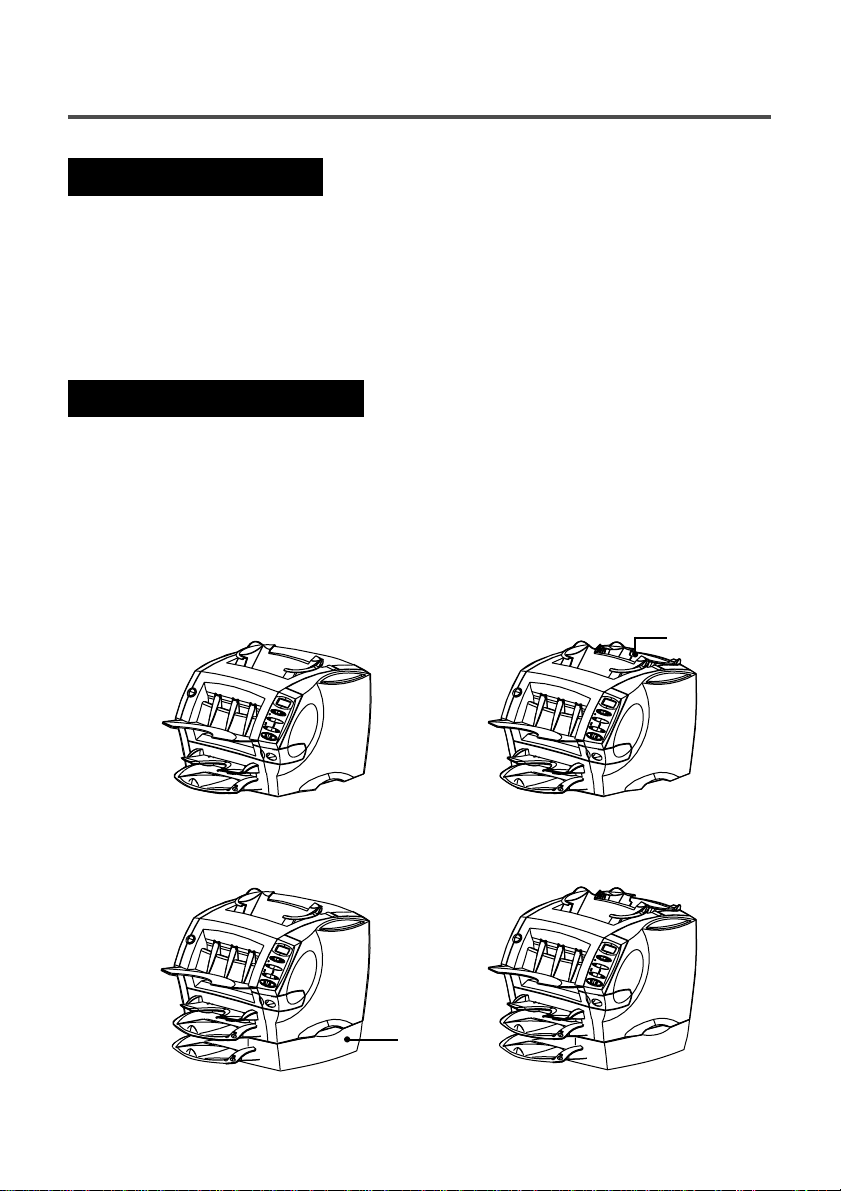
Machine Configurations … … … … … … … … … … … … … … … … … … 3
Machine Identification … … … … … … … … … … … … … … … … … … … 4
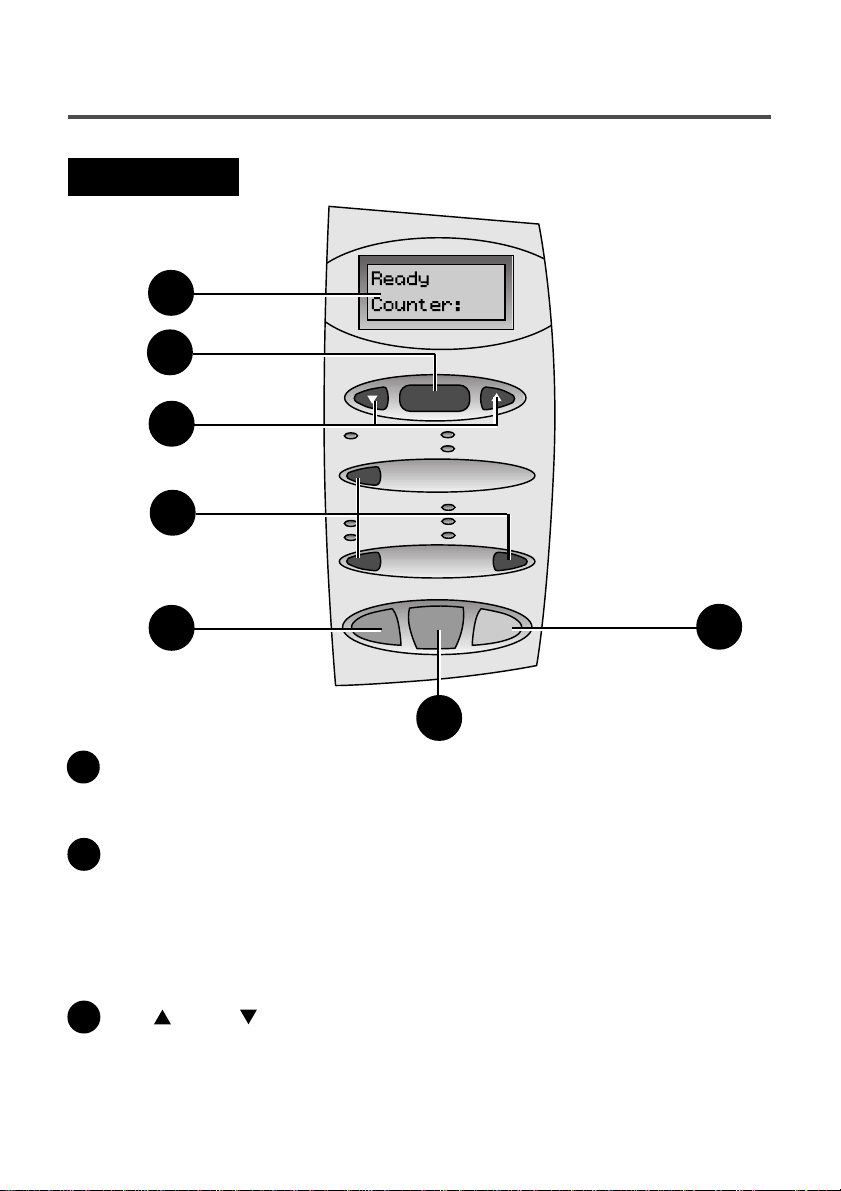
The Controls … … … … … … … … … … … … … … … … … … … … … … 6
2. Preparing and Loading
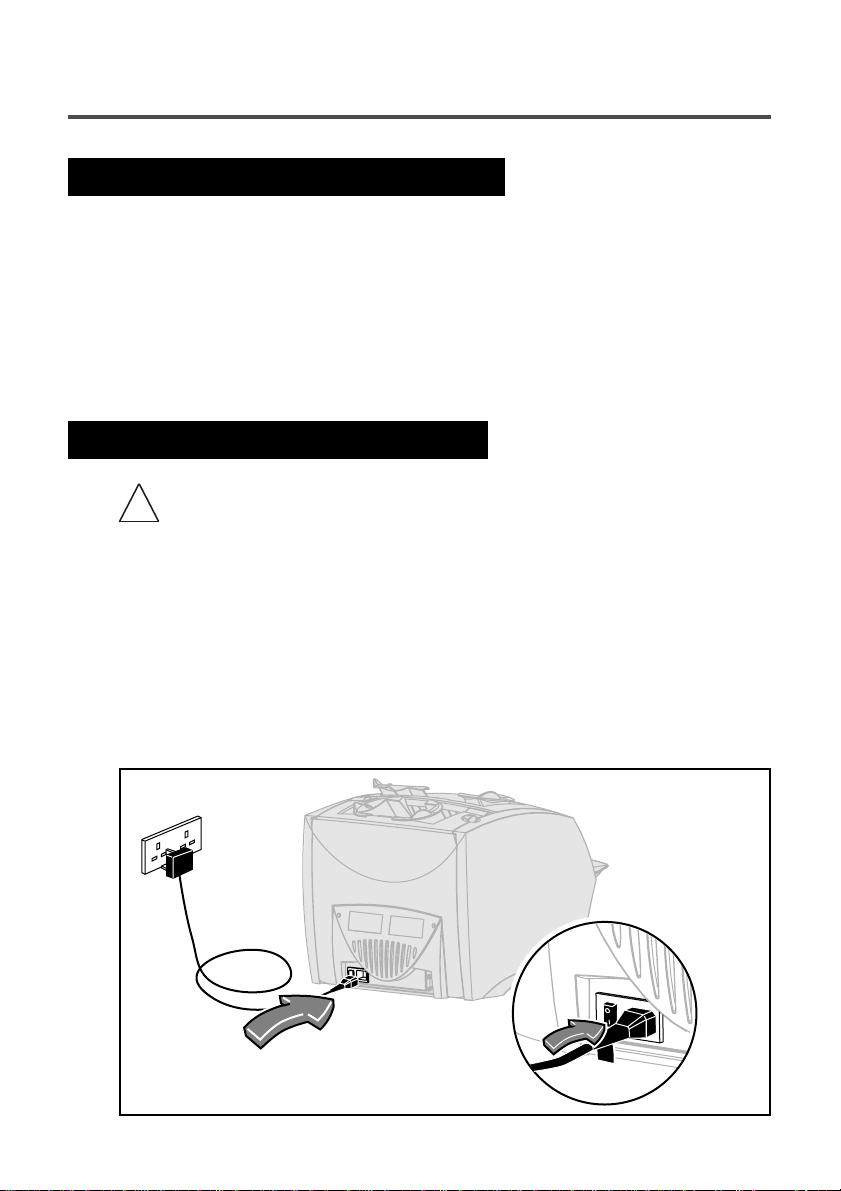
Connecting Power and Turning On … … … … … … … … … … … … … … 8
Filling the Moistener … … … … … … … … … … … … … … … … … … … 9
Loading Sheet Feeders (Feeders A1 and A2) … … … … … … … … … … … 10
Loading the Envelope Feeder (Feeder B) … … … … … … … … … … … … 11
Loading the Insert Feeder (Feeder C) … … … … … … … … … … … … … 12
3. Running Jobs
General Information/Job Listing … … … … … … … … … … … … … … … 13
Job 1 - 1 folded sheet into an envelope … … … … … … … … … … … … … 15
Job 2 - 1 folded sheet, no envelope (fold only) … … … … … … … … … … 16
Job 3 - 1 folded sheet + 1 insert into an envelope … … … … … … … … … 17
Job 4 - 1 insert into an envelope … … … … … … … … … … … … … … … 18
Job 5 - 2 folded sheets into an envelope … … … … … … … … … … … … 20
Job 6 - 2 collated folded sheets into an envelope … … … … … … … … … 21
Job 7 - 2 folded sheets, no envelope (fold only) … … … … … … … … … … 22
Job 8 - 2 collated folded sheets, no envelope (fold only) … … … … … … … 23
Job 9 - 2 folded sheets and an insert into an envelope … … … … … … … … 24
Job 10 - 2 collated folded sheets and an insert into an envelope … … … … 26
The Manual Feeder M … … … … … … … … … … … … … … … … … … 28
4. Advanced Menu Options
Reset Counter … … … … … … … … … … … … … … … … … … … … … 29
Move the address in the window … … … … … … … … … … … … … … … 29
Sheet double detect on/off … … … … … … … … … … … … … … … … … 30
Insert double detect on/off … … … … … … … … … … … … … … … … … 31
Turn safe seal on/off … … … … … … … … … … … … … … … … … … … 31
5. Reference
Error Messages … … … … … … … … … … … … … … … … … … … … … 32
General Troubleshooting … … … … … … … … … … … … … … … … … … 35
Clearing Material Stoppages … … … … … … … … … … … … … … … … 37
The Stacker … … … … … … … … … … … … … … … … … … … … … … 38
Service and Supplies … … … … … … … … … … … … … … … … … … … 38
Material Specifications … … … … … … … … … … … … … … … … … … 39
Machine Specifications … … … … … … … … … … … … … … … … … … 40
Page

2
1. INTRODUCTION
Safety
In some countries the DI200 is supplied with a moulded mains lead and plug. In
other countries, or if the supplied lead is not used, the following information
applies:
1. An approved mains lead for the country concerned must be used.
2. As the colours of the wires in the mains lead of this equipment may not
correspond with the coloured markings identifying the terminals in your plug,
proceed as follows:
-The wire which is coloured green and yellow must be connected to the
terminal in the plug which is marked with the letter “E” or by the earth
symbol or coloured green or green and yellow.
- The wire which is coloured blue must be connected to the terminal which is
marked with the letter “N” or coloured black.
- The wire which is coloured brown must be connected to the terminal which
is marked with the letter “L” or coloured red.
3. The wires in the supplied mains lead are coloured in accordance with the
following code:
Green and Yellow - Earth
Blue - Neutral
Brown - Live
WARNINGS:
THE DI200 MUST BE EARTHED
The socket outlet should be near to the equipment and should be
easily accessible.
If you relocate a DI200 which has the optional Second Sheet
Feeder A2 installed, remove it from the Second Sheet Feeder first.
Make sure it fully disengages from the feeder as it is lifted clear.
Obtain help if necessary.
To comply with health and safety standards, operators must observe all local
standard safety precautions relating to the operation of office equipment. In
particular, DO NOT remove covers from the machine. Refer all servicing to
qualified personnel.
Keep hands, jewellery, ties, long hair, etc. away from moving parts.
!
Safety

3
About your machine
Your new DI200 is a compact folding and inserting machine designed to speed
the process of mail creation.
It has a minimal number of user adjustments and an intuitive, easy to use control
panel. This simplifies machine operation and enhances the productivity of your
mailing operation.
Machine Configurations
There are four configurations of the DI200 available. The basic model can be
supplied from the factory with or without an insert feeder. In addition, either of
these two models can have an optional second sheet feeder added – making four
configurations in all.
You can purchase the optional second sheet feeder and easily install it yourself at
any time.
Configuration 1
basic machine - no insert feeder Configuration 2
machine with insert feeder
Configuration 3
basic machine - 2nd sheet feeder added Configuration 4
machine with insert feeder and
2nd sheet feeder added
insert feeder
2nd sheet
feeder
Introduction

4
2 1
3
4
5
6
8
12
11
10
9
7
Insert Feeder C (not fitted on all models)
Use this feeder to add additional inserts to your envelope. Material fed from this
feeder cannot be folded by the inserter. However, this feeder is especially suited
to feeding pre-folded or thicker inserts.
Insert Cover E Release Button (blue button marked E)
Press this button to release the insert area cover if a stoppage occurs in this area
of the machine. The display prompts you if this cover needs to be opened to
access material.
Operating Guide Slot
Store this Operating Guide in the slot provided so that it doesn’t get lost and is
readily available when needed.
Control Panel
This is where you enter commands and where the machine informs you of its
status. Pages 6 and 7 explain what each button does.
1
2
3
4
Machine Identification
Introduction

5
5
6
7
8
9
10
11
12
Introduction
Moistener Tank
This tank holds EZ-Seal® solution or water to moisten and seal envelope flaps. It
slides out to the right for refilling and has an oval level indicator window at the
front so that you can easily check the fluid level.
Lifting Handles (one each side)
Always lift the DI200 using these handles. DO NOT lift the machine by any of the
feeders or stacker.
Standard Sheet Feeder A1
This feeder enables folding and inserting of a sheet into the envelope. Always
load sheets into this feeder face down and bottom edge first. i.e. the bottom
edge of the sheet furthest into the machine.
Second Sheet Feeder A2 (optional)
You can add this feeder to enable folding and inserting of a second sheet into the
envelope. It functions in exactly the same way as the standard sheet feeder A1.
IMPORTANT: When both sheet feeders A1 and A2 are used together, always
load the address bearing sheet into sheet feeder A2. If you don’t, the address
won’t show in the envelope window. Always load sheets into this feeder face
down and bottom edge first. i.e. the bottom edge of the sheet furthest into the
machine.
Refer to the ‘Warning’ on page 2 before moving a machine which has the second
sheet feeder A2 installed.
Manual Feeder M
Use this feeder to manually feed stapled or unstapled sets of up to 3 sheets. The
machine waits for you to feed each set by hand into this feeder before it folds and
inserts the set automatically. Sheets are always fed into this feeder face down
and bottom edge first. i.e. the bottom edge of the sheet furthest into the
machine.
Stacker
Finished items are delivered to this area.
Front Cover D Release Button (blue button marked D)
Press this button to release the front cover if a stoppage occurs in this area of the
machine. The display prompts you if this cover needs to be opened to access
material.
Envelope Feeder B
This feeder feeds envelopes into the inserting area where they are filled with
sheets or inserts requested from the other feeders.

6
Feeder A1
Menu / Enter
no yes
Feeder A2
2nd Page
Seal
No Seal
Trial Piece Stop
Start
Envelope Fdr B
Insert Fdr C
Fold Only
Display
Shows the current status of the machine and displays prompts/error messages
which help you operate the machine.
Menu/Enter
Press this button to enter the menu options. Options available are:
•Reset Counter
•Move Address in Window
•Turn Sheet Double Detection On/Off
•Turn Insert Double Detection On/Off
•Turn Safe Seal On/Off
yes and no buttons
Once you’ve entered the menu using
Menu/Enter
, press these buttons to answer
yes
or
no
to prompts. They are also used to increase or decrease settings offered
by menu options.
1
2
3
4
57
6
1
2
3
The Controls
Introduction

7
Selection Buttons and Indicator Lights
Press these buttons to step through the feeders/options that are available on your
machine.
Depending on your model configuration, some indicator lights and associated
feeders may be inoperable. i.e. if your model doesn’t have a second sheet feeder,
the indicators associated with this feeder will not light – this is normal.
A green indicator shows that a feeder or function is selected for use.
A red indicator shows that you selected an invalid (impossible) combination of
functions. Simply correct the error in selection and the indicator(s) will change
back to green.
An unlit indicator means that the feeder or function is turned OFF.
Trial Piece
After a job has been setup using the control panel, a trial piece must be run. If
you press
Start
before running a trial piece, the display will prompt you to run a
trial piece first.
Press this button to run one fully collated piece as programmed via the control
panel. The envelope will not seal regardless of whether the system has been told
to seal or not. This allows you to inspect the processed job to make sure that
everything is inserted correctly and that the address appears in the window. The
trial piece also allows the system to calibrate itself and set its double detect
feature, if selected.
IMPORTANT: Running the trial piece is essential and must be done prior to a
start every time a new batch of material is used. This allows the system to re-
calibrate in case different batches of material vary slightly.
Start
Press to begin automatic operation.
Stop
Press to stop automatic operation at the end of the next cycle.
IMPORTANT – SLEEP MODE
After 10 minutes of inactivity the system will enter a power saving ‘sleep mode’
and displays Powersave On. Press any button to wake the machine up. The
machine remembers the last job setup.
4
5
6
7
Introduction

8
2. PREPARING AND LOADING
This chapter explains how to connect and load the machine.
Once you understand the subjects covered in this chapter, you can quickly setup
and use the machine for a variety of jobs using ‘Running Jobs’ on page 13.
Before setting up a job, make sure the material meets machine
specifications (See ‘Specifications’ on page 39).
Connecting Power and Turning On
WARNING: Read the safety information on page 2 before connecting
the machine.
Connect the power cord to the socket on the back right hand corner of the
machine.
Plug the power cord into a suitable power outlet. Make sure the power outlet is
near the machine and is easily accessible.
Turn the power switch ON. After a few seconds, the display shows Ready.
When turned ON, the machine remembers the last job setup, but resets the item
counter back to zero.
!
Loading

9
Filling the Moistener
Refill the moistener when the fluid level drops below the line on the oval viewing
window.
Slide the moistener out to the right.
IMPORTANT: Never open the moistener
while the machine is processing material.
Carefully fill the moistener with EZ-Seal®
solution or water up to the ‘Max’ mark in
the filler funnel.
We recommend EZ-Seal® to minimise
algae growth and scale build-up.
Slide the moistener back into the machine.
From dry, the moistener takes about 5 minutes to become fully wet and ready for
use.
Loading

10
Loading the Sheet Feeders (Feeders A1 and A2)
Sheet Feeder A1 is fitted to all models and is located immediately below the
Manual Feeder M. Sheet Feeder A2 is an option on all models that allows a
second folded sheet to be inserted into an envelope.
Both feeders are used for sheets that require folding before inserting. Load both
feeders in exactly the same way.
Tap the stack of sheets onto a firm surface
to align the edges.
Place the sheets into Sheet Feeder A1
or A2 as required.
IMPORTANT:
1. Always load sheets into these
feeders face down and bottom
edge first. i.e. the bottom edge of the
sheet is furthest into the machine.
2. If you’re using both Sheet Feeders
A1 AND A2 at the same time, the
document printed with the address
MUST be loaded into Sheet Feeder
A2. If you load the address bearing
document into Sheet Feeder A1, the
address won’t be visible in the
envelope window.
Slide the back stop fully in until it stops just
behind the paper stack.
Loading

11
Loading the Envelope Feeder (Feeder B)
A note about envelopes:
The DI200 needs to use DL Mailing envelopes (also known as ‘machineable’
envelopes). For full details, see ‘Specifications’ on page 39. Suitable envelopes
may be ordered from Pitney Bowes (see page 38 for more details).
The feeder can hold up to 60 envelopes.
Tap the envelope stack onto a firm surface
to align the edges.
IMPORTANT:
Load envelopes right way up and facing
you. This means that the envelope flap is
on the back of the envelope and at the top.
Any other orientation will prevent the
machine inserting properly.
Place the envelope stack into Feeder B
with the back envelope flat against the feed
belts. There’s no need to ‘shingle’ or
stagger the envelope stack.
Slide the two side guides up to the
envelope stack then
slightly
back them off.
The correct setting is when the guides
control the envelopes but in no way restrict
their feed into the machine.
Use the blue handles at the rear of the
guides when moving them.
Loading

12
Loading the Insert Feeder (Feeder C)
The Insert Feeder C is only available on certain model configurations. Use this
feeder to add additional inserts to your envelope that do not require folding by the
inserter. This feeder is especially suited to feeding pre-folded or thicker inserts
such as Business Reply Envelopes or Response Cards, etc.
Tap the stack of inserts onto a firm surface
to align the edges.
Place the insert stack into Feeder C.
IMPORTANT:
The orientation of the insert stack will
depend on the nature of the material being
run. For pre-folded inserts it’s normally best
to load with the ‘closed’ edge feeding first.
Business Reply Envelopes can normally be
loaded right way up and facing you.
However, if the flaps are pulled open when
feeding, try loading with the flaps down and
facing you.
Slide the two side guides up to the insert
stack then
slightly
back them off. The
correct setting is when the guides control
the inserts but in no way restrict their feed
into the machine.
Use the blue handles at the rear of the
guides when moving them.
Loading

13
3. RUNNING JOBS
Chapter 1 “Introduction” explained the main features of the machine and how to
use the Control Panel. Chapter 2 “Preparing and Loading” described how to turn
the machine ON and how to load the feeders and moistener unit.
This chapter assumes you understand the content of the previous chapters. It
provides a visual reference to identify the various jobs that can be run on the
DI200 series of machines, and then gives quick steps to setup and run each job.
Once you’re familiar with the machine, use this chapter as a quick reference if
you have to change a job setup.
The Manual Feeder M is used to manually feed sets of up to 3 sheets. See
page 28 for an explanation of how to setup and use this feeder.
envelope
1 folded sheet
JOB 1 Page 15
1 folded sheet
no envelope (fold only)
JOB 2 Page 16
JOB 3 Page 17 JOB 4 Page 18
envelope
1 insert 1 folded sheet
envelope
1 insert
Running Jobs
ALL MODELS
MODELS with an INSERT FEEDER C

14
MODELS with an optional SECOND SHEET FEEDER A2
JOB 5 Page 20 JOB 6 Page 21
MODELS with an INSERT FEEDER C and SECOND SHEET FEEDER A2
JOB 9 Page 24 JOB 10 Page 26
envelope
2 folded sheets
envelope
2 folded sheets
(collated)
JOB 7 Page 22 JOB 8 Page 23
2 folded sheets
no envelope (fold only)
2 folded sheets
(collated)
no envelope (fold only)
envelope
1 insert 2 folded sheets
envelope
1 insert 2 folded sheets
(collated)
*see note below
*see note below
*see note below
NOTE: Jobs marked with a *use the Second Sheet Feeder A2 in ‘2nd Page’ mode
to feed 2-sheet collated sets. You must load sheets into the feeder
in collated sequence: ‘first page, second page, first page, second page’, etc.
as may be printed by a typical office laser printer.
Running Jobs

15
1 folded sheet into an envelope
Model
Required: Any DI200
Notes: Models with the optional 2nd sheet feeder A2
can use this feeder instead of sheet feeder A1,
as long as it is loaded and selected in
steps 1 and 3 below.
Step Action Tips More Details…
1 Load sheets Load face down Page 10
into Sheet Feeder A1 and bottom edge first
2 Load envelopes Load right way up Page 11
into Feeder B and facing you
3 Press button Make sure green Page 6
to select
Feeder A1
indicator lights
4 Press button to Make sure green Page 6
select
Envelope Fdr B
indicator lights
5 Press button to choose Make sure moistener Page 6
Seal
or
No Seal
has EZ-Seal® or water
6 Press
Trial Piece
button Trial piece will not Page 6
and check trial piece seal - this is normal
7 Press
Start
button
Stop
button will stop Page 6
to run job machine at end of cycle
Problems? Refer to the help sections on pages 32 and 35.
Job 1
envelope
1 folded sheet

16
Job 2
1 folded sheet, no envelope (fold only)
Model
Required: Any DI200
Notes: Models with the optional 2nd sheet feeder A2
can use this feeder instead of sheet feeder A1,
as long as it is loaded and selected in
steps 1 and 2 below.
Step Action Tips More Details…
1 Load sheets Load face down Page 10
into Sheet Feeder A1 and bottom edge first
2 Press button Make sure green Page 6
to select
Feeder A1
indicator lights
3 Press button to Make sure green Page 6
select
Fold Only
indicator lights
4 Press
Trial Piece
button Check trial piece Page 6
and check trial piece for a good fold
5 Press
Start
button
Stop
button will stop Page 6
to run job machine at end of cycle
Problems? Refer to the help sections on pages 32 and 35.
1 folded sheet
no envelope (fold only)

17
1 folded sheet + 1 insert
into an envelope
Model The DI200 must have
Required: an Insert Feeder C
Notes: Inserts are pre-folded sheets or unfolded
items such as Business Reply Envelopes,
Booklets or Response Cards, etc.
Models with the optional 2nd sheet feeder A2 can use this feeder
instead of sheet feeder A1, as long as it is loaded and selected in steps 1
and 4 below.
Step Action Tips More Details…
1 Load sheets Load face down Page 10
into Sheet Feeder A1 and bottom edge first
2 Load envelopes Load right way up Page 11
into Feeder B and facing you
3 Load inserts Loading orientation Page 12
into Insert Feeder C depends on item
4 Press button Make sure green Page 6
to select
Feeder A1
indicator lights
5 Press button Make sure BOTH Page 6
to select
Envelope Fdr B
green indicators
AND
Insert Fdr C
are lit
6 Press button to choose Make sure moistener Page 6
Seal
or
No Seal
has EZ-Seal® or water
Job 3
envelope
1 insert 1 folded sheet
…continues on next page

18
Step Action Tips More Details…
7 Press
Trial Piece
button Trial piece will not Page 6
and check trial piece seal - this is normal
8 Press
Start
button
Stop
button will stop Page 6
to run job machine at end of cycle
Problems? Refer to the help sections on pages 32 and 35.
Job 3 (continued)

19
1 insert into an envelope
Model The DI200 must have
Required: an Insert Feeder C
Notes: Inserts are pre-folded sheets or unfolded
items such as Business Reply Envelopes,
Booklets or Response Cards, etc.
Step Action Tips More Details…
1 Load envelopes Load right way up Page 11
into Feeder B and facing you
2 Load inserts Loading orientation Page 12
into Insert Feeder C depends on item
3 Press button Make sure BOTH Page 6
to select
Envelope Fdr B
green indicators
AND
Insert Fdr C
are lit
4 Press A1/A2 select button Make sure NO Page 6
until both feeders and indicators are lit for
2nd Page are turned OFF A1 or A2 or 2nd Page
5 Press button to choose Make sure moistener Page 6
Seal
or
No Seal
has EZ-Seal® or water
6 Press
Trial Piece
button Trial piece will not Page 6
and check trial piece seal - this is normal
7 Press
Start
button
Stop
button will stop Page 6
to run job machine at end of cycle
Problems? Refer to the help sections on pages 32 and 35.
envelope
1 insert
Job 4
Other manuals for OFFICERIGHT DI200
2
Table of contents
Other Pitney Bowes Folding Machine manuals
Popular Folding Machine manuals by other brands

Morgana
Morgana MB300 XL Pro Operator's manual

Morgana
Morgana TF MEGA-S instruction manual

Electrolux
Electrolux IC4 4819 FFS Service manual

Duplo
Duplo DBM-70 instruction manual

GERA
GERA Mondial B05 Operator's manual

Martin Yale
Martin Yale Mark VII AF Air-Feed AutoFolder Installation, operation & maintenance instructions