Planar PA1575R User manual

PA1575R All-in-One
Touchscreen Computer
USER’S GUIDE
www.planartouch.com

The information contained in this document is subject to change without notice.
This document contains proprietary information that is protected by copyright. All rights
are reserved. No part of this document may be reproduced,translated to another language
or stored in a retrieval system, or transmitted by any means, electronic, mechanical,
photocopying, recording, or otherwise, without prior written permission. Windows is a registered
trademark of Microsoft, Inc. Other brand or product names are trademarks of their respective
holders.
Important Recycle Instructions:
Lamp(s) inside this product contains mercury. This product may contain other
electronic waste that can be hazardous if not disposed of properly. Recycle or
dispose in accordance with local, state, or federal Laws. For more information,
contact the Electronic Industries Alliance at WWW.EIAE.ORG. For lamp specific
disposal information check WWW.LAMPRECYCLE.ORG.

Table of Contents
Usage Notice
Precautions .......................................................................................................................... 1
Introduction
About PA1575R .................................................................................................................... 2
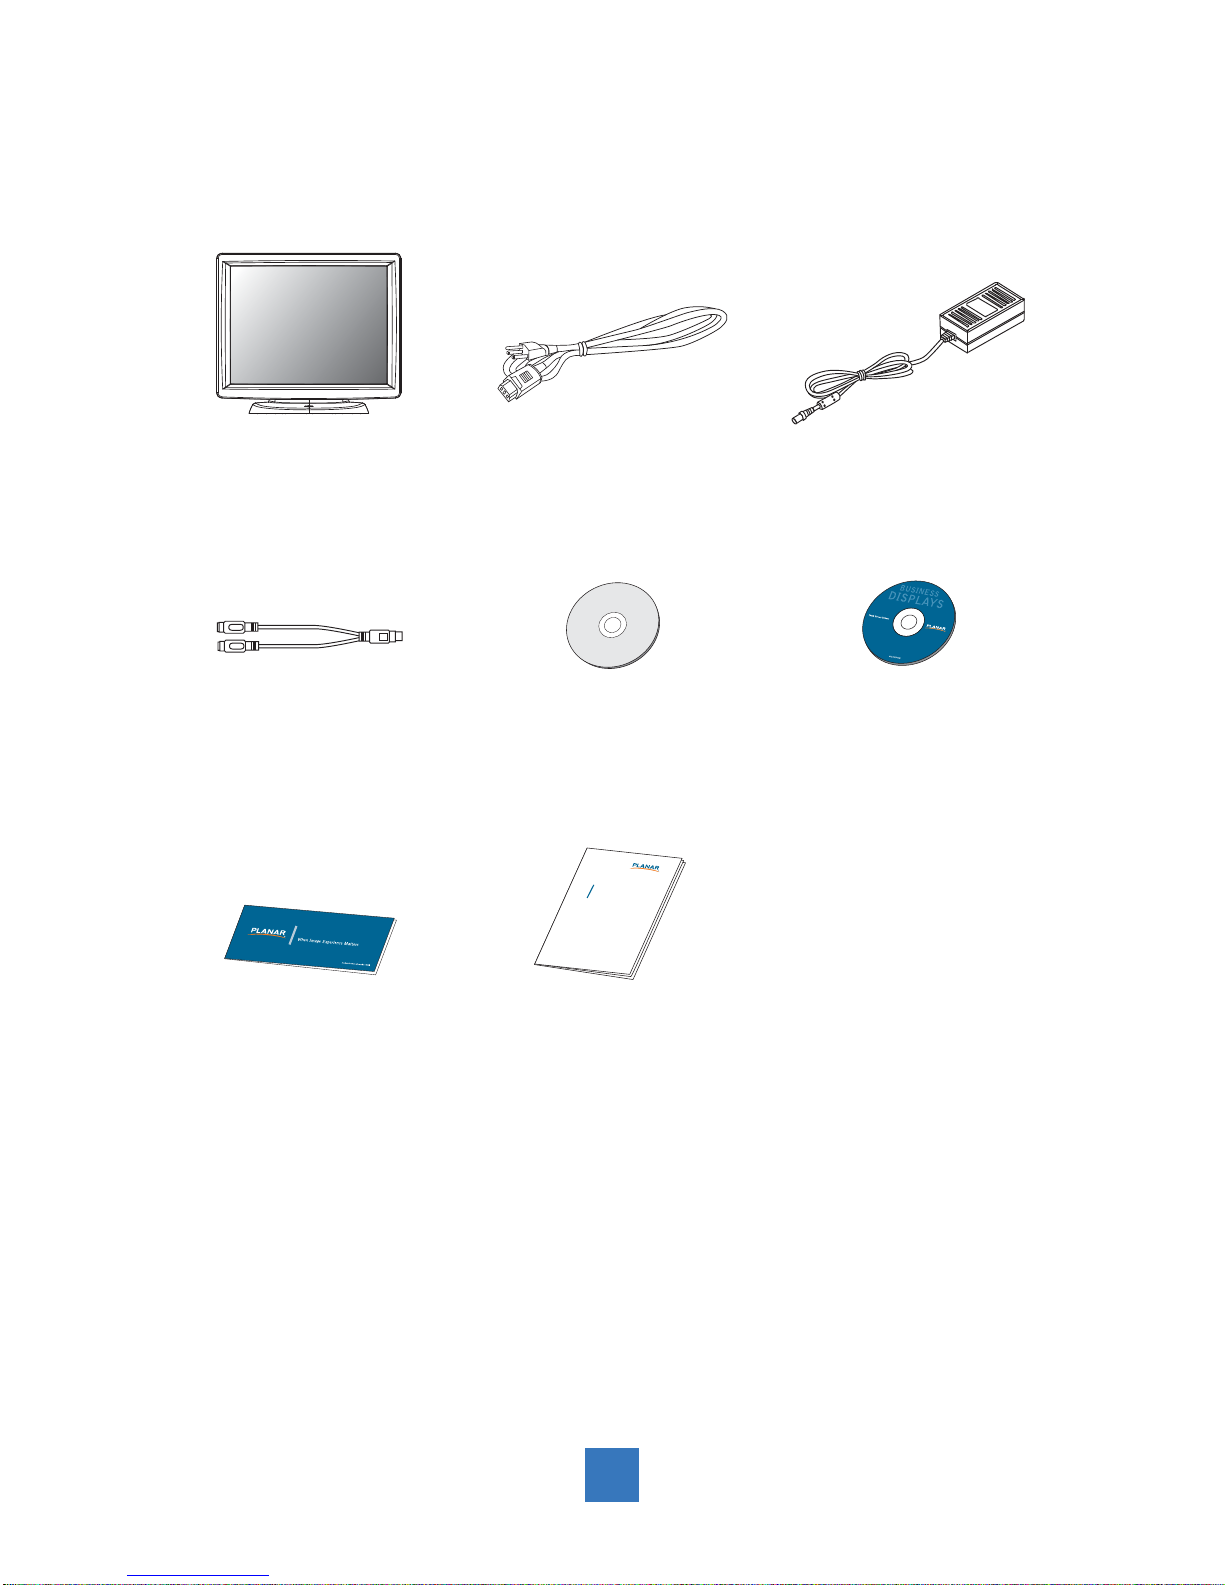
Package Overview .......................................................................................................4
Installation
Product Overview ................................................................................................................. 5
Kensington Security Slot....................................................................................................... 6
VESA Mount your Computer................................................................................................. 7
Start Your Installation............................................................................................................ 8
Remove the Deskstand .................................................................................................... 9
User Controls
Side Panel Controls ............................................................................................................10
Initial Turn-On ..................................................................................................................... 11
XP PRO Initial On Steps................................................................................................. 11
WEPOS Initial On Steps ................................................................................................. 18
Test Devices ....................................................................................................................... 20
Testing the Touchscreen ................................................................................................. 20
Recovering the Operating System...................................................................................... 22
1.Using the Recovery CD ............................................................................................... 22
A.For XP Pro............................................................................................................... 22
B.For WEPOS............................................................................................................. 30
2.PA1575R Touchscreen Driver Install Instructions: ....................................................... 34
Display Specifications......................................................................................................... 35
Power Supply Specifications .............................................................................................. 36
Environmental Specifications.............................................................................................. 36
Touch Computer Specifications .......................................................................................... 37
How to Use the OSD Menus............................................................................................... 40
On-Screen Display Menus.................................................................................................. 41
Appendix
Troubleshooting.......................................................................................................... 42
Warning Signal ................................................................................................................... 42
No Signal ............................................................................................................................42
Going to Sleep................................................................................................................... .42
Out of Range ...................................................................................................................... 42
Product Dimensions............................................................................................................ 43
Compatibility Modes ........................................................................................................... 44
Product Registration and Technical Support .......................................................................45

Usage Notice
! Warnin
g
- To prevent the risk o
f
fi
re or shock hazards, do not expose
t
hi
s
p
ro
d
uct to ra
i
n or mo
i
sture.
! Warnin
g
- Please do not open or disassemble the product as this ma
y
cause
elec
tr
ic
shock
.
Precautions
Follow all warnings, precautions and maintenance as recommended in this user’s manual to
maximize the life of your unit.
Do:
• Turn off the product before cleaning.
• Touch screen surface may be cleaned using a soft clean cloth moistened with mild
window glass commercial cleaners or 50/50 mixture of water and isopropyl alcohol.
• Use a soft cloth moistened with mild detergent to clean the display housing.
• Use only high quality and safety approved AC/DC adapter.
• Disconnect the power plug from AC outlet if the product is not going to be used for
an extended period of time.
Don’t:
• Do not touch the LCD display screen surface with sharp or hard objects.
• Do not use abrasive cleaners, waxes or solvents for your cleaning.
• Do not operate the product under the following conditions:
- Extremely hot, cold or humid environment.
- Areas susceptible to excessive dust and dirt.
- Near any appliance generating a strong magnetic field.
- In direct sunlight.
1

Introduction
About PA1575R
The PA1575R is All-in-One Touch computer model. It has a 15" flat panel screen with an
active matrix, thin-film transistor (TFT) liquid crystal display (LCD).
The PA1575R incorporates the Mobile Intel® 910GMLE/915GME Chipset, consisting of the
Intel® 910GMLE/ 915GME Graphic Memory Controller Hub (GMCH) and Intel® I/O Control-
ler Hub 6-M (ICH6-M), is an optimized integrated graphics solution with a 400/533MHz front-
side bus.
The integrated 32-bit 3D graphics engine, based on Intel® Graphics Media Accelerator 900
(Intel® GMA 900) architecture, operates at core speeds of up to 320 MHz. It features a low-
power design, is validated with Intel® Pentium M/ Celeron® M processors on 130nm or
90nm process.
Intel® Graphics supports a unique intelligent memory management scheme called Dynamic
Video Memory Technology (DVMT). DVMT handles diverse applications by providing the
maximum availability of system memory for general computer usage, while supplying
additional graphics memory when a 3D-intensive application requests it. The Intel GMA 900
graphics architecture also takes advantage of the high-performance Intel processor. Intel
GMA 900 graphics supports Dual Independent Display technology.
Features include:
• Supports Celeron® M processor, 400MHz FSB (910GMLE chipset)
• Supported Operating Systems: Windows® XP and WePOS
• DDRII SODIMM Slot x 2, up to 2GB system memony (Standard 1GB)
• Onboard 10/100 BaseT and Gigabit LAN
• Supported dual display, Main display with OSD function.
• 3 USB 2.0, one 12V powered USB, 4 COM(one ext./3 int. w/header), Watchdog timer
• One Mic, one Earphone, PS2 KB/MS, cash drawer port, VGA, DC 12V input
• Active matrix TFT LCD technology
• 1024x768 XGA resolution
• 15" viewable display area
• 0.297mm x 0.297mm pixel pitch
• Multilingual OSD user control
• Kensington security slot
• 75 mm VESA mount
2

3
• Removable base for flexible mounting solutions.
• 5-wire resistive touch screen with USB controller
• Built-in speakers-1W x 2
Touch Screen for PA1575RXP / PA1575RWP
• Analog 5-wire resistive touch screen for finger and stylus input
• Surface: Anti-glare treatment
• Transmittance: 80% (Typ.)

Package Overview
4
LCD Touch Computer Power Cord
Recovery CD Touch Screen Driver
Installation CD-ROM
PS/2 Y-Cable
DC Power Supply
Landing Strip User's Guide
xxxxxxxxx
/
xxxxxxxxx
xxxxxxxxx
USER’S GUIDE
www.planar.com

Installation
Product Overview
• Front View
• PA1575R Button View (Without Stand)
PS2 RJ11 MIC RJ45 USB POWER
RS232
EAR PHONE
VGA USB POWER
5

Kensington Security Slot
The computer can be secured to your desk or any other fixed object with Kensington lock
security products. The Kensington lock is not included.
6

VESA Mount Your Computer
This computer conforms to the VESA Flat Panel Mounting Physical Mounting Interface
Standard which defines a physical mounting interface for flat panel computers, and
corresponding with the standard mounting devices of flat panel computer, such as wall and
table arms. The VESA mounting interface is located on the back of touch computer.
To mount the computer on a swing arm or other mounting fixture, follow the instructions
included with the mounting fixture to be used, please note to mount touch computer to the
devices (either mounting fixture or swing arm) what conforms to the UL listed.
mm75
mm75
Slots ( x 4)
VESA
Mounting
Interface
! Warning!
Please select the proper screws!
The distance between the back cover surface and the bottom of the screw hole
is 8 mm. Please use four M4 screws diameter with proper length to mount your
monitor.
NOTE: the stand will support up to 11 lbs (5kg).
7

Start Your Installation
Remove the Back Cover
Please follow these instructions to remove the cover on the back panel of the LCD so that
you can hookup the cables to associated connector.
Figure A
1. Remove the stand back cover by pulling in the direction of the arrow.
2. Connect applicable cables to the appropriate connectors.
3. Re-attach the stand back cover by pressing firmly until the tabs snap into place. You
may also keep the cables in order by using the cable organizer.
! Note!
You can place the LCD flat horizontally to make it
easier to connect the cables. Please make sure
that you place it on an even surface lest the LCD
should be damaged by scratches or collision.
included cables organizer
8

Remove the Deskstand
Remove stand back cover.1.
Remove hinge cover.2.
Remove 4 screws and then3.
remove hinge.
9

User Controls
Side Panel Controls
Icon key Name
Menu
Up
Down
Enter
Power
OSD
Key Menu off status Menu on status
Menu appear Menu disappear/ return to main item
Brightness Main item select up/ Adjust up
Mute Main item select down/ Adjust down
Enter/Select sub-item function
Power On/Off
10

Initial Turn-On
The initial setup of the operating system takes approximately 5-10 minutes. Additional time
may be needed depending on touch computer hardware configuration and connected devices.
To setup the Windows OS for the touch computer, turn on the touch computer and follow the
instructions on the screen.
XP PRO Initial On Steps
Step 1. Boot Computer
▼
▎
▼
▎
11

Step 2. Press "Next"
Step 3. Read agreement and press " I accept this agreement" and
"Next".
12

Step 4. Language Selection, Press "Next"
Click Customize. The Regional and Language window shown below will appear.
Step 5. Type your full name, organization and press "Next"
13

Step 6. Type product key and press "Next"
Please find the "Certificate of Authenticity" license label on the back-cover.
14

Step 7. Setup your computer name, administrator password and
press "Next"
Step 8. Date and Time Settings, Setup your computer date and
time and press "Next"
15

Step 9. Choose typical or custom setting and press "Next"
Step 10. Choose applicable option
▼
▎
16

Step 11. Press "Finish"
17
Other manuals for PA1575R
1
Table of contents
Other Planar Desktop manuals

Planar
Planar Clean Screen C3012T User manual

Planar
Planar Invitium Tk7 User manual

Planar
Planar Invitium Tk7 User manual

Planar
Planar PA1575R User manual

Planar
Planar invitium User manual

Planar
Planar DS15i Parts list manual

Planar
Planar DS15 User guide

Planar
Planar C3215 Clean Screen II User manual

Planar
Planar ND1750 User manual

Planar
Planar DS15 Parts list manual