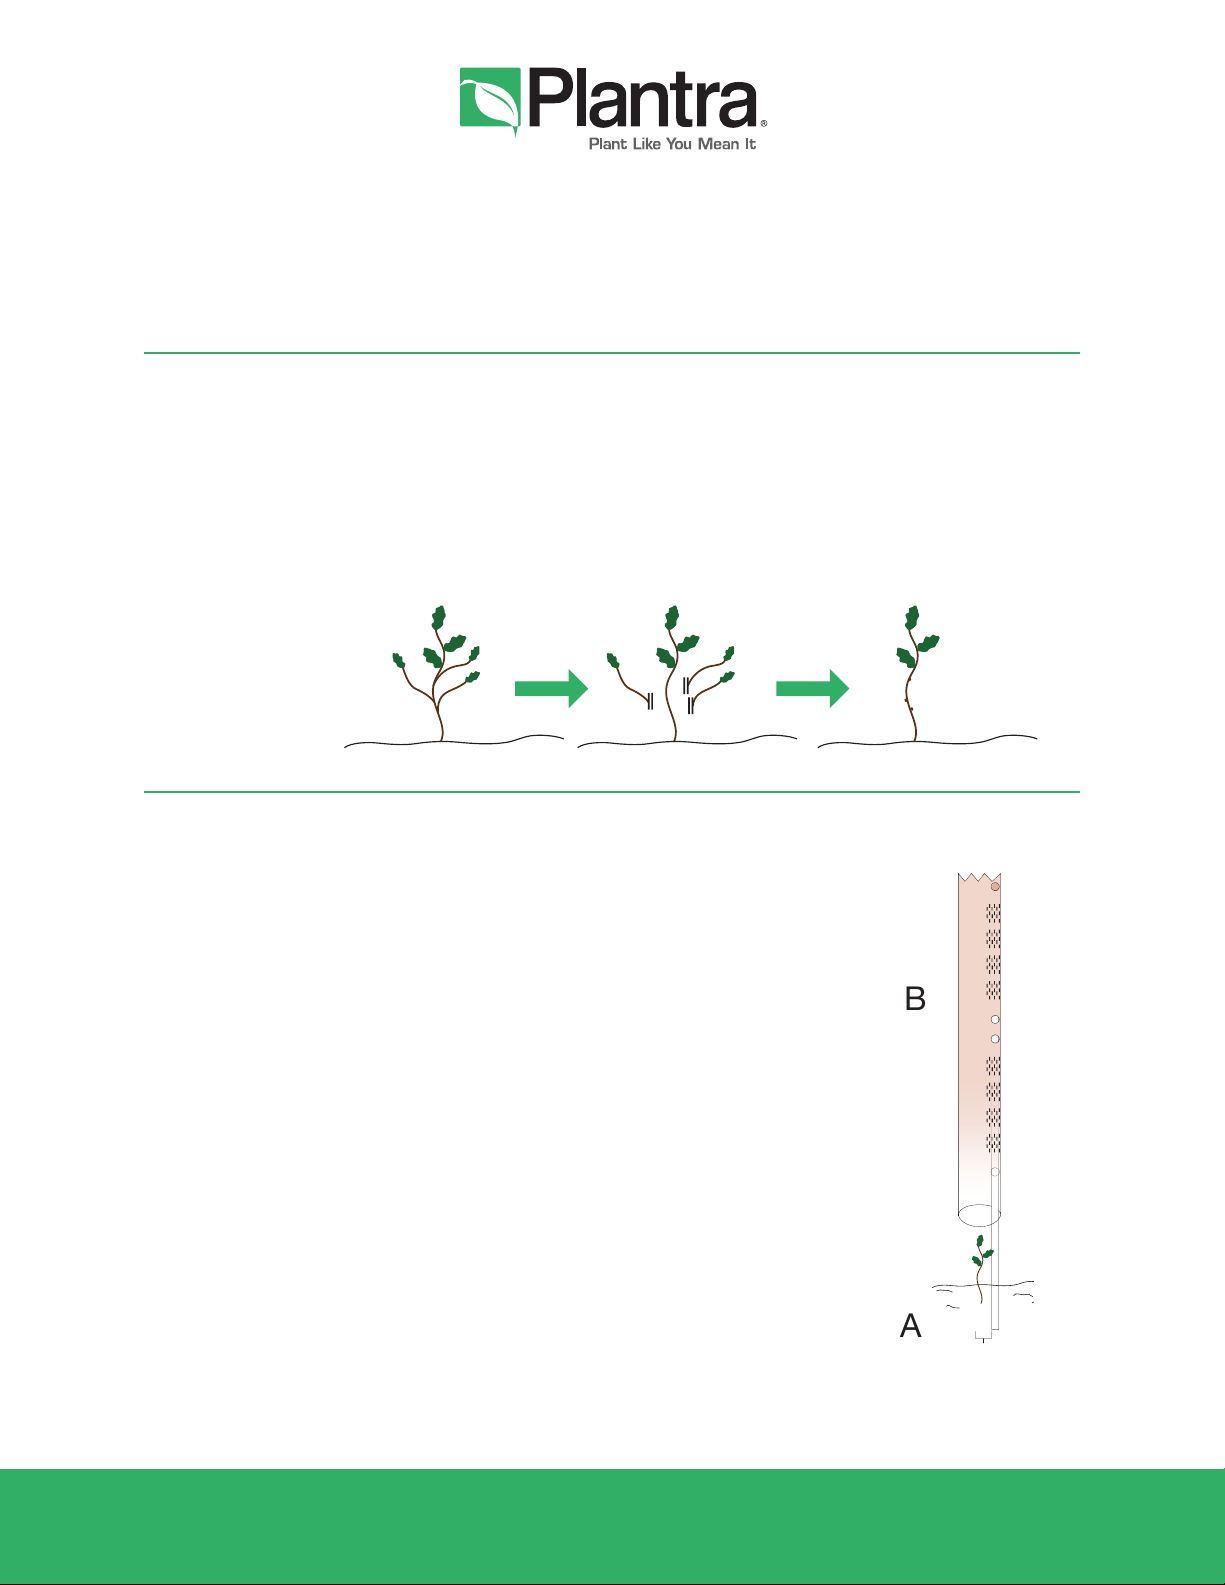
Step 1 – Plant seedling
Step 2 – Prepare the seedling
for “tubing”
If your seedlings have side (lateral) branches
please remove them carefully using sharp
pruning shears before installing the grow
tube .
NOTE: Do NOT bend side branches to
squeeze or otherwise force them into the
grow tube. Doing so will encourage weak
branching and other problems as the tree
matures.
Step 3 – Install Grow Tube
and Support Stake
Preferred Method: Using SunFlex Stake
Your grow tube installation is only as good
as the support stake you choose for the
job. That’s why SunFlex Grow Tubes are
designed to fully integrate the SunFlex
Stake inside the grow tube to achieve the
strongest, long-lasting and secure stake/
tube attachment available anywhere (see
.
A. Position stake 1.5 – 2 inches from the
seedling with ground-line marker towards
the ground. Use Plantra SunFlex Stake
Driver and drive stake until ground-line
marker reaches the soil surface.
B.
its entire length in opposite direction as
packed. Next, slide the grow tube over
the top of the stake and down to the
ground carefully guiding the seedling
inside the grow tube along the way.
Step 1 Step 2 Step 3
FIGURE 1
© Plantra, Inc. 2015
SFII150714
FIGURE 2
11
/
2 - 2 in
BACK
TOP
stake
Twist-Lock Tie
A
B
C
D
E
www.PLANTRA.com
NOTE: This method of installing support
stake inside the grow tube is recommended
for SunFlex stakes only. The SunFlex Stake
has a rounded top to avoid stem abrasion
and a small diameter to avoid crowding the
seedling inside the grow tube. Other stake
materials should never be installed inside
grow tubes as their sharp edges could
damage stems that come in contact with the
stake top and have large diameters which will
occupy important growing volume inside the
tube the tree should have.
C. Position the grow tube so the stake is
tight against the of the tube and lined-up
between the paired tie holes.
D.
completed, the tip of the SunFlex stake
should be at least 1-2 inches above the top
tie hole and below the top of the grow tube.
IMPORTANT: Firmly tap the top of the tube
to seat the tube base into the soil. Mound
additional soil around tube base as needed to
reduce entry by rodents.
E. Attach the grow tube to the stake by
inserting a Plantra Twist-Lock tie through
top tie hole from the outside, guiding it
around the stake and back out the paired
the tube and stake are tight together to
prevent the grow tube from sliding up
from contact by animals. Repeat steps for
middle and bottom tie holes.
TIP: Bend the Twist-Lock tie about 2 inches
from one end to make a “curl.” Use this end
to thread the tie into one tie hole, around the
stake and out the other tie hole.
Plantra®Grow Tube Guidelines:
SunFlex™Grow Tubes for Trees
FIGURE 3
Stake Completely Inside Tube With
Flat Side Of Stake Snug Against Tube
Step 1 – Plant seedling
Step 2 – Prepare the seedling
for “tubing”
If your seedlings have side (lateral) branches
please remove them carefully using sharp
pruning shears before installing the grow
tube .
NOTE: Do NOT bend side branches to
squeeze or otherwise force them into the
grow tube. Doing so will encourage weak
branching and other problems as the tree
matures.
Step 3 – Install Grow Tube
and Support Stake
Preferred Method: Using SunFlex Stake
Your grow tube installation is only as good
as the support stake you choose for the
job. That’s why SunFlex Grow Tubes are
designed to fully integrate the SunFlex
Stake inside the grow tube to achieve the
strongest, long-lasting and secure stake/
tube attachment available anywhere (see
.
A. Position stake 1.5 – 2 inches from the
seedling with ground-line marker towards
the ground. Use Plantra SunFlex Stake
Driver and drive stake until ground-line
marker reaches the soil surface.
B.
its entire length in opposite direction as
packed. Next, slide the grow tube over
the top of the stake and down to the
ground carefully guiding the seedling
inside the grow tube along the way.
Step 1 Step 2 Step 3
FIGURE 1
© Plantra, Inc. 2015
SFII150714
FIGURE 2
11
/
2 - 2 in
BACK
TOP
stake
Twist-Lock Tie
A
B
C
D
E
www.PLANTRA.com
NOTE: This method of installing support
stake inside the grow tube is recommended
for SunFlex stakes only. The SunFlex Stake
has a rounded top to avoid stem abrasion
and a small diameter to avoid crowding the
seedling inside the grow tube. Other stake
materials should never be installed inside
grow tubes as their sharp edges could
damage stems that come in contact with the
stake top and have large diameters which will
occupy important growing volume inside the
tube the tree should have.
C. Position the grow tube so the stake is
tight against the of the tube and lined-up
between the paired tie holes.
D.
completed, the tip of the SunFlex stake
should be at least 1-2 inches above the top
tie hole and below the top of the grow tube.
IMPORTANT: Firmly tap the top of the tube
to seat the tube base into the soil. Mound
additional soil around tube base as needed to
reduce entry by rodents.
E. Attach the grow tube to the stake by
inserting a Plantra Twist-Lock tie through
top tie hole from the outside, guiding it
around the stake and back out the paired
the tube and stake are tight together to
prevent the grow tube from sliding up
from contact by animals. Repeat steps for
middle and bottom tie holes.
TIP: Bend the Twist-Lock tie about 2 inches
from one end to make a “curl.” Use this end
to thread the tie into one tie hole, around the
stake and out the other tie hole.
Plantra®Grow Tube Guidelines:
SunFlex™Grow Tubes for Trees
STEP 3 Continued...
(see gure 3)
C. Position the grow tube so a at side of the stake is snug
against the side of the tube and in-line between the paired
tie-holes.
D. Firmly tap the top of the tube to seat the tube base into the
soil. Mound additional soil around tube base as needed to
reduce entry by rodents. When completed, the tip of the
Trunk-Builder stake should be at least 1-2 inches above the
top tie hole and below the top of the grow tube.
E. Attach the grow tube to the stake with 3 Twist-Lock™
Double Wire Twist Ties (only 2 ties for 35-in and 24-in tube
heights). Begin by inserting the rst twist-tie through the top
tie hole, guiding it around the stake and back out the paired
tie hole. Twist the ends rmly so that the tube and stake are
tight together to prevent the grow tube from sliding up from
contact by animals. Repeat steps for one set of middle tie
holes and for the bottom set of tie holes.
TIP: Bend the Twist-Lock tie about 2 inches from one end
to make a “curl.” Use this end to thread the tie into one tie
hole, around the stake and out the other tie hole.
Step 1 – Plant seedling
Step 2 – Prepare the seedling
for “tubing”
If your seedlings have side (lateral) branches
please remove them carefully using sharp
pruning shears before installing the grow
tube .
NOTE: Do NOT bend side branches to
squeeze or otherwise force them into the
grow tube. Doing so will encourage weak
branching and other problems as the tree
matures.
Step 3 – Install Grow Tube
and Support Stake
Preferred Method: Using SunFlex Stake
Your grow tube installation is only as good
as the support stake you choose for the
job. That’s why SunFlex Grow Tubes are
designed to fully integrate the SunFlex
Stake inside the grow tube to achieve the
strongest, long-lasting and secure stake/
tube attachment available anywhere (see
.
A.
Position stake 1.5 – 2 inches from the
seedling with ground-line marker towards
the ground. Use Plantra SunFlex Stake
Driver and drive stake until ground-line
marker reaches the soil surface.
B.
its entire length in opposite direction as
packed. Next, slide the grow tube over
the top of the stake and down to the
ground carefully guiding the seedling
inside the grow tube along the way.
Step 1 Step 2 Step 3
FIGURE 1
© Plantra, Inc. 2015
SFII150714
FIGURE 2
11
/
2 - 2 in
BACK
TOP
stake
Twist-Lock Tie
A
B
C
D
E
www.PLANTRA.com
NOTE: This method of installing support
stake inside the grow tube is recommended
for SunFlex stakes only. The SunFlex Stake
has a rounded top to avoid stem abrasion
and a small diameter to avoid crowding the
seedling inside the grow tube. Other stake
materials should never be installed inside
grow tubes as their sharp edges could
damage stems that come in contact with the
stake top and have large diameters which will
occupy important growing volume inside the
tube the tree should have.
C. Position the grow tube so the stake is
tight against the of the tube and lined-up
between the paired tie holes.
D.
completed, the tip of the SunFlex stake
should be at least 1-2 inches above the top
tie hole and below the top of the grow tube.
IMPORTANT: Firmly tap the top of the tube
to seat the tube base into the soil. Mound
additional soil around tube base as needed to
reduce entry by rodents.
E. Attach the grow tube to the stake by
inserting a Plantra Twist-Lock tie through
top tie hole from the outside, guiding it
around the stake and back out the paired
the tube and stake are tight together to
prevent the grow tube from sliding up
from contact by animals. Repeat steps for
middle and bottom tie holes.
TIP: Bend the Twist-Lock tie about 2 inches
from one end to make a “curl.” Use this end
to thread the tie into one tie hole, around the
stake and out the other tie hole.
Plantra®Grow Tube Guidelines:
SunFlex™Grow Tubes for Trees
TOP VIEW
BACK
Twist-Lock Tie
Stake
FIGURE 4A
47-in & 58-in Grow Tube Heights
FIGURE 4B
71-in Grow Tube Heights
STEP 4 Install bird exclusion mesh top
(see gure 4)
Simply stretch the netting over the tube top like pulling on a sock. Pull the netting down to the top tie and
gently insert one or both ends of the twist ties through the mesh to keep it from blowing off in the wind.
When installed, approximately 1 inch of mesh cap should remain closed at the top as shown in Figure 4A
and 4B. For 47-in and 58-in grow tube heights the mesh tops should be pulled down to height of tie holes.
For 71-in SunFlex Grow Tube installation the mesh cap will only extend about half-way down between the
top of the tube the tie holes. In this instance the tie ends will need to reach up to hook the netting in place
to allow enough netting above tube top to remain closed.
PLANTRA.COM
© Plantra, Inc. 2018
V.WISLR181128A
For more product information including
specications, images & user tips please visit: