manuals.online logo
Brands
  1. Home
  2. •
  3. Brands
  4. •
  5. Plantra
  6. •
  7. Lawn And Garden Equipment
  8. •
  9. Plantra SunFlex Instruction Manual

Plantra SunFlex Instruction Manual

Step 1 – Plant seedling
Step 2 – Prepare the seedling
for “tubing”
If your seedlings have side (lateral) branches
please remove them carefully using sharp
pruning shears before installing the grow
tube (see gure 1).
NOTE: Do NOT bend side branches to
squeeze or otherwise force them into the
grow tube. Doing so will encourage weak
branching and other problems as the tree
matures.
Step 3 – Install Grow Tube
and Support Stake
Preferred Method: Using SunFlex Stake
Your grow tube installation is only as good
as the support stake you choose for the
job. That’s why SunFlex Grow Tubes are
designed to fully integrate the SunFlex
Stake inside the grow tube to achieve the
strongest, long-lasting and secure stake/
tube attachment available anywhere (see
gure 2).
A. Position stake 1.5 – 2 inches from the
seedling with ground-line marker towards
the ground. Use Plantra SunFlex Stake
Driver and drive stake until ground-line
marker reaches the soil surface.
B. Pop grow tube open by attening tube
its entire length in opposite direction as
packed. Next, slide the grow tube over
the top of the stake and down to the
ground carefully guiding the seedling
inside the grow tube along the way.
1-2 in
1- 1
1
/2in
Step 1 Step 2 Step 3
1-2 in
1-2 in
1-11
/
2in
BACK SIDE
1-2 in
SIDE
1-2 in
4ft, 5ft, or 6ft Grow Tubes 2ft or 3ft Grow Tubes
FIGURE 1
© Plantra, Inc. 2015
SFII150714
FIGURE 2
1-2 in
1- 1
1
/2in Step 1 Step 2 Step 3
1-2 in
11
/
2 - 2 in
BACK SIDE
1-2 in
SIDE
1-2 in
4ft, 5ft, or 6ft Grow Tubes 2ft or 3ft Grow Tubes
BACK TOP
stake
Twist-Lock Tie
A
B
C
D
E
www.PLANTRA.com
NOTE: This method of installing support
stake inside the grow tube is recommended
for SunFlex stakes only. The SunFlex Stake
has a rounded top to avoid stem abrasion
and a small diameter to avoid crowding the
seedling inside the grow tube. Other stake
materials should never be installed inside
grow tubes as their sharp edges could
damage stems that come in contact with the
stake top and have large diameters which will
occupy important growing volume inside the
tube the tree should have.
C. Position the grow tube so the stake is
tight against the of the tube and lined-up
between the paired tie holes.
D. Press tube base rmly into soil. When
completed, the tip of the SunFlex stake
should be at least 1-2 inches above the top
tie hole and below the top of the grow tube.
IMPORTANT: Firmly tap the top of the tube
to seat the tube base into the soil. Mound
additional soil around tube base as needed to
reduce entry by rodents.
E. Attach the grow tube to the stake by
inserting a Plantra Twist-Lock tie through
top tie hole from the outside, guiding it
around the stake and back out the paired
tie hole. Twist both tie ends rmly so that
the tube and stake are tight together to
prevent the grow tube from sliding up
from contact by animals. Repeat steps for
middle and bottom tie holes.
TIP: Bend the Twist-Lock tie about 2 inches
from one end to make a “curl.” Use this end
to thread the tie into one tie hole, around the
stake and out the other tie hole.
Plantra®Grow Tube Guidelines:
SunFlex™Grow Tubes for Trees
Alternate Method: Using “other”
support stake on outside of grow tube
This method is not as strong as using SunFlex
Stakes but will accommodate other stake
materials. When choosing a stake, always
avoid natural materials prone to rot such as
bamboo and most wooden stake materials
including white or red oak. These stake types
will not last the estimated 5-7 (or more) years
most grow tubes, tree tubes and tree shelters
need to remain standing. Avoid using rigid,
non exible stakes made from wood, bamboo
or metal as these materials interfere with
normal stem development and will lead to
weaker trunks. Lastly, choose a stake length
that allows sufcient anchoring depth and
when driven into the soil is above the top tie
holes but below the top of the tube.
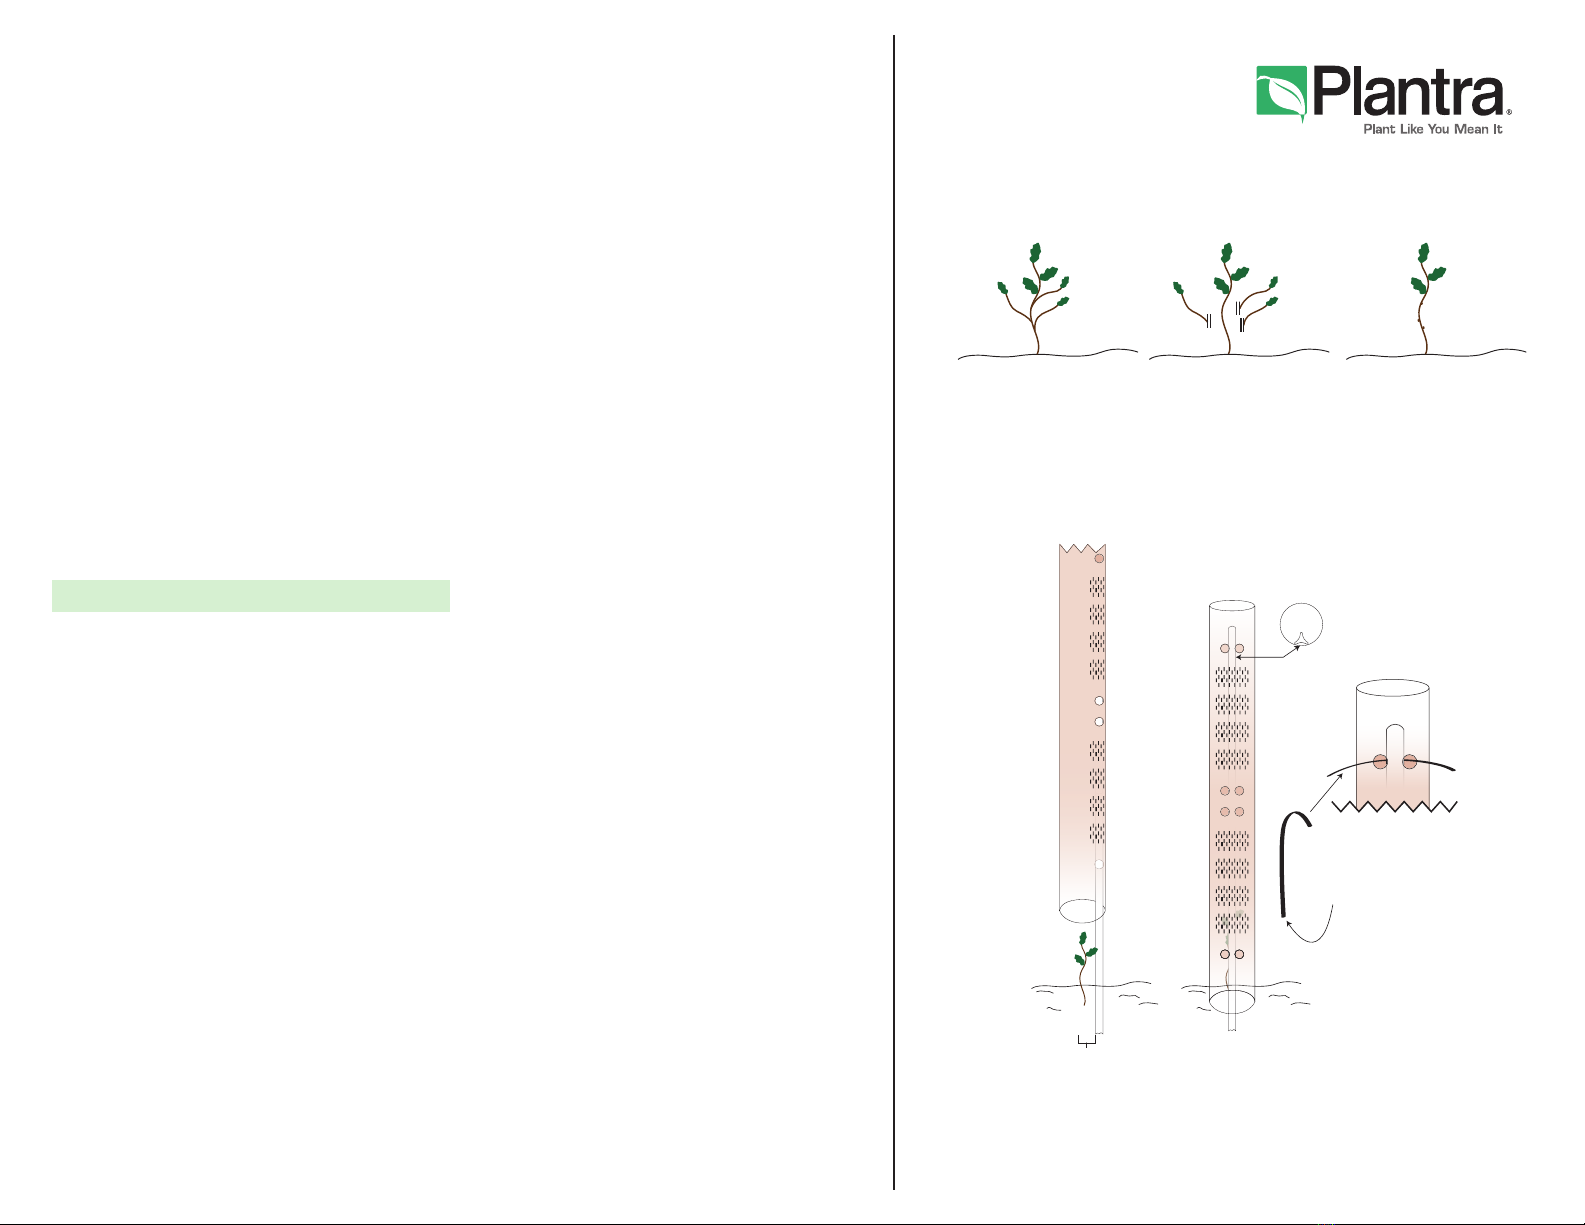
Drive stake as shown in gure 2. Position the
grow tube over the seedling to the ground
with the stake outside the tube and between
the tie-holes. Next, seat the tube bottom
rmly into the soil and mound additional soil
as needed around tube base to help prevent
entry by rodents. Thread Plantra Twist-Lock
double wire twist ties through paired tie holes,
wrap the ends around the stake and twist to
secure (see gure 3).
Step 4 – Install bird exclusion
mesh top
All SunFlex Grow Tubes 4ft tall and taller come
with exclusion mesh netting that is intended to
discourage birds from entering the tubes.
Simply stretch the netting over the tube top
like pulling on a sock. Pull the netting down to
the top tie and gently insert one or both ends
of the twist ties through the mesh to keep it
from blowing off in the wind (see gure 4).
Additional Considerations
A Word About Weed Control
Weeds and grasses steal light, water, and
nutrients from your seedlings and provide
cover for stem-girdling rodents. Every square
FIGURE 3
FIGURE 4
1-2 in
1- 1
1
/2in Step 1 Step 2 Step 3
1-2 in
1-2 in
1-11
/
2in
BACK SIDE
1-2 in
SIDE
1-2 in
4ft, 5ft, or 6ft Grow Tubes 2ft or 3ft Grow Tubes
1-2 in
1- 1
1
/2in Step 1 Step 2 Step 3
1-2 in
11
/
2 - 2 in
BACK SIDE
1-2 in
SIDE
1-2 in
4ft, 5ft, or 6ft Grow Tubes 2ft or 3ft Grow Tubes
BACK TOP
stake
Twist-Lock Tie
foot of soil is capable of producing a limited
amount of biomass growth. By controlling
weeds, growth potential is maximized. Using
Plantra SunFlex Grow Tubes will make your
seedlings easier to nd for weed control
and provide protection against weed sprays.
Plantra®SunFlex™Mulch Mats are a great way
to control weeds and offer a safe alternative to
chemicals.
Grow Tube After-Care
SunFlex Grow Tubes are designed to last for
years – until your trees are big enough to make
it on their own. In the rst season or two, new
leaves will form on the stem inside the tube
as the seedling grows. Please do not remove
these green leaves - they are important to fuel
the tree’s early growth.
During the rst season(s) be sure that the
bird exclusion mesh tops remain in place
on all tubes 4ft and taller. If any mesh tops
are missing before seedlings grow within 6
inches of the tube tops please call our Grower
Success Team at Plantra and we’ll send you
replacements free of charge. Once seedlings
get to the top of the tube the mesh tops are no
longer needed and should be removed.
To keep your trees fully protected beyond the
rst growing seasons, do not remove SunFlex
Grow Tubes until the tree trunk has grown to
the size of the tube diameter. SunFlex Grow
Tubes are perforated along two sides their
entire length, allowing the tube to split open
once the trunk diameter grows bigger than the
diameter of the tube.
Waiting until the stem grows to the size of the
tree tube diameter ensures that your tree is
“wind-rm” and ready to support itself entirely.
Doing so also allows the tube to help protect
the main trunk against damage by antler rub,
gnawing rodents or mechanical injury. Once
your trees outgrow the tube diameter the tubes
and support stakes should be removed from
the eld. SunFlex grow tubes can be recycled
and SunFlex stakes can be reused again.
© Plantra, Inc. 2015
SFII150714
www.PLANTRA.com

Other Plantra Lawn And Garden Equipment manuals

Plantra SunFlex User manual

Plantra

Plantra SunFlex User manual

Plantra Phyto-Builder Installation guide

Plantra

Plantra Phyto-Builder Installation guide

Plantra SunFlex Greenhouse Grow Tube System for... User manual

Plantra

Plantra SunFlex Greenhouse Grow Tube System for... User manual

Popular Lawn And Garden Equipment manuals by other brands

MO-EL MO-STICK INOX 372 Use and maintenance

MO-EL

MO-EL MO-STICK INOX 372 Use and maintenance

Pyle SereneLife PSLBZ8 user manual

Pyle

Pyle SereneLife PSLBZ8 user manual

Stiga SD 98 Series Operator's manual

Stiga

Stiga SD 98 Series Operator's manual

FRAME IT ALL 170001018-MD350 manual

FRAME IT ALL

FRAME IT ALL 170001018-MD350 manual

MDM SC071008JJ Assembly & operating instructions

MDM

MDM SC071008JJ Assembly & operating instructions

NATURE'S INSTRUMENTS NI-PG-403-06 quick start guide

NATURE'S INSTRUMENTS

NATURE'S INSTRUMENTS NI-PG-403-06 quick start guide

DANA 4360-20 parts list

DANA

DANA 4360-20 parts list

bellissa 95460 Assembly instructions

bellissa

bellissa 95460 Assembly instructions

Billy Goat QV550HSP owner's manual

Billy Goat

Billy Goat QV550HSP owner's manual

Toro TRX-19 Operator's manual

Toro

Toro TRX-19 Operator's manual

The Handy 905040 Assembly instructions

The Handy

The Handy 905040 Assembly instructions

Acrimo 7700 installation instructions

Acrimo

Acrimo 7700 installation instructions

YVAN BEAL YB38T instruction manual

YVAN BEAL

YVAN BEAL YB38T instruction manual

Extreme Max 3005.4095 Assembly instructions

Extreme Max

Extreme Max 3005.4095 Assembly instructions

STYRA Pergola Zip PZ440 Mounting instruction

STYRA

STYRA Pergola Zip PZ440 Mounting instruction

Makita DG002G instruction manual

Makita

Makita DG002G instruction manual

Birko BK1004101 Operation manual

Birko

Birko BK1004101 Operation manual

Schiller CLASSEN TA18AH Operators safety manual

Schiller

Schiller CLASSEN TA18AH Operators safety manual

manuals.online logo
manuals.online logoBrands
  • About & Mission
  • Contact us
  • Privacy Policy
  • Terms and Conditions

Copyright 2025 Manuals.Online. All Rights Reserved.