manuals.online logo
Brands
  1. Home
  2. •
  3. Brands
  4. •
  5. PlayMonster
  6. •
  7. Game
  8. •
  9. PlayMonster Chronobomb Nightvision User manual

PlayMonster Chronobomb Nightvision User manual

1 OR MORE PLAYERS
Ages 7 & Up
RULES OF
THE GAME
CONTENTS
OBJECT
SET UP
Sensor
Sensor
10 Gear Cards, 4 Standard Clamps, Reel Clamp with 37-ft.
String, Sensor Clamp, Sensor, 2 Pairs of UV Light Goggles,
Bomb, Rules UV Light
2 Pairs of UV
Light Goggles
Bomb
Sneak through the fantasy laser field without touching the string so you can defuse the bomb!
Note: You can play during the day, or play in the dark using the UV Light Goggles to see the strings and bomb at night!
• First, you’ll need to power the Bomb, and that requires three AAA batteries.
Same goes for your trusty night vision Goggles! See last page for details.
• Once your Bomb is powered, it’s time to set up your string laser field!
• Connect the Bomb’s wire to the Sensor. [diagram A]
• Fit the Sensor on the Sensor Clamp. [diagram B]
• Clip the Bomb and Sensor to part of your game environment (table, chair,
shelf, etc.). This will be the end destination of your string. The sensor
will need to stay as level as possible. [diagram C ]
Sensor
A
B
C
B
B
Sensor Clamp
Standard Clamp
Reel & Reel Clamp
Sensor Clamp
BEFORE YOU START YOUR MISSION
NIGHT VISION
Sensor
connection
point should
remain
centered.
• Clip the four Standard Clamps sporadically throughout the space that will be your
laser field. It’s best to clamp them to a horizontal surface, such as the edge of a
table or desktop. Keep in mind that the string will connect to each clamp.
• Note: Attach clamps to sturdy objects that will not be knocked
over easily. Avoid attaching to anything fragile or breakable.
• Take the Reel Clamp and hook the end of the string onto the Sensor.
[diagram D]
• The sensor connection point should remain centered. The string should not pull it to
where it touches the bottom or sides of sensor.
D
E
F
String should not touch the bottom or loop around.
• Press the button on the Reel Clamp and unwind the string.
• Pass the string through the connection point of each of the Standard Clamps
throughout your laser field.[diagram E]
• Attach the Reel Clamp to finish off the fantasy laser field! [diagram F]
• Once everything is installed, adjust the string tension by winding the Reel Clamp.
[diagram F]
• Place the Gear Cards all along the string laser field to increase the game’s difficulty.
The player must pick them all up before diffusing the Bomb.
Sample setup
Sample setup
• Check that the Sensor and Bomb are properly connected.
• Make sure your laser field is installed well.
• Push the switch in the back of the Bomb up, to the SINGLE position.
• Press the START button on front of the Bomb.
• Touch various locations of the string:
– If the Bomb makes a sound, it means the laser field is installed correctly!
– If the Bomb does not make any sound, check the string. It may be too tight
or too loose. Adjust and try again.
Wanna take your super spy skills to the next level? Play in the dark!
• Once you have everything set up and ready to play, put on your UV
light Goggles!
• Turn them on by using the switch on the back.
• Turn off the lights, and then look at your “laser field” to see it glow!
• Note: If it’s light outside and that light is filtering into the room, the Night
Vision will not work well. The room needs to be very dark, so playing after
sunset or in the basement is best.
TRAINING
COMPETITION
TIPS & TROUBLESHOOTING
GAME ON
Need to familiarize yourself with the laser field before going on your first secret
mission? Go ahead with a training mission!
• Switch the back of the Bomb to SINGLE.
• Press the START button on the front of the Bomb.
• Position yourself at the beginning of your laser field.
• Begin weaving through the field, avoiding touching the string. Do this like a real
spy, stepping over some strings and crawling or dipping under others. Make it
fun!
• If you touch the string, the Bomb will buzz to let you know. In this training
mode, there is no time tracking.
• Pick up the Gear Cards as you go. If you miss any, then your mission will not be
successful!
• When you make it to the Bomb, press the FINISH button to defuse it!
• More fun with SINGLE mode: Set up the string in your room to detect intruders!
When someone enters, touching the string, the Bomb will make a sound to alert
you of their presence!
Ready to go on a secret mission, with time counting down? Maybe challenge your
friends and see who’s the quickest spy? Let’s do it!
• Switch the back of the bomb down to CHRONO.
• Select the Bomb countdown, from one minute to 10 minutes, by pressing the TIME
button on the front of the Bomb.
Remember: In CHRONO mode, each time the string is touched, 20
seconds is deducted from the time! If you touch it hard enough, you
could lose up to 60 seconds!
• Maneuver through your laser field, avoiding touching the string. Do this like a real
spy, stepping over some strings and crawling or dipping under others. Make it fun!
• Pick up all of the Gear Cards as you go. Your mission will not be successful if you
don’t get all of the Cards.
• Audio cues: When the Bomb gets to only 60 seconds left on the clock, the
beeping will speed up. When it only has 30 seconds left, the beeping will speed
up even more.
• When you make it to the Bomb, press the FINISH button to defuse it! If you
made it in time, and you picked up all the Cards, you completed your mission
successfully!
• If the Bomb goes off before you get to it, or you failed to collect all of the Cards,
your mission was unsuccessful. Try again!
Spies can be competitive, so if you want to challenge your friends (or yourself),
go for it!
• Take turns going through the laser field and keep track of the Bomb time when it
gets defused (the screen will display the time).
• You want to try to be the spy who gets through the laser field the fastest. This
means you want the most time left on the Bomb countdown when you defuse it.
• Who had the best time? You are the best secret spy!
• Who sets up the laser field if multiple players are going to compete? Everyone
helps! Or take turns making different laser fields!
• Challenge yourself to get quicker going through your laser field. A spy can never be
too good, right?
• If your string is falling off of the Clamps, try adjusting the tension. It may be
too tight or too loose.
• If the Sensor falls off of its Clamp, adjust the Clamp location or adjust the
string tension.
• If the Bomb keeps making noise or counting down in chunks of time as if the string
is being touched, but it isn’t, check that the Sensor is level. If it is not level, this will
affect its sensitivity.
• When setting up your laser field, be sure to place clamps higher and lower so you
get a good variety of heights to maneuver through.
• Attach the Clamps to sturdy, stationary items that will not move easily.
• It is best to clamp the Standard Clamps to a horizontal surface, such as the edge
of a table or desktop. Clamping to a vertical edge like a table leg may cause
poor performance.
• When passing the string through the connection point of the Clamps, try to position
it close to the top, not touching the flat base as it curves around the connector.
• Try to avoid attaching Clamps at fully opened position. If the item you are clamping
onto is too big, and the Clamp cannot “give” and “grab,” it may pull off easily.
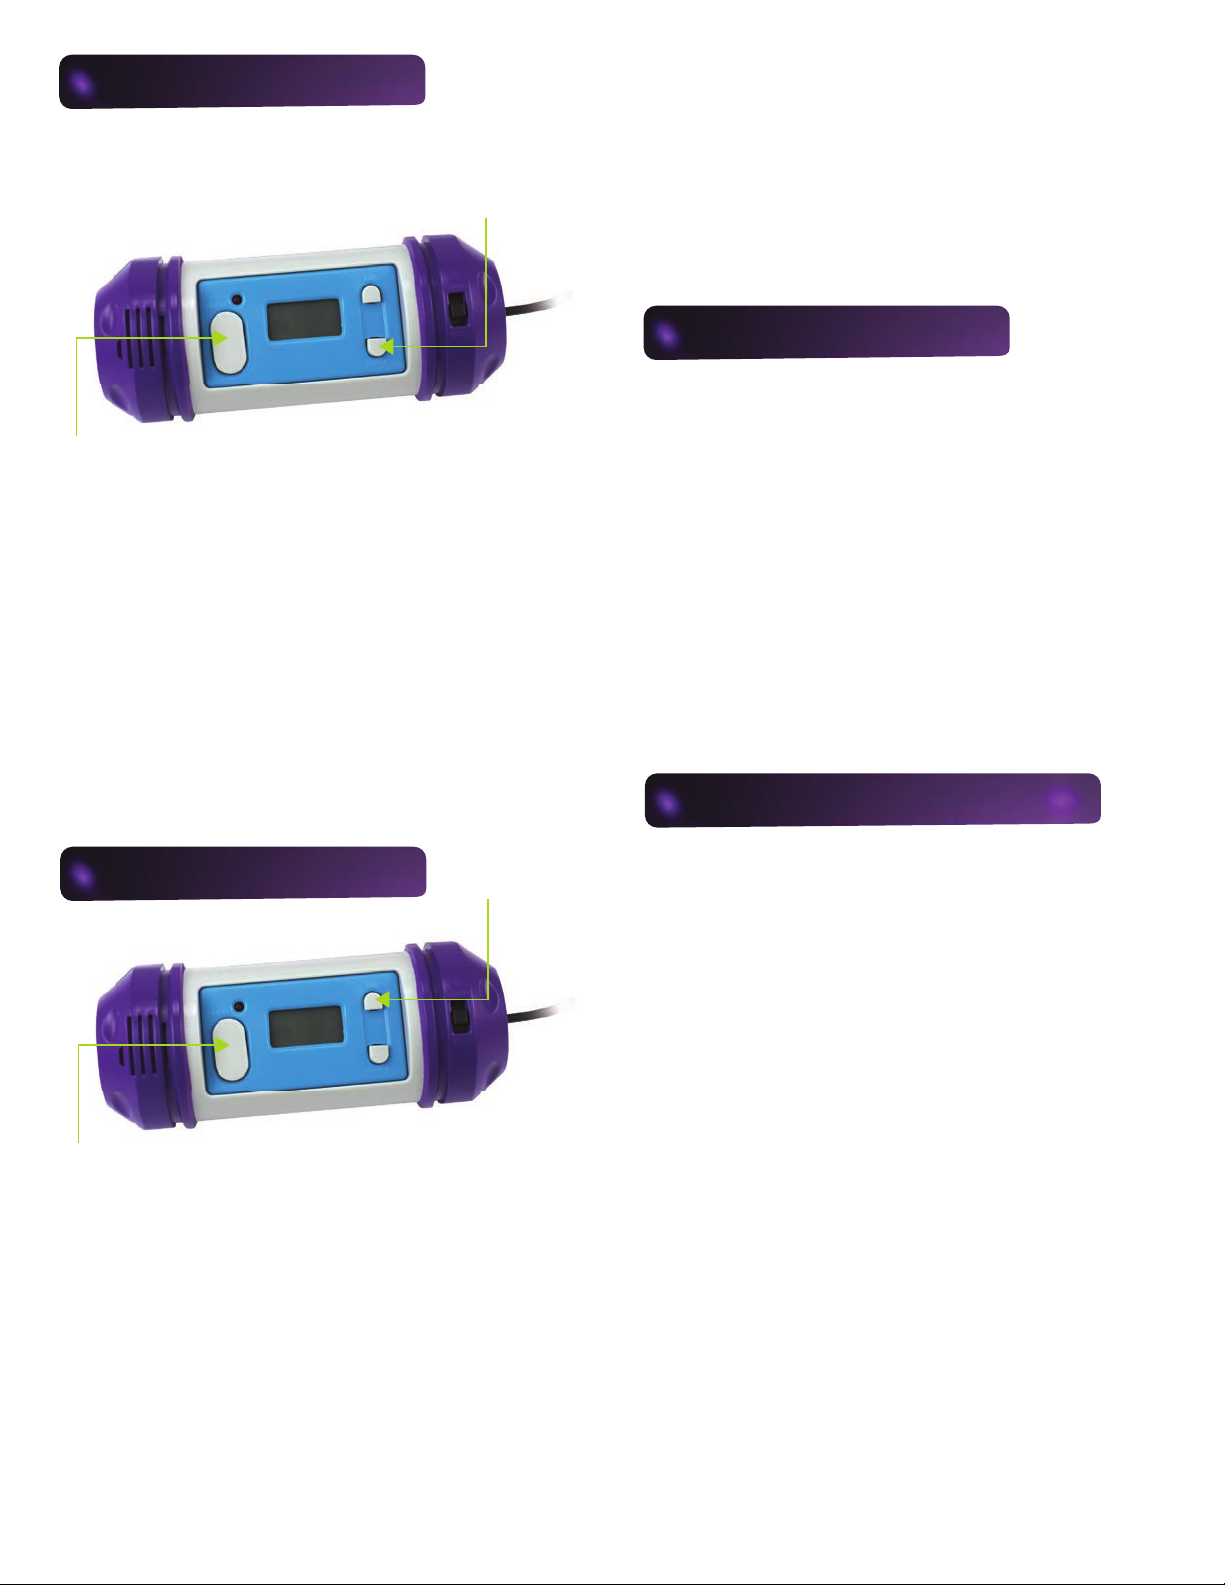
Start Button
Finish Button
Time Button
Finish Button
Contact us at:
Customer Service
1400 E. Inman Pkwy., Beloit, WI 53511
playmonster@playmonster.com | 1-800-524-4263
For more fun, visit playmonster.com
This device complies with Part 15 of the FCC Rules. Operation is subject to the following two conditions:
(1) this device may not cause harmful interference, and (2) this device must accept any interference
received, including interference that may cause undesired operation.
NOTE: This equipment has been tested and found to comply with the limits for a Class B digital device,
pursuant to Part 15 of the FCC Rules. These limits are designed to provide reasonable protection against
harmful interference in a residential installation. This equipment generates, uses and can radiate radio
frequency energy and, if not installed and used in accordance with the instructions, may cause harmful
interference to radio communications. However, there is no guarantee that interference will not occur in a
particular installation. If this equipment does cause harmful interference to radio or television reception,
which can be determined by turning the equipment off and on, the user is encouraged to try to correct the
interference by one or more of the following measures:
•
Reorient or relocate the receiving antenna.
•
Increase the separation between the equipment and receiver.
•
Connect the equipment into an outlet on a circuit different from that to which the receiver is connected.
•
Consult the dealer or an experienced radio/TV technician for help.
Please note that changes or modifications not expressly approved by the party
responsible for compliance could void the user’s authority to operate the equipment.
© 2018 PlayMonster LLC,1400 E. Inman Pkwy., Beloit, WI 53511 USA.
Made in China. All rights reserved. Chrono Bomb Night Vision and
Mission: Cross the Laser Field Before It’s Too Late are trademarks of
DUJARDIN, Z.A du Pôt au Pin, Entrepôt A4,
33610 Cestas – France. Parts and colors
may vary from those shown.
BATTERY INSTALLATION
Bomb Battery
Installment
Goggles Battery
Installment
• Alkaline batteries are recommended for best performance. Remove the battery cover using a
screwdriver and insert three AAA batteries, as shown. Then screw the battery cover back on.
• Note: The Bomb and Goggles will not function if the batteries are inserted incorrectly. Test
the Bomb by sliding the ON/OFF switch down to CHRONO and tap the TIME button on front.
If the Bomb turns on, you are good to go! If the Bomb does not work, slide the switch to
OFF and recheck the batteries.
• To test the Goggles, simply switch them to ON to see if the light turns on.
• Note: When not playing, keep the switch on the bomb in the middle position of OFF to
conserve your batteries! Also keep the Goggles switch in the OFF position when not in use.
© 2018 PlayMonster LLC,1400 E. Inman Pkwy., Beloit, WI 53511 USA.
Chrono Bomb Night Vision
and
are trademarks of
BATTERY INFO
BATTERY SAFETY INFORMATION
In exceptional circumstances, batteries may leak uids that can cause a chemical burn injury or ruin your
product.To avoid battery leakage:
• Adult supervision is recommended when changing batteries.
• Non-rechargeable batteries are not to be recharged.
• Rechargeable batteries are to be removed from the toy before being charged (if designed to be removable).
• Rechargeable batteries are only to be charged under adult supervision (if designed to be removable).
• Do not mix alkaline, standard (carbon-zinc), or rechargeable (nickel-cadmium) batteries.
• Do not mix old and new batteries.
• Only batteries of the same or equivalent type as recommended are to be used.
• Batteries are to be inserted with the correct polarity.
• Exhausted batteries are to be removed from the toy.
• The supply terminals are not to be short-circuited.
• Dispose of battery(ies) safely.
• Batteries may explode or leak if disposed of in a re.
We wanna hear about
all the fun you had!
7014
Keep these instructions for future reference as they contain important information.

Other PlayMonster Game manuals

PlayMonster OranguTwang User manual

PlayMonster

PlayMonster OranguTwang User manual

PlayMonster DRONE HOME User manual

PlayMonster

PlayMonster DRONE HOME User manual

PlayMonster Lauri Tall-Stackers Pegs & Pegboard Set User manual

PlayMonster

PlayMonster Lauri Tall-Stackers Pegs & Pegboard Set User manual

Popular Game manuals by other brands

Hasbro Cover to Cover instructions

Hasbro

Hasbro Cover to Cover instructions

MGA Entertainment BIG SCREEN GAMES 549215 quick start guide

MGA Entertainment

MGA Entertainment BIG SCREEN GAMES 549215 quick start guide

Disney High School Musical instructions

Disney

Disney High School Musical instructions

Playcraft PTBARWOS08-Barcelona Assembly instructions

Playcraft

Playcraft PTBARWOS08-Barcelona Assembly instructions

Hathaway Maverick II BG50390 Assembly instructions

Hathaway

Hathaway Maverick II BG50390 Assembly instructions

Learning Resources Three Bear Family manual

Learning Resources

Learning Resources Three Bear Family manual

Playskool Playskool Bulls-Eye Bounce and Roll Game manual

Playskool

Playskool Playskool Bulls-Eye Bounce and Roll Game manual

GeoSafari Talking Globe Instruction guide

GeoSafari

GeoSafari Talking Globe Instruction guide

Protocol TOTALLY BUZZED instruction manual

Protocol

Protocol TOTALLY BUZZED instruction manual

Circuit Blox 11S instruction manual

Circuit Blox

Circuit Blox 11S instruction manual

Hasbro Beyblade 85958 owner's manual

Hasbro

Hasbro Beyblade 85958 owner's manual

Tippmann Alpha black ELITE owner's manual

Tippmann

Tippmann Alpha black ELITE owner's manual

Tiger Wheel of Fortune Deluxe Control guide

Tiger

Tiger Wheel of Fortune Deluxe Control guide

PoolMaster Pro Rebounder 72783 quick start guide

PoolMaster

PoolMaster Pro Rebounder 72783 quick start guide

Parker Brothers Boggle instructions

Parker Brothers

Parker Brothers Boggle instructions

Saitek Mephisto Maestro Travel Chess Computer instructions

Saitek

Saitek Mephisto Maestro Travel Chess Computer instructions

Hasbro Fantastic Gymnastics manual

Hasbro

Hasbro Fantastic Gymnastics manual

Carmelli NG4009H Assembly instructions

Carmelli

Carmelli NG4009H Assembly instructions

manuals.online logo
manuals.online logoBrands
  • About & Mission
  • Contact us
  • Privacy Policy
  • Terms and Conditions

Copyright 2025 Manuals.Online. All Rights Reserved.