FR
Précautions
Veuillez lire attentivement les informations de ce mode d’emploi et de l’emballage du produit
avant toute utilisation. Veuillez également prendre connaissance du mode d’emploi du système
PlayStation®. Merci de conserver toute la documentation afin de pouvoir vous y référer à l’avenir.
Sécurité
ˎObservez tous les avertissements, précautions et instructions.
ˎRISQUE D’ÉTOUFFEMENT - Petites pièces. Gardez hors de portée des jeunes enfants.
Utilisation et manipulation
ˎArrêtez immédiatement d’utiliser le système en cas de fatigue, de gêne ou de douleur lors de
l’utilisation du casque-micro. Si les symptômes persistent, consultez un médecin.
ˎÉvitez l’utilisation prolongée du casque-micro. Faites une pause environ toutes les 30 minutes.
ˎL’utilisation du casque-micro à un volume trop élevé peut entraîner une perte d’audition
permanente. Réglez le volume à un niveau qui ne présente aucun risque. Bien qu’avec le temps
un volume audio élevé puisse paraître normal, il n’en demeure pas moins que le risque de perte
d’audition reste présent. Si vous ressentez des sifflements dans les oreilles ou que les voix vous
paraissent être étouffées, arrêtez immédiatement l’écoute et consultez un spécialiste pour
passer un audiogramme. Plus le volume est élevé, plus vite votre ouïe en subira les
conséquences. Pour protéger votre ouïe :
ˋLimitez la durée d’utilisation du casque-micro à des volumes sonores élevés.
ˋÉvitez d’augmenter le volume dans le but d’étouffer les environnements bruyants.
ˋBaissez le volume si vous n’entendez pas les gens parler autour de vous.
ˎN’utilisez pas le casque-micro s’il provoque une gêne à votre peau. Si c’est le cas, arrêtez
immédiatement de l’utiliser.Si les symptômes persistent, même après l’arrêt, consultez un
médecin.
ˎN’exposez pas le casque-micro à des températures élevées, une humidité excessive ou au
rayonnement direct du soleil.
ˎNe posez aucun objet lourd sur le casque-micro.
ˎNe laissez aucun liquide ou petite particule entrer dans le casque-micro.
ˎNe lancez pas le casque-micro,ne le laissez pas tomber et ne le soumettez pas à des chocs
physiques violents.
ˎNe laissez aucun objet en caoutchouc ou en vinyle au contact extérieur du casque-micro
pendant une période prolongée.
ˎEssuyez le casque-micro à l’aide d’un chiffon doux et sec. N’utilisez aucun solvant ou autre
produit chimique.
ˎN’utilisez aucun chiffon ayant été traité chimiquement.
ˎNe démontez pas ou n’insérez rien à l’intérieur du casque-micro pour éviter d’endommager les
composants internes ou de vous blesser.
ˎObservez toute indication d’éteindre les appareils électriques ou radiophoniques dans certains
endroits, notamment dans des stations service ou des points de ravitaillement en carburant,aux
alentours des hôpitaux ou des zones de dynamitage, dans des atmosphères potentiellement
explosives ou encore dans des aéronefs.
Déclaration de la FCC
Remarque
Cette unité a été testée et jugée conforme aux normes stipulées par l’article 15 des règlements de
la FCC pour un appareil numérique de catégorie B.
Ces normes sont établies afin d’offrir une protection raisonnable contre toute possibilité de
brouillage préjudiciable dans une installation résidentielle.Cette unité produit, utilise et peut
émettre une énergie radioélectrique,et si elle n’est pas installée et utilisée conformément aux
instructions, pourrait causer un brouillage préjudiciable à la radiocommunication. Il est toutefois
impossible de garantir qu’il n’y aura pas de brouillage préjudiciable dans une installation donnée.
Si cette unité cause un brouillage préjudiciable à la réception radio ou télévisuelle, ce qui peut
être déterminé en mettant l’appareil hors tension puis sous tension, l’utilisateur est encouragé à
tenter de corriger le brouillage en prenant l’une ou plusieurs des mesures proposées suivantes :
ˎRéorienter ou déplacer l’antenne de réception.
ˎÉloigner l’unité du récepteur.
ˎConnecter l’appareil à une prise sur un autre circuit que celui auquel le récepteur est connecté.
ˎDemander de l’aide au détaillant ou à un technicien radio/télévision spécialisé.
Aucun changement ou modification n’est permis sans avoir été approuvé par les parties
responsables des règlementations qui sont en droit d’interdire l’utilisation de ce produit par
l’utilisateur.
Pour toute assistance avec ce produit, visitez notre site Web à l’adresse
www.us.playstation.com/support/stereoheadset ou appelez le service
consommateurs SCEA au 1-800-345-7669.
Déclaration de conformité
Nom commercial : Sony Computer Entertainment America LLC
N° de modèle : CECHYA-0087
Partie responsable : Sony Computer Entertainment America LLC
Adresse : 2207 Bridgepointe Parkway, San Mateo, CA 94404 U.S.A.
N° de téléphone : 650-655-8000
Cet appareil est conforme aux stipulations de l’article 15 des règlements de la FCC et
CNR-Gen des règles IC.
Son opération est sous réserve des deux conditions suivantes:
(1) cet appareil ne peut pas causer de brouillage préjudiciable et (2) cet appareil doit
accepter le brouillage préjudiciable reçu, y compris un brouillage qui pourrait causer son
fonctionnement irrégulier.
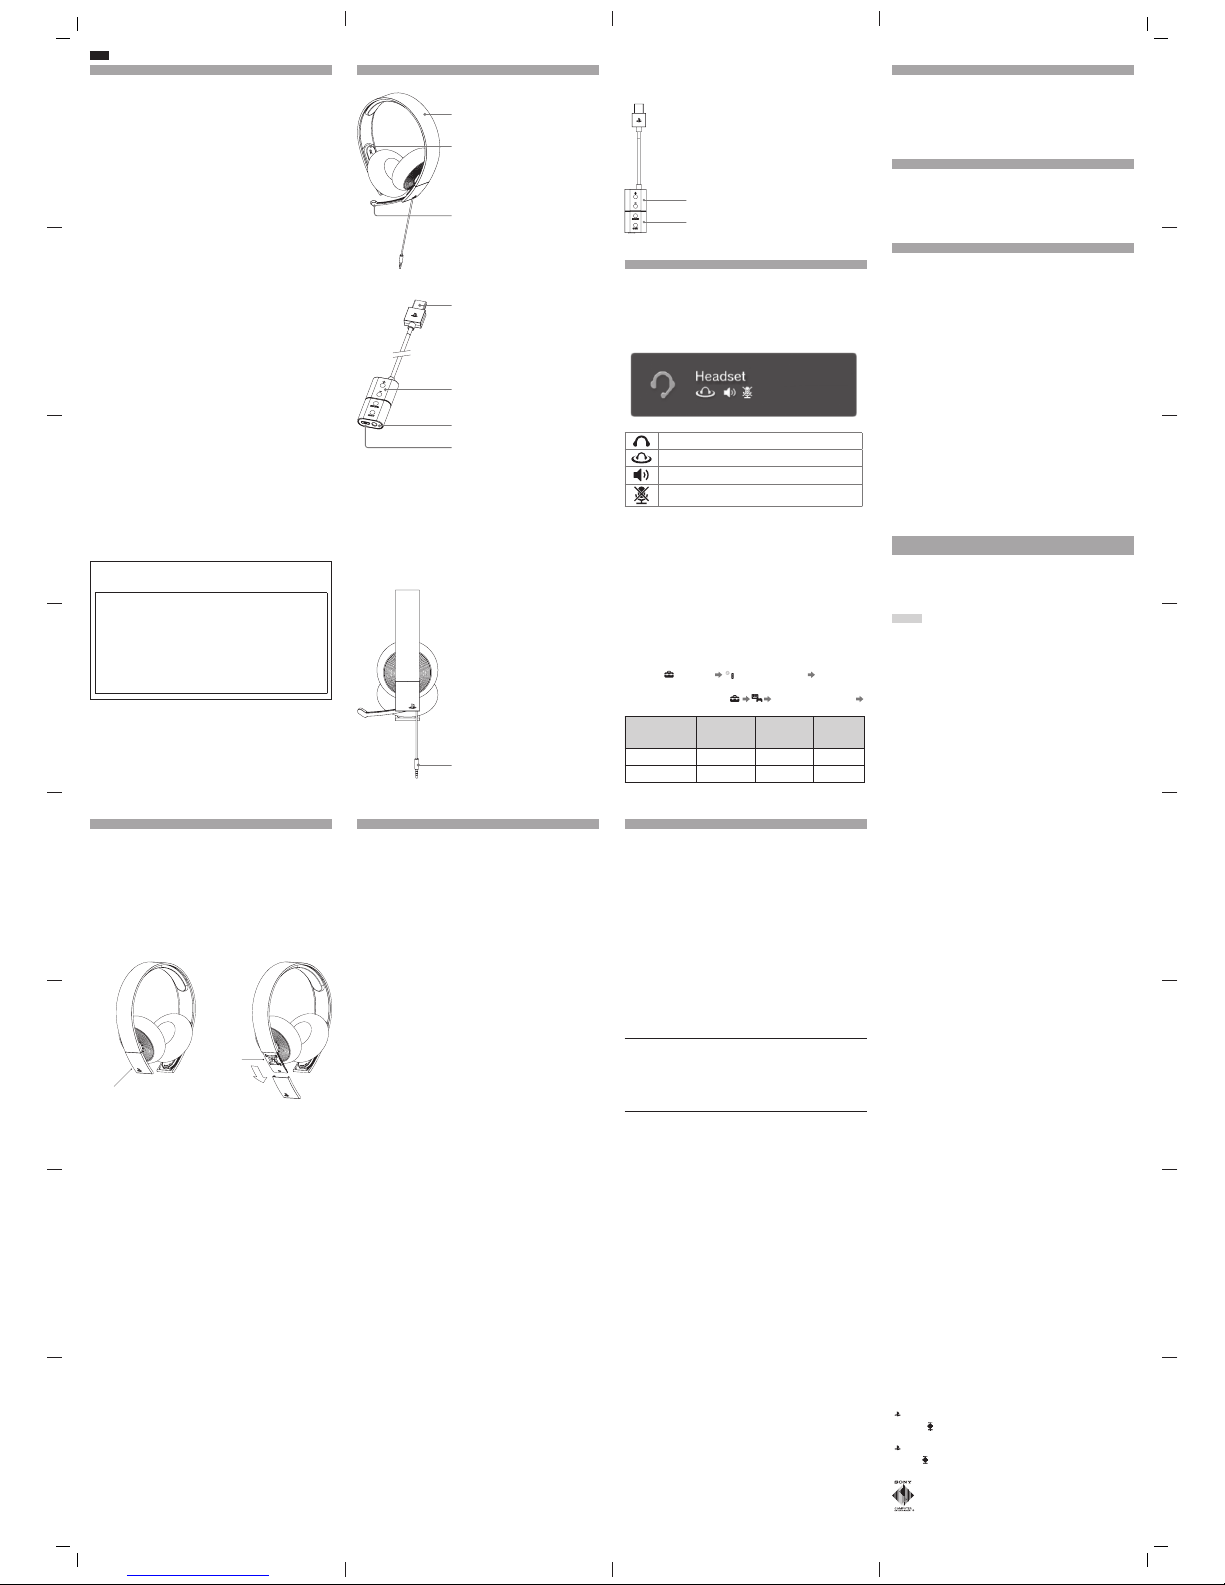
Nom et fonction des pièces
Avant
Microphone
Pour parler,déplacez le microphone vers le bas
jusqu’à ce qu’il clique en position.
Pour mettre le microphone en sourdine, placez-le en
position relevée.
Nous vous recommandons d’éloigner le casque des
haut-parleurs lorsque le microphone est allumé, car
cela peut entraîner un retour audio.
Serre-tête
R (droite)
Télécommande
Touches volume +/-
Règlent le volume du casque-micro.
Dessous
Fiche audio
Télécommande
Cette télécommande se connecte au système PlayStation®3 ou PlayStation®4 pour activer des
fonctions uniques. Ces fonctions incluent l’ajout d’un nouveau profil sonore (son virtuel
ambiophonique 7.1), l’amplification du volume du clavardage et l’affichage des notifications à
l’écran.
Touches volume +/-
Règlent le volume du casque-micro.
Préparation
1 Mettez votre système PS3™ ou PS4™ sous tension.
2 Assurez-vous que le casque-micro est connecté à la télécommande, puis
insérez le connecteur USB de la télécommande dans le port USB du système.
Affichage du statut
Lorsque vous connectez le casque-micro à un système PlayStation® ou utilisez
l’application compagnon pour en modifier les paramètres,les informations de
statut suivantes s’affichent dans le coin supérieur droit de l’écran :
S’affiche quand [Extension audio du casque-micro stéréo] est réglé
sur [Oui] *
S’affiche quand l’ambiophonie virtuelle est activée
Indique le niveau du volume
Indique que le microphone est désactivé
*Le réglage Stereo Headset Audio Extension est un paramètre système qui permet de
régler le type de sortie audio vers le casque-micro. Il est disponible seulement lorsque la
télécommande est connectée au port USB du système PlayStation®.
Remarque
La compatibilité avec les systèmes PS4™ et PS3™ peut nécessiter une mise à jour
du logiciel système.
Sélection de la sortie audio
Ce casque-micro stéréo avec fil vous permet d’écouter l’audio de votre système
PlayStation® en son virtuel ambiophonique, y compris de la musique ainsi que
l’audio des vidéos et des jeux.
ˋVous pouvez écouter simultanément l’audio des jeux et du clavardage. Vous
pouvez ajuster le niveau sonore des jeux par rapport à celui du clavardage en
utilisant les touches SOUND/CHAT.
ˋVous pouvez modifier les paramètres de sortie audio vers le casque pour vous
permettre d’entendre uniquement l’audio du clavardage.
Vous pouvez également changer les paramètres de sortie audio et activer ou
désactiver la touche VSS et les touches SOUND/CHAT. Sur un système PS3™
sélectionnez (Paramètres) (Paramètres accessoires) [Extension
audio du casque-micro stéréo].
Pour le système PS4™, sélectionnez [Paramètres de sortie audio]
[Sortie au casque-micro].
Extension audio du
casque-micro stéréo
(PS3) / Sortie au
casque-micro (PS4)
Sortie audio au
casque-micro
Touche VSS
(ambiophonie
virtuelle)
Touches
SOUND/CHAT
Oui Toutes les
sorties audio Activée Activée
Non Conversation
audio seule Désactivée Désactivée
Effet local
La fonction d’effet local vous permet d’entendre votre propre voix dans le
casque-micro.
Pour faire défiler les paramètres de l’effet local, maintenez les touches VSS et CHAT
simultanément enfoncées pendant 3 secondes.
Un bip signifie que vous avez sélectionné un volume d’effet local faible, deux bips
signifient un volume d’effet local fort et un bip faible signifie que vous avez
désactivé l’effet local.
Application compagnon pour casque-micro
Avec l’application compagnon pour casque-micro, vous pouvez sélectionner un
mode audio supplémentaire pour votre casque-micro. Il y a plusieurs modes parmi
lesquels choisir, chacun optimisé pour améliorer différentes caractéristiques audio.
Ces modes sont développés exclusivement pour être utilisés avec les systèmes
PlayStation®.
Pour obtenir l’un de ces modes audio, téléchargez l’application compagnon du
casque-micro dans PlayStation®Store et suivez les instructions qui apparaissent à
l’écran.
Mise à jour du mode audio
Avant de mettre à jour le mode audio,assurez-vous que le casque-micro soit
connecté à la télécommande et que celle-ci ne soit pas connectée au système.
Pour faire une mise à jour du mode audio sur un système PS3™
1 Connectez la télécommande au port USB du système.
2 Lancez l’application compagnon du casque-micro.
3 Sélectionnez le casque-micro approprié dans l’écran de l’application
compagnon du casque-micro.
4 Sélectionnez le mode audio désiré.
• Si vous souhaitez charger un nouveau mode audio dans votre casque-micro,
sélectionnez-le et suivez les instructions à l’écran.
• Si vous souhaitez rétablir les paramètres par défaut du casque-micro,
appuyez sur la touche SELECT de votre manette, puis sélectionnez
PARAMÈTRES PAR DÉFAUT.
5 Après que le mode audio a été chargé dans le casque-micro, vous pouvez
quitter l’application compagnon.
Pour faire une mise à jour du mode audio sur un système PS4™
1 Tout en maintenant enfoncée la touche VSS du casque-micro, connectez la
télécommande au port USB du système.
2 Lancez l’application compagnon du casque-micro.
3 Sélectionnez le casque-micro approprié dans l’écran de l’application
compagnon du casque-micro.
4 Sélectionnez le mode audio désiré.
• Si vous souhaitez charger un nouveau mode audio dans votre casque-micro,
sélectionnez-le et suivez les instructions qui apparaissent à l’écran.
• Si vous souhaitez rétablir les paramètres par défaut du casque-micro, appuyez
sur la touche OPTIONS de votre manette,puis sélectionnez PARAMÈTRES PAR
DÉFAUT.
5 Après que le mode audio a été téléchargé vers le casque-micro, vous pouvez
quitter l’application compagnon.
Utilisation du casque-micro avec un ordinateur personnel
ou un appareil portable
Vous pouvez utiliser le casque-micro pour écouter de la musique et utiliser la
fonction de clavardage vocal avec un PC Windows ou un Mac OS,un périphérique
portable ou d’autres appareils dotés d’une sortie audio. Déconnectez la fiche audio
de la télécommande et insérez-la dans la sortie audio de l’appareil.
Pour plus d’informations sur l’utilisation du casque-micro, visitez la page
us.playstation.com/support/stereoheadset
Conseils
ˎCe casque peut ne pas fonctionner avec certains ordinateurs ou appareils
portables.
ˎCertaines fonctions peuvent ne pas fonctionner avec certains ordinateurs ou
appareils portables.
ˎLa touche VSS et les touches SOUND/CHAT ne peuvent être utilisées que lorsque
le casque-micro est connecté à un système PlayStation®.
ˎLorsque le câble audio du casque-micro est débranché de la télécommande et
connecté directement à un appareil, la touche VSS et les touches SOUND/CHAT ne
sont pas utilisables.
ˎLe volume sonore varie en fonction de l’appareil connecté. Ajustez le volume en
conséquence.
ˎVous pouvez connecter le câble audio du casque-micro pour écouter du contenu
audio et pour parler.
ˎSi votre appareil est conçu uniquement pour les câbles audio standard, vous ne
pourrez pas utiliser ce casque-micro pour des communications vocales.
Étiquette de classe
L’étiquette de classe comprend des renseignements précis sur le modèle, le
fabricant et la conformité. L’étiquette est située sous une plaque à la droite du
serre-tête.
Pour retirer la plaque et accéder à l’étiquette de classe :
1 Glissez le coussinet droit complètement vers le haut.
2 Tenez le casque-micro à l’envers. Tenez le coussinet dans le creux de vos
mains, de manière à placer vos pouces sur le haut de la plaque.
3 Poussez la plaque vers l’avant à l’aide de vos pouces, jusqu’à ce que la
plaque se libère.
Pour replacer la plaque, glissez-là dans le casque-micro jusqu’à ce qu’elle
s’enclenche.
Spécifications
Température de fonctionnement 5 °C à 35 °C (41 °F à 95 °F)
Dimensions (l/h/p) Casque-micro stéréo avec fil - argent:
178,3 x 191,5 x 48 mm (7,0 x 7,7 x 1,9 in)
(0,7 × 0,3 × 1,4 in)
Poids Casque-micro stéréo avec fil - argent :
environ 295,4 g (10,4 oz)
Contenu Casque-micro stéréo avec fil - argent (1)
Télécommande (1)
Guide de mise en route (1)
Guide de sécurité et de support technique (1)
La conception et les spécifications peuvent faire l’objet de modifications sans préavis.
Avant de mettre au rebut le casque-micro stéréo avec fil
Ce casque-micro stéréo avec fil est composé de plastiques et de métaux. Suivez les règlements
applicables de votre région lorsque vous souhaitez mettre ce casque-micro au rebut. Les produits
Sony peuvent être recyclés gratuitement aux États-Unis et au Canada en les déposant dans un
centre de recyclage.
Consultez www.sony.com/ecotrade et www.eco.sony.ca pour plus de détails.
GARANTIE LIMITÉE
Sony Computer Entertainment America LLC ("SCEA") garantit à l’acheteur original que ce produit
ne présentera aucun vice matériel ou de fabrication pendant une période d’un (1) an à compter
de la date d’achat.Cette garantie ne couvre pas les consommables (tels que les batteries ou les
piles). Pour tout défaut de matériel ou de fabrication constaté ou survenant durant la période de
garantie, SCEA accepte pendant une période d’un (1) an et sur présentation d’une preuve d’achat,
de réparer ou de remplacer ce produit, selon le choix de SCEA,par un produit neuf ou recertifié
par l’usine. Aux fins de cette Garantie limitée, le terme "recertifié par l’usine" signifie un produit
retourné à ses spécifications originales. Visitez http://www.us.playstation.com/support ou
appelez le 1-800-345-7669 pour recevoir une autorisation de retour de produit et des instructions
d’expédition.Cette garantie ne s’applique plus si le vice du produit SCEA a été causé par abus,
mauvais traitement, négligence ou dommages non liés aux matériels ou à la fabrication.
CETTE GARANTIE REMPLACE TOUTES LES AUTRES ET AUCUNE AUTRE REPRÉSENTATION OU
RÉCLAMATION DE TOUTE NATURE NE DEVRA LIER OU OBLIGER SCEA. TOUTES GARANTIES
IMPLICITES SUR CE PRODUIT, Y COMPRIS DES GARANTIES SUR LA QUALITÉ MARCHANDE OU LE
CARACTÈRE UTILISABLE DE CE PRODUIT POUR UN BUT PRÉCIS, SONT LIMITÉES À LA PÉRIODE D’UN
(1) AN SUSMENTIONNÉE. EN AUCUN CAS, SCEA N’ASSUMERA DE RESPONSABILITÉ PAR RAPPORT
AUX DOMMAGES CONSÉQUENTS OU ACCESSOIRES RÉSULTANT DE LA POSSESSION, DE
L’UTILISATION OU DU MAUVAIS FONCTIONNEMENT DE CE PRODUIT SCEA. CERTAINS ÉTATS OU
PROVINCES NE PERMETTENT PAS DE LIMITES SUR LA DURÉE D’UNE GARANTIE IMPLICITE ET
QUELQUES ÉTATS NE PERMETTENT PAS L’EXCLUSION OU DES LIMITES DE TOUT DOMMAGE
INDIRECT OU ACCESSOIRE. IL EST DONC POSSIBLE QUE LES LIMITES OU LES EXCLUSIONS
SUSMENTIONNÉES NE S’APPLIQUENT PAS.
Cette garantie vous confère des droits légaux précis et vous pouvez également posséder d’autres
droits pouvant varier d’état en état ou de province en province.
Cette garantie n’est applicable qu’aux États-Unis et au Canada.
Le casque-micro stéréo avec fil pour systèmes PlayStation® apporte un son dynamique à votre
expérience de divertissement. Si vous obtenez des résultats inattendus avec ce produit,
contactez-nous avant de le retourner à votre détaillant.
Pour plus d’informations ou pour de l’assistance avec ce produit, visitez
http://us.playstation.com/support/stereoheadset
ou appelez le service consommateurs SCEA au 1-800-345-7669.
“ ” and “PlayStation” are registered trademarks of Sony Computer Entertainment Inc.
“SONY” and “ ” are registered trademarks of Sony Corporation.
“” et "PlayStation”sont des marques déposées de Sony Computer Entertainment Inc.
“SONY” et “ ” sont des marques déposées de Sony Corporation.
© 2014 Sony Computer Entertainment America, LLC. All rights reserved.
© Sony Computer Entertainment America LLC, 2014. Tous droits réservés.
Touche VSS (Audio VSS)
L’effet du son virtuel ambiophonique est activé par
défaut. Appuyez sur la touche en la maintenant
enfoncée pendant plus d’une seconde pour activer
ou désactiver l’effet.
Effet local
Les touches VSS et CHAT permettent également de
contrôler la fonction d’effet local, qui vous permet
d’entendre votre propre voix dans le casque-micro.
Pour changer les paramètres de l’effet local, appuyez
sur les touches VSS et CHAT simultanément en les
maintenant enfoncées pendant 3 secondes.
Un bip signifie que vous avez sélectionné un volume
d’effet local faible, deux bips signifient un volume
d’effet local fort et un bip faible signifie que vous
avez désactivé l’effet local.
Étiquette
de classe
Plaque amovible
Touches SOUND/CHAT (Son/Clavardage)
Règlent le volume du clavardage par rapport au volume
sonore du jeu.
Connecteur USB
Se connecte au port USB du système.
Sortie audio
Permet de connecter la fiche audio du casque-micro.
Terra Manual_10.indd 2 11/24/14 12:56 PM