plenti SOLAR Asgoft ASE-1000 User manual

Contents
(V1.0)
1
2-3
4
4
5
5-6
6
7
7
8
8
8
9
9
9
9
10
10
10-11
11
12
12
12-13
12
13
13-14
13-14
14
14-15
15
15-16
17
16-17
Disposal
...............................................................................................................................
1. Intelligent Lithium Battery Pack
..........................................................................................
Asgoft App Download
.......................................................................................................
1.1 Specifications
...............................................................................................................
1.2 Packing List
.................................................................................................................
Disclaimer
............................................................................................................................
Safety Guidelines
..................................................................................................................
4. Operation Mode 1 - Balcony Photovoltaic Storage System
....
...............................................
3.2 Product Showcase
.....................................................................................................
..
.
1.3 Important Notes
............................................................................................................
2. Split Inverter
.....................................................................................................................
3.1 Specifications
...............................................................................................................
2.1 Specifications
...............................................................................................................
1.4 Product Display
.............................................................................................................
4.4 Instructions for Use
....................................................................................................
...
.
Charging
...............................................................................................................
...
......
Discharging
...................................................................
.........................................
......
.
2)Automatic Mode
.
.......................................................................
..
............................
5. Operating Mode 2 - Portable Power Station
..........................................
..............................
5.1 System Configuration
....................................................................................................
4.3 System Combination Display
....
..................................................................................
.
..
4.2 Product Installation
..
....................................................................................................
4.1 System Configuration
....................................................................................................
2.2 Packing List
.................................................................................................................
3. Smart Plug
........................................................................................................................
2.3 Product Display
............................................................................................................
1)Manual Mode
....
......................................................................................................
5.2 Product Combination Display
........................................................................................
5.3 Instructions for Use
...................................................................
................................
...
.
2)Stacking Mode
.
.......................................................................
..
..............................
6. Frequently Asked Questions
..........................................
.....................................................
7. Maintenance and Care
.......................................................................................................
18
8. Customer Support
..............................................................................................................
1)Battery Replacement Mode
....
..................................................................................
Asgoft ASE-1000 | User Manual
www.plentisolar.de

Disclaimer
To protect the legitimate rights and interests of users, please carefully read the user manual of this
product before use, to ensure correct usage after full understanding. After reading, please keep
the user manual properly for future reference. If this product is not used correctly, you may cause
serious injury to yourself or others, or damage to the product and property loss. Once you start
using this product, it is deemed that you have read, understood, recognized, and accepted all the
terms and content of the product instructions, disclaimer, and safety instructions. The user under-
takes to be responsible for their own actions and all consequences arising therefrom. Asgoft is not
responsible for any losses caused by users not using the product in accordance with the user
manual.
In the event of force majeure such as lightning, earthquake, flood, etc., causing damage to the
product or property loss, or if the use of the Balcony Photovoltaic Storage System is not compliant
due to local policies, all consequences shall be borne by the user, and Asgoft is not responsible for
any losses caused thereby.
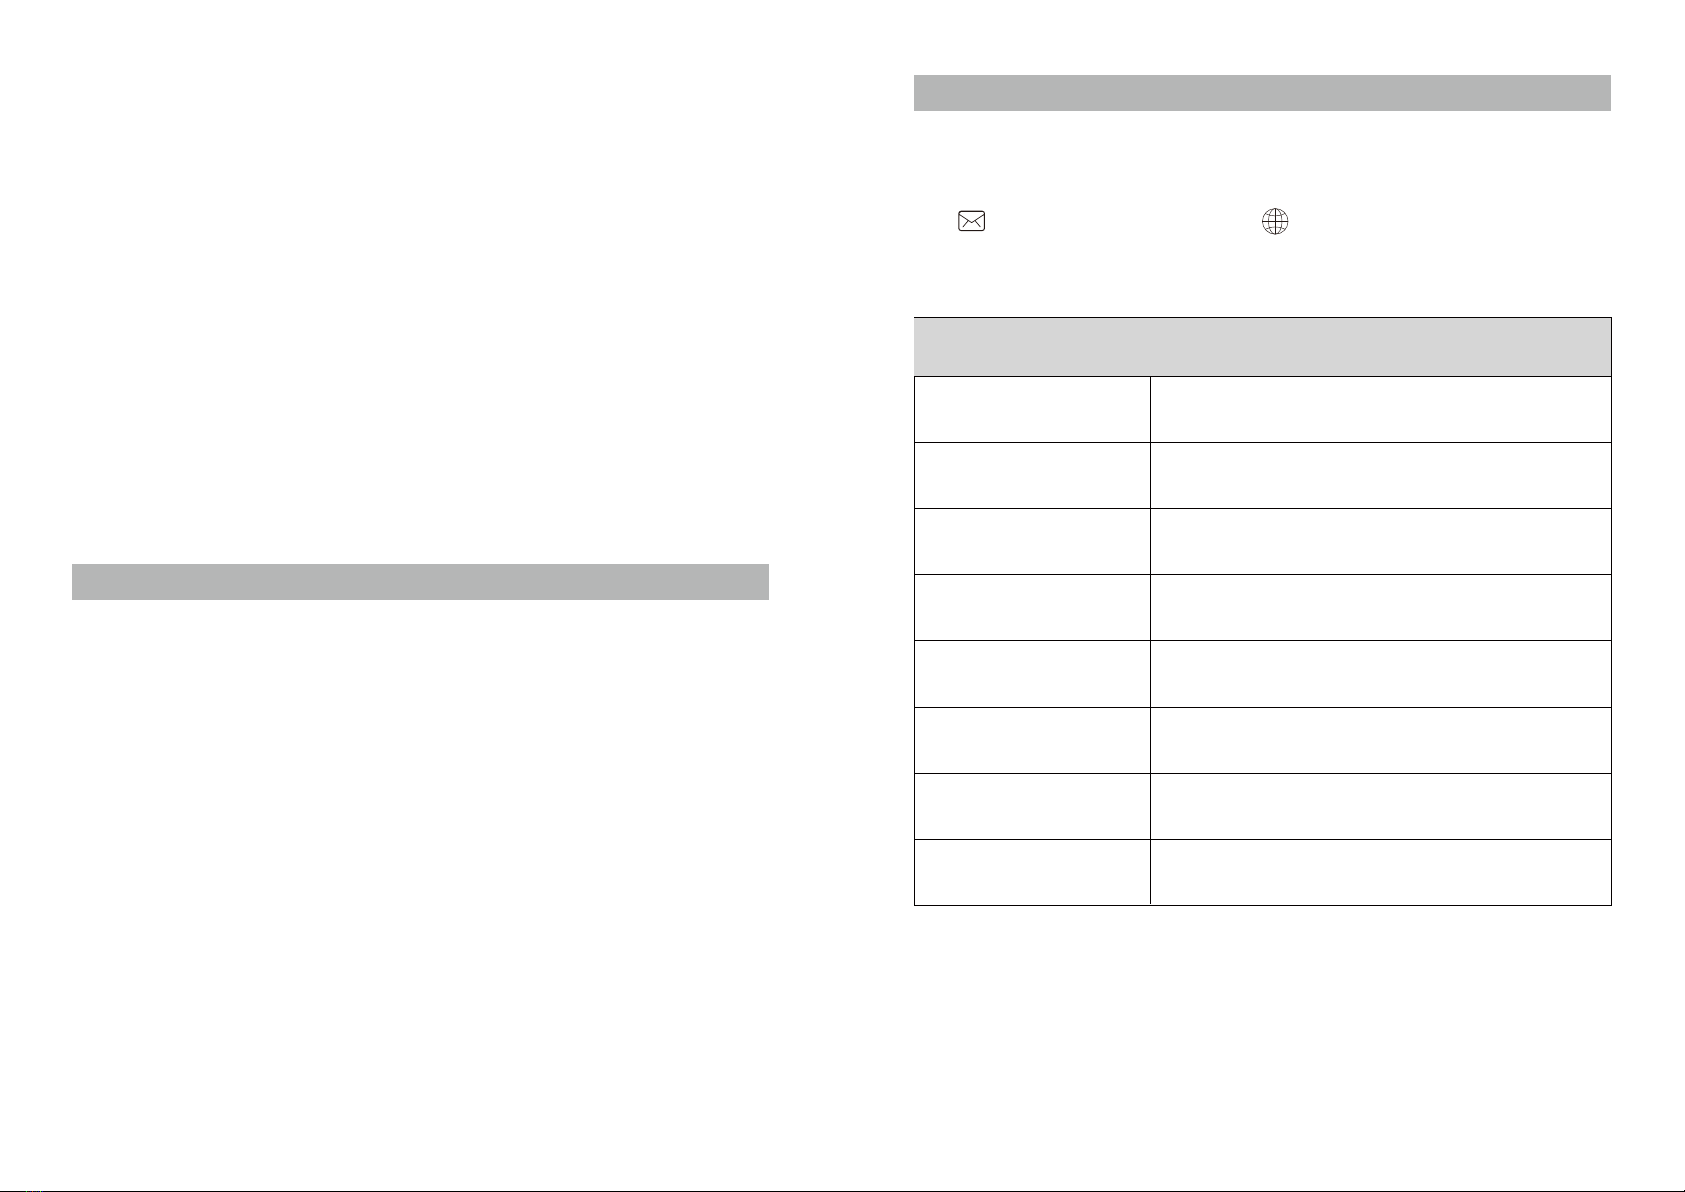
In compliance with laws and regulations, the company reserves the final right to interpret all
related documents of this document and this product. In case of updates, revisions, or termina-
tions, no further notice will be given. Please visit the official website of Asgoft to obtain the latest
product information. (http://www.pairbest.com/)
Safety Guidelines
1. Store the product in a cool, dry place and strictly avoid using it near a heat source.
2. It is strictly prohibited to allow the product to come into contact with any liquids. Do not immerse
it in water or get it wet. Avoid using the product in rainy or humid environments.
3. Do not use the product in environments with flammable or explosive substances, such as
gasoline, gas, or highly corrosive chemicals. Failure to comply may pose a safety risk.
- Always operate in accordance with regulations, instructions, and signs in environments where
explosions may occur.
- Do not store flammable liquids, gases, or explosives in the box containing this product.
4. Using the product in environments with strong static electricity or strong magnetic fields is
prohibited.
5. Disassembling the product or piercing it with sharp objects in any way is strictly prohibited.
6. Do not use wires or other metallic objects for unauthorized connections to prevent short circuits.
7. Please do not use unofficially provided parts or accessories. For replacements, please inquire
about relevant purchase information from Asgoft's official sales channels.
8. When using the product, strictly follow the recommended operating temperature range in this
user manual. High temperatures may lead to battery ignition or even explosion; low temperatures
can significantly reduce product performance or even cause it to stop working.
9. Prohibit stacking other heavy objects on top of this product.
10. Avoid impacts, drops, and severe vibrations. In the event of severe external force impact, imme-
diately power off and place the battery in an open area away from flammable materials or crowds.
Dispose of it properly in accordance with local legal regulations.
11. If the product accidentally falls into water during use, place it in a safe open area. Do not
approach the product before it is completely dry. Do not use a dried product that has been in
contact with water again. Dispose of it properly following the instructions in the "Disposal" section
below. If the product catches fire, use the recommended fire-fighting equipment in the following
order: water or water mist, sand, fire blanket, dry powder, and CO2 fire extinguisher.
1EN 2EN

3EN 4EN
Disposal
1. If conditions permit, discharge the battery of this product completely. Then, place the product in
the designated battery recycling bin. This product contains a battery, which is a hazardous chemi-
cal. It is strictly prohibited to dispose of it in regular garbage bins. For further details, please follow
local laws and regulations regarding battery recycling and disposal.
2. If the battery cannot be completely discharged due to a malfunction of this product itself, do not
dispose of the battery directly in the battery recycling bin. Please contact a professional battery
recycling company for further handling.
App Operation Instructions, please log in to the Asgofte official website to download. (http://ww-
w.pairbest.com/)
12. If there is dirt on the product interface, use a dry cloth to clean it.
13. Please handle the product with care to prevent it from tilting and causing damage. If the
product is severely damaged after tilting, immediately power off, place the battery in a spacious
area away from flammable materials or crowds, and dispose of it properly in accordance with local
legal regulations.
14. Store the product in a place inaccessible to children and pets to avoid potential safety hazards
from accidental triggering.
15. In humid environments, it is recommended to use a moisture-proof bag to prevent immersion
in water. If water is found inside the product, do not power it on or use it. Take precautions against
electric shock before touching the product. Immediately place it in a safe, waterproof open area
and contact Asgoft customer service for assistance.
16. This product is not recommended for powering medical emergency equipment related to
personal safety, including but not limited to hospital-grade CPAP (Continuous Positive Airway
Pressure) machines and ECMO (Extracorporeal Membrane Oxygenation). However, home version
CPAP machines for household use can be used normally and generally do not require continuous
professional monitoring. Follow medical advice and consult the manufacturer of the respective
equipment for usage restrictions.
17. Power products inevitably generate electromagnetic fields during use, which may affect the
normal operation of implanted medical devices or personal medical equipment such as pacemak-
ers, cochlear implants, hearing aids, and defibrillators. If you use these medical devices, consult
the manufacturer for usage restrictions to ensure a sufficient safe distance between this product
and the implanted medical device (e.g., pacemaker, cochlear implant, hearing aid, defibrillator)
while it is operating.
Asgoft App Download
You can connect to this product through the Asgoft app to view information, control the
device, and make personalized settings.

5EN 6EN
Working Conditions:
List Inside the Box
Note: Cables Packed in Separate Small Boxes.
Note: The quantity of cables depends on the system configuration.
Project Description Description Technical Description Technical
Specifications
Operating Temperature -10℃-45℃
Relative Humidity 5~95%
Altitude ≤4000 m
Atmospheric Pressure 70K~106K Pa
Discharge only below 0°C
No condensation
Derate use above 2000 meters
User Manual
Extension Cable
(MC4 to MC4) (Optional)
Mainframe
Micro-Inverter One-to-Two
Connection Cable
1.2 Package List
1. Intelligent Lithium Battery Pack
Project Description
Mainframe
Remark
Weight
Dimensions (L*W*H)
Battery Type
Cycle Life
Single Module
600W*2
Compliant with
EU Standards
Single Channel
Maximum Input Power
Maximum Output Power
Input Voltage Range
Maximum Input Current
Output Voltage Range
Maximum Number of Batteries
that can be Connected in Parallel
Maximum Expandable Capacity
Protection Level
Charging Temperature
Discharging Temperature
Overcharge, Overdischarge,
Overcurrent, High Temperature,
Low Temperature, Short
WiFi Module
Balancing Mode
Communication
Protection
Others
Capacity
Product Model
Technical
Specifications
12.99*8.27*7.68(in)/
330*210*195(mm)
20.94lbs/9.5Kg
LiFePO4
6000 cycles, remaining
capacity ≥ 70%
1200W
800W
18-55V
15A
20-50V
5
5120Wh
IP67
0-45℃
-10-45℃
Support
Support
Support
CAN
1024 Wh
ASE-1000
Basic Parameters
1.1 Specifications
PV Connection Cable
(MC4 to Aviation Plug)
Micro-Inverter
Connection Cable
(MC4 to Aviation Plug)

7EN 8EN
1. Please check if your area allows the installation of the Balcony Photovoltaic Storage System. You
need to obtain official permission from the local government before installation.
2. Before installation, please check the accessories. Some accessories may need to be purchased
separately.
3. Before installing or removing the Intelligent Lithium Battery Pack, make sure the device is in the
off state and disconnect the photovoltaic panel and micro inverter.
4. After installation, you need to download the Asgoft application and synchronize it with the
device.
Power On: Press and hold the power button for about 3 seconds. The indicator light will flash
rapidly, indicating that the device is in the power-on self-checking state. When the indicator light
stays solid blue, the self-check is complete, and the device is powered on.
Power Off: Press and hold the main power button for about 5 seconds. The indicator light will go
off, indicating that the output function is turned off, and the device is powered off.
WiFi: Press and hold the WiFi button for 3 seconds. The button indicator light will flash blue,
entering the network pairing mode. When the blue indicator light goes off, it enters the internet
dialing mode. Once successfully connected to the network, the indicator light will stay solid blue.
When the WiFi indicator light blinks slowly, it indicates a disconnection. In the case of multiple
modules in parallel, only one module needs to be connected to the network. The other modules
will automatically form a network through communication, without the need for each module to be
paired.
1.4 Product Display
PV Input
Power Switch
Output
Wi-Fi Switch
2. Split Inverter
2.1 Specifications
2.2 Package List
Description Technical Specifications
User ManualMainframe PV Connection Cable (MC4 to XT60)
Standard Configuration
1.3 Important Notes
Input DC Voltage 42-58VDC (Rated 48VDC)
Product Model ASI-1000
Noise Level ≤55dB
AC Output Voltage AC 220V~240V
Output Frequency 50Hz/60Hz
Maximum Output Power 1000W
Dimensions (L*W*H) 12.99*8.27*2.36(in)/330*210*60(mm)
Weight 5.51lbs/2.5kg
Protection Functions
Input undervoltage, output short circuit,
output overload,
high/low temperature protection, etc.
Communication Interface CAN

9EN 10EN
Power On/Off: Press the power button to turn on the device. The button indicator will stay green.
Press the button again to turn off the device. The indicator will go off.
3. Smart plug
Description
Voltage
Frequency
Operating Temperature
Maximum Current
Technical Specifications
AC 100V~240V
Product Model PET-SP16
50/60Hz
-20℃~50℃
16A
3.1 Specifications
3.2 Product Showcase
2.3 Product Display
Solar Input Port
USB Output
AC Output
Main Power Switch
4. Operating Mode 1
- Balcony Photovoltaic Storage System
Connect ① and ② together.
①
②
You can stack and parallel connect multiple modules to expand the capacity. Up to 5 modules can
be connected in parallel. The modules are connected with hard links, no additional cables are
needed. Refer to the diagram for details:
4.1 System Configuration
4.2 Product Installation
PV Modules
Power Cord
Microinverter
Wi-Fi Internet
Cell PhoneRouter

11EN
12EN
In the Balcony Photovoltaic Storage System, once the photovoltaic equipment is connected, the
intelligent lithium battery pack will automatically turn on and off. At this point, the intelligent lithium
battery pack can be charged using the solar panel.
1) You can charge this product using solar energy, supporting a maximum of 1200W solar
charging.
2) Before connecting the solar panel, please confirm that the output open-circuit voltage specifica-
tion of the solar panel is within 55V.
For detailed system connections, please refer to the instructions above.
Discharging
1)Manual Mode
Set the power setting mode to manual mode through the APP, and then set the power level in the
device power setting column.
As shown in the following figure:
4.4 Instructions for Use
Charging
Discharging
Friendly Reminder:
1) Before stacking the devices, make sure the intelligent lithium battery pack is turned off.
2) After stacking the devices, connect the photovoltaic panel, and then connect to the WiFi network.
3) When the photovoltaic panel is generating power, the device will automatically power on
without the need to press the power button.
4) Do not touch the metal contacts of the connector with your hand or any other object. If necessary,
gently clean them with a dry cloth.
4.3 System Combination Display
PV Panel
Intelligent Lithium Battery Pack
Top View
Intelligent Lithium
Battery Pack
Micro Inverter
Note: When disassembling the system, turn off the intelligent lithium battery pack switch, discon-
nect the photovoltaic panel, disconnect the micro-inverter, and disassemble and move one
module at a time.
Note: Specific values may vary depending on the operating status of the device.
<
Device power settings
close
100W
150W
CANCEL
OK
Battery
Device power settings
Power setting mode auto manual
total voltage 0V
V
total current -5.54A
A
Charge and discharge state discharge
STATUS
SOC 0%
SOC
>
>

14EN
13EN
Image: Product Combination Display (Split-type Inverter + Intelligent Lithium Battery Pack)
5.2 Product Combination Display
1. Turn off the switches of the Intelligent Lithium Battery Pack and the Split Inverter. Ensure that the
Split Inverter is not connected to the photovoltaic panel. Then, follow the product demonstration to
connect the Intelligent Lithium Battery Pack and the Split Inverter.
2. Turn on the switches of the Intelligent Lithium Battery Pack and the Split Inverter. Activate the WiFi
connection. For detailed steps on how to connect to the network, please refer to the APP User
Manual.
5.3 Instructions for Use
Project Parameters
AC Output Voltage AC 220~240V
Frequency 50/60Hz
Maximum PV input power 1200W
AC Output Power 1000W
WiFi Support
Size
(L*W*H)
12.99in*8.27in*9.25in/
330mm*210mm*235mm(1kWh)
2)Automatic Mode
Automatic mode configuration for smart plug use. The commonly used load end is configured with
smart plugs, smart plugs and Intelligent lithium Battery Packs are configured with LAN, and the
output power is accurately controlled according to the information of the smart plug to achieve
automatic mode. As shown in the following figure:
5.1 System Configuration
5. Operation Mode 2 - Portable Power Station
Portable Power Station
Figure: Portable power station system configuration diagram
Cell Phone
Router
InternetWi-Fi
PV Modules
<
MPPT
Battery
Power setting mode manual
MPPT1 circuit voltage 0.01V
V
MPPT1 circuit current 8.1A
A
MPPT2 circuit voltage 0.46V
V
inverter
total voltage 0.01V
W
total current -5.92A
W
MPPT2 circuit current 8.16A
A
MPPT1 channel status fault
STATUS
MPPT2 channel status fault
STATUS
auto
>
> >

15EN 16EN
3. The product can be charged by connecting the photovoltaic panel to the Intelligent Lithium
Battery Pack through the solar charging port on the Split Inverter. It is important to note that you
must first connect the Intelligent Lithium Battery Pack and the Split Inverter, ensuring they are both
powered off, before connecting the photovoltaic panel.
4. When replacing the Intelligent Lithium Battery Pack, first turn off the switches of the Intelligent
Lithium Battery Pack and the Split Inverter, disconnect the photovoltaic panel, and then proceed
with the battery replacement.
1)Battery Replacement Mode
Each Split Inverter is connected to one Intelligent Lithium Battery Pack module. When the
Intelligent Lithium Battery Pack runs out of power, you can replace it after turning off the
power to continue using it.
2)Stacking Mode
For long-term usage of heavy loads, it is recommended to utilize a high-capacity
stacked portable energy storage system. This involves combining one inverter with 2-3
intelligent lithium battery packs stacked together. This configuration ensures uninter-
rupted power supply without the need for frequent battery replacements.
Image: Battery Pack Replacement Diagram
soc 0% soc 100%
Combination of Split Inverter and Multiple Intelligent Lithium Battery Packs
1. How many solar panels can be connected to each intelligent lithium battery
pack?
Each intelligent lithium battery pack can be connected to a maximum of 2 solar
panels, each with a maximum output of 600W. When multiple intelligent lithium
battery packs are used in parallel, the host (topmost battery pack) is connected to the
solar panels.
2. How should the intelligent lithium battery pack be cleaned?
If the unit is placed outdoors on a balcony, it will be exposed to wind and sunlight
daily. Therefore, we recommend performing regular light cleaning. Use a dry,
non-abrasive cloth for wiping. If a deeper clean is desired, you may consider using a
specialized screen cleaning solution for phones or computers. However, ensure that
no excessive liquid enters the device or terminal, as this may cause internal circuit
damage or affect terminal conductivity, potentially compromising user safety.
6. Frequently Asked Questions

17EN 18EN
7. Maintenance and Care
1. Please store the product away from water sources and heat sources.
2. For an extended battery lifespan, it is best to use or store this product in an environ-
ment with a temperature range of 20°C to 30°C.
3. For long-term storage, please charge and discharge the product once every 3 months
(first discharge to 0%, then charge to full, and discharge to 80% for long-term storage).
Products that have not undergone charging and discharging for more than 6 months
will not be covered by the warranty.
4. For safety reasons, please do not store this product in environments exceeding 45°C
or below -10°C for extended periods.
5. If the product's battery level is critically low and it has been idle for an extended
period, it must be charged before it can be used again.
3. What are the safety precautions for using this device?
When using the intelligent lithium battery pack, please pay attention to the tempera-
ture range of the operating environment. The ASE-1000 will perform optimally within
its specified temperature range. Operating the device outside of this range may
significantly reduce its performance and potentially shorten its lifespan.
4. How is the safety performance of this device?
The ASE-1000 is certified to meet all necessary safety standards and can be used
both indoors and outdoors.
It is recommended to use the device within the range of 0°C to 45°C. Operating
outside of this temperature range may affect the efficiency of charging and
discharging. In temperatures below freezing, the device can only be discharged and
not charged.
5. In what temperature range is this device suitable for use? Name
Email
Phone number
Purchase channel
Purchase order number
Purchase date
Product model
Product serial number
Warranty Card Information
You can contact us and get more product information through the follow-
ing channels:
8. Customer Support
After receiving the product, please fill out the warranty card information and send it to our
after-sales email to activate your warranty service.
www.pairbest.com
czp@pairbest.com

Inhaltsverzeichnis
(V1.0)
1
2-3
4
4
5
5-6
6
7
7-8
8
8
8
9
9
9
9
10
10
10-11
11
12
12
12-13
12
13
13-14
13-14
14
14-15
15
15-16
17
16-17
Entsorgung
...........................................................................................................................
1. Intelligenter Lithium-Ionen-Akku
........................................................................................
Asgoft App herunterladen
..................................................................................................
1.1 Spezifikationen
.............................................................................................................
1.2 Packliste
.......................................................................................................................
Haftungsausschluss
..............................................................................................................
Sicherheitsrichtlinien
.............................................................................................................
4. Betriebsmodus 1 - Powerstation für Balkonkraftwerk
....
............................................
.........
...
3.2 Produktpräsentation
...................................................................................................
..
.
1.3 Wichtige Hinweise
........................................................................................................
2. Geteilter Wechselrichter
.....................................................................................................
3.1 Spezifikationen
.............................................................................................................
2.1 Spezifikationen
............................................................................................................
1.4 Produktanzeige
............................................................................................................
4.4 Gebrauchsanweisung
................................................................................................
...
.
Aufladen
...............................................................................................................
...
......
Entladen
...................................................................
.........................................
..........
.
2)Automatischer Modus
.
.......................................................................
..
.....................
5. Betriebsmodus 2 - Tragbare Energiespeicherung
..........................................
.......................
5.1 Systemkonfiguration
......................................................................................................
4.3 Systemkombinationsanzeige
....
..................................................................................
.
..
4.2 Produktinstallation
..
.................................................................................................
..
...
4.1 Systemkonfiguration
..................................................................................................
..
..
2.2 Packliste
......................................................................................................................
3. Intelligente Steckdose
........................................................................................................
2.3 Produktanzeige
............................................................................................................
1)Manueller Modus
....
..................................................................................................
5.2 Produktkombinationsanzeige
..............................................................................
.
..........
5.3 Gebrauchsanweisung
...................................................................
.............................
...
.
2)Stapelmodus
.
.......................................................................
..
......................
....
........
6. Häufig gestellte Fragen
..........................................
.................................................
........
....
7. Wartung und Pflege
.............................................................................................................
18
8. Kundenbetreuung
...............................................................................................................
1)Akkutauschmodus
....
................................................................................
...............
..
Asgoft ASE-1000 | Benutzerhandbuch
www.plentisolar.de

1DE
Haftungsausschluss
Um die legitimen Rechte und Interessen der Benutzer zu schützen, lesen Sie bitte sorgfältig das
Benutzerhandbuch dieses Produkts vor der Verwendung, um eine korrekte Nutzung nach vollstän-
digem Verständnis zu gewährleisten. Bitte bewahren Sie das Benutzerhandbuch nach dem Lesen
sorgfältig auf, um es für zukünftige Referenzen bereitzuhalten. Bei unsachgemäßer Verwendung
dieses Produkts können ernsthafte Verletzungen für Sie oder andere entstehen, ebenso wie
Schäden am Produkt und Verlust von Eigentum. Sobald Sie mit der Verwendung dieses Produkts
beginnen, gilt als gelesen, verstanden, anerkannt und akzeptiert, was in den Produktanweisun-
gen, Haftungsausschlüssen und Sicherheitshinweisen steht. Der Benutzer verpflichtet sich, für
sein eigenes Handeln und alle daraus resultierenden Konsequenzen verantwortlich zu sein.
Asgoft ist nicht verantwortlich für Verluste, die durch die Nichtbeachtung der Bedienungsanleitung
des Produkts durch die Benutzer verursacht wurden.
Im Falle von höherer Gewalt wie Blitz, Erdbeben, Überschwemmung usw., die zu Schäden am
Produkt oder Verlust von Eigentum führen, oder wenn die Verwendung des Balkon-Photovol-
taik-Speichersystems aufgrund lokaler Vorschriften nicht konform ist, trägt der Benutzer alle
Folgen, und Asgoft haftet nicht für dadurch entstandene Verluste.
In Übereinstimmung mit Gesetzen und Vorschriften behält sich das Unternehmen das endgültige
Recht vor, alle relevanten Dokumente dieses Dokuments und dieses Produkts zu interpretieren. Im
Falle von Aktualisierungen, Überarbeitungen oder Beendigungen wird keine weitere Benachrichti-
gung erfolgen. Bitte besuchen Sie die offizielle Website von Asgoft, um die neuesten Produktinfor-
mationen zu erhalten. (http://www.pairbest.com/)
Sicherheitsrichtlinien
1. Lagern Sie das Produkt an einem kühlen, trockenen Ort und vermeiden Sie strikt die Verwendung
in der Nähe von Wärmequellen.
2. Es ist strengstens untersagt, das Produkt mit Flüssigkeiten in Kontakt kommen zu lassen. Tauchen
Sie es nicht ins Wasser oder machen Sie es nass. Vermeiden Sie die Verwendung des Produkts in
regnerischen oder feuchten Umgebungen.
3. Verwenden Sie das Produkt nicht in Umgebungen mit brennbaren oder explosiven Substanzen
wie Benzin, Gas oder ätzenden Chemikalien. Bei Nichtbeachtung kann dies ein Sicherheitsrisiko
darstellen.
- Betreiben Sie immer in Übereinstimmung mit Vorschriften, Anweisungen und Schildern in
Umgebungen, in denen Explosionen auftreten können.
- Lagern Sie keine brennbaren Flüssigkeiten, Gase oder Sprengstoffe in der Box, die dieses
Produkt enthält.
4. Die Verwendung des Produkts in Umgebungen mit starker statischer Elektrizität oder starken
Magnetfeldern ist untersagt.
5. Das Zerlegen des Produkts oder das Einstechen mit scharfen Gegenständen ist strengstens
untersagt.
6. Verwenden Sie keine Drähte oder andere metallische Gegenstände für nicht autorisierte
Verbindungen, um Kurzschlüsse zu vermeiden.
7. Bitte verwenden Sie keine inoffiziell bereitgestellten Teile oder Zubehörteile. Für Ersatzteile
erkundigen Sie sich bitte nach relevanten Kaufinformationen von den offiziellen Vertriebskanälen
von Asgoft.
8. Bei der Verwendung des Produkts beachten Sie bitte streng den empfohlenen Betriebstempera-
turbereich in diesem Benutzerhandbuch. Hohe Temperaturen können zur Entzündung des Akkus
führen oder sogar zu einer Explosion führen; niedrige Temperaturen können die Leistung des
Produkts erheblich reduzieren oder es sogar zum Stillstand bringen.
9. Das Stapeln anderer schwerer Gegenstände auf diesem Produkt ist untersagt.
10. Vermeiden Sie Stöße, Stürze und starke Vibrationen. Im Falle eines schweren äußeren Krafts-
toßes schalten Sie das Gerät sofort aus und platzieren Sie den Akku in einem offenen Bereich, der
von brennbarem Material oder Menschenmengen entfernt ist. Entsorgen Sie ihn gemäß den
örtlichen gesetzlichen Vorschriften ordnungsgemäß.
1DE 2DE

3DE 4DE
Entsorgung
1. Wenn es die Bedingungen erlauben, entladen Sie den Akku dieses Produkts vollständig. Platzie-
ren Sie es dann in den dafür vorgesehenen Akku-Recyclingbehälter. Dieses Produkt enthält einen
Akku, der eine gefährliche Chemikalie ist. Es ist strengstens untersagt, ihn in regulären Mülltonnen
zu entsorgen. Für weitere Details beachten Sie bitte lokale Gesetze und Vorschriften zur Akkuent-
sorgung und -recycling.
2. Wenn der Akku aufgrund eines Defekts des Produkts selbst nicht vollständig entladen werden
kann, entsorgen Sie den Akku bitte nicht direkt im Akku-Recyclingbehälter. Wenden Sie sich
stattdessen an ein professionelles Unternehmen für Akku-Recycling für weitere Maßnahmen.
App-Bedienungsanleitung. Bitte loggen Sie sich auf der offiziellen Website von Asgoft ein, um die
App herunterzuladen. (http://www.pairbest.com/)
11. Wenn das Produkt während der Verwendung versehentlich ins Wasser fällt, stellen Sie es an
einem sicheren, offenen Ort ab. Nähern Sie sich dem Produkt nicht, bevor es vollständig trocken ist.
Verwenden Sie kein getrocknetes Produkt, das mit Wasser in Kontakt gekommen ist, erneut. Entsor-
gen Sie es gemäß den Anweisungen im Abschnitt "Entsorgung" unten. Wenn das Produkt Feuer
fängt, verwenden Sie die empfohlene Feuerlöscherausrüstung in folgender Reihenfolge: Wasser
oder Wassersprühnebel, Sand, Feuerlöschdecke, Trockenpulver und CO2-Feuerlöscher.
12. Wenn Schmutz auf der Produktschnittstelle vorhanden ist, verwenden Sie ein trockenes Tuch,
um es zu reinigen.
13. Bitte behandeln Sie das Produkt vorsichtig, um ein Kippen und Beschädigen zu vermeiden.
Wenn das Produkt nach dem Kippen schwer beschädigt ist, schalten Sie es sofort aus, legen Sie
den Akku in einen geräumigen Bereich, der von brennbarem Material oder Menschenmengen
entfernt ist, und entsorgen Sie ihn gemäß den örtlichen gesetzlichen Vorschriften ordnungsgemäß.
14. Bewahren Sie das Produkt an einem für Kinder und Haustiere unzugänglichen Ort auf, um
potenzielle Sicherheitsrisiken durch versehentliches Auslösen zu vermeiden.
15. In feuchter Umgebung wird empfohlen, einen Feuchtigkeitsschutzbeutel zu verwenden, um ein
Eintauchen in Wasser zu verhindern. Wenn Wasser im Produkt gefunden wird, schalten Sie es nicht
ein oder verwenden Sie es nicht. Nehmen Sie vor dem Berühren des Produkts
Vorsichtsmaßnahmen gegen elektrischen Schlag. Platzieren Sie es sofort an einem sicheren,
wasserdichten, offenen Ort und kontaktieren Sie den Kundendienst von Asgoft für Unterstützung.
16. Dieses Produkt eignet sich nicht zur Stromversorgung von medizinischen Notfallgeräten im
Zusammenhang mit persönlicher Sicherheit, einschließlich, aber nicht beschränkt auf kranken-
hausgrade CPAP (Continuous Positive Airway Pressure) Geräte und ECMO (Extracorporeal
Membrane Oxygenation.
17. Stromprodukte erzeugen zwangsläufig elektromagnetische Felder während des Gebrauchs, die
die normale Funktion implantierten medizinischen Geräte oder persönlicher medizinischer
Ausrüstung wie Herzschrittmacher, Cochlea-Implantate, Hörgeräte und Defibrillatoren beeinträch-
tigen können. Wenn Sie diese medizinischen Geräte verwenden, konsultieren Sie den Hersteller
bezüglich der Verwendungsbeschränkungen, um einen ausreichend sicheren Abstand zwischen
diesem Produkt und dem implantierten medizinischen Gerät (z. B. Herzschrittmacher, Cochlea-Im-
plantat, Hörgerät, Defibrillator) während des Betriebs zu gewährleisten.
Asgoft App herunterladen
Sie können sich über die Asgoft-App mit diesem Produkt verbinden, um Informationen
anzuzeigen, das Gerät zu steuern und individuelle Einstellungen vorzunehmen.

5DE 6DE
Arbeitsumgebung
In-Box-Liste
Das Kabel ist in einem separaten kleinen Karton verpackt
Hinweis: Die Anzahl der Kabel hängt von der Systemkonfiguration ab.
Projektbeschreibung Technische Daten Bemerkung
Betriebstemperatur -10℃-45℃
Relative 5~95%
Höhe über dem ≤4000 m
Luftdruck 70K~106K Pa
Entladung nur unter 0°C
keine Kondensation
Verwenden Sie bei einer Höhe
Benutzerhandbuch
Verlängerungskabel
(MC4 zu MC4) (Optional)
Hauptgerät
Mikro-Wechselrichter Ein-
zu-Zwei-Verbindungskabel
1.2 Packliste
PV-Verbindungskabel
(MC4 zu Luftfahrtstecker)
Micro-Inverter-
Verbindungskabel
(MC4 zu Luftfahrtstecker)
1. Intelligenter Lithium-Ionen-Akku
Projektbeschreibung
Gesamtsystem
Technische
Datens Bemerkung
Gewicht
Abmessungen (L*W*H)
Batterietyp
Zykluslebensdauer
12.99*8.27*7.68(in)/
330*210*195(mm) Einzelmodul
20.94lbs/9.5Kg
LiFePO4
6000 Zyklen,
Restkapazität ≥ 70%
1200W 600W*2
800W Nach EU-
Standards
18-55V
15A Einzelstrecke
20-50V
5
5120Wh
IP67
0-45℃
-10-45℃
Besitzen
Besitzen
Besitzen
CAN
Maximale Eingangsleistung
Maximale Ausgangsleistung
Eingangsspannungsbereich
Maximaler Eingangsstrom
Ausgangsspannungsbereich
Maximale Anzahl der parallel
anschließbaren Batterien
Maximal erweiterbare Kapazität
Schutzgrad
Lade-Temperatur
Entlade-Temperatur
Schutz vor Überladung, Tiefentladung
Überstrom, hoher Temperatur, niedriger
WiFi-Modul
Balancierungsmodus
Kommunikation
Schutzart
Others
Kapazität 1024 Wh
Produktmodell ASE-1000
Grundparameter
1.1 Spezifikationen

7DE 8DE
1. Bitte überprüfen Sie, ob es in Ihrer Region erlaubt ist, das Balkon-Photovoltaik-Speichersystem zu
installieren. Sie müssen vor der Installation die offizielle Genehmigung der örtlichen Regierung
einholen.
2. Überprüfen Sie vor der Installation bitte das Zubehör. Einige Zubehörteile müssen möglicher-
weise separat erworben werden.
3. Bevor Sie das intelligente Lithiumbatteriepaket installieren oder entfernen, stellen Sie sicher,
dass das Gerät ausgeschaltet ist und trennen Sie das Photovoltaikpanel und den Mikroinverter.
4. Nach der Installation müssen Sie die Asgoft-Anwendung herunterladen und mit dem Gerät
synchronisieren.
Einschalten: Halten Sie die Ein- / Ausschalttaste etwa 3 Sekunden lang gedrückt. Die Anzeige-
leuchte blinkt schnell, was darauf hinweist, dass das Gerät sich im Selbsttestmodus für das
Einschalten befindet. Wenn die Anzeigeleuchte dauerhaft blau leuchtet, ist der Selbsttest abges-
chlossen und das Gerät ist eingeschaltet.
Ausschalten: Halten Sie die Hauptstromtaste etwa 5 Sekunden lang gedrückt. Die Anzeigeleuchte
erlischt, was darauf hinweist, dass die Ausgangsfunktion ausgeschaltet ist und das Gerät ausges-
chaltet ist.
Wenn die WiFi-Anzeige langsam blinkt, deutet dies auf eine Trennung hin. Bei mehreren Modulen
in Parallelschaltung muss nur ein Modul mit dem Netzwerk verbunden werden. Die anderen
Module bilden automatisch ein Netzwerk durch Kommunikation, ohne dass jedes Modul gepaart
werden muss.
WiFi: Halten Sie die WiFi-Taste 3 Sekunden lang gedrückt. Die Tastenanzeige leuchtet blau und
wechselt in den Netzwerkkopplungsmodus. Wenn die blaue Anzeige erlischt, wechselt sie in den
Internetwählmodus. Nach erfolgreicher Netzwerkverbindung leuchtet die Anzeige konstant blau.
1.4 Produktanzeige
PV-Eingang
Netzschalter
Ausgang
WLAN-Schalter
2. Geteilter Wechselrichter
2.1 Spezifikationen
2.2 Packliste
Beschreibung Technische Spezifikationen
Eingangsgleichspannung 42–58 VDC
(Nennspannung 48 VDC)
Produktmodell ASI-1000
AC-Ausgangsspannung AC 220V~240V
Maximale Ausgangsleistung 1000W
Abmessungen (L*B*H) 12.99*8.27*2.36(in)/330*210*60(mm)
Gewicht 5.51lbs/2.5kg
Schutzfunktionen
Schutzfunktionen: Eingangsunterspannung,
Ausgangskurzschluss, Ausgangsüberlastung,
Hoch-/Niedertemperaturschutz, usw.
Kommunikationsschnittstelle CAN
Benutzerhandbuch
Hauptgerät PV-Verbindungskabel (MC4 zu XT60)
Standardkonfiguration
1.3 Wichtige Hinweise
Geräuschpegel ≤55dB
Ausgangsfrequenz 50Hz/60Hz

9DE 10DE
Ein-/Ausschalten: Drücken Sie die Ein-/Ausschalttaste, um das Gerät einzuschalten. Die Tastenan-
zeige leuchtet grün auf. Drücken Sie die Taste erneut, um das Gerät auszuschalten. Die Anzeige
erlischt.
3. Intelligente Steckdose
Beschreibung
Spannung
Frequenz
Betriebstemperatur
Maximaler Strom
Technische Spezifikationen
AC 100V~240V
Produktmodell PET-SP16
50/60Hz
-20℃~50℃
16A
3.1 Spezifikationen
3.2 Produktpräsentation
2.3 Produktanzeige
Solar Eingangsschnittstelle USB Ausgang
AC Ausgang
Ausgangshauptschalter
4. Betriebsmodus 1
- Powerstation für Balkonkraftwerk
Verbinden Sie ① und ② miteinander.
Sie können mehrere Module stapeln und parallel anschließen, um die Kapazität zu erweitern. Bis
zu 5 Module können parallel verbunden werden. Die Module werden mit festen Verbindungen
angeschlossen, es sind keine zusätzlichen Kabel erforderlich. Details entnehmen Sie bitte dem
Diagramm:
4.1 Systemkonfiguration
4.2 Produktinstallation
①
②
PV-Module
Stromkabel
Microinverter
Wi-Fi Internet
HandyRouter

11DE
12DE
Im Balkon-Photovoltaikspeichersystem schaltet sich der intelligente Lithium-Akkupack automa-
tisch ein und aus, sobald die Photovoltaikausrüstung angeschlossen ist. Zu diesem Zeitpunkt kann
der intelligente Lithium-Akkupack mithilfe des Solarmoduls aufgeladen werden.
1) Sie können dieses Produkt mit Solarenergie aufladen und dabei bis zu 1200 W Solarkapazität
nutzen.
2) Bevor Sie das Solarmodul anschließen, stellen Sie bitte sicher, dass die Ausgangs-Leerlaufspan-
nung des Solarmoduls innerhalb von 55 V liegt.
Für detaillierte Systemanschlüsse beachten Sie bitte die oben stehenden Anweisungen.
Discharging
1)Manueller Modus
Set the power setting mode to manual mode through the APP, and then set the power level in the
device power setting column.
As shown in the following figure:
4.4 Gebrauchsanweisung
Aufladen
Entladen
Hinweise:
1. Vor dem Stapeln der Geräte sollte der intelligente Lithium-Ionen-Akku ausgeschaltet sein.
2. Nach Abschluss des Stapelvorgangs schließen Sie zuerst die Photovoltaikmodule an und verbin-
den Sie dann das Gerät mit dem WiFi-Netzwerk.
3. Wenn die Photovoltaikmodule Strom erzeugen, schaltet sich das Gerät automatisch ein. Ein
Einschalten per Knopfdruck ist nicht erforderlich.
4. Berühren Sie die metallenen Kontakte des Steckers nicht mit der Hand oder anderen Gegenstän-
den. Falls notwendig, verwenden Sie ein trockenes Tuch zur vorsichtigen Reinigung.
4.3 Systemkombinationsanzeige
PV-Modul
Intelligentes Lithium
-Batteriepack
Draufsicht
Intelligentes Lithium
-Batteriepack
Mikroinverter
Hinweis: Beim Auseinanderbauen des Systems schalten Sie den Schalter des intelligenten
Lithium-Akkupacks aus, trennen Sie das Photovoltaikpanel ab, trennen Sie den Mikro-Inverter ab
und bauen Sie jeweils ein Modul ab und bewegen Sie es.
<
Geräteeinstell...
schließen
100W
150W
Abbrechen
Bestätigen
Batterie
Geräteeinstellungen
Leistungsein-
stellungsmodus Automatisch
Manuell
Gesamtspannung 0V
V
Gesamtstrom -5.54A
A
Lade- und Entladezustand Entladen
STATUS
Verbleibende Batterie 0%
SOC
>
>
Hinweis: Die konkreten Werte können je nach Betriebszustand des Geräts variieren.

14DE
13DE
Bild: Produktkombinationsanzeige (Geteilter Wechselrichter + Intelligenter Lithiumbatteriepack)
5.2 Produktkombinationsanzeige
1. Schalten Sie die Schalter des Intelligenten Lithiumbatteriepacks und des geteilten Wechselrich-
ters aus. Stellen Sie sicher, dass der geteilte Wechselrichter nicht mit dem Photovoltaikpanel
verbunden ist. Folgen Sie dann der Produktvorführung, um das Intelligente Lithiumbatteriepack
und den Geteilten Wechselrichter zu verbinden.
2. Schalten Sie die Schalter des Intelligenten Lithiumbatteriepacks und des geteilten Wechselrich-
ters ein. Aktivieren Sie die WiFi-Verbindung. Für detaillierte Schritte zur Netzwerkverbindung lesen
Sie bitte das Handbuch der APP.
5.3 Gebrauchsanweisung
Projekt Parameter
AC-Ausgangsspannung AC 220~240V
Frequenz 50/60Hz
Maximale PV-Eingangsleistung 1200W
AC-Ausgangsleistung 1000W
WiFi Unterstützung
Abmessungen (L*B*H) 12.99in*8.27in*9.25in/
330mm*210mm*235mm(1kWh)
2)Automatischer Modus
Automatischer Modus für die Verwendung des intelligenten Steckers konfigurieren. Konfigurieren
Sie den intelligenten Stecker an der häufig verwendeten Lastseite. Der intelligente Stecker und der
intelligente Lithiumbatteriepack sind im lokalen Netzwerk konfiguriert. Steuern Sie die Ausgang-
sleistung präzise basierend auf den Informationen des intelligenten Steckers, um den automa-
tischen Modus zu realisieren. Wie in der folgenden Abbildung dargestellt:
5.1 Systemkonfiguration
5. Betriebsmodus 2 - Tragbare Energiespeicherung
Tragbare Stromstation
Abbildung: Diagramm der Systemkonfiguration der tragbaren Stromstation
Handy
Router
InternetWLAN
PV-Module
<
MPPT
Batterie
MPPT1 Schaltungsspannung 0.01V
V
MPPT1 Stromkreis 8.1A
A
MPPT2 Schaltungsspannung 0.46V
V
Wechselrichter
Gesamtspannung 0.01V
W
Gesamtstrom -5.92A
W
MPPT2 Stromkreis 8.16A
A
MPPT1-Kanalstatus Fehler
STATUS
MPPT2-Kanalstatus Fehler
STATUS
>
> >
Leistungsein-
stellungsmodus Manuell Automatisch

15DE 16DE
3. Das Produkt kann aufgeladen werden, indem das Photovoltaikpanel über den Solarladean-
schluss am geteilten Wechselrichter mit dem Intelligenten Lithiumbatteriepack verbunden wird. Es
ist wichtig zu beachten, dass Sie zuerst das Intelligente Lithiumbatteriepack und den geteilten
Wechselrichter anschließen müssen, um sicherzustellen, dass sie beide ausgeschaltet sind, bevor
Sie das Photovoltaikpanel anschließen.
4. Wenn Sie das Intelligente Lithiumbatteriepack austauschen möchten, schalten Sie zuerst die
Schalter des Intelligenten Lithiumbatteriepacks und des geteilten Wechselrichters aus, trennen Sie
das Photovoltaikpanel ab, und führen Sie dann den Batterieaustausch durch.
1)Akkutauschmodus
Jeder Split-Inverter ist mit einem Modul des Intelligenten Lithiumbatteriepacks verbund-
en. Wenn der Intelligente Lithiumbatteriepack keinen Strom mehr hat, können Sie ihn
nach dem Ausschalten des Stroms austauschen, um die Verwendung fortzusetzen.
2)Stapelmodus
Für den langfristigen Betrieb von schweren Lasten wird empfohlen, ein tragbares
Hochleistungs-Energiespeichersystem zu verwenden. Dies beinhaltet die Kombination
eines Wechselrichters mit 2-3 gestapelten intelligenten Lithiumbatteriepacks. Diese
Konfiguration gewährleistet eine unterbrechungsfreie Stromversorgung, ohne dass
häufig Batterieaustausche erforderlich sind.
Batteriepack-Austausch-Schemazeichnung
soc 0% soc 100%
Kombination aus einem geteilten Wechselrichter und mehreren intelligenten Lithium-Batterie-
packs
1. Wie viele Solarmodule können an jedes intelligente Lithiumbatteriepaket
angeschlossen werden?
Jedes intelligente Lithium-Batteriepack kann mit maximal 2 Solarpanelen mit einer
maximalen Leistung von 600 W verbunden werden. Wenn mehrere intelligente
Lithium-Batteriepacks parallel verwendet werden, ist das Hauptgerät (oberstes
Batteriepack) mit den Solarpanelen verbunden.
2. Wie sollte das intelligente Lithiumbatteriepaket gereinigt werden?
Wenn das Gerät im Freien auf einem Balkon platziert wird, ist es täglich Wind und
Sonnenlicht ausgesetzt. Daher empfehlen wir eine regelmäßige leichte Reinigung.
Verwenden Sie ein trockenes, nicht scheuerndes Tuch zum Abwischen. Wenn eine
gründlichere Reinigung erwünscht ist, können Sie in Betracht ziehen, eine spezialis-
ierte Bildschirmreinigungslösung für Handys oder Computer zu verwenden. Achten
Sie jedoch darauf, dass keine übermäßige Flüssigkeit in das Gerät oder den
Anschluss gelangt, da dies möglicherweise zu Schäden an den internen Schaltkrei-
sen führt oder die Leitfähigkeit der Anschlüsse beeinträchtigt und die Sicherheit des
Benutzers gefährden könnte.
6. Häufig gestellte Fragen

17DE 18DE
7. Wartung und Pflege
1. Bitte lagern Sie das Produkt fern von Wasserquellen und Hitzequellen.
2. Um die Lebensdauer des Akkus zu verlängern, empfiehlt es sich, dieses Produkt in
einer Umgebung mit einer Temperatur von 20°C bis 30°C zu verwenden oder zu lagern.
3. Für die Langzeitlagerung laden und entladen Sie das Produkt bitte alle 3 Monate
einmal (zuerst entladen bis 0%, dann aufladen bis vollständig, und dann auf 80%
entladen für die Langzeitlagerung). Produkte, die seit mehr als 6 Monaten nicht aufge-
laden und entladen wurden, sind von der Garantie ausgeschlossen.
4. Lagern Sie aus Sicherheitsgründen bitte dieses Produkt nicht in Umgebungen, die
45°C übersteigen oder unter -10°C fallen, für längere Zeiträume.
5. Wenn der Batteriestand des Produkts kritisch niedrig ist und es längere Zeit ungenutzt
war, muss es aufgeladen werden, bevor es wieder verwendet werden kann.
3. Welche Sicherheitsvorkehrungen gibt es bei der Verwendung dieses Geräts zu
beachten?
Beachten Sie bei der Verwendung des intelligenten Lithiumbatteriepakets bitte den
Temperaturbereich der Betriebsumgebung. Das STC01/1 E0 wird innerhalb seines
spezifizierten Temperaturbereichs optimal funktionieren. Der Betrieb außerhalb
dieses Bereichs kann die Leistung erheblich reduzieren und möglicherweise die
Lebensdauer verkürzen.
4. Wie ist die Sicherheitsleistung dieses Geräts?
Das STC01/1 E0 ist zertifiziert, um alle notwendigen Sicherheitsstandards zu erfüllen,
und kann sowohl drinnen als auch draußen verwendet werden.
Es wird empfohlen, das Gerät im Bereich von 0°C bis 45°C zu verwenden. Der Betrieb
außerhalb dieses Temperaturbereichs kann die Effizienz des Ladens und Entladens
beeinträchtigen. Bei Temperaturen unter dem Gefrierpunkt kann das Gerät nur
entladen und nicht aufgeladen werden.
5. In welchem Temperaturbereich ist dieses Gerät für den Gebrauch geeignet?
Name
Email
Telefonnummer
Kaufkanal
Kaufdatum
Bestellnummer
Produktmodell
Produktschlüsselnummer
Garantiekarteninformation
Sie können uns über die folgenden Kanäle kontaktieren und weitere
Produktinformationen erhalten:
8. Kundenbetreuung
Nach Erhalt des Produkts bitten wir Sie, die Informationen auf der Garantiekarte auszufüllen und an
unsere After-Sales-E-Mail zu senden, um Ihren Garantieservice zu aktivieren.
www.pairbest.com
czp@pairbest.com
Table of contents
Languages:
Other plenti SOLAR Batteries Pack manuals