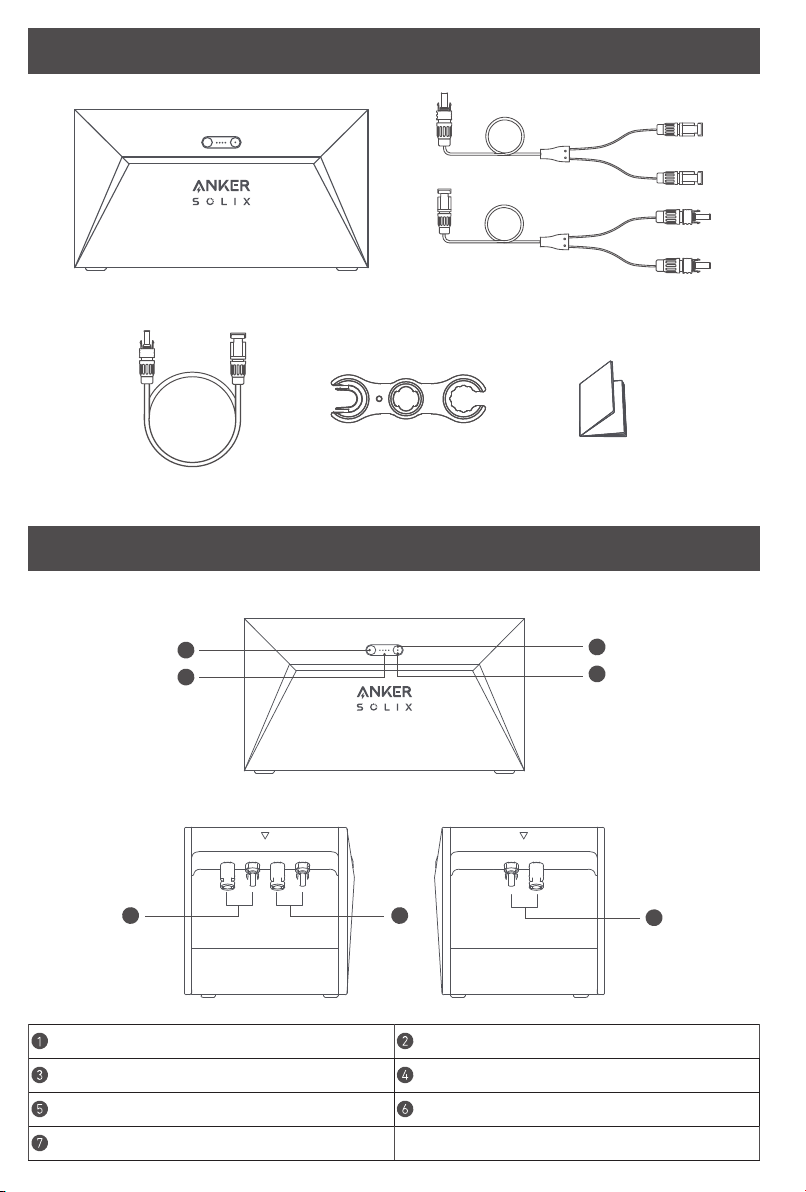
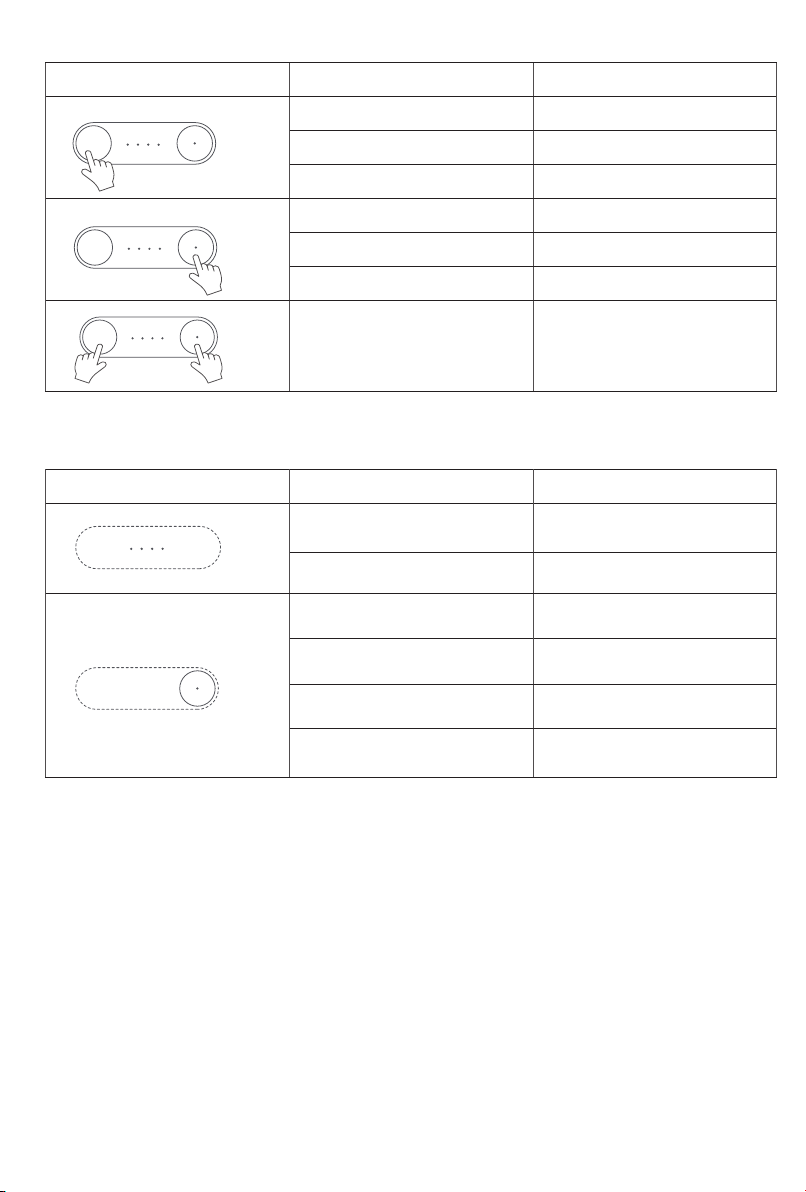
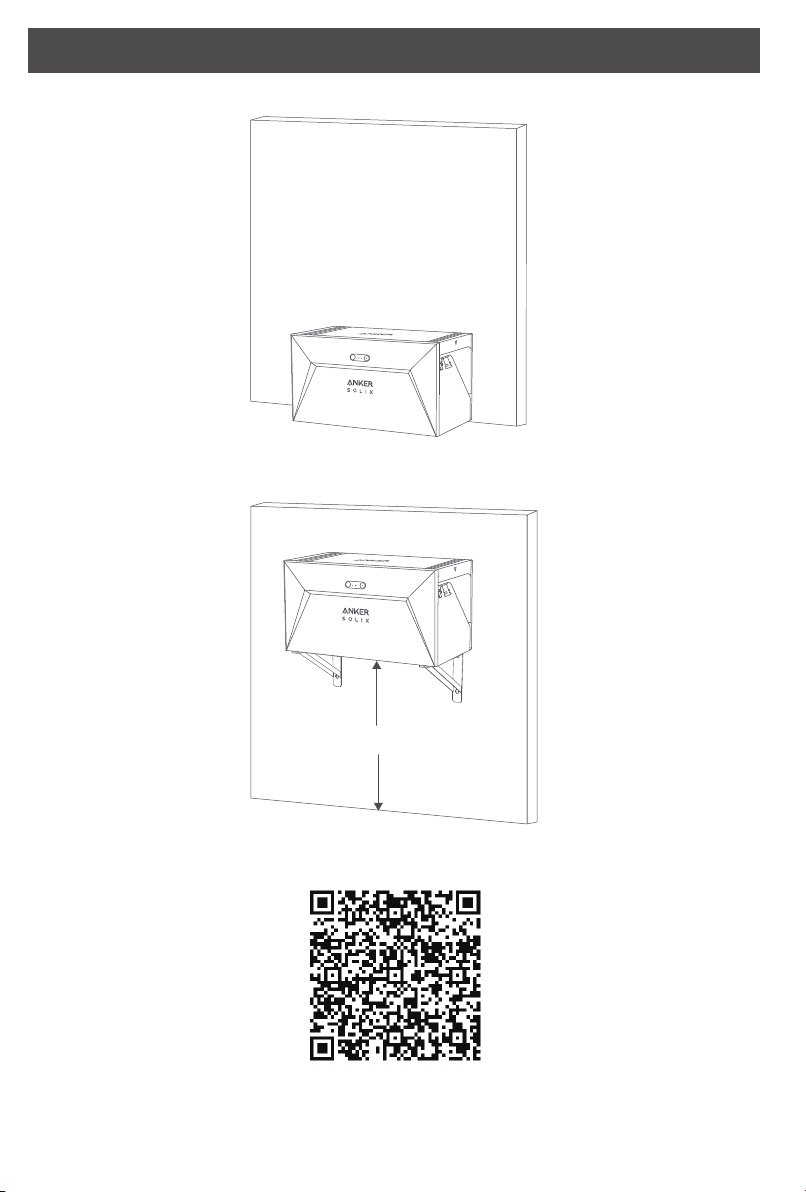
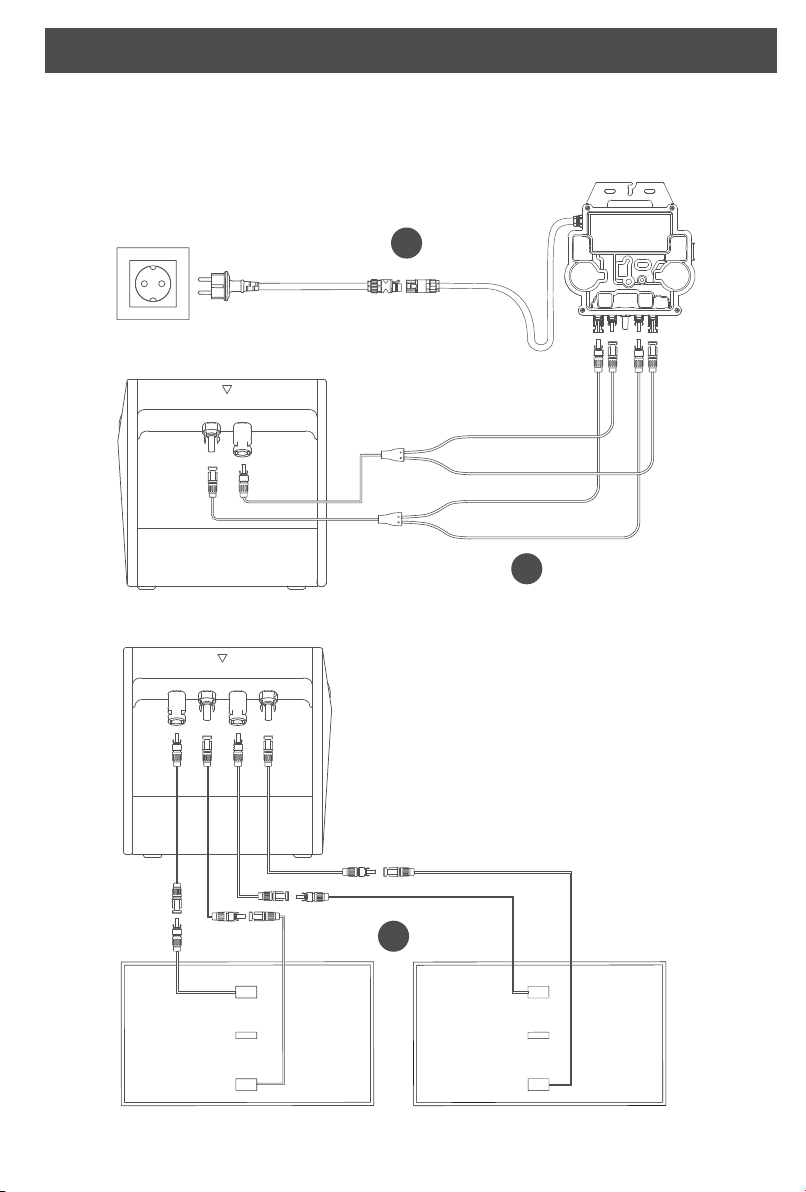
Anker SOLIX Solarbank E1600 User manual

USER MANUAL
Anker SOLIX Solarbank E1600

English 01
%FVUTDI 18
Español 36
Français 54
*UBMJBOP 72
Nederlands 89

01 EN
What's in the Box
MC4 Y Output Cable ×2
Anker SOLIX Solarbank E1600
Solar Panel Extension Cable ×4
Overview
Product Overview
1
2
3
4
5 6
7
Power button Power status LED
IoT button IoT status LED
MC4 ports for PV input 1 MC4 ports for PV input 2
MC4 ports for PV output
User Manual
Wrench for Removing MC4
Connectors

EN 02
Button Controls
Button Action Function
Press for 2 seconds Turn Solarbank on
Press for 2 seconds Turn Solarbank o
Press once when powered on Check current battery level
Press once Enable Internet connection
Press for 2 seconds Disable Internet connection
Press for 7 seconds Reset Bluetooth and Wi-Fi
Simultaneously press for at least 15
seconds Reset Solarbank
LED Guide
LED Indication Status
Breathing white Being charged
Steady white Current battery level
Flashing green Disconnected to the Internet
Steady green Connected to the Internet
Light o Connection disabled
Flashing red Malfunction warning

03 EN
Installing Your Solarbank
Option A: Position your Solarbank on a hard, level floor.
Option B: Mount your Solarbank onto a solid concrete wall using additional mount brackets*.
<1m / 3.28ft
* Please scan the QR code to buy mount brackets.

EN 04
Connecting Cables
Single Solarbank
1. Connect Solarbank to the micro inverter using the included MC4 Y output cables.
2. Connect the micro inverter to a home outlet using the original cable.
3. Connect the solar panels to Solarbank using the included solar panel extension cables.
1
2
3
*The plug varies by region.

05 EN
Cascaded Solarbanks
Only two Solarbanks can be cascaded to double the capacity to 3,200 Wh.
1. Connect each Solarbank to the micro inverter using the included MC4 Y output cables.
2. Connect the micro inverter to a home outlet using the original cable.
3. Connect solar panels to Solarbanks using the included solar panel extension cables.
1
2
*The plug varies by region.

EN 06
3
Before connecting cables, ensure that the micro inverter, solar panels, and the home grid are
disconnected, and Solarbanks are turned o.

07 EN
Using Your Solarbank
Power On
Press the power button for 2 seconds to turn on your Solarbank.
When powered on, the power status LED will flash white and IoT status LED will flash green simultaneously
three times.
2S
Using the App
Anker App for Smart Control
Download the Anker app to get full functionality of your Solarbank.
1. Download the Anker app from the App Store (iOS devices) or Google Play (Android devices), or by scanning
the QR code. After installing the app, sign up for an account.
2. Follow the on-screen instructions to complete the setup.
• Connect to the Internet: To remotely interact with your home system, connect your Solarbank to the Internet
via Wi-Fi 2.4G or Bluetooth 4.0 network.
• Establish a home system: Create a home system or join an existing one. You can monitor energy flow and
make an energy plan for your home.
• Transfer energy: Customize your energy usage and storage preferences by period.
• Check energy data: Get insight into your system's energy generation, usage, and storage with energy
graphs.
3. When the app is successfully launched, you will be directed to the login page.
Please be reminded that the country region MUST match where you live. An incorrect country region may
cause a device connection failure.

EN 08
4. You can login via an Anker account, Amazon, or Apple ID.
If you do not have an Anker account, you can tap [Sign Up] to register:
• Please prepare an email for the registration process. Passwords must contain 8-20 characters, uppercase
and lowercase letters, numbers, and symbols.
Initialization Setting
Network Configuration
Before configuring, please ensure the network is working well. Keep good quality Wi-Fi signal strength and do
not place the device too far away from the router.
Step 1 Press and hold the left button on the device for 2 seconds.
Turn on your Solarbank.
Step 2
Press the right button on the device. Enable Wi-Fi mode.
• When the green light flashes, the device is in configuration
mode.
• If the device has configured Wi-Fi, and you wish to change
the network, you may hold this button for 7 seconds to
reset the Wi-Fi.
Step 3
1. Keep the devices on,
2. Tap [+] or [Add Device] at the top right corner of Devices
page.

09 EN
Step 4
The app will automatically search for your Solarbank. Once
the device is found, it will appear on the list.
• Please make sure your mobile Bluetooth is on, and the
app is authorized to access Bluetooth and Wi-Fi.
• If you wish to manually search for the device, you could
tap [Balcony Solar System] in the "Add devices manually"
row.
Step 5
After connecting Solarbank via Bluetooth, you need to
choose a network for the device. Select a network from the
list and enter the password.
• The device only supports 2.4Ghz Wi-Fi.
• Make sure the password is correct.
Step 6
Your solarbank has successfully configured the network.
If the configuration process fails, you can troubleshoot
below:
• Is the network working normally?
• Is the device close to the router?
• Is your Wi-Fi password entered correctly?
Firmware Update
Make sure your device has configured the Wi-Fi network and is currently online, and the micro inverter is
connecting to the Solarbank.
Step 1
1. Select the brand of the micro inverter which is connecting
to the Solarbank
• If you have not found a brand, pick "Others"
2. Select the model of the micro inverter
Step 2
*If there is an important update for the firmware of
Solarbank or micro inverter, the app will guide you to go to
the "Firmware Updates" process. Make sure your devices are
on and connected to Wi-Fi.
If there is no update requirement, skip this step.
*The updates might last for a few minutes. Please be patient.
If the updates fail, check if the devices are turned on or
online.

EN 10
Control Mode
When solar energy is produced, the power will flow to your home load usage, Solarbank storage, and the grid.
You may set family load power rates to limit solar energy output during a specified time, so that energy could
be eectively used by your family instead of being consumed by the grid. The extra energy will be stored in
your Solarbank.
In the final step, you can select Wi-Fi Control Mode or Bluetooth Control Mode.
1. WiFi Control Mode: Your Solarbank will connect to Anker server, and we will
provide more cloud services to you, including:
• Creating a home system.
• Remotely setting an energy plan.
• Remotely viewing the energy flow of the home.
• Collecting energy data and displaying trends from historical data.
2. Bluetooth Control Mode: Your Solarbank will not connect to Anker server and
will be able to work in oine circumstances. Note that you CANNOT:
• Create a home system.
• Review Solarbank's real-time data anytime. Only when you're connected to it.
• Set an energy plan anytime. Only when you're connected to Solarbank.
• Have a backup save of power data in the cloud.
Family Load Power Rate
When solar energy is produced, the power will flow to your home load usage, Solarbank storage, and the grid.
You may set family load power rates to limit solar energy output during a specified time, so that energy could
be eectively used by your family instead of being consumed by the grid. The extra energy will be stored in
your Solarbank.
Overall
1. Explaining the Daily Energy Usage Screen:
• Blue line: The home load power rate. Modify it in the
setting below.
• The curve: Solar energy produced the day before.
Note that weather changes may aect solar energy
production. This curve is for reference only.
• Green area: Estimated solar storage in Solarbank.
• Blue area: Estimated solar energy consumption,
including the home load and grid.
2. Time frame: You can schedule how much power is used
during each time period.
3. Family load power limit: Set a limit on solar energy
consumed by your home and the grid. You can customize
the rate for each time period. After modifying, the plan
[Picture 1] will change to reflect your changes.
Add Time
Period
Change
Power
Rate
1. You can tap [Set a schedule] below to add a time period.
Each clip has a default rate of 200W.
2. You can edit the power rate by tapping the schedule
section [set power] in each time period.

11 EN
Home System
Create a home system
Once the configuration is done, you can create a home for Solarbank:
Scene 1
Name your home and tap Create to build a home system.
• You may skip this step by closing the page; however, we
highly recommend you to create a home system so we
can provide better home energy service for you.
• You may create or join a home system later on the
[Profile] page.
Scene 2 If there are existing home systems on the account, you can
join a home system.

EN 12
Home statistics
When a home system is established, you can view and check power flow and statistics on your [Home] page.
Scene 1
1. Create a new home system or add a device to
your current home system.
2. Go to Home setting.
3. Select a home system (if you have multiple
homes).
4. The energy flows from each device in the home
• You may tap the Solarbank picture to check the
device status.
• If there's an error, you will see a mark by the
device.
5. Home load setting: This shows the solar energy
limit you've set for your home during the current
time period. You can tap it to go to the home load
setting page.
6. See the total amount of electricity savings, CO
emissions reduced, and solar energy production
generated by your home system.
The trend map shows the statistics of devices
during a certain period of time:
7. Change the data period to day/week/month/
year.
8. Check the previous / next time period.
9. View data trends of solar production, Solarbank,
and portable power stations (if trends are detected).
10. Graph showing electricity savings, CO
emissions reduced, and solar energy generated by
solar panels during the current time period.
11. Distribution of solar power in your home
system, either used or stored.

13 EN
Scene 2
When checking Solarbank data:
1. The trend map will show the charging (negative)
and discharging (positive) power rate of the
device.
2. The total storage and output of Solarbank during
the selected time period.
Storage and Maintenance
For optimal performance, follow the instructions below to store and maintain your Solarbank regularly.
• Keep the product on a flat surface when using, charging, and storing.
• Use a cotton cloth and water to clean. Do not use steel wool or other hard materials for cleaning.
• For long-term storage, charge and discharge Solarbank once every 3 months (discharge Solarbank to 20%,
then recharge it to 80%).

EN 14
FAQ
Q1: How does Solarbank work?
Solarbank is the middle connection between the photovoltaic module and the micro inverter. The photovoltaic
power generation flows into Solarbank and is intelligently distributed to the micro inverter. The PV power
then becomes electricity for your home or is stored as energy in the battery. The excess energy does not flow
directly into the grid. When the energy generated is far below the user's demand, the energy storage will
supply the house with electricity.
You can control this power distribution by setting limits during specific time periods in the Anker app. Then
further modify the power distribution with the following three methods:
1. When photovoltaic power generation meets or exceeds your limit, Solarbank delivers electricity to your
home through the pass-through circuit. Excess energy is stored in Solarbank.
2. When photovoltaic power generation is greater than 100W but less than your limit, the solar panels deliver
electricity to your home. No energy is stored, and no stored energy is discharged.
3. When photovoltaic power generation is less than 100W, electricity is sent to your home according to your
needs.
When photovoltaic power generation isn't working, electricity is delivered from energy storage based upon
your needs.
Examples:
• If your electricity demand is 100W at noon and the photovoltaic power generation is 700W, Solarbank will
allow 100W to flow into the micro inverter to enter the grid, and 600W will be stored in Solarbank.
• If your electricity demand is 600W and photovoltaic power generation is 50W, Solarbank shuts down
photovoltaic generation. Solarbank instead uses stored energy to distribute 600W to your home.
• In the morning, if your electricity demand is 200W and photovoltaic power generation is 300W, Solarbank
delivers electricity to your home through the pass-through circuit based on your settings. Excess energy is
stored in Solarbank.
Q2: What kind of solar panels and inverters are compatible with Solarbank?
Please use a solar panel that meets the following specifications for charging:
We recommend the total PV Voc (open circuit voltage) is in the range of 30-55V. PV Isc (short circuit current):
36A max. Input voltage: 60VDC max.
The micro inverter needs to meet the output specifications of Solarbank: Solarbank MC4 DC output: 11-60V,
30A (800W max)
Q3: How do I connect cables and devices to Solarbank?
• Connect the Solarbank to the micro inverter with the included MC4 Y output cables.
• Connect the micro inverter to a household socket with the original cable.
• Connect the solar panels to the Solarbank with the included solar panel extension cables.
Q4: What is the output voltage of Solarbank? Is there a minimum voltage for the micro inverter?
The output voltage of the Solarbank is 11-60V. If the output voltage of the Solarbank exceeds the start voltage
of the micro inverter, the micro inverter will work.
Q5: Is there a bypass or does the Solarbank always have to discharge?
We have set up a bypass circuit, but the energy storage and photovoltaic will not be discharged
simultaneously. During photovoltaic power generation, the micro inverter is powered by the bypass circuit to
reduce energy conversion losses. Some excess solar energy is used to charge Solarbank.
Q6: If my solar panel is below 400W, will connecting Solarbank damage the micro inverter?
No, connecting Solarbank will not damage the micro inverter. We recommend you set the output power in the
app below 400W to avoid potentially damaging the micro inverter.

15 EN
Q7: How do I connect two Solarbanks?
1. Connect each Solarbank to the same micro inverter with the included MC4 Y output cables.
2. Connect the micro inverter to a household socket with the original cable.
3. Connect the solar modules and the two units with the included solar module extension cables.
Q8: Can power stored in Solarbank E1600 be distributed to the domestic grid during outages?
In the event of a power failure, the power stored in the Solarbank E1600 cannot be distributed into the
domestic power grid.
Q9: Can Solarbank E1600 be used below 0°C? What is the ideal outside temperature?
Below 0°C, Solarbank cannot charge itself, but it does discharge normally. Photovoltaic power generation
also occurs normally. During winter, photovoltaic power generation is low. You'll likely use most PV generated
electricity with less excess power wasted.
We recommend using Solarbank inside during winter. Please see the ideal ambient temperature ranges below
for the Solarbank battery:
Charging temperature: 0~55˫
Discharging temperature: -20~55˫
Q10: Is Solarbank waterproof and dustproof?
The product can be placed outdoors and is rated IP65, which resists dust and water.
Specifications
Specifications are subject to change without notice.
Capacity 1600Wh
Battery type LiFePO4
Wireless type Bluetooth, 2.4GHz Wi-Fi
Input port MC4
Input power (charging) 800W max
Input current 30A max (15A ×2)
*Voltage range 11-60VDC
Output port MC4
Rated output power (discharging) 800W max
Output current 30A max
*Nominal voltage range 11-60VDC
Charging temperature 0-55˫
Discharging temperature -20-55˫
Dimensions 420×232×240mm
Weight 20kg
Waterproof rating IP65
Warranty 10 years
*Considering the power and voltage fluctuation of the solar panels, and to match the operating voltage of the micro inverter,
it is recommended that the total PV Voc (open circuit voltage) be between 30-55V.

EN 16
Safety Information
IMPORTANT SAFETY INSTRUCTIONS
Read all instructions before you use this product. Do not make any changes or create settings that are not
described in this manual. If physical injury, loss of data, or damage is caused by failure to follow instructions,
the warranty does not apply.
• To reduce the risk of injury, close supervision is necessary when the product is used near children.
• Do not put fingers or hands into the product.
• Use of an attachment not recommended or sold by the product manufacturer may result in a risk of
fire, electric shock, or injury to persons.
• To reduce risk of damage to the electric plug and cord, pull the plug rather than the cord when
disconnecting the product.
• Do not use the product in excess of its output rating. Overload outputs above the rating may result
in a risk of fire or injury to persons.
• Do not use the product or attachment that is damaged or modified. Damaged or modified batteries
may exhibit unpredictable behavior resulting in fire, explosion, or risk of injury.
• Do not operate the product with a damaged cord or plug, or a damaged output cable.
• Do not disassemble the product. Take it to a qualified service person when service or repair is
required. Incorrect reassembly may result in a risk of fire or electric shock.
• Do not expose the product to fire or high temperatures. Exposure to fire or temperatures above
130°C may cause an explosion.
• To reduce the risk of electric shock, unplug the power pack from the outlet before attempting any
instructed servicing.
• Have servicing performed by a qualified repair person using only identical replacement parts. This
will ensure that the safety of the product is maintained.
• When charging a device, the product may feel warm. This is a normal operating condition and
should not be a cause for concern.
• When charging the internal battery, work in a well-ventilated area and do not restrict ventilation in
any way.
• Do not clean the product with harmful chemicals or detergents.
• Misuse, dropping, or excessive force may cause product damage.
• When disposing of secondary cells or batteries, keep cells or batteries of dierent electrochemical
systems separate from each other.
• Do not use or store this product in direct sunlight for a long period, such as in a car, cargo bed, or
any other place where it will be exposed to high temperatures. Doing so may cause the product to
malfunction, deteriorate, or generate heat.
• Servicing of batteries should be performed or supervised by personnel knowledgeable about
batteries and the required precautions.
• Do not use this product near strong static electricity or strong magnetic fields.
• Do not expose this product to flammable, explosive gas, or smoke.
• Do not stand on the product.
• Do not immerse the product in water. If the product accidentally falls into water, place it in a safe,
open place and keep it away from fire until it is completely dry.
General Instructions Regarding Removal and Installation of Batteries
• When replacing batteries, replace with the same type and number of batteries or battery packs.
• Do not dispose of batteries in a fire. The batteries may explode.
• Do not open or damage batteries. Released electrolytes may be toxic and are harmful to skin and eyes.
• A battery can present a risk of electrical shock and high short-circuit current. The following precautions
should be observed when working on batteries:
a) Remove watches, rings, or other metal objects.
b) Use tools with insulated handles.

17 EN
c) Wear rubber gloves and boots.
d) Do not lay tools or metal parts on top of batteries.
e) Disconnect the charging source prior to connecting or disconnecting battery terminals.
f) Determine if the battery is inadvertently grounded. If inadvertently grounded, remove the source from
the ground. Contact with any part of a grounded battery can result in electrical shock. The likelihood of
such shock can be reduced if such grounds are removed during installation and maintenance (applicable
to equipment and remote battery supplies not having a grounded supply circuit).
Warning:
• Replacing a battery with an incorrect type may nullify safeguards and create danger;
• Disposal of the battery/product in a fire, a hot oven, or another source of significant heat, or by mechanically
crushing or cutting the battery/product may result in an explosion;
• Leaving the battery/product in an extremely hot environment may result in an explosion or leakage of
flammable liquids or gases;
• Subjecting the battery/product to extremely low air pressure may result in an explosion or leakage of
flammable liquids or gases.
CAUTION: RISK OF EXPLOSION IF BATTERY IS REPLACED BY AN INCORRECT TYPE. DISPOSE OF USED
BATTERIES ACCORDING TO THE INSTRUCTIONS.
Attention
Not permitted on aircraft.
Declaration of Conformity
Hereby, Anker Innovations Limited declares that this product is in compliance with Directives 2014/53/EU &
2011/65/EU. The full text of the EU declaration of conformity is available at the following internet address:
https://www.anker.com.
The following importer is the responsible party (contract for EU matters):
Anker Innovations Deutschland GmbH I Georg-Muche-Strasse 3, 80807 Munich, Germany
This symbol means the product must not be discarded as household waste, and should be delivered
to an appropriate collection facility for recycling. Proper disposal and recycling helps protect natural
resources, human health, and the environment. For more information on the disposal and recycling
of this product, contact your local municipality, disposal service, or the shop where you bought this
product.
The Bluetooth® word mark and logos are registered trademarks owned by the Bluetooth SIG, Inc.
and any use of such marks by Anker Innovations Limited is under license. Other trademarks and
trade names are those of their respective owners.

DE 18
Lieferumfang
MC4 Y Ausgangskabel ×2
Anker SOLIX Solarbank E1600
Solarpanel-Verlängerungskabel
×4
Übersicht
Produktübersicht
1
2
3
4
5 6
7
Ein-/Ausschaltknopf Stromstatus-LED
IoT-Knopf IoT-Status-LED
MC4-Anschlüsse für PV-Eingang 1 MC4-Anschlüsse für PV-Eingang 2
MC4-Anschlüsse für PV-Ausgang
BenutzerhandbuchSchlüssel zum Entfernen von
MC4-Steckern
Other manuals for SOLIX Solarbank E1600
2
Table of contents
Languages:
Other Anker Batteries Pack manuals

Anker
Anker SOLIX BP1000 User manual

Anker
Anker 621 User manual

Anker
Anker A1289 User manual

Anker
Anker 7 Series User manual

Anker
Anker MagGo User manual

Anker
Anker Prime User manual

Anker
Anker SOLIX BP3800 User manual

Anker
Anker Prime User manual

Anker
Anker 511 User manual

Anker
Anker SOLIX BP3800 User manual