Plug and Play Robotics ZenCrate User manual

Your ZenGuide
Rev.2 May 21st 2018

2
Table of Contents
Unpack Your ZenCrate ..................................................................................... 3
Package Contents............................................................................................. 3
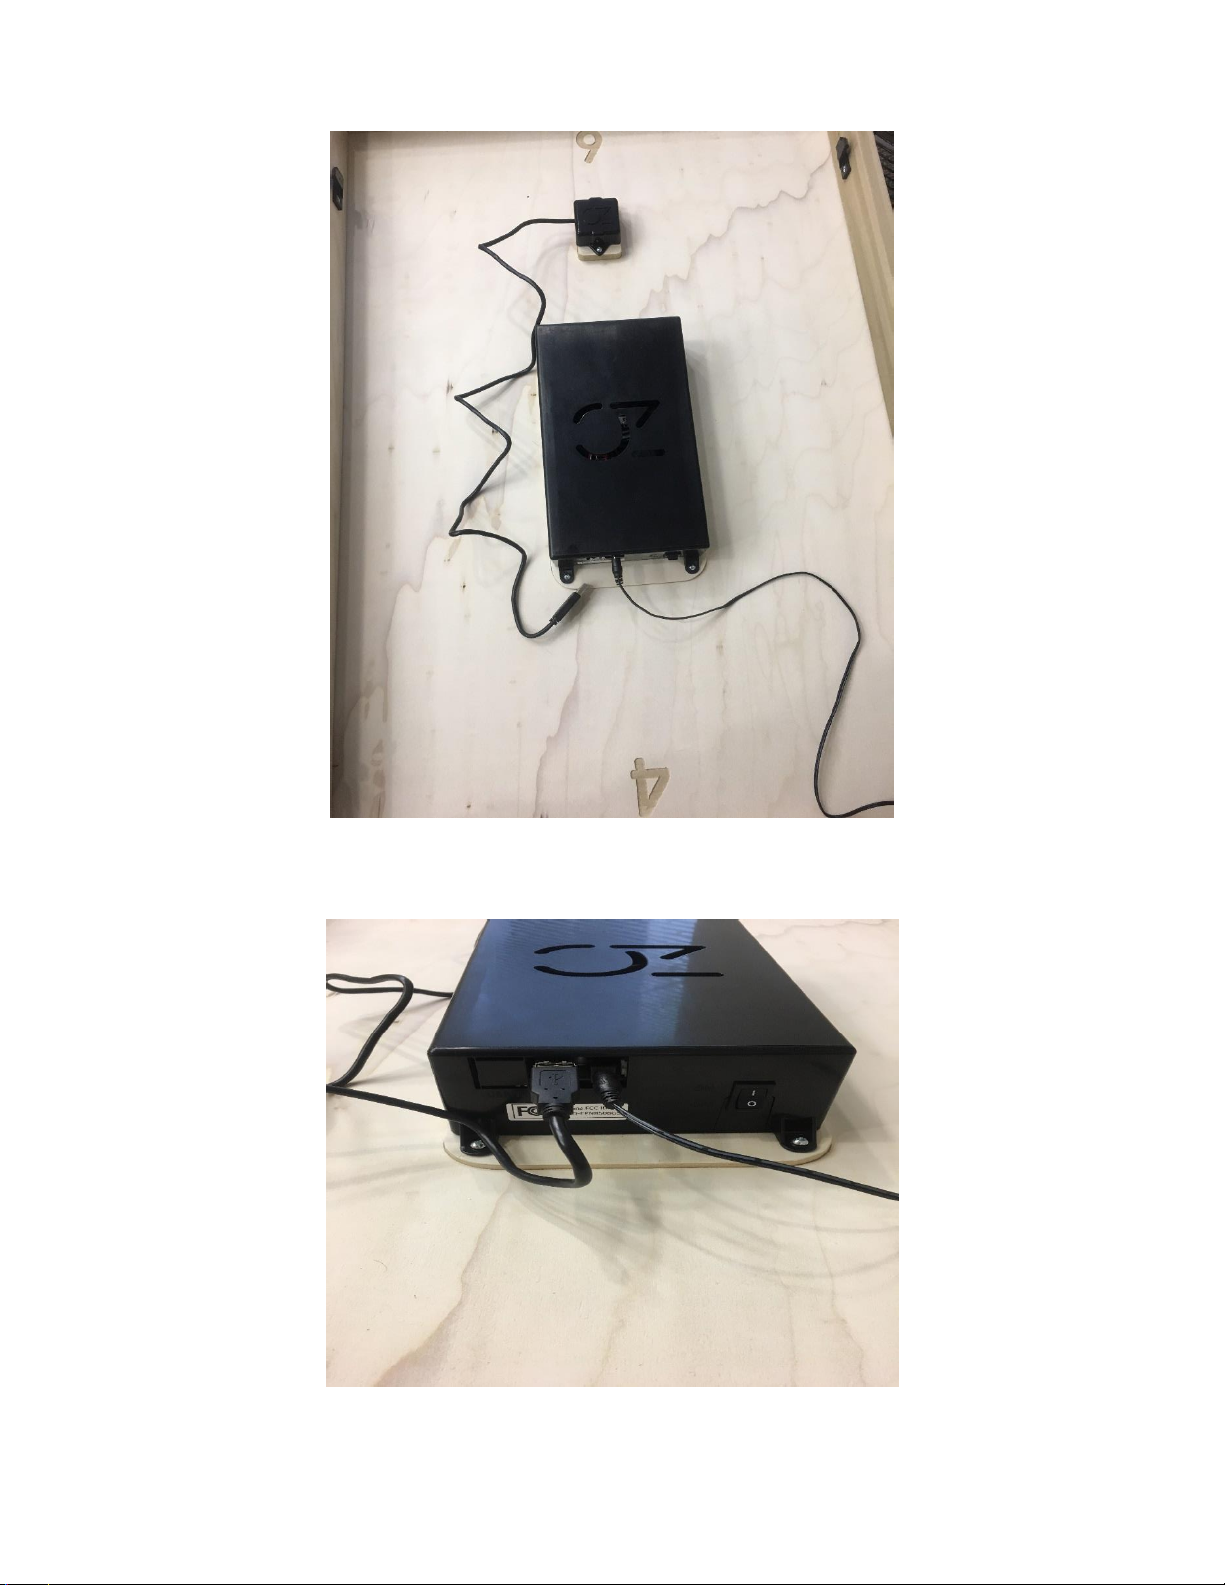
Assembly .......................................................................................................... 4
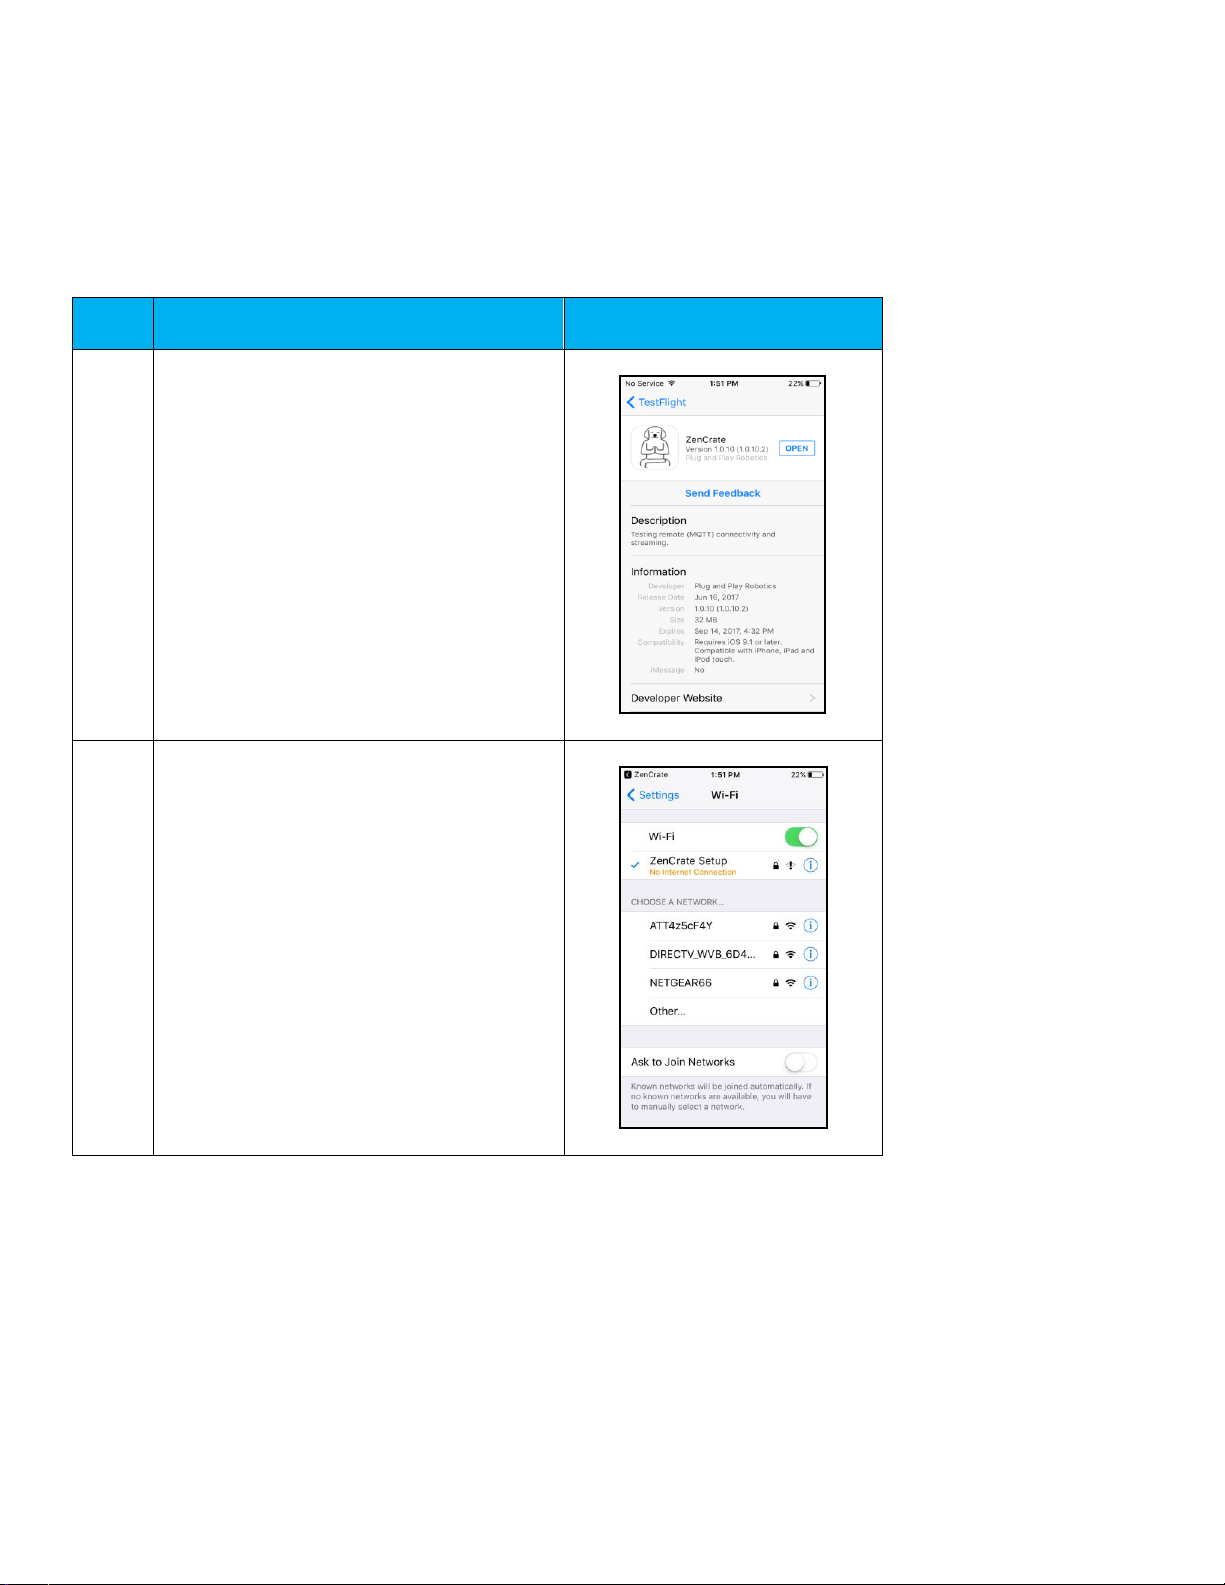
Download the ZenCrate App............................................................................. 10
IPhone, IPad and iPod touch ............................................................................ 10
Android ............................................................................................................. 15
Power Supply.................................................................................................... 19
Service and Support ......................................................................................... 19
Limited Warranty............................................................................................... 19
Frequently Asked Questions (FAQs) ................................................................ 19
Company Information........................................................................................ 20
FCC Warning Statement................................................................................... 20

3
Unpack your ZenCrate
Congratulations! Your dog now owns the most advanced anti-anxiety dog crate! The ZenCrate is super
easy to assemble and will take you no more than 5 to 10 minutes to put together.
Package Contents
Your ZenCrate will arrive in 2 separate packages and 3 if you purchased the waterproof memory foam
mattress with the following contents: 7 wooden panels (all labeled in figure 1), and 1 power supply in a small
white box (figure 1d). If you ordered the camera add-on it will arrive to you already attached to the electronics
panel. If you ordered the memory foam mattress you will have 1 vacuum sealed dog bed (figure 1a), 1
waterproof bed liner (figure 1b), 1 bed cover (figure 1c) Make sure you have plenty of room to assemble your
ZenCrate and lay the 7 wooden panels out on the floor, matching up each number, as shown in Figure 1 to
ensure you have all the panels.

4
Left Figure 1 Right
Figure 1a Figure 1b Figure 1c Figure 1d
Assembly –No tools needed
Place all seven (7) panels on the floor as shown in Figure 1. We recommend assembling with two people for
ease and safety.
Step 1) Left Panel –Align the number 1 on the left panel with the number 1 on the bottom panel. With the
bottom panel laying on the floor, insert the side panel so the black tabs & numbers line up with each other.
Push down firmly until the tabs click into the latches –as shown in figure 2 below.
Figure 2

5
Step 2) Right Panel –Align the number 2 on the right panel with the number 2 on the bottom panel. With the
bottom panel laying on the floor, insert the side panel so the black tabs & numbers line up with each other.
Push down firmly until the tabs click into the latches –as shown in figure 3.
Figure 3
Step 3) Back Panel –Align the number 3 on the back panel with the number 3 on the bottom panel. Slide the
back panel down along the two grooves of the left and right panels, making sure that the numbers line up –as
shown in figures 4 and 5. Drape the black cord over the top of the back panel as we will use this cord in step
4a –shown in figure 4.

6
Figure 4 Figure 5
Step 4) Electronics Panel –With the plastic “ZC” electronics box facing up, slide it into the grooves of the left &
right panels making sure that the number 4 on the electronics panel lines up with the number 4 on the back
panel –as shown in figures 6 and 7. Ensure the electronics cable is draped over the top of the back panel as
instructed in step 3. Push the panel firmly all the way to the back of the ZenCrate.
Figure 6 Figure 7
Step 4a) Electronics Cable - Connect the electronics cable that you draped over the back panel to the small
power socket on the plastic electronic box –as shown in figures 8 and 9.
Figure 8 Figure 9

7
Step 4b) Optional Camera add on –The camera is the smaller of the two plastic boxes on this panel. Connect
the camera to either USB port on the larger plastic box –as shown in figure 10.
Figure 10
Step 4c) On/Off (I/O) –Turn the I/O switch to the “I” position –as shown in figure 11.
Figure 11

8
Step 5) Door Panel –Align the number 5 on the door panel with the number 5 on the bottom panel –as
shown in figure 12. The door panel has two metal pins on the top and bottom. Place the bottom pin (this will
be on the same side as the number 5 on the door) into the hole on the left side of the floor panel –as shown in
figure 12. Let the door rest against the crate momentarily.
Figure 12 Figure 13
Step 5a) Door Panel latch –Attached to the door there is a small male end that will latch into the female
receptacle on the right side panel. The two will need to be lined up together and you can gently push the male
end in until it clicks, once clicked in the door will be secure –as shown in figure 14.
Figure 14

9
Step 6) Roof Panel –Align the number 6 on the top panel with the number 6 on the electronics panel. Then
align the four (4) corners of the top panel with the four exposed black tabs on the left and right side panels –as
shown in figure 16.The top panel will need to be gently pushed downward until the roof panel can also align
with the metal pin on the door –shown in figure 17. This pin will slide into the small hole on the bottom face of
the top panel.
Figure 15 Figure 16
Step 7) Power –Unpack the external power cord from figure 1d. One end of this will plug into a wall outlet and
the other end is a circular male end that will plug into the female barrel jack located on the back panel –as
shown in figure 17.
Figure 17

10
Download the ZenCrate App
For iPhone, iPad and iPod Touch Users
Be sure the ZenCrate is plugged in to a wall outlet and is turned on.
a. Go to the App Store and download the “ZenCrate” app. Your device will discover the ZenCrate on the
network.
Step
Action
Result
1
Please Note:
The ZenCrate app requires iOS 9.1 or later
and is compatible with iPhone, iPad and
iPod touch.
*Please note the ZenCrate will not support
WEP Security only WPA/WPA2 and
2.4GHz frequency when connecting to your
home router network.
2
Use your iPhone Settings application to
connect to the ‘ZenCrate Setup’ network
with password ‘zencrate’’. Note the
message will show ‘No Internet Connection’
when connected to the ZenCrate Setup
network.

11
3
Open the ZenCrate app and your device
will begin searching for a ZenCrate on the
network.
*Please Note if the ZenCrate is not found
the first time it may have timed out and try
discovering again.
4
Choose your Wi-Fi network and enter your
personal Wi-Fi password at this time.
5
Please wait while the ZenCrate is setting up
on the network.

12
6
Your device has discovered your ZenCrate
and added it to your home network.
*If you get an error message or no
ZenCrates detected check and make sure
your password for your router was entered
correct as well as checking your router
settings and confirm it is set to WPA/WPA2
security and 2.4GHz frequency. (If you do
not know how to log into your router you
may need to call your internet provider and
they can do it for you. If your system was
set to 5.0GHz you can change back after
the ZenCrate is connected to your home
network)
7
*Whatever option is greyed out is the
selection your device is set to.
ON indicates the ZenCrate is on and
functioning.
OFF Indicates your ZenCrate is off and is
NOT functioning.
AUTO indicates your ZenCrate will activate
whenever your pet enters the ZenCrate.
STREAM VIDEO is for purchased optional
camera only.
SHOW USAGE shows you how often your
pet enters the ZenCrate.
Volume is adjustable with the slide bar.
Note: The Zen Music will stop when your
pet exits the ZenCrate when set to AUTO.
Again, your selection will be greyed out as
seen in picture.
*Gear wheel in the top right-hand corner
will drop down and give you options to
select Settings or Notifications
To Add another crate hit the Discover icon
in the bottom middle of the screen and it
will start searching for other crates that are
turned on.

13
To manage your crates or change crates
you are currently connected to, select the
button in the bottom right corner of the
screen that says ZenCrates. You will then
see all your crates listed and select which
crate you would like to view.
8
Show Usage
This screen shows you how much time your
pet spends in your ZenCrate. The bars
indicate the number of hours and minutes
as well as the days of the week.
Select Done to go back to the Main Screen.
9
Settings
Select ‘Disconnect your ZenCrate’ to
disconnect your ZenCrate from your home
network.
Any server or firmware updates you need to
perform on the crate will show up in this
screen and show perform update button
above notifications, but you will also get an
alert when you first open the ZenCrate App
when they are available to you.

14
10
This screen indicates that your ZenCrate
has been disconnected from your home
network.
Select OK to return to the previous screen.
11
Notifications
Email address Add –allows you to enter
an email address to your ZenCrate
notifications.
SMS Number Add –allows you to enter an
SMS number to your ZenCrate
notifications.
Enable Notifications
Email –slide to the right to enable email
notifications.
SMS –slide to the right to enable SMS
notifications.
Email Address –will list the email
addresses you have entered.
SMS Mobile #s –will list the SMS numbers
you have entered.
Notify Days of Week- Choose the days of
the week you would like to be notified when
your dog enters the crate.
Notify During Time- You can set a time
window of when you would like to be
notified when your dog enters the crate.
Daily Notify Limit- Set a limit to how many
times a day you would like to be notified.
Select Done when finished.

15
For Android Users
Be sure the ZenCrate is plugged in to a wall outlet and is turned on.
a. Go to the Play Store and download the “ZenCrate” app.
b. Your device will discover the ZenCrate on the network automatically.
Step
Action
Result
1
Tap the Wi-Fi signal to connect to the
ZenCrate app.
*Please note the ZenCrate will not support
WEP Security only WPA/WPA2 and
2.4GHz frequency.
2
Your device will begin searching for a
ZenCrate on the network.
3
Choose your home network to connect to
the ZenCrate.

16
Step
Action
Result
4
Enter your home network’s password.
5
It may take a few minutes to setup the
ZenCrate with network credentials.
*If you get an error message or no
ZenCrates detected check and make sure
your password for your router was entered
correct as well as checking your router
settings and confirm it is set to WPA/WPA2
security and 2.4GHz frequency. (If you do
not know how to log into your router you
may need to call your internet provider and
they can do it for you. If your system was
set to 5.0GHz you can change back after
the ZenCrate is connected to your home
network)
6
The ZenCrate app has connected and is
ready to use.

17
Step
Action
Result
7
*Whatever option is greyed out is the
selection your device is set to.
ON indicates the ZenCrate is on and
functioning.
OFF Indicates your ZenCrate is off and is
NOT functioning.
AUTO indicates your ZenCrate will activate
whenever your pet enters the ZenCrate.
STREAM VIDEO is for purchased optional
camera only.
SHOW USAGE shows you how often your
pet enters the ZenCrate.
Volume is adjustable with the slide bar.
Note: The Zen Music will stop when your
pet exits the ZenCrate when set to AUTO.
Again, your selection will be greyed out as
seen in picture.
To Add another crate hit the Discover icon
in the bottom middle of the screen and it
will start searching for other crates that are
turned on.
8
Show Usage
This screen shows you how much time your
pet spends in your ZenCrate. The bars
indicate the number of hours/minutes as
well as the date.

18
Step
Action
Result
9
Settings
Go to the three circle tab that looks like
in the upper right corner and hit Settings
from the drop down and it will take you to
the screen seen to the right.
You will see ZenCrate Name and the Pet
Name on your device’s keypad as well as
Distance to dog bed adjustment bar
CHANGE NAME allows you to change the
ZenCrate’s name by clicking next to the
preloaded name “Charger’s Crate” and
delete and place whatever you want your
crate name to be and hit Change Name to
save input.
CHANGE PET NAME allows you to change
your pet’s name. Same as above delete
preloaded name “Charger”and enter in
your pet’s name and hit Change Pet Name
to save.
Any server or firmware updates you need to
perform on the crate will show up in this
screen with an update available button
above Disconnect Your ZenCrate, but you
will also get an alert when you first open the
ZenCrate App when they are first available
to you.
9
Notifications
Email Notification –Click the box to
enable email notifications.
Email Recipients –Click and it will list the
email addresses you have entered and be
able to add.
Text Notification –Click the box to enable
text notifications.
Text Recipients –Click and it will list the
numbers you have entered and be able to
add.
Notify Days of Week- Choose the days of
the week you would like to be notified when
your dog enters the crate.
Notify During Time- You can set a time
window of when you would like to be
notified when your dog enters the crate.
Daily Notify Limit- Set a limit to how many
times a day you would like to be notified.

19
Step
Action
Result
10
Select Manage your ZenCrate to add or
select a different ZenCrate.
Power Supply: The ZenCrate is equipped with a power supply having a grounding wire with a grounding plug.
Make sure you are within close proximity to a power outlet. Do not use outdoors or in damp areas. Do not
alter or subject the power supply cord to damage or stress.
Service and Support: For more information about ZenCrate, please visit
www.zendogcrate.com or contact support@zendogcrate.com
Limited Warranty: The ZenCrate has a 30-day warranty against defects in workmanship and materials. If
within 30 days of purchase a defect occurs as a result of normal use, ZenCrate will repair the defect or
exchange the product. Product failures caused by excessive or abusive conditions do not qualify for
exchange. This warranty is available only to the original purchaser and is not transferrable. Please be advised
that shipping costs will fall on the customer. Contact ZenCrate at support@zendogcrate.com.
Frequently Asked Questions (FAQS)
Does the ZenCrate come with a door to make the crate enclosed?
The ZenCrate comes with a door with an opening in the front for the dog to come and goes as it pleases. We will be
releasing a gate insert as an add-on feature in the near future which will make the ZenCrate a closed crate.
Can I switch the direction of how the door opens?
Yes, we have designed the door to be able to open both ways. If you look closely on your ZenCrate you will notice that
we have installed metal holes on both the left and right side of your crate so that you can flip your door around. You will
need to use a Philips head screw driver to remove the female latching mechanism from the right side panel and screw it
into the left side panel –we have made small pre-drilled holes so you can easily line this up. As always you can contact
our customer service support for additional help if needed.
Is the ZenCrate safe?
We use all natural poplar hardwood and plywood, sourced directly from the U.S. that meet or exceed strict regulations,
such as the California Air Resources Board or (CARB). Nearly all wood products made overseas or from cheap materials
contain formaldehyde, which can be toxic for both humans and animals. Having tight control over these materials is just
one reason we have decided to manufacture right here in the U.S.

20
What are the features of the orthopedic dog bed?
The orthopedic memory foam mattress has a waterproof liner that separates from the mattress for easy cleaning. Both
the cover and liner have a zipper on one side. The mattress has 2 inches of full memory foam and 2 inches of support
foam. The memory foam waterproof liner and mattress cover can be machine washed in cold water and line dry. Do not
place the waterproof liner in the dryer.
Where does ZenCrate ship to?
Currently we only ship to US and Canada but have plans to expand our shipping destinations in the future. If you’d like to
be updated as we release new developments and shipping locations for the ZenCrate please subscribe by singing up for
our newsletter at www.zendogcrate.com.
What is your return policy?
ZenCrate 100% stands behind the engineering and production of each ZenCrate. With that said every dog is an individual
and every dog is different. The ZenCrate is designed as a tool among a variety of modalities to reduce anxiety. Due to the
personal nature of each ZenCrate, products cannot be returned in the event that it does not succeed in curing your dog’s
anxiety. We do not authorize returns based on your dog’s usage of the ZenCrate. If a return is granted after contacting a
customer service representative shipping will not be covered by ZenCrate for any returns made, this will fall onto the
customer.
In the case of damaged, missing hardware or need help setting up your ZenCrate we are here to lend a paw, so please
contact us via chaton our website, email support@zendogcrate.com or by phone at 954-635-2129 M-F 8am-5pm EST. If
damage to the ZenCrate during shipping occurs, please take pictures of the box it came in before throwing shipping
boxes away, so we can contact the shipping company as soon as possible and report it. Please contact ZenCrate within
14 days of delivery to report any damaged pieces or defects due to shipping. For a full detailed list of our return policy
please refer to ZenDogCrate.com under Support for a more detailed list.
What do I do if my dog will not go into the ZenCrate?
ZenCrate was made for self-administered anxiety relief for your pets, but it may take some time for your dog to get used
to his or her new ZenCrate. Begin with positive reinforcement or treats inside their crate until they get used to their new
surroundings. For more information and tips on treating pet anxiety naturally, visit our blog at zendogcrate.com.
FCC Warning Statement
FCCWARNING STATEMENT
THIS DEVICE COMPLIES WITH PART 15 OF THE FCC RULES. OPERATION IS SUBJECT TO THE
FOLLOWING TWO CONDITIONS: (1) THIS DEVICE MAY NOT CAUSE HARMFUL INTERFERENCE,
AND (2) THIS DEVICE MUST ACCEPT ANY INTERFERENCE RECEIVED, INCLUDING INTERFERENCE
THAT MAY CAUSE UNDESIRED OPERATION.
NOTE: THE GRANTEE IS NOT RESPONSIBLE FOR ANY CHANGES OR MODIFICATIONS NOT
EXPRESSLY APPROVED BY THE PARTY RESPONSIBLE FOR COMPLIANCE. SUCH MODIFICATIONS
COULD VOID THE USER’S AUTHORITY TO OPERATE THE EQUIPMENT.
NOTE: This equipment has been tested and found to comply with the limits for a Class B digital
device, pursuant to part 15 of the FCC Rules. These limits are designed to provide reasonable
protection against harmful interference in a residential installation. This equipment generates
uses and can radiate radio frequency energy and, if not installed and used in accordance with
the instructions, may cause harmful interference to radio communications. However, there is no
guarantee that interference will not occur in a particular installation. If this equipment does cause
harmful interference to radio or television reception, which can be determined by turning the
Table of contents
Popular Pet Care Product manuals by other brands

whisker
whisker Litter Robot manual

Extreme Dog Fence
Extreme Dog Fence Contain and Train owner's manual

Chihiros Aquatic Studio
Chihiros Aquatic Studio Commander Controller instructions

Petcube
Petcube Bites 2 Lite user guide

Sunbeam
Sunbeam SBCF01 instruction manual

SportDOG
SportDOG SportTrainer 575 user manual