PNI VOYAGER S1250 User manual

PNI VOYAGER S1250
USER MANUAL / MANUAL DE UTILIZACIÓN
HASZNALATI UTASITTAS / INSTRUKCJA OBSŁUGI
MANUAL DE UTILIZARE
DASHBOARD DVR CAMERA / CÁMARA DVR AUTO
AUTO DVR CAMERA / CAMERA DVR AUTO

EN
3
Caution! Read before use!
1. Please use only class 10 (or better) memory cards with this device,
otherwise due to incompatibility, errors may occure like “le error” or “SD
card error”. This device supports microSD memory cards up to 32Gb.
2. We recommend to format the memory card when rst use it in this
device.
If the memory card contains external les, it may not be read properly.
3. Caution when inserting the memory card intro the device! If the
memory card is not inserted properly, it can damage the memory card
and the device also.
4. It is recommended to disconnect the power adapter from the car
socket when the device is not in use, such in parking, otherwise it will
drain power from the car battery and can cause your car slow to crank
and even to burn the device when starting the car.
5. This DVR camera is designed to be used in car, with the original
power adapter. The internal battery of the camera it has a small capacity
and it is used only for saving the last recording le after you turned o
the car.
6. This device it is power supplied at 5V with 1A, DO NOT use chargers
and power adapters from home electronics, USE ONLY the original car
adapter to power the device. Otherwise you may damage the device.
The original car adapter has an input power range of 8 to 36V and output
to 5V with 1A.
Nota: Pentru a intelege si a utiliza corect produsul, va rugam sa cititi cu
atentie acest manual inainte de utilizare.

EN
4
USER GUIDE
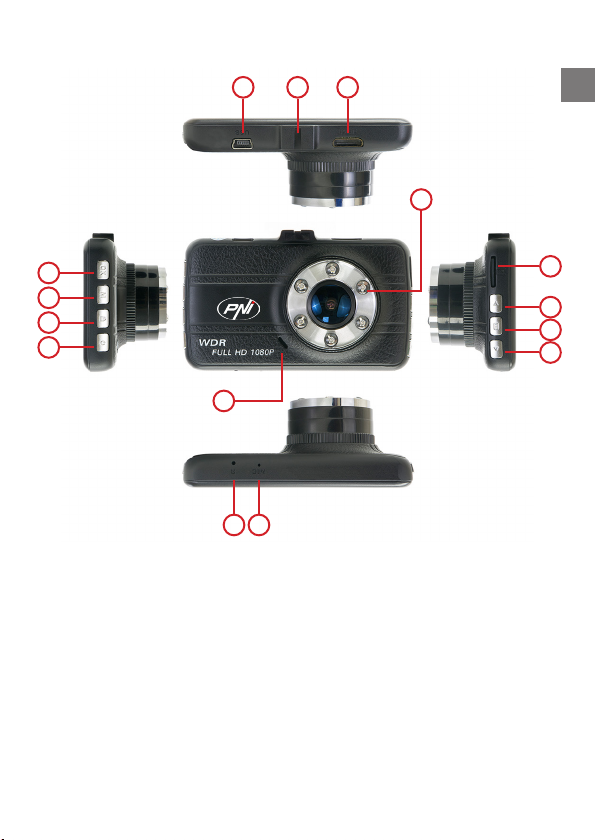
1. ON/OFF: Short press power button to power on the device; long press
to power o the device.
Short press in video or photo mode to activate night mode.
Note: The camera automatically powers on when you connect the power
supply. If a memory card is inserted, once the camera has started, it will
start recording.
2. Start/Stop recording: In video mode, press OK button to start or stop
recording.
3. Taking pictures: In photo mode, press OK button to take a picture.
4. Playback: In playback mode, use Up/Down keys to navigate through
recorded les; press OK button to play back a selected le.
5. OK: Select and conrm settings; start/stop recording; take pictures.
6. UP key: In menu, it is navigate up function. In photo or video mode,
press Up to zoom in. In playback mode, press Up to rewind.
7. DOWN key: In menu, it is navigate down function. In photo or video
mode, press Down to zoom out. In playback mode, press Down to fast
forward.
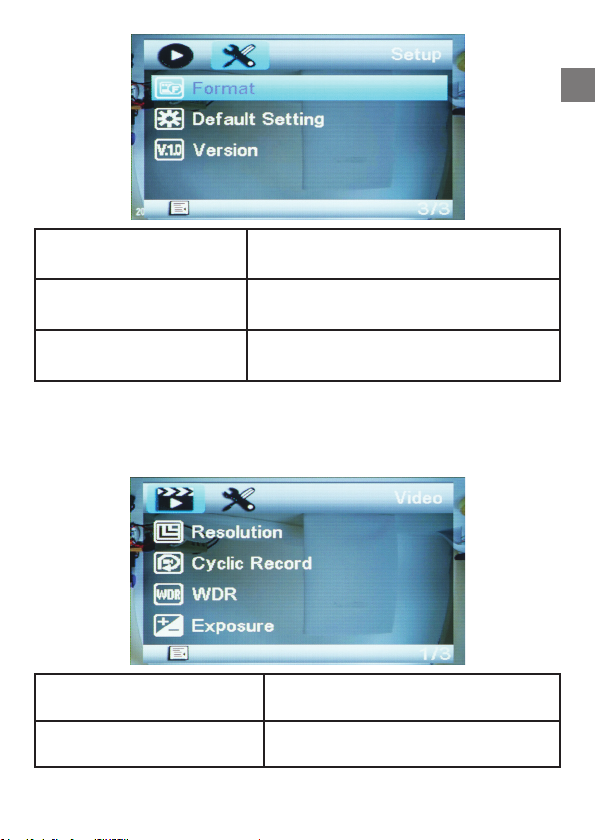
8. Menu: In video or photo mode, press Menu button to enter the video
or photo settings; navigate the menu using the Up/Down keys, press OK
button to edit a setting and to conrm it. In any mone, press menu button
twice to enter general settings.
Long press Menu button to activate “Parking monitor”
9. Modes: In stand-by status, press Mode (M) key to switch between
Video, Photo and Playback mode.
While recording video, press Mode to protect the le.

EN
5
OVERVIEW
1. miniUSB port 9. M (Mode)
2. Windscreen mounting bracket 10. Lock
3. miniHDMI - AV output 11. Power (ON/OFF)
4. microSD card slot 12. Reset
5. Up 13. Microphone
6. Menu 14. Speaker
7. Down 15. IR LEDs
8. OK
123
4
5
6
7
8
9
10
11
12 13
14
15

EN
6
Video recording
In Video mode, in the upper left corner of the screen the icon will be
displayed, press OK to start recording.
The icon will be ashing in the upper left corner of the screen.
To stop recording press OK button.
The DVR camera splits the recordings into 3 minute les by default. From
the video settings menu, you can adjust the le split limit, by selecting
Cyclic Record, to 1, 2 or 3 minutes.
Note: To protect the current recording le (1, 2 or 3 minutes) press the
Mode or Lock key.

EN
7
Taking pictures
1. Press Mode key untill the icon will be displayed in the upper left
corner of the screen.
2. To take a picture press OK button.
Note: Hold still the camera to take a clear picture.
Playback
1. Browsing les: Press Mode key to switch to palyback mode.
Browse les using Up/Down buttons and press OK to play back a le.

EN
8
2. Delete and protect: In playback mode, press Menu key and select
one of the 2 options: “Delete” or “Protect”.
Select “Delete”, then choose: “delete current?” to delete the selected
le or “delete all?” to delete all the les on the memory card (except the
protected les).
Press OK to select and conrm.
Select “Protect”, then choose “lock one” to protect the selected le,
“lock all” to protect all the les on the memory card, “unlock one” to
remove protection for the selected le or “unlock all” to remove protection
for all the les on the memory card.
Press OK to select and conrm.

EN
9
SETTINGS
General settings
In any mode, press Menu button twice to open general settings menu.
Use Up/Down keys to brows though settings. To select and conrm
settigns press OK button.
Date/Time Set the current date and time
Auto Power O Adjust the power o time out timer
Beep sound Activate / Deactivate key press beep
sound
Language Select display language

EN
10
Display auto o Adjust the turn o screen time out timer.
Infrared light Activate / Deactivate night mode
Frequency 50 Hz or 60 Hz
License No set Select to set the car plate number.
To set the car license number, select “License No set“.
Press Mode key to set the license plate number, use Up/Down buttons to
browse letters/numbers, press OK button to conrm.
Repeat procedure for the rest of the plate number characters.
Select “OK“ using Mode key, then press OK button to conrm.
Note: The car plate number will be shown on the display above the date
and time, and it will be stamped on the recorded les.

EN
11
Format Select to format the memory card
Default setting Select to return to factory settings
Version Select to check current rmware version
Video settings
In video Mode, press Menu button to open video settings.
Resolution Select video recording resolution
Cyclic Record Adjust the le split limit or deactivate
cyclic recording

EN
12
WDR Activate / Deactivate WDR function
This function allows recording images
in a higher dynamic range
Exposure Adjust image exposure level
Motion Detection Activate / Deactivate motion detection
triggered recording
Microphone Activate / Deactivate audio recording
Date Stamp Activate / Deactivate date and time
stamp on the recorded les
Gravity sensing Adjust sensitivity level for the gravity
sensor.
Parking monitor Adjust sensitivity level for the parking
monitor.

EN
13
Photo settings
In photo mode, press Menu button to open photo settings.
Capture mode Select ‘single’ to take a instant shot, or ‘timer‘ to
take a timer delayed picture
Resolution Select photo rezolution
Sequence Activate / Deactivate burst photo mode
Quality Select image quality level

EN
14
Sharpness Adjust image sharpness level
White Balance Adjust image white ballance level,
according to the environment
Color Set an image color eect
ISO Adjust light sensitivity level of the
image sensor
Exposure Adjust image exposure level
Anti-Shaking Activate / Deactivate image
stabilizer
Quick Review Adjust image preview time after
taking the picture
Date Stamp Activate / Deactivate date and
time stamp on the pictures

This manual suits for next models
2
Table of contents
Other PNI Dashcam manuals