PNI Voyager S2500 User manual

PNI Voyager S2500
4K UHD Dashcam / DVR за кола / Auto DVR /
DVR para coche / DVR de voiture / Autós DVR /
DVR per auto / Auto DVR / DVR samochodowy /
Camera auto DVR 4K UHD

EN User manual ........................................................ 3
BG Ръководство за употреба .............................. 20
DE Benutzerhandbuch ............................................. 40
ES Manual de usuario ............................................... 60
FR Manuel utilisateur ............................................... 78
HU Használati utasítás .............................................. 97
IT Manuale utente .................................................. 115
NL Handleiding ........................................................ 133
PL Instrukcja obsługi ............................................... 152
RO Manual de utilizare ............................................. 171

3 - User manual
Safety warnings
• This car DVR supports Class 10 SD card with
a maximum capacity of 256 GB. If you use
another type of card, you may see the error “file
error” or “Memory error”.
• Format the card when you insert it into the car
DVR for the first time.
• Pay attention to the direction of inserting the
card into the car DVR. If you insert it in the
wrong direction, you could damage both the
card and the DVR.
• This car DVR only works if it is powered by the
car’s battery through the cigarette lighter plug.
The built-in battery has a very small capacity and
is only for saving data in case of sudden power
interruption.
• To power the DVR, do not use a cigarette lighter
plug other than the one in the package (5V 2A).
• The car DVR only works if it is powered with the
power cable included in the package or with the
optional power cable (code PNI-PC-DVR).

4 - User manual
Introduction
1
2
3
4
1
Short press Start/Stop recording
Long press Turn on/o the device
In the menu Confirm selection
(OK)

5 - User manual
2Short press
Change mode: Video
recording, Image
capture, File access
Long press Menu access
3
Short press Enable/Disable audio
Long press AP Mode
In the menu Up function
4Short press Video file lock
In the menu Down function
Functions
Cyclic recording
Car DVR overwrites older files (except locked ones)
when the SD card is full.
Motion detection
When the DVRisin standby mode, ifsomething moves
in front of the camera, the DVR will automatically
start recording.

6 - User manual
G-sensor (Gravity Sensor)
If your car is suddenly hit by an external force (such
as in the case of an accident), thanks to the G-sensor
function, the device will automatically block the file
with the impact recording. Thus, this file will not be
deleted by the cyclic recording.
Parking monitor
When the car is parked and the Parking Monitoring
function is active, the car DVR continues recording.
For this, you need a special power cable (code PNI-
PC-DVR), which can be purchased separately.
Note: set the sensitivity of the G-Sensor function to
High.
Basic instructions
Turn on/o the device
Long press the button to turn on/o the device.

7 - User manual
Start / Stop recording
Briefly press the button to start/stop video
recording.
Switch operating mode
After stopping recording, short press the M key to
switch between Video, Photo (image capture) or
Playback mode.
Image capture
• Briefly press the key to stop video recording.
• Short press the M key to switch to Image
Capture mode.
• Press the key to take a picture.
Preview and play recordings
• Briefly press the key to stop video recording.
• Briefly press the M key twice to switch to file
preview mode.
• Press the Up or Down key to reach the desired
photo or video file.

8 - User manual
• Press the key to play the selected video file.
• Press the M key to return to the file list.
• Press the M key again to exit playback mode.
Video recording
Recording starts automatically when you power up
the DVR. The green LED on the device flashes. In the
upper right corner of the screen, the red icon flashes
and the timer is displayed. If you want to disable the
audio recording, briefly press the Down key. If you
want to take a picture, briefly press the Up key. If you
want to lock the file with the current recording, briefly
press the Down key.
To stop the recording manually, press the key briefly
.
To start recording, press the key again .
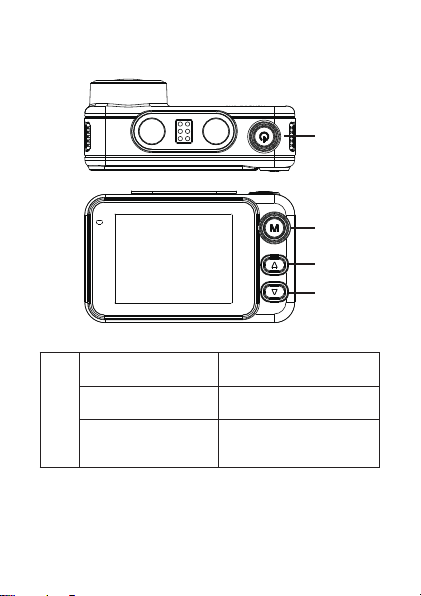
Video mode menu
• Press the key to stop recording.
• Long press the M key to access the video menu.
• Press the Up or Down key to navigate through
the menu.
• Press the key to access a submenu.

9 - User manual
• Press the Up or Down key to navigate through
the options.
• Press the key to confirm the selection.
01. Resolution
Options: 4K 30 fps/2K 30fps/1080P 60 fps/1080P
30fps.
02. Cyclic recording and video file duration
Options: O (cyclic recording disabled), 1 min, 2 min,
3 min.
03. WDR
Options: On (active function) and O (function
inactive).
04. Exposure
Options: +2/3, +1/3, +0.0, -1/3, -2/3, -1.0, -4/3, -5/3,
-2.0.
05. Audio record
Options: On (audio recording enabled) and O (audio
recording disabled).
06. Motion detection
Options: On (active function) and O (inactive

10 - User manual
function).
07. G-sensor
Options: motion sensitivity setting (low, medium,
high) and disabling the G-sensor function.
08. Parking
Activating/Deactivating the Parking Monitoring
function.
09. Stamp date
Options: On (the date will be printed on the video
recordings) and O (the date will not be printed on
the video recordings).
10. Volume
Set the volume level: low, medium, high or o.
Photo mode menu
• Press the key to stop recording.
• Short press the M key to switch to Image capture
(photo) mode.
• Long press the M key to access the photo menu.
• Press the Up or Down key to navigate through
the menu.

11 - User manual
• Press the key to access a submenu.
• Press the Up or Down key to navigate through
the options.
• Press the key to confirm the selection.
01. Capture mode
Options: Single (the photo is taken only when the
key is pressed ), 2S Timer, 5S Timer, 10S Timer
(periodically, at 2, 5 or 10 seconds the device will take
a photo).
02. Photo dimensions
Options: 8M 3264 x 2448, 5M 2992 x 2244.
03. Exposure
Options: +2.0, +5/3, +4/3, +1.0, +2/3, +1/3, +0.0,
-1/3, -1.0, -4/3, -5/3, -2.0
04. Stamp data
Options: O (the date will not be printed on the
photos), Date (only the date will be printed), Date/
Time (both the date and time will be printed).

12 - User manual
General menu
• Whatever mode you are in, Video or Photo,
long press the M key twice in a row to access the
general settings menu.
• Press the Up or Down key to navigate through
the menu.
• Press the key to access a submenu.
• Press the Up or Down key to navigate through
the options.
• Press the key to confirm the selection.
01. WiFi
Options: On (WiFi enabled) and O (WiFi disabled).
02. Date/Time
Set the date and time.
03. Automatic shutdown
Options: O (disabled function), 1 minute, 3 minutes,
5 minutes.
04. Automatic screen shutdown
Options: O (disabled function), 1 minute, 3 minutes.

13 - User manual
05. Language
Options: English, Spanish, Portuguese, Russian,
Romanian.
06. Key tone
Options: On (active function) and O (inactive
function).
07. Volume
Options: 1 - 5.
08. Frequency
Options: 50Hz si 60Hz.
09. Format
Format SD card.
10. Reset
Return to factory values.
11. Version
Display firmware version.

14 - User manual
Control from the Viidure application
• Activate the WiFi option.
• Download the Viidure-Dashcam Viewer
application from the App Store or Google Play.
• After installing the application, add the camera
to the application.
• Press the “Add camera” button.
• In the next interface, press the “Next” button,
then “Connect WiFi”.
• Go to the phone’s WiFi settings and connect to
the WiFi network generated by the camera. The
name and password of the network are displayed
on the screen of the car DVR, in the WiFi menu.
• Access the camera by pressing the Access
camera button.
• Through the application you can directly access
the images taken by the car DVR, you can start/
stop the video recording, you can make image
headers, you can access the video recordings
from the SD card installed in the DVR and you
can make dierent settings, such as enabling/
disabling audio recording, video recording
file duration, collision sensitivity, SD card
formatting and Reset.

15 - User manual

16 - User manual

17 - User manual
Technical specifications
Video resolution
4K 3840*2160 @30FPS
/ 2K 2560*1440@30FPS
/ FHD 1080P
1920*1080@60FPS &
30FPS
Video format MP4 H.265
Sensor SONY 335
View angle 170°
Screen 2.0” IPS (320*240)
Recordings storage
Micro SD card slot
(maximum capacity
256GB)
Input 12V / 24V
Output 5VDC 2A
Connections
USB Type C (for power
cable connection)
Jack 2.5 mm for external
camera connection

18 - User manual
Battery Super Capacitor 2.0UF
Dimensions 72 x 45 x 32 mm
Weight 60 gr
WiFi frequency 2.4GHz
Transmission power 100mW
Operating
temperature -26°C ~ +80°C
Troubleshooting
The error “SD card full”
appears on the screen
Make sure you use a
compatible Class 10 SD
card.
Make sure that you
have activated cyclic
recording in the DVR
menu.
We recommend periodic formatting (2-3 times a
month) of the SD card, to delete blocked files that
are not deleted by cyclic recording.

19 - User manual
The image freezes while
the DVR is recording
Make sure you use a
compatible Class 10 SD
card.
Change the SD card. If
the problem persists,
contact a specialized
service center.
The recorded image is
not very clear
Check if you have set
the maximum resolution
in the menu.
Environmental
conditions, such as
insucient light or fog,
can aect the quality of
the recorded image.
Simplified EU declaration of conformity
ONLINESHOP SRL declares that the PNI Voyager
S2500 Car DVR Camera complies with the EMC
Directive 2014/30/EU and the RED Directive
2014/53/EU. The full text of the EU declaration
of conformity is available at the following internet
address:
https://www.mypni.eu/products/9203/download/
certifications

20 - Ръководство за употреба
Предупреждения за безопасност
• Този DVR за кола поддържа SD карта от
клас 10 с максимален капацитет от 256 GB.
Ако използвате друг тип карта, може да
видите грешката „грешка във файла“ или
„Грешка в паметта“.
• Форматирайте картата, когато я поставите
в автомобилния DVR за първи път.
• Обърнете внимание на посоката на
поставяне на картата в автомобилния DVR.
Ако го поставите в грешна посока, можете
да повредите както картата, така и DVR.
• Този DVR за кола работи само ако се
захранва от акумулатора на автомобила
през щепсела на запалката. Вградената
батерия е с много малък капацитет и служи
само за запазване на данни при внезапно
прекъсване на захранването.
• За да захранвате DVR, не използвайте
щепсел за запалка, различен от този в
опаковката (5V 2A).
• Автомобилният DVR работи само ако се
захранва със захранващия кабел, включен
в пакета, или с опционалния захранващ
кабел (код PNI-PC-DVR).
Table of contents
Languages:
Other PNI Dashcam manuals