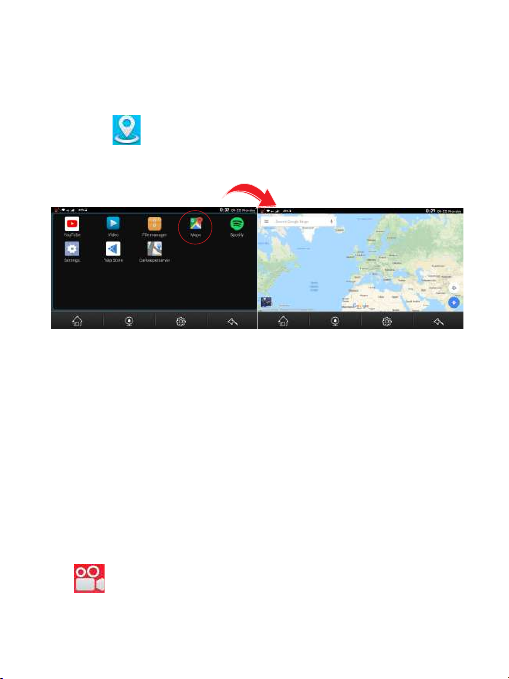
PNI DH710 User manual

EN User manual ............................................. 2
PNI DH710
RO Manual de utilizare ................................... 18
HU Használati Útmutató.................................. 35
PL Instrukcja obsługi ........................................ 78
IT Manuale d'uso ................................... ......... 61

Chapter I Beginning Use
This chapter introduces the appearance, components and basic operaons.
1.1 Appearance
The effect figure below is subject to the material object.
DVR VERSION:
1.2 Power Supply & Charging
1.2.1 Power Supply
Our device can be powered by the built-in baery or external power supply.
When the device is unconnected to the charger, it is powered by the Li-polymer
baery. The baery capacity icon in the APP main interface shows current
residual baery capacity.
When the device is connected to the charger, it is powered by external power
and the baery is charged.
2

[Aenon] The device has internal non-removable Li-polymer baery. To avoid
baery rupture, explosion, release of hazardous substance or burn, do not
unpack, pierce, strike on or discard the baery in fire or water.
1.2.2 Charging by Car Charger
Plug the car charger into the USB port of the device and the other to the
charging port to supply power and charge it.
[Note] Plug in the car charger aer the engine be started to avoid damage
due to current surge.
1.3 Basic Use
1.3.1 Powering On/Off/ Sleep
Powering on
Long press the power key at least 2 seconds to power on the device.
[Note] Great humidity fluctuaon may lead to short circuit of the GPS navigator.
Power on the device aer it has accommodated to new environment.
Powering off / Sleep
Long press the power key at least 2 seconds to power off the device.
The following interface will be prompted.
Short press the power key, device will go to sleep status.
3

1.3.2 Restarng the System
When the system does not response, press the reset key on the back of the
device to restart the system.
[Relevant Informaon] The following situaons might lead to no response
of the system.
1. Delay or stagnancy in interface switching;
2. Failure of funcon acvaon with overlong execuon;
3. Failure to power on/off the device by pressing the power key
[Note] Restarng the system by pressing the reset key will result in loss of
unsaved data. Please backup your data regularly.
1.3.3 Fixing the device with Mounng Kit
The mounng kit is composed of a back splint and a bracket. To use the device
in an automobile, fix it on the dashboard under the front windshield.
[Note] Do not place the device in posions obstrucng the driver’s vision.
Do not place it without fixing it, or in the place of air bag or the area aer the
air bag is inflated.
1.4 Main Interface and Major Funcons
DVR VERSION:
① ② ③
④⑤ ⑥ ⑦ ⑧
⑨ ⑩ 11
12
4

The main funcons are listed as below:
1) Navigaon: click it will enter the default GPS navigaon.
2) Music: sign up for free spofy,play you favorite songs and arsts.
3) Cloud service: use your phone scan the CarKeeper QR code to download the app.
4) DVR: click it will enter car video recording menu.
5) Bluetooth: click it will quickly enter Bluetooth hands-free sengs menu.
6) FM: click it will enter FM transmier funcon menu.
7) WIFI hotspot: To share the network with phones or laptops.
8) Applist: click it will enter the systems default applicaon and other app you
downloaded into this car dvr.
9) Home: click it to return to the main interface.
10) Back camera: click it will enter rear view recording display.
11) Seng: set up wireless data,screen or voice control.
12) Return: click to return to the previous step.
13) Video: click it will enter Video Player of the device.
14) File manager: system file management
5

Chapter II GPS
Various navigaon map applicaons can be installed in this device,
such as Google map, Baidu map,IGO map etc. intelligent navigaon system,
which posion the navigator via the satellite receiver and display it on the map.
Set a desnaon, and the system will automacally work out the best path to
help the user reach the desnaon safely and quickly.
2.1 Map
Due to transportaon development, inconformity between products and real
traffic informaon will occur a period aer product release. Please drive
according to road condion and abide by traffic regulaons.
2.2 Navigaon
Navigaon paths are for reference only, and the user may decide whether to
follow them.
2.3 Recepon
High and crowded structures (such as inside of tunnels, space between high
buildings, underground car parks and under viaducts), weather change or
satellite signals turn off may influence signal recepon, resulng in posioning
failure, inaccurate posioning, navigaon failure or system funcon abnormity.
With stereoscopic maps, instant animaon, voice prompt and text prompt of
the navigaon system, you will appreciate its unique charm and enjoy a great trip.
Different navigaon maps may have different operaon method. Please follow
instrucons of corresponding navigaon map applicaons.
[Note] Before using the GPS navigator, please purchase and install map
applicaons and appoint file paths. For seng methods please refer to 3.1
Navigaon.
6

Chapter III Interface and Operaon
3.1 Navigaon
Long press this icon around 2 seconds to go inside navigaon path
sengs menu as below:
[Note]
If you want to use Google or Baidu map without internet in your car, you must
download off-line road data packet with wifi in your home or office at first.
If you can not find any map exe in this App list, pls go into File Manager first to
check, find out the map apk file and install first.
If you done Backup & reset, the map apk file and all data will be erased, please
contact your device seller to download the map file first, then you can do your
sengs again.
3.2 DVR (only DVR version have)
Tap this icon in the main menu to go into DVR interface as below:
7

Locking:
Tap this icon to lock the recorded video.
Capture :
Tap this icon to start to take photos.
Recording:
Tap this icon to start recording.The le top will display recording me,
the speed of travel and the latude and longitude.
ASAS:
Tap this icon to turn ADAS on/off.
Mute record:
when dvr make the video recording, tap this icon ,you could choose
record the voice or not
Sengs:
Tap this icon to do recording sengs as below:
.
8

Format sdcard:Click OK to format the SD card.
Stream Media :Click to turn on/off stream media.
Recording me:You can set video length as 1 minute, 3 minutes or 5 minutes,
with this cycle recording funcon,the dvr camera can overwrite the old video
(except the locked video) automacally,so that the sd card will not be full.
Collision-locking sensivity:It will automacally lock the 10 seconds video
files before and aer the car collision happened during video recording. You
could set up the Collision-locking sensivity (High--Middle--Low--Off).
The locked video files will not be automacally overwrien by Loop recording
funcon in certain me. But if the memory card is almost full, the systems will
also start to overwrite the first locked video files and then keep video record.
(If no TF card inside, this funcon don’t work )
Adas sensivity:You can set your Adas sensivity as high, middle or low.
Lane Departure Warning System(LDWS):When your car is deviated from the
original track,the system quickly detect and judge,issued a"di,di..." sound,
alarm driver.
9

Forward Collision Warning System(FCWS):The Device image sensor can collect
pavement informaon and work out the distance in front of your car,if the
distance from your car to front car is too close,the device will give the alarm to
let you keep the distance.
3.3 Cloud service
Tap this icon in the main menu to go into Cloud service interface as below:
1.Use your phone scan the CarKeeper QR code to download the app;
2. Scan the QR code of the device to connect your phone with the device;
3. With the GPS signal and net connecng, you can playback the live video and
real-me driving tracks on your phone.
3.4 Bluetooth
Tap this icon in the main menu to go into Bluetooth interface as below:
10

1) Click on the Manage and turn on Bluetooth to connect your phone.
2)Click on the Contacts aer successfully connecng to Bluetooth. Your contact
person and call records will be displayed below.
3)Click on the Phone to enter the phone number you want to dial directly below.
11

4) Click on the Music to enter, you can directly play the music on your phone.
3.5 FM
Tap this icon in the main menu to go into FM interface as below:
1)Click to turn on the FM, the car dvr speaker will be closed automacally.
And then go to the Car FM radio to set up the same Frequency (for example,
set up FM 100), then DVR’s audio music will be transmied and synchronize
to the car audio to play out.
2)You could adjust the FM frequency only aer you turn on the DVR ‘s FM.
3)Click to turn off the FM transmier funcon , and the DVR speaker will
be turn on, you will hear the voice again from the dvr.
12

Tips: As the FM transmier power is limited, and the car radio antenna
installaon method are different, so that the car original radio sound effect
will be different.
3.6 WIFI hotspot
Tap this icon in the main menu to go into WIFI hotspot interface as below:
Open the WIFI hotspot and connect to the phone or laptop to share the network.
Wi-Fi hotspot sengs and user management are available below.
3.7Applist
Tap this icon in the main menu to go into Applist interface as below:
13

YouTube:
Tap this icon to enter YouTube.Enjoy your favorite videos and music on
YouTube, upload original content and share your videos with friends, family
and viewers around the world.
Video (only DVR version have):
Tap this icon to enter Video.You can view and delete the normal and
locked videos recorded by the DVR, as well as the pictures.
File manager:
Tap this icon to enter File manager as below:
14

Maps:
Tap this icon to enter Maps as below:
Spofy:
Tap this icon to enter Spofy. Spofy gives you instant access to millions
of songs – from old favorites to the latest hits. Just hit play to stream anything
you like.
Sengs:
Tap this icon to enter Sengs as below. You can make some general
sengs here.
15

Yalp Store:
Tap this icon to enter Yalp applicaon store,you could download it as
you want.
Carkeeperserver:
Tap this icon to enter Carkeeperserver as blow:
Use your phone scan the CarKeeper QR code to download the app.
Scan the QR code of the device to connect your phone with the device.
With the GPS signal and net connecng, you can playback the live video and
real-me driving tracks on your phone.
Chapter IV Installaon Instrucons
4.1 Camera installaon process
1) Close automobile engine.
2) Insert the Micro SD card into TF card slot
[Noce]Please use high speed memory card (Class 10), capacity could not
less than 512MB, micro sd card maximum support 128GB.
3) Fix the car camera to the car windshield.
16

4) Plug the car charger into car cigaree lighter.
Connect the car charger with car camera USB port.
[Noce]Arrange the car charger cable to be laid along the edge of windshield.
5) Install the rear camera on the backside of car, please noce the install direcon.
Arrange the rear camera cable to be laid along the vehicle roof. Aer rear
camera cable arrangement, please plug into the car camera’s AV-IN port.
6) Adjust the camera lens posion, ensure the lens level with ground.
7)Start automobile engine, check whether the car camera installaon is correct.
[Noce]If install correctly, system working indicator lights; car camera will
enter recording status, video recording indicator flash. Please check whether
the screen display image is normal, if it is inverted image, please don’t hesitate
to contact us.
4.2 Insert the micro-sim card
The micro-sim card needed to be inserted to the slot in the opposite side to the
standard usually applied on smartphone.
Note:There have two difference Card direcon,please insert the sim card
follow the picture
17

Manual de utilizare
PNI DH710
18

Capitolul 1
1.1 Descriere produs
1.2 Alimentare si incarcare dispozitiv
1.2.1 Alimentarea dispozitivului
Dispozitivul se alimenteaza de la bateria interna Li-Polimer sau de la o sursa de
alimentare externa. Cand dispozitivul se alimenteaza de la bateria interna, pe ecran
va fi afisata pictograma care arata capacitatea bateriei.
Bateria se incarca atunci cand conectati dispozitivul la o sursa de curent externa.
Nota: Timpul de functionare pe baterie este limitat.
19

[Atentie] Bateria interna nu poate fi scoasa. Nu dezasamblati si nu aruncati in apa sau
in foc dispozitivul.
1.2.2 Alimentarea prin adaptorul auto
Conectati adaptorul auto la portul USB al dispozitivului.
[Nota] Conectati adaptorul auto la mufa de bricheta a masinii dupa pornirea
motorului pentru a evita defectarea datorata de diferentele de tensiune.
1.3 Instructiuni de baza
1.3.1 On/Off/ Sleep
Pornirea
Pentru a porni dispozitivul, apasati lung butonul On/Off.
[Nota] Umiditatea ridicata poate cauza scurtcircuite in dispozitiv. Porniti dispozitivul
doar dupa ce acesta s-a obisnuit cu noile conditii de mediu.
Oprirea / Standby
Pentru a opri dispozitivul, apasati lung butonul On/Off.
Va aparea urmatoarea interfata.
Apasand scurt tasta On/Off, dispozitivul va intra in modul standby.
20
Table of contents
Other PNI GPS manuals