PNI IP1MP User manual

Használati útmutató
PNI IP1MP IP kamera
varifókális, kültéri, 720p
Ez a kézikönyv csak egy gyors
használati útmutató IP PNI
kamerákhoz.
Kiválasztott IP cím és más
paraméterek a képernyő jobb oldalán
található meg.Ha meg akarja
változtatni a paraméterek
konfigurációját kattintson a “Modify”
gombra, hogy lementse.
MEGJEGYZÉS: Videókamera
ugyanabban a hálózatban kell legyen
mint a router. Kattintson “Same to PC”
gombra, ahhoz, hogy importálja a PC
összes hálózati paramétereit (Subnet
és Gateway).
MEGJEGYZÉS: Hogy Internet
Explorer keresztül férjen hozzá fel kell
telepítse az ActiveX plug-in-t.
Állítsa be a browser biztonsági
szintjét :
[Internet options] - [Security] - [Custom
level] -> [ActiveX] kattintson Enable az
összes lehetőséghez.
Fel tudja telepíteni a plug-in-t a
csomagban levő CD-ről is. Lépjen be
[Software]-[EActive].
4.2CMS szoftveren keresztül
A csomagban levő CD-ről telepítse a
management szoftvert (General CMS):
Alapértelmezett értékek a
bejelentkezéshez:
-Felhasználónév: super
- Jelszó:hadja kitöltetlenül
- Manuális hozzáadás: Írja be a
készülék nevét, IP címet, domain nevet
vagy a kameria széria számát .
Kattintson OK, hogy befejezze a
hozzáadást .
M E G J E G Y Z É S :A h o z z , h o g y
hozzáadjon videókamerát a következő
metódusokkal: domain név, cloud és
ARSP csatlakoztatva kell legyenek az
internethez.
d . A k a m e r a n e v é n e k d u p l a
kattintásával [Channel display area],
kattintson jobbra a csatornanévre, hogy
kiválassza a fő és másodlagos
folyamatot.
e. Állítsa be a zoom és fókusz előre
meghatározott pontjaihoz
4.3 Okostelefonról való hozzáférés:
Kompatibilis hálózat: WiFi, 3G
Operációs rendszer: Android, iOS
Szoftver: VmEyeCloud , szoftver
letöltési forrás Google Play, AppStore.
Me g jegy zé s: Ami k or a ka m er a
nyilvános hálózatban van VmEyeCloud
keresztül is hozzá lehet férni.
c. Lépjen be a [Main menu] ->[System] -
>[Device Manager] , hogy hozzáadjon
egy IP kamerát IP cím, domain név,
cloud vagy ARSP segítségével.
A kamera hozzáadása az IP cím
beirásával ez támogat úgy automatikus
mint manuális IP keresést. Más
metódusok a kamera hozzáadásához
csak manuális hozzáférést támogat
- Automatikus keresés: kattintson [IP
search]. Meg fog jeleni az összes online
IP cím a helyi hálózatból.
3.1 Készülék elindítása
MEGJEGYZÉS: Csak egy 12V 2A
tápegységet használjanak vagy ehhez
hasonlót. Áramforrás és az internet
csatlakozás után várjanak 50
másodpercet mielőtt használná a
kamerát.Javasoljuk az alkatrészek
használatát 15 oldalon leírtak alapján.
3.2 IP konfigurálás
[IP cím ]:alapértelmezett 192.168.1.10
[Subnet Mask]: alapértelmezett
255.255.255.0
[Default Gateway]: alapértelmezett
192.16
Nyissák meg a csomagban levő CDt,
kattintson duplán Setup.exe fáljra és a
következőket végezzék ell: [English] >
[Software] > [Upgrade management]
4.1 Internet Explorer keresztül:
Nyissa meg az Internet Explorert,í rja be
az IP címet a browserbe következő
formában: http://192.168.1.10
Írja be a felhasználónevet és a jelszót
Alapértelmezett értékek:
- felhasználónév: admin
- jelszó:hadja kitöltetlenül
Ajánljuk, hogy cserélje ki a jelszót az
első bejelentkezéskor a rendszerbe
Bejelentkezés után lépjen be a Stream
menübe, hogy beállítsa
fő és másodlagos videófolyamatot.
1. BEVEZETÉS:
2. TERMÉK LEÍRÁSA:
3. KÉSZÜLÉK ELINDÍTÁSA
ÉS IP KONFIGURÁCIÓ:
4. LAN HOZZÁFÉRÉS:
Fémdoboz vízálló
IR LED
12V tápellátás
Hálózati felület
1
1
2
3
4
Válasszon ki egy IP címet
Főmenü
1
Képernyő megjelenités
Streamválasztás
2Előre megtekintés
PTZ kontrol menü
3Képernyő kettáválasztása
Menüelemek
4Hangerő
5Főmenü
6PTZ kontroll
7Régi események
Kattintson “IP search”. A képernyőn az
összes IP online címek meg fognak
jeleni a hálózatban
1. 3. 5. 7.
2. 4. 6. 8.

5. Cloud műveletek:
6. Vételezési konfiguráció:
7. KÉRDÉSEK ÉS VÁLASZOK:
9. Műszaki adatok:
5.1 Lépjen be a PCbe
a. Lépjen be http://xmeye.net.
Jelentkezzen be:
b. Adjanak hozzá egy videókamerát a
következő lépések szerint
Lépjen be [Device config] -> [Record] ->
[Record]:
[Channel] Váassza ki a megfelő
csatornát. Válassza All, hogy beállítsa
az összes csatornát
[Length] Vételezés hosszát, be lehet
állítani 1 - 120 között. Alapértelmezett
érték 60 perc.
[Redundancy*] Válassza ki ezt a
f u n k c i ó t , h o g y b i z t o s í t s a n a k
vételezésnek dupla backup-ot .
*Ez a funkció csak akkor aktiv, ha a
kamera 2 HDD támogat
[Record Control] Válassza ki a
vételezés típusát: Programozható,
Manuális vagy Megállító,előre beállított
i d ő i n t e v a l l u m k ö z ö t t v a g y
mozgásérzékelésre .
[Manual] Manuális mó d ban , a
vételezés megállás nélkül működik 24
órán keresztül
[Stop] Megállító módban a vételezés
leáll attól függően, hogy a vételezés
milyen módban és típusban van.
[Period] A vételezés csak az előre
beállított időintervalum között működik .
[ Re g u l ar ] El ő r e m eg h at á r o zo t t
időintervallumban levő vételezés. Fálj R
kiterjesztés.
[ D et ec t] ] El ő r e m eg ha tá ro z o t t
időintervallumban levő vételezés, csak
m o z g á s é r z é k e l é s n é l ,
képh i án y os s ág nál, rend e ll e ne s
működésnél. Fálj M kiterjesztés
7.1 ActiveX IE telepítés
- C s ö k k e n t s e a s z á m í t ó g é p
biztonságát. Főmenübe futtasa a
“msconfig”parancsot, változtassa meg
UAC beállításokat, kattintson “Enable”,
válassza ki “Never notify”.
- Állítsa be az IE biztonsági szintet
Lépjen be Control Panel>Network and
In ter ne t >N e tw ork a n d Sha ri n g
Center>Internet Options. Válassza ki a
biztonsági szintet. Aktiválja az összes
ActiveX lehetőségeket.
ActiveX IE telepítése Windows Xp-ba
- XP óperációs rendszerekben csak a
biztonsági szintet kell beállítani (tartsák
be a lépéseket mint a Windows 7)
7.2 Tárgyak elmozgása a keretben
egy árnyékot hagy a képernyőn.
Ok: elektronikus redőny aktiválása után
a frame arány nagyon kicsi.
Lépjen be [Device config]->[System
settings]->[Camera parameters]és
kapcsolja ki “Electronic shutter”.
7.3 Sikertelen frissítés
OK : A firmware nem kompatibilis a
videókamera módeljével. Vegye fel a
kapcsolatot az Ön szolgáltatójával,
hogy egy kompatibilis firmeware verziót
kaphason.
ŸÉrzékenység: CMOS
Ÿ IR-CUT filter
ŸFelbontás 720P / 1.0 MP
ŸVideórendszer PAL
ŸVideótömörités H.264
ŸVarifokális lencse 2.8-12mm
Ÿ IR LED 42 darab
Ÿ IR távoli világítás: 50 m
ŸTámogatott eszközök
okostelefonról: iPhone, iPad,
BlackBerry, Android, Windows
ŸKompatibilis ONVIF 2.4 protokollal
Ÿ Ethernet 10 / 100 Mbps
ŸTámogatot funkció iCloud (P2P)
ŸKompatibilis: Google Chrome,
Internet Explorer, Mozilla Firefox,
Safari Browser
ŸVédettség IP66
ŸÜzemi hőmérséklet
-20°C ~ +40°C
ŸPáratartalom <95%
7.4 Sikertelen csatlakozás a Cloud
szolgáltatással
- Lépjen be [Device config]->[System
settings]->[Network settings] DNS
konfigurálja
- Zárja be a routerben a MAC és IP filter
címet és minden nyilvános hálózat
korlátozási hozzáférését.
7.5 Be van jelentkezve a Cloud
szolgáltatásba, de nem látja a
kamerát.
Ok: ActiveX nincs teleptve. Telepítse a
ActiveX plug-int, ahogy le van írva
ebben a kézikönyvben (lásd 7.1
pontot).
8. Ajánlott tartózékok:
- Vezérlőtápegység
PNI PS10A 12V 10A, videótérfigyelő
rendszereknek, 2 kimenettel
- Vezérlőtápegység
PNI PS20A 12V 20A ,videótérfigyelő
rendszereknek, 3 kimenettel
c. Kattintson Login, hogy belépjen a
Cloud előfelületébe. Kattintsanak a
képernyő bal felére egy kamerára az
előnézethez .
d. Amiután rendesen beálitották a
kamerát , akárhol hozzáférhet ahol
Internet csatlakoztatás van.
MEGJEGYZÉS: Piros jel az előfelület
bal felső részében, azt jelenti, hogy a
videókamera nincs csatlakoztatva a
cloud szolgáltatóhoz.
5.2 Hozzáférés okostelefonon keresztül
Kompatibilis hálózat: WiFi, 3G
Óperácios rendszer: Android, iOS
Szoftver: VmEyeCloud
Szoftver letöltési forrás: Google Play,
AppStore.
9. 11. 13. 15.
10. 12. 14. 16.

Fast Manual Instructions
Outdoor varifocal IP camera
PNI IP1MP 720p
This operation manual is only for a brief
description of the product, for more
product information please open the
CDROM.
Choose IP address to config. IP address
and port are displayed on the right, you
can modify the IP parameters and click
"Modify" to save.
Note: IP address of the speed dome
must share the same network segment
with the router and conform to the
router's IP, and make sure the IP is not
conflicted in the network of LAN. Go
to[conform to local PC] to automatically
match subnet mask and default
gateway with local computer.
Note: Plug-ins need to be installed if you
login via IE browser. IE is default to
intercept plug-in.
Please set IE security level. Go to
<internet options>--<security>--<
Customized level>-<ActiveX >, enable
them all. Or go to our official website to
d o wn lo ad a nd i n s t al l pl ug -i ns
(http:flwww.xmeye.net); Or get it from
t he C D an d i n s ta ll I E p l u g - in
_V1.1.0.78.exe.
4.2 Client access
1. Open the CD, double-click Setup.exe,
go to [English] > [Software]> [CMS]to
install centralized network video
management software.CMS shortcut
icon will be displayed when installed
successfully.
2.Double-click CMS shortcut icon, input
user name and password( user name:
super, no password) to login.
-Manual add: Input the device name, IP
address, domain name or serial number
of the speed dome, click "ok" to finish
the adding.
Note: Domain name, clouds and ARSP
are under public network to add the
device and that need Speed dome
connected to Public network.
4. Double-click speed dome name in
<channel display area>, right-click the
channel name to choose main stream or
sub-stream.
5. Control the rotation, zoom, focus,
preset points, points cruise and other
movements via PTZ control area.
4.3 Mobile Access
Network environment: WIFI, 3G
Mobile system: Android, Apple
Software Name: VmEyeCloud
Software Download: Google Market,
App store. Note: if the speed dome can
be visited on public network, it also can
be achieved via VmEyeSuper on public
network.
3.Go to [Main Menu] > [System] >
[Device Manager J to add speed dome
to client, you can add camera via IP
address, domain name, cloud or ARSP.
Added cameras will be displayed in
channel display area. Adding visa IP
supports both search adding and
manual adding, adding by others
methods support manual adding only.
- Search add: click [IP search] ,all online
IP address will be displayed, select one,
click OK to finish. Note: Search function
only support adding via IP address.
3.1 Boot up
Please use the formal 12 V 2A power
adapter. Please use the positive power
of about 50 seconds of network
cameras start complete, the network
camera through a cable connected to
t h e L AN . W e r e co m m e n d t h e
accesories from the page 15.
3.2 IP config
[IP address]:default is 192.168.1.10
[Subnet Mask]:default is 255.255.255.0
[Gateway]:default is 192.168.1.1.
Open the CD, double-click Setup.exe,
go to [English]> [Software]> [Upgrade
management] to install upgrade
management tools. Then click [IP
search],all online IP address of the
monitoring devices within the LAN will
be searched and displayed.
4.1 IE Access
Open web browser, enter IP address,
take 192.168.1.1 O as an example,
input http: //192.168.1.10 to connect.
Enter user name and password
(default user name is admin, no
password). Change the administrator
password timely after login.
After successful login, go to [stream
menu] to connect main stream or
substream.
1. Introduction:
2. Product description:
3. Boot up & IP configuration: 4. LANAccess:
1
1
2
3
4
Choose one IP address
Main menu
1Channel display
Stream selection
2Preview
PTZ control
3Screen-split
Shortcut menu
4Volume
5Main menu
6PTZ control
7Log display
1. 3. 5. 7.
2. 4. 6. 8.
Waterproof metalic case
IR LED
Network interface
DC 12V input

5. Cloud operations:
6. Record config: 7. Q&A:
9. Technical specifications:
5.1 PC access
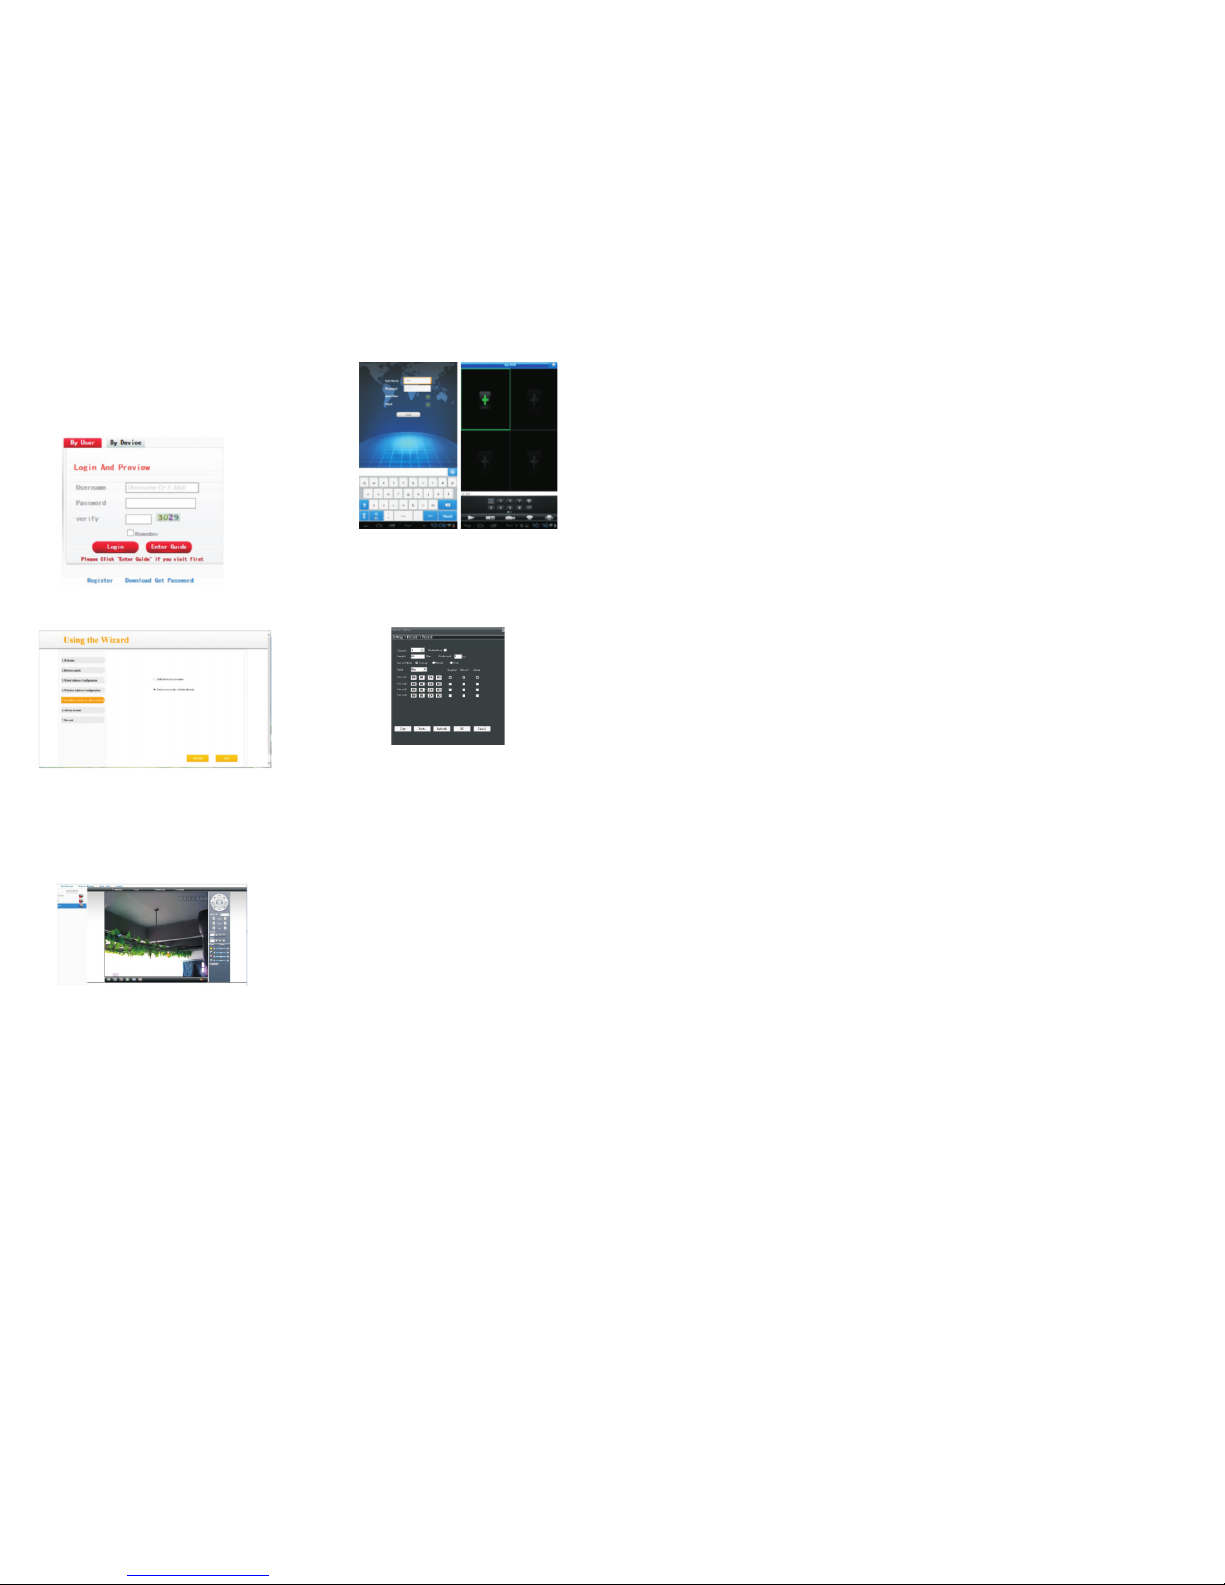
a. Visit http://xmeye.net.
Login:
b. Install it step by step according to the
guides prompt message.
Go to [Device config] -> [Record] ->
[Record]:
[Channel] Choose the corresponding
channel number. Choose "ALL" to make
all the channels with same configuration
[Length] the time length of each video
file can be set between 1 min to 120min.
60 minutes is default value.
[Redundancy*] Choose the redundancy
function to double backup the file.
*Available only for devices with two
HDD.
[Record Control] Set video state: timing,
manual or stop. Configuration: Record
according to the set video type
(common, detection) and time section.
[Manual] Corresponding channel starts
recording 24 hours non-stop.
[Stop] Whatever state the channel is in,
the corresponding channel recording
stops when stop button is selected.
[Period] Set the time section of common
recording, The recording will start only
among the set range.
[Regular] Record according to the set
time section. The video file type is "R".
[Detect] Within the set time section,
trigger the motion detect, video blind,
video loss or abnormal analysis. When
above alarm is set as opening
recording, the recording detection state
is on. The video file type is M.
[Alarm] when alarm happen, trigger
alarm input, the recording detection
state is on.
7.1 IE ActiveX installation
IE ActiveX installation in WIN7
- Lower PC security level: In the main
menu, run"msconfig", change UAC
settings, click "enable" , select "Never
notify."
- Set IE security level
Go to Control Panel> Network and
Internet>Network and Sharing Center>
Internet Options, select the Custom
Level; enable all the ActiveX controls
and plug-ins.
IE ActiveX installation in XP
In XP system, only need to set IE
security level, operation same as Win7.
7.2 Moving object has dragged
shadow in the live screen
It's caused
It's caused by insufficient frame rate
after enable electronic shutter. In dark
environment, our speed dome camera
will open the electronic shutter
automatically to get good image, it will
come out dragged shadow as lengthen
exposure time and lower stream, and
you can go to <device config>-<system
settings>-<camera parameters> to
close •electronic shutter-
7.3 Upgrade failed
Upgrade firmware doesn't match
product model, please contact us to get
the correct one.
ŸSensor: CMOS
ŸIR-CUT filter
ŸResolution 720P / 1.0 MP
ŸVideo system PAL
ŸVarifocal lens 2.8-12mm
Ÿ42 pcs. IR LED
Ÿ50 Meter illumination
ŸSupports: iPhone, iPad, BlackBerry,
Android, Windows
ŸSupports ONVIF 2.4 protocol
ŸPort Ethernet 10 / 100 Mbps
ŸSupports iCloud (P2P) function
ŸSupports Google Chrome, Internet
Explorer, Mozilla Firefox, Safari
Browser
ŸWaterproof IP66
ŸWorking temperature
-20°C ~ +40°C
7.4 Connect cloud service failed
Go to [Device Config]> [System
Settings]> [Network Settings] to config
DNS, make sure it shares with LAN
router.
2. Turn off the router's MAC address
filtering, IP address filtering and other
limit connections to public network.
7.5 Cloud server login, but can not
get live videos
IEActiveX is not installed, so follow
instruction to install ActiveX, please
close anti-virus software before
installing it, otherwise it will intercept the
installations of IE ActiveX or make the
installaFor more information, please
contact us directly.
8. Recommended accesories:
12V switching power supply PNI PS10A
12V switching power supply PNI PS20A
c. Click "Login" to enter cloud service
interface, double-click left camera with
alias name to connect to the preview.
d. After successful configuration,
wherever and whenever you are, as
long as you can surf the Internet, you
can get access to the device.
NOTE: When left device name shows
with red cross, it means speed dome is
not connected with cloud service
website.
5.2 Mobile Access
Network environment: WIFI, 3G
Mobile system: Android, Apple
Software Name: VmEyeCloud
Software Download:Google Play,
AppStore.
9. 11. 13. 15.
10. 12. 14. 16.
Table of contents
Languages:
Other PNI IP Camera manuals
Popular IP Camera manuals by other brands

Lilin
Lilin IPG012ES instruction manual

Grandstream Networks
Grandstream Networks GXV3662_HD/FHD user manual

EverFocus
EverFocus EDN Plus Series user manual

Raptor Photonics
Raptor Photonics Ninox 1280 user manual

GeoVision
GeoVision GV-Fisheye GV-FE2301 user manual

dallmeier
dallmeier DF4 20HD-DN/IR Series Commissioning