Point Zero Energy Titan 240 SP User manual

1
Titan 240 SP User Manual

Table of Contents
Safety Instructions 3
Product overview 4
Technical specs 7
CHARGING YOUR POWER STATION 8
Charging from the Wall (AC 240v power source) 8
Charging from the Wall (AC 120V power source) 8
Charging from Solar 9
Charging with the Internal MPPT 10
Solar Charging with the External MPPT 10
Safety Mode 11
OPERATING INSTRUCTIONS 11
Initial Setup: Programming & Calibration 12
Reading the Battery Meter 14
Using the App 14
Programming Using the App 17
Programming Using the Display Screen 18
USING YOUR TITAN POWER STATION 20
UPS (Uninterrupted Power Supply) 22
Battery Charging 22
Temperature Range 23
STORING YOUR POWER STATION 23
TROUBLESHOOTING 24
WARRANTY & RETURNS 24
© Point Zero Energy 2023
2

IMPORTANT: CHARGE YOUR BATTERY
Your Titan lithium battery will arrive partially charged.
Before using or storing, charge your Titan solar generator
until it is fully charged.
The Titan battery meter WILL NOT READ THE CORRECT STATE OF
CHARGE PERCENTAGE UNTIL the battery meter is CALIBRATED
CORRECTLY (see ‘Initial Setup: Programming & Calibration’).
SAFETY INSTRUCTIONS
To avoid personal injury or damage to the solar generator
or any connected products, carefully read, understand, and
comply with all instructions before use. Keep this manual
for future reference.
Observe all Input/Output watt ratings: To avoid possible hazards,
observe all ratings on unit, and products you intend to use; check
manuals for more information.
Use in a well ventilated area: Ensure proper ventilation while in use
and keep away from any combustible materials or gases. Do not
stack anything on top of the unit in storage or in use. Inadequate
ventilation and/or improper storing may cause damage to the unit.
DO NOT operate in wet conditions: In order to avoid short circuits
or electric shock do not allow unit to get wet. Let unit dry
completely before using.
Keep the unit clean and dry: Inspect the unit for dirt, dust, or
moisture on a regular basis.
DO NOT insert foreign objects into outputs or ventilation holes.
DO NOT open the Titan solar generator; there are no user
serviceable parts inside.
Any misuse, or manipulation to the unit or its components, will void
all warranties.
3

PRODUCT OVERVIEW
© Point Zero Energy 2023
4
A- 240v AC L14-30R (30A 4 prong twist lock outlet, 4,000 watts
max)
B- 120V AC sockets 15A per socket, 2000 watt total for each pair.
C- 240V AC 14-50R (RV 50A outlet, 4,000 watts max)
D- AC power switch (Pressed in turns the inverter on, out is off)
E- Battery display
Front View

5
F- Battery latch. Ensure battery is secure with all 4 latches before
use
G- AC input - l14-30p (used for Charging batteries, and powering
loads)
H- A0A Breakers for AC input
I- Solar input Max 130V (see more in solar charging)
J- Aux ports for connecting external AC chargers, MPPTs, and
24VDC loads
K- Solar switch used to turn on and offthe solar input
L- SB50 ports for top battery
Side View

© Point Zero Energy 2023
6
O- Battery latch. Ensure battery is secure with all four latches
closed before use
P- Power button
Q- SB50 battery connectors
R- BMS port cover. Factory serviceable- DO NOT OPEN!

TECHNICAL SPECS
Power Module
Weight
62 lbs
Dimensions
18.5 x 12 x 8.5
Solar Input
volts: up to 130VDC watts: up to 2400 w
Output Voltage
120V and 240V AC Pure sine wave
Continuous Power
Output
4,000 watts
Peak Power Output
8,000 watts for 10 seconds
Outlets
(4) 120V 15A, (1) 240V 30A (1) 240V 50A
Warranty
5 year Limited Warranty
Battery
Chemistry
24V Lithium Iron Phosphate
Capacity
2,500 watt-hours per battery pack
Life Cycle
3,500 cycles to 80% original capacity
6,500 cycles to 50% original capacity
Weight
48 lbs
Warranty
5 year Limited Warranty
7

CHARGING YOUR POWER STATION
There are two ways to charge your Titan power station: from solar,
or using an AC power source.
If the Titan is connected to a 240V power source, it will use that
source for charging, and bypass the inverter. It will also turn offthe
MPPT, and only use the AC source. However, if you use the 120V
charging, it will simply charge with the AC source, leaving the
MPPT function, and also use the inverter for the power output.
*IMPORTANT: ALL SOURCES OF CHARGING COMBINED SHOULD
NOT EXCEED 1300 watts PER BATTERY.
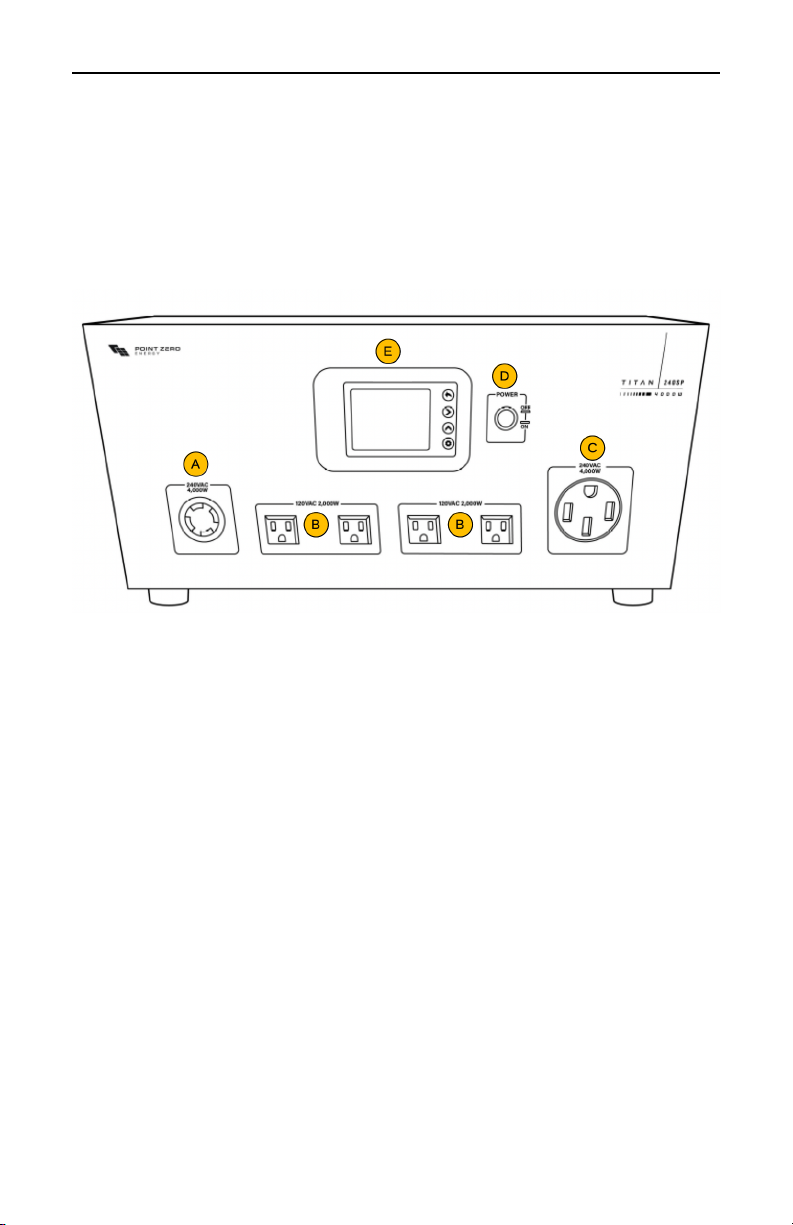
CHARGING FROM THE WALL (AC 240V POWER SOURCE)
1. Due to the large variations of 240V outlets, the Titan 240SP
does not come with an AC charging cable. In order to use the
internal AC charger/AC bypass function of the Titan, you will
need a 240V Charging cable with the correct end for your 240V
AC source.
2. With your AC charging cable, plug it into the Titan, and then into
your 240V AC source (Home, gas generator, etc).
3. Once there is power provided to the AC input of the Titan, it will
bypass (using your power source to power the outlets), and
charge the Titan Batteries.
4. Your batteries are fully charged when the battery voltage reads
AT LEAST 27.2V, or 100% if the meter has already been
calibrated correctly.
CHARGING FROM THE WALL (AC 120V POWER SOURCE)
1. Plug the AC Battery Charger (must be purchased separately) into
any wall outlet.
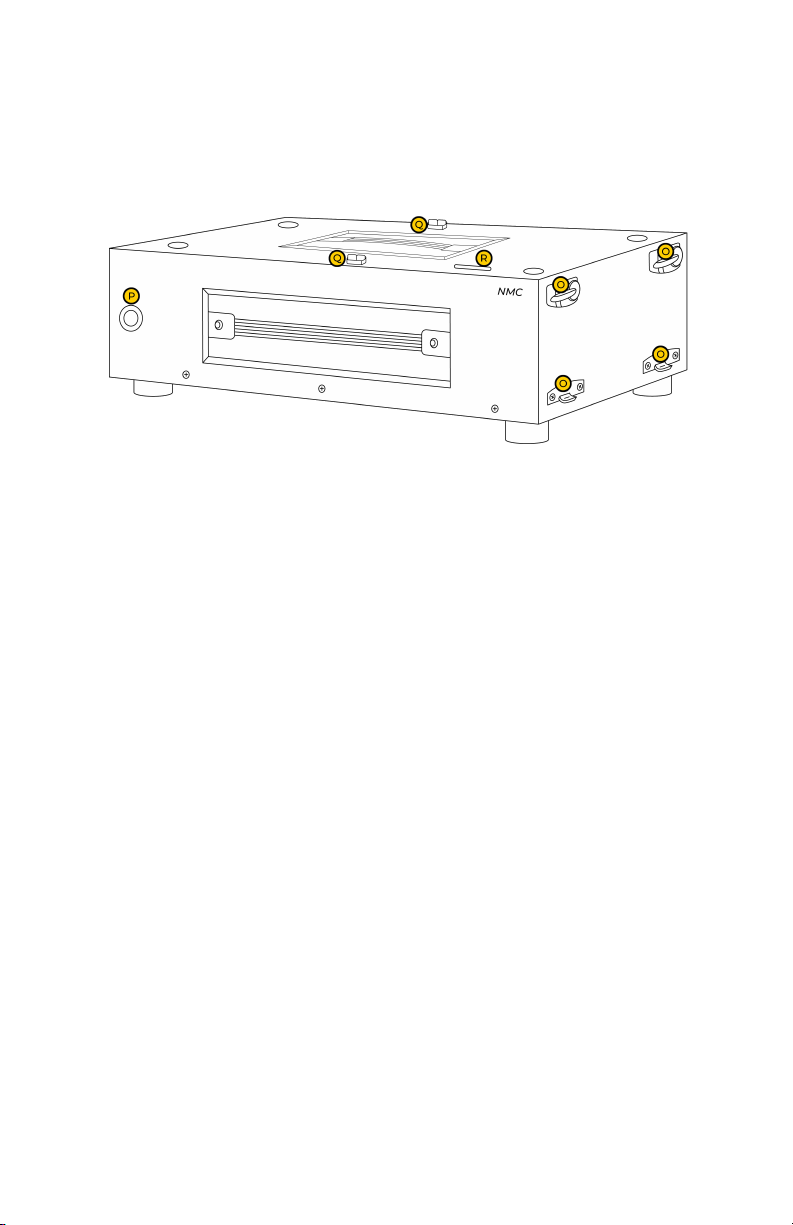
2. Connect the red Anderson plug end of the AC Battery Charger
to the Titan Aux port.
3. Your batteries are fully charged when the battery voltage reads
AT LEAST 27.2V, or 100% if the meter has already been
calibrated correctly.
© Point Zero Energy 2023
8

You can use up to 4 120v AC wall chargers by using SB50 splitters
(two AC chargers per SB50 aux port). Each charger can charge up
to 600 watts (depending on battery state of charge).
It does not hurt to leave your AC wall charger connected even after
the batteries are fully charged.
CHARGING FROM SOLAR
If you purchase solar panels from Point Zero Energy, follow the
diagrams shown on your Quick Start Guide or on our website at
https://www.pointzeroenergy.com/learn/wiring-diagrams/
If you purchase solar panels from another source, make sure your
panels are configured to keep the open circuit voltage under 240V.
This is not the rating of the solar panel but the ACTUAL OPEN
CIRCUIT VOLTAGE (which will change depending on temperature
and sun). Solar panels can and do produce higher voltages than
the rated VOC on the panel when they are cold.
If you have questions regarding this, please contact us at
208-722-1342.
The Titan 240SP can be charged using solar via the internal MPPT,
and/or external MPPT’s. The internal MPPT is capable of up to
2400 watts with a solar input voltage range from 35 to 130VDC.
You can also charge with up to 2 added external MPPT’s. Each
external MPPT is capable of 1,000 watts with a voltage input from
35 to 240V.
The internal MPPT will not be in use when there is a 240V AC input
connected to the AC input plug of the Titan. When AC is connected
to this port, it will bypass the inverter and internal MPPT, but will
charge with the AC source. However, the external MPPT will
continue to charge even when an AC source is plugged into the
Titan.
9

CHARGING WITH THE INTERNAL MPPT
There are two sets of Anderson plugs on the side of the power
module labeled “Solar Input” that are designed for solar charging
(see Product Overview).
The Titan 240SP only has one internal MPPT charge controller.
These two ports are designed to parallel two identical strings into
the Titan. The Titan 240SP MPPT is capable of charging up to
2400 watts, with an input up to 130V. DO NOT EXCEED 130V of
SOLAR INPUT.
1. Place your solar panels where they will get as much direct
sunlight as possible.
2. Make sure the Solar switch is turned off(under the solar
input ports)
3. Connect solar panels to the generator in the correct
configuration.
4. Turn the solar switch on
5. Your batteries are fully charged when the battery voltage
reads AT LEAST 27.2V, or 100%, if the meter has been
calibrated correctly.
It does not hurt to leave your solar panels connect even after the
batteries are fully charged.It does not hurt to leave your solar
panels connect even after the batteries are fully charged.
SOLAR CHARGING WITH THE EXTERNAL MPPT
There are two sets of Anderson plugs on the side of the power
module labeled “Solar Input” that are designed for solar charging
(see “Side View” under Technical Specs).
Each solar set is capable of charging up to 1000 watts (240v max).
You can connect more than 1000 watts per MPPT, however, the
generator will limit charging to 1000 watts per set. This can be
beneficial if you want to limit the charge rate of the battery and get
more power in low sun conditions.
DO NOT EXCEED 240V of SOLAR INPUT PER MPPT.
© Point Zero Energy 2023
10

SAFETY MODE
When the battery has been depleted below normal operating
levels, the Titan battery will go into safety mode. During safety
mode, the Titan will not turn on with the power switch. To take it
out of safety mode, the battery must be charged.
To do this, simply connect a charging source (AC charger, or solar).
As soon as it starts charging, the Batteries will go out of safety
mode. It is recommended that you fully charge your batteries after
being in safety mode.
OPERATING INSTRUCTIONS
Due to it’s unique design, there is a specific way to initially setup
the Titan power station so it can read correct charge/discharge
information and function properly.
PLEASE FOLLOW INSTRUCTIONS CAREFULLY.
Setting up the Titan 240SP is easier by using the app but not
necessary. You can install the app from these QR codes:
11
Android
Apple

INITIAL SETUP: PROGRAMMING & CALIBRATION
Battery Configuration
Battery packs on the 240SP need to be connected so that there is
an equal number of batteries connected to the top as the bottom, It
is ok to have one more on one or the other, when there is an odd
number of batteries. For example, if you have 3 batteries you need
two on the bottom, and one on the top, or two on the top and one
on the bottom. However, if you wire the top to the bottom using an
exterior wire then this will not be needed, and you can use any
configuration. Usually, for this it is convenient to use a base/cap
combination. Also, any external battery stacks need to be
connected to both the top and bottom, or if it is connected to just
one, it will need to follow the same rule where the number
connected to the top and the bottom is equal or within one.
Programming & Calibration
1. CONNECT THE BATTERY PACK(S) TO THE TITAN POWER
MODULE
1. Ensure the power button on the battery is OFF (in the out
position) on all batteries being connected.
2. If you have multiple batteries, remove the protective plates
from underneath all batteries, except the bottom battery.
Stack the batteries.
3. Ensure the power switch on the Titan Power module is in the
OFF position (in the out position).
4. Stack all batteries together ensuring the rubber feet are
aligned on top of the circle indentations of the battery pack.
When connected, all of the led lights on the batteries should
be off.
5. Stack the Titan power module on top of the battery (or
batteries), ensuring the rubber feet are aligned on top of the
circle indentations of the battery pack.
6. Tighten the four metal latches on the sides of each battery,
and the power module. You may need to press down on the
generator to close the latch.
7. The battery (or batteries) are now connected.
© Point Zero Energy 2023
12

2. PROGRAM THE METER
1. Turn on all batteries by ensuring the button on each battery
is pressed in. The led lights on the batteries only indicate
there is power at the terminals. This is a safety feature
rather than an indicator the battery is on. Turning on one
battery will light all buttons on all connected batteries,
however only batteries with the button pressed in will be in
use.
2. Turn the Titan Power Module to ON.
3. Program the meter to the combined AMP-HOURS of ALL
battery packs that will be in use:
a) Determine the total amp hours of batteries connected. If
using LiFePo4, each battery is 90ah, if using NMC, each
battery is 74ah. For example if you have 3 LiFePo4
batteries, your total amp hours is 3x90= 270 ah.
b) Open your app on your phone, and program the meter to
the correct amp hours. You can see instructions on how to
use the app in section
c) Alternately, you can program the meter by following the
instructions in the battery meter section.
3. CALIBRATE THE METER (Step 2 must already be done)
1. If not already on, turn on all batteries and the Titan Power
Module.
2. Check the battery voltage on the Titan display screen. If the
battery voltage is over 26.0V, drain the battery to 26.0V or
less (this must be done in order for the battery to calibrate
correctly).
3. Charge your batteries using the provided AC charger or
solar, following the previous instruction.
4. Fully charge the batteries until the Titan's meter display
reads at least 27.2V and 100%.
Important: Do not unplug or stop the charger until it has fully
charged. If you do, or for some reason the charging stops before
the meter calibrates, you must drain the battery back down to
26.0V and charge again.
13

READING THE BATTERY METER
Both the built in display, and the app provide the same information,
and can be used to program the display.
Note: Only the amps, volts, and watts will be accurate when the
meter is not calibrated. The other readings need the meter to be
calibrated for an accurate display.
The Battery display shows the status of the battery, including:
State of charge in a percentage: This is the percentage of the
remaining battery ranging from 0% to 100%.
Ah: This is the remaining amp hours of the battery.
Remaining time: This is the time left until the battery will be empty
(based on the current rate of discharge), or the time until the
battery will be full (based on the current charge rate.
Amps: This is the amps coming out or going into the battery. Do
not confuse this with AC amps being used by appliances. Because
the battery has a lower voltage than the AC output, the battery
amps will be much higher.
Volts: This is the current voltage of the battery.
Watts: This is the current draw in watts from the battery.
USING THE APP
After downloading the app, open it to begin initial setup. When the
app first opens, it will prompt you to enable BlueTooth when using
the app. Select “ok” to enable BlueTooth. The app must have
BlueTooth enabled in order to connect to the Titan Battery monitor.
After enabling BlueTooth, the app will scan for local Titan units to
connect to. Once it successfully scans local units, the unit name will
appear at the bottom. Note, in order for the app to successfully
detect nearby Titan units, those units must be turned on.
The units listed will have a manufacturer’s device name, usually
written in numbers. Select the device, and you will be prompted to
rename it.
© Point Zero Energy 2023
14

15

You will know which Titan you are connected to when the white
BlueTooth icon appears on the Titan’s display screen, on the upper
right. If you’d like to, you can rename the device (this is especially
helpful for customers with multiple Titan devices). After renaming
the device, select “Update Name” this will lock in the new name on
the device and bring you to the app’s home screen.
Notice several things on the home screen:
1. In the middle of the screen you’ll find the battery current state of
charge shown as a percentage with the amp hours listed as well.
2. On the upper left is a gear icon. Select this to enter the settings
menu and change the Titan’s settings.
3. Further down, you’ll find an hourglass symbol with an estimated
time remaining for the battery. This estimated time is dependent on
the load applied to the battery.
4. The remaining numbers in order from top to bottom are as
follows:
•Voltage: which tells you the current
voltage of the battery.
•Current: which tells you the DC load
or charging rate being applied to the
battery. In this example screenshot
there is a load of 62.42 DC amps
being drawn from the battery.
•Power: which tells you the rate in
watts of how high the load or charge
is. In the example screenshot there
is a load of 1572 watts being drawn
from the battery.
© Point Zero Energy 2023
16

PROGRAMMING USING THE APP
Select the gear icon on the upper right of the home screen in order
to enter the settings menu.
1. Without the proper amp hours set, the app will not properly track
the state of charge.
2. Max voltage: This tells the display screen what the maximum
voltage of the batteries should be. For both the Titan NMC and
LiFePo4 batteries, go ahead and leave this at 29.
3. Min Voltage: This will tell the Titan display screen when to
calibrate to 0%.
4. Capacity Alarm Ah: This will allow you to receive an alarm when
the battery amp hours have dropped to a certain number. For
example, if you have 1 LiFePo4 Battery (90ah) and want to be
alerted when the battery has depleted to half, set this to 45. At
45 amp hours the Titan will make a chirping noise to alert you.
5. Full Volt: This will tell the display screen when the voltage of the
battery is full and the screen should calibrate. Leave this set to
27.2 for both the Titan NMC and LiFePo4 batteries.
6. LCD On time (min): This tells the display screen how long to stay
on (in minutes) for example, if you
want your display screen to stay on
for 10 minutes then set this to 10.
After inputting the appropriate settings
for your unit, select “Update” this will
lock in the settings and bring you back
to the home screen where you can
then monitor your Titan unit.
17

PROGRAMMING USING THE DISPLAY SCREEN
1. Enter the display screen settings by pressing the gear button
located on the bottom right of the display screen.
2. Once you are in the settings menu, press the gear button again
to access the settings.
You’ll notice 6 different settings.
The top 3 settings will already be properly set from Point Zero
Energy. You should not need to adjust these settings unless
otherwise stated from a Point Zero Energy support agent.
The bottom 3 settings are as follows:
CAPACITY: The total combined number of amp hours from your
batteries. Titan LiFePo4 batteries are 90 amp hours each and Titan
NMC batteries are 74 amp hours each. For example, if you have 3
Titan LiFePo4 batteries you will want to change this setting to 270
(90*3)
ALARM: This will tell the unit to alert you when your batteries have
depleted to a certain level. For example, if you have 1 LiFePo4
battery (90ah) and want to be alerted when your batteries are at
half, set this to 45.
LCD ON (MIN): How long you would like to keep the display screen
on (in minutes) before the display screens goes into sleep mode.
© Point Zero Energy 2023
18

3. After you’ve pressed the gear button again, you’ll notice that the
first number will flash in red. This will let you know that you are now
in programming mode for the settings. The number flashing red will
be the current number you are on and have access to change.
4. Press the RIGHT arrow button to move between selections. Note
that when you press this button, the adjacent number will flash.
Continue pressing this button to move to the number you’d like to
change.
5. Continue pressing the RIGHT arrow button until you reach the
capacity setting. Use the UP arrow button to change the capacity
setting to the proper number. Remember, Titan LiFePo4 batteries
are 90 amp hours each and Titan NMC batteries are 74 amp hours
each.
6. After you’ve set the proper capacity setting, set the Alarm and
LCD On to the desired number.
7. After finishing your new settings, press the gear button to save
the settings. You’ll know it is saved when no more numbers are
flashing red.
8. Press the BACK arrow button to exit the programming menu and
return the home screen. Now your unit should be properly set to
calibrate and measure the state of charge of the batteries correctly.
19

USING YOUR TITAN POWER STATION
The Titan power station can power various appliances such as
refrigerators, freezers, microwave ovens, and cooking appliances.
It's pure sine wave power output will safely run power tools,
electronics, and medical equipment such as CPAP machines.
The Titan 240SP has two 240V outlets, one 50A RV outlet, and
one 30A twist lock outlet. Each one of these can handle up to the
full 4,000 watts of the inverter. It also contains four 120V outlets.
Each outlet can handle 15A (about 1800 watts). However, the two
on the left have a maximum of 2,000 watts combined, and the two
on the right have a maximum of 2,000 watts combined. So, if you
have two large load appliances that combined are over 2,000
watts, you would want to plug one into the one of the two on the
left, and the other into one of the two on the right.
When deciding on what to power, you will need to calculate the
continuous and peak loads of each appliance you want to run
simultaneously to determine if the total amount of watts is within
the capacity of the generator. Remember, run times will vary
depending on the number of batteries and solar panels.
When using large amounts of AC power when the battery is low,
the inverter may turn offearlier than normal with useable battery
capacity still remaining. If this happens, turn the Titan solar
generator offand back on again. Try reducing the amount of power
being used via AC.
The Titan power station can power various appliances such as
refrigerators, freezers, microwave ovens, and cooking appliances.
It's pure sine wave power output will safely run power tools,
electronics, and medical equipment such as CPAP machines.
When deciding on what to power, you will need to calculate the
continuous and peak loads of each appliance you want to run
simultaneously to determine if the total amount of watts is within
the capacity of the generator. Remember, run times will vary
depending on the number of batteries and solar panels.
© Point Zero Energy 2023
20
Table of contents
Other Point Zero Energy Portable Generator manuals
Popular Portable Generator manuals by other brands

Cebora
Cebora 261.00 Service manual

EWM
EWM Tetrix 200 DC Smart 2.0 puls TM operating instructions

Champion
Champion 42451 Owner's manual & operating instructions

Wacker Neuson
Wacker Neuson GS 12Ai Operator's manual

Troy-Bild
Troy-Bild 030594 Quick setup guide

Winco
Winco EC6010KE-03/B Installation and operator's manual

Teseq
Teseq NSG 5500 Hardware guide

Westinghouse
Westinghouse WGen2000 user manual

Champion Global Power Equipment
Champion Global Power Equipment 73001i-UK Owner's manual & operating instructions

Yanmar
Yanmar YDG5001SE Operation manual

Mosa
Mosa NAKED Use and maintenance manual

Champion Global Power Equipment
Champion Global Power Equipment 200950 Operator's manual