point pro Series User manual


Automatic Vacuum Sealer
POVS220S
User Manual

4 - 13
44 - 53
34 - 43
24 - 33
14 - 23

4
SAFETY WARNINGS
Read and fully understand all instructions and warnings prior to using
this appliance.
1. Read the instructions carefully.
2. Do not allow the appliance to be used as a toy.
3. This appliance should not be operated by children.
4. Do not operate the appliance with a damaged mains power cable
or plug.
5. Do not use the appliance on a wet or hot surface, or near a heat
source.
6. Always use the appliance on a level surface.
7. Do not immerse any part of the appliance, mains power cable or
plug into water or other liquid.
8. To disconnect, unplug the mains power cable from the mains
power socket. Do not disconnect by pulling on the mains power
cable. Always unplug the appliance before cleaning and when not
in use.
9. Do not operate the appliance if it malfunctions or is any way
damaged. If the mains power cable or the appliance is damaged,
return it to our after-sales department for proper service,
replacement or repair.
10. Close supervision is required when this appliance is used near
children.
11. The appliance is not for commercial use. If sealing more than 20
bags continuously, wait at least 25 minutes before resuming use
of your appliance.

5
PRODUCT OVERVIEW
A. SPEED (HIGH / LOW)
Touch this button to select vacuuming in high or low speed.
When the indication light is Red, the appliance will vacuum in high
speed ; when the indication light is Blue, the appliance will vacuum in
low speed.
B. FOOD (DRY / MOIST)
Touch this button to select vacuuming pattern for dry food or moist
food.
Red indication light for Dry ; Blue indication light for Moist.
C. VACUUM SEAL
Touch this button to vacuum and seal bags. When the vacuuming is
done, the appliance will seal the bag automatically. If you want to
control the vacuum degree by yourself, then you can touch the SEAL
ONLY in advance while the appliance is vacuuming.
D. CANCEL & ON/OFF SWITCH
When plugged in, press and hold this button for 2 seconds to turn on
the appliance. When you want to shut down the appliance, press and
hold this button again for 2 seconds.
During the appliance’s operation, touch this button to CANCEL.
6
E. SEAL ONLY
Touch this button to seal the bags.
If the appliance is vacuuming, touch this button immediately to stop
the vacuum process and begin sealing the bag.
F. CANISTER
Touch this button to vacuum with canister.
G. MARINATE
Touch this button to marinate food.
H. ACCESSORY PORT
Allows vacuum packaging with Canisters and Accessories.
Note that this suction port can not be blocked if you don’t vacuum with
canister or marinate food. This is also the gas outlet, if it is blocked,
then the appliance will not work normally.
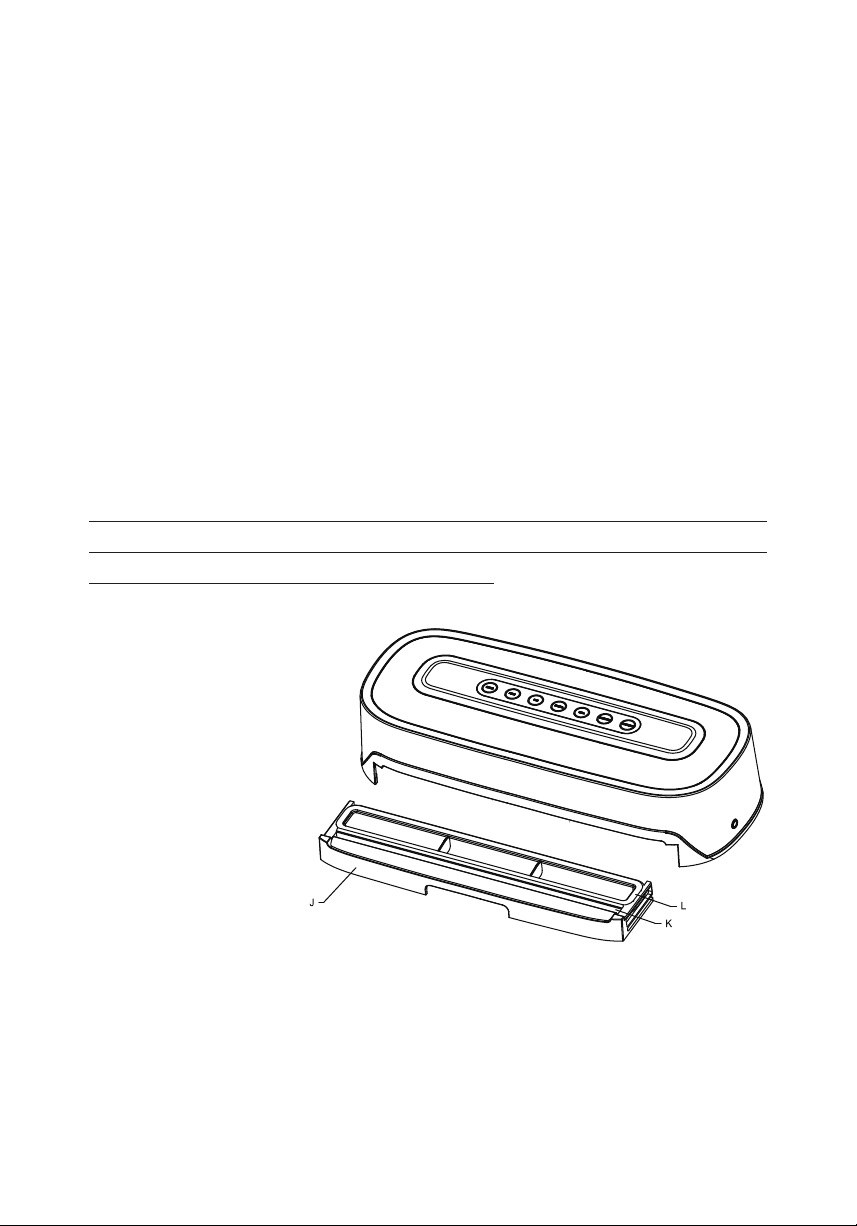
I. VACUUM CHAMBER
J. DETACHABLE VACUUM SLOT
Removable for easy cleaning.
K. SILICONE SEALING STRIP
L. SEALING GASKET

7
OPERATION
How to Make Custom Sized Bags
1. Pull enough bag material to hold the item to be vacuum packaged,
plus an extra 2 inches. With a pair of scissors or a sharp knife, cut
the desired bag length from the bag roll. Make sure to cut in a
straight line.
2. Plug in the appliance and turn it on.
3. Touch the SEAL ONLY button for the appliance to enter standy
mode for sealing.
4. Place one end of cut bag parallel into the vacuum chamber. When
the appliance senses the bag, it will start sealing automatically.
There is an indication light to indicate the sealing is in process.
5. Once completed, the indication light will turn o. The appliance will
release the bag automatically.
6. Take out the bag and this custom sized bag is now ready for
vacuum sealing.
CAUTION : Make sure you give the appliance time to cool down. Wait
at least 20 seconds between seals. Under very heavy usage, the
appliance will shut o automatically to prevent overheating. If it does,
wait 25 minutes to allow the appliance to cool o.
How to Vacuum Seal with the Vacuum Bags
1. Place the item to be sealed into the pre-cut or custom sized bag.
Leave at least 2 inches between the contents and the top of the
bag to allow for bag contraction.
2. Plug in the appliance and turn it on.
3. Choose high or low speed, dry or moist food pattern according to
your need. The default setting of the appliance is VACUUM SEAL

8
Dry food in High speed.
NOTE : When vacuuming moist food, choose low speed and
moist food pattern.
4. Place the open end of the bag into the vacuum chamber parallel.
When the appliance senses the bag, it will start vacuuming and
then will seal the bag automatically. There is an indication light to
indicate the process.
5. Once completed, the indication light will turn o. The appliance will
release the bag automatically.
6. Now it is safe to take out the bag.
How to Use Canister Function
NOTE : Canister and hose are not included with this appliance.
1. Wipe the canister cover, canister base and ensure that they are
clean and dry.
2. Place the food into the canister and leave at least one inch of space
between the food and the cover.
3. Place the cover onto the canister, insert one end of the hose into
the port on the appliance. Put the other end onto the canister port;
pressing down firmly to ensure a tight fit.
4. Plug in the appliance and turn it on.
5. Touch the CANISTER button, then the appliance will start
vacuuming the canister automatically. There is an indication light
to indicate the process.
6. Once completed, the indication light will turn o, then it is safe to
remove the hose from the appliance and the canister.
How to Use Marinate Function
1. Put the food into the vacuum canister, add the marinade to the

9
food, then close the cover onto the canister.
2. Use the hose to connect the appliance’s suction port and the cover
of the canister.
3. Touch the MARINATE button, then marinating process will operate
automaticlly.
4. While the marinate function is operating, the appliance will start
to vacuum, when it reaches the default vacuum pressure, it will
hold on for 1 minute, then release, and then vacuum again. This will
last for 30 minutes.
5. If you think the marinate is not enough after 30 minutes, you can
select this function and do it again.
CARE & CLEANING
1. Always unplug the appliance before cleaning.
2. Do not immerse in water.
3. Do not use abrasives to clean the appliance.
4. Wipe the outer surface with a soft, damp cloth and soap.
5. To clean the inside of the appliance, wipe away any food or liquid
with a paper towel.
6. Dry all parts thoroughly before you plug in and operate the
appliance again.
7. Vacuum slot may trap liquids that were drawn from the bag; it can
be removed from the sealer, use a mild dish washing soap and a
warm-damp cloth to wipe away any left behind liquid from the
vacuum slot. Dry thoroughly.
TROUBLE SHOOTING
Nothing happens when I press the ’’VACUUM SEAL’’ button:
Make sure the mains power cable is correctly plugged into the
Other manuals for pro Series
29
This manual suits for next models
1
Table of contents
Languages:


