point POAF7006XL User manual

1
Air fryer
POAF7006XL
User Manual

Thank you for purchasing your new POINT Upright Fridge. These
operating instructions will help you use it properly and safely. We
recommend that you spend some time reading this instruction manual
Read all the safety instructions carefully before use and keep this
instruction manual for future reference.
Takk for at du kjøpte ditt nye POINT stående kjøleskap. Denne
bruksanvisningen vil hjelpe deg med å bruke den på en trygg og riktig
måte. Vi anbefaler at du tar deg tid til å lese gjennom hele
bruksanvisningen for å bli fortrolig med alle funksjonene som tilbys.
Les alle sikkerhetsanvisningene nøye før bruk, og oppbevar
bruksanvisningen for fremtidig referanse.
Kiitos, kun valitsit uuden POINT-jääkaappi. Nämä käyttöohjeet
opastavat sinua käyttämään laitetta oikein ja turvallisesti. On
suositeltavaa käyttää aikaa tämän käyttöoppaan lukemiseen, jotta
ymmärrät täysin, mitä toiminnallisia ominaisuuksia tuote tarjoaa. Lue
kaikki turvallisuusohjeet huolellisesti ennen laitteen käyttöä ja säilytä
käyttöopas myöhempää käyttöä varten.
Tak for købet af dit nye køleskab fra POINT. Disse brugervejledninger
hjælper dig med at bruge dette apparat rigtigt og sikkert. Vi anbefaler,
at du læser denne brugervejledning, så du får en fuld forståelse af
hvordan alle funktionerne virker. Læs sikkerhedsforskrifterne grundigt
inden brug, og gem denne brugervejledning til senere brug.
Tack för att du har köpt ditt nya stående kylskåp från POINT. Denna
bruksanvisning hjälper dig att använda den på ett säkert och korrekt
sätt. Vi rekommenderar att du tar dig tid att läsa igenom denna
bruksanvisning för att till fullo förstå alla driftfunktioner som den
erbjuder. Läs noga igenom alla säkerhetsinstruktioner före användning
och spara bruksanvisningen för framtida bruk.
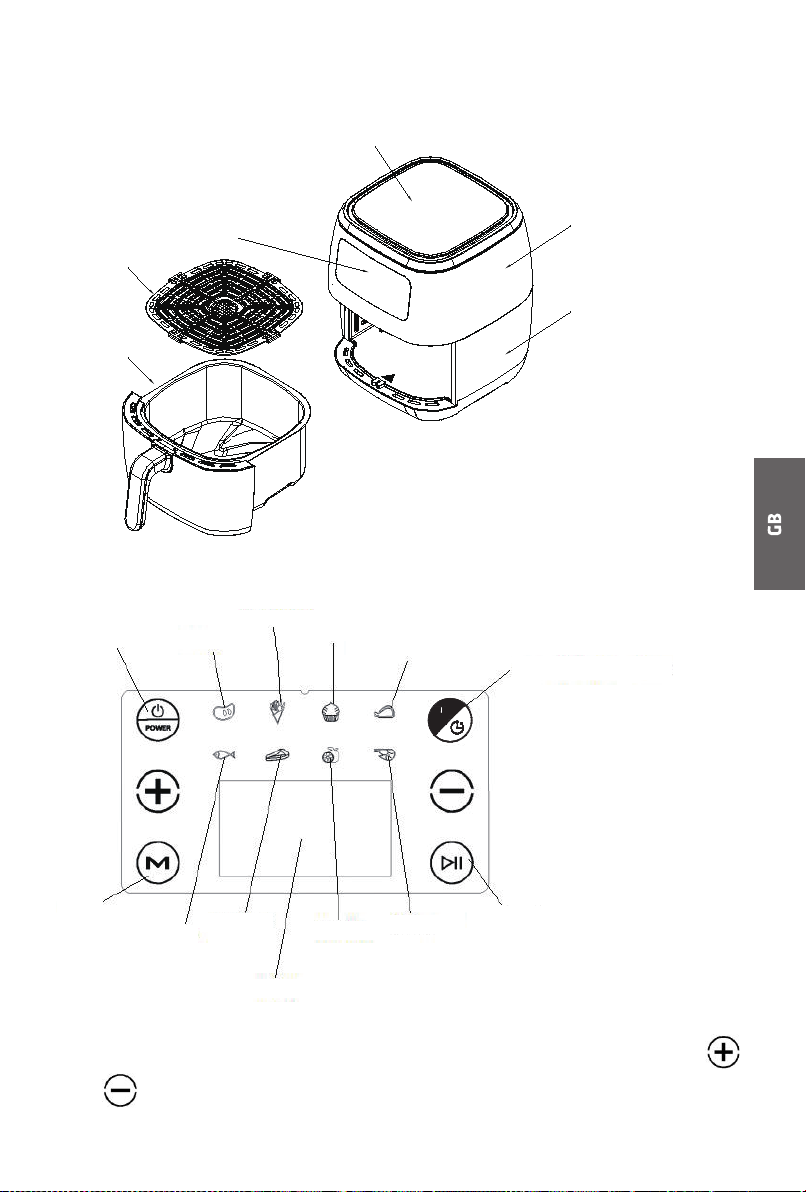
Thank you for purchasing your new POINT air fryer. These operating
instructions will help you use it properly and safely. We recommend that
you spend some time reading this instruction manual in order that you
fully understand all the operational features it oers. Read all the safety
instructions carefully before use and keep this instruction manual for
future reference.
Takk for at du kjøpte denne nye air fryer fra POINT.
Denne bruksanvisningen vil hjelpe deg med å bruke den på en trygg
og riktig måte. Vi anbefaler at du tar deg tid til å lese gjennom hele
bruksanvisningen for å bli fortrolig med alle funksjonene som tilbys. Les
alle sikkerhetsanvisningene nøye før bruk, og oppbevar bruksanvisningen
for fremtidig referanse.
Kiitos, kun valitsit uuden POINT-ilmafriteerauskeittimen. Nämä
käyttöohjeet opastavat sinua käyttämään laitetta oikein ja turvallisesti.
On suositeltavaa käyttää aikaa tämän käyttöoppaan lukemiseen, jotta
ymmärrät täysin, mitä toiminnallisia ominaisuuksia tuote tarjoaa. Lue
kaikki turvallisuusohjeet huolellisesti ennen laitteen käyttöä ja säilytä
käyttöopas myöhempää käyttöä varten.
Tak for købet af din nye air fryer fra POINT. Disse
brugervejledninger hjælper dig med at bruge dette apparat rigtigt og
sikkert. Vi anbefaler, at du læser denne brugervejledning, så du får en fuld
forståelse af hvordan alle funktionerne virker. Læs sikkerhedsforskrifterne
grundigt inden brug, og gem denne brugervejledning til senere brug.
Tack för att du har köpt din nya luftfritös från POINT. Denna
bruksanvisning hjälper dig att använda den på ett säkert och korrekt
sätt. Vi rekommenderar att du tar dig tid att läsa igenom denna
bruksanvisning för att till fullo förstå alla driftfunktioner som den erbjuder.
Läs noga igenom alla säkerhetsinstruktioner före användning och spara
bruksanvisningen för framtida bruk.

3
Thank you for purchasing your new POINT Upright Fridge. These
operating instructions will help you use it properly and safely. We
recommend that you spend some time reading this instruction manual
in order that you fully understand all the operational features it oers.
Read all the safety instructions carefully before use and keep this
instruction manual for future reference.
Takk for at du kjøpte ditt nye POINT stående kjøleskap. Denne
bruksanvisningen vil hjelpe deg med å bruke den på en trygg og riktig
måte. Vi anbefaler at du tar deg tid til å lese gjennom hele
bruksanvisningen for å bli fortrolig med alle funksjonene som tilbys.
Les alle sikkerhetsanvisningene nøye før bruk, og oppbevar
bruksanvisningen for fremtidig referanse.
Kiitos, kun valitsit uuden POINT-jääkaappi. Nämä käyttöohjeet
opastavat sinua käyttämään laitetta oikein ja turvallisesti. On
suositeltavaa käyttää aikaa tämän käyttöoppaan lukemiseen, jotta
ymmärrät täysin, mitä toiminnallisia ominaisuuksia tuote tarjoaa. Lue
kaikki turvallisuusohjeet huolellisesti ennen laitteen käyttöä ja säilytä
käyttöopas myöhempää käyttöä varten.
Tak for købet af dit nye køleskab fra POINT. Disse brugervejledninger
hjælper dig med at bruge dette apparat rigtigt og sikkert. Vi anbefaler,
at du læser denne brugervejledning, så du får en fuld forståelse af
hvordan alle funktionerne virker. Læs sikkerhedsforskrifterne grundigt
inden brug, og gem denne brugervejledning til senere brug.
Tack för att du har köpt ditt nya stående kylskåp från POINT. Denna
bruksanvisning hjälper dig att använda den på ett säkert och korrekt
sätt. Vi rekommenderar att du tar dig tid att läsa igenom denna
bruksanvisning för att till fullo förstå alla driftfunktioner som den
erbjuder. Läs noga igenom alla säkerhetsinstruktioner före användning
och spara bruksanvisningen för framtida bruk.
4
21
38
55
72
20
37
54
71
88
-
-
-
-
-

54
IMPORTANT SAFEGUARDS
Before using the electrical appliance, the following basic
precautions should always be followed including the
following:
1. Read all instructions.
2. Before using check that the voltage of wall outlet
correspond to the one shown on the rating plate.
3. Do not operate any appliance with a damaged cord or
plug or after the appliance malfunctions, or is dropped
or damaged in any manner. Return appliance to the
nearest authorized service facility for examination,
repair or electrical or mechanical adjustment.
4. If the supply cord is damaged it must be replaced by
the manufacturer or a authorized service agent or a
qualified technician in order to avoid a hazard.
5. The use of accessory not recommended by the
manufacturer may cause injuries to persons.
6. Do not touch the hot surface. Use the handle or the
button.
7. Do not use the appliance for other than intended use.
8. Do not let the cord hang over the edge of a table or
counter or touch a hot surface.
9. Do not place on or near a hot gas or electric burner or
in a heated oven.
10. Do not leave the appliance unattended when it is
being operated.
11. Children should be supervised to ensure that they do
not play with the appliance.

5
12. The appliance must not be immersed.
13. Unplug from outlet when not in use and before
cleaning. Allow to cool down before putting on or
taking off parts, and before cleaning the appliance.
14. Use special gloves when moving the appliance.
15. Before use, always ensure that the frying tank is
positioned correctly.
16. Though the detachable frying tank can be completely
immersed in water and clean, it must be thoroughly
dried before next use to prevent electric shock.
17. To prevent fire, do not place the appliance close to
flammable materials such as curtains, and do not
place anything above the appliance.
18. Make sure all papers, cardboard or plastic have been
removed before frying food.
19. The appliance can not be used for storing things,
especially papers, cardboard or plastic.
20. Always disconnect the appliance from the supply
before close the appliance.
21. The appliances are not intended to be operated by
means of an external timer or separate remote-
control system.
22. This appliance shall not be used by children from 0
year to 8 years. This appliance can be used by children
aged from 8 years and above if they are continuously
supervised. This appliance can be used by people with
reduced physical, sensory or mental capabilities or
lack of experience and knowledge if they have been

76
given supervision or instruction concerning use of the
appliance in a safe way and understand the hazards
involved. Keep the appliance and its cord out of reach
of children aged less than 8 years. Cleaning and user
maintenance shall not be made by children.
23. This appliance is intended to be used in household
and similar applications such as:
-staff kitchen areas in shops, offices and other
working environments
-farm houses
-by clients in hotels, motels and other residential
type environments
-bed and breakfast type environments
24. Save these instructions.

7
PRODUCT OVERVIEW
Control panel
Top lid
Upper housing
Lower housing
Wire rack
Frying tank
CONTROL PANEL
Power button Chop
French fries
Bake
Chicken leg/Chicken wing
Menu
Beefsteak
Display
Dry fruit Shrimp Start/Stop button
Fish
Temperature/Time button
NOTE:
zTo easily increase or decrease time or temperature, press and hold the
or buttons.

98
USING FOR THE FIRST TIME
1. Before using the appliance for the first time, Remove all packaging from
the air fryer, including any temporary stickers.
2. Pull the handle to remove the baskets.
3. Wash both basket and basket pad, using either a dishwasher or a non-
abrasive sponge.
4. Wipe the inside and outside of the air fryer with a slightly moist cloth. Dry
with a towel.
5. Put the baskets back inside the air fryer.
6. Place the air fryer on a stable, level, heat-resistant surface, away from
areas that can be damaged by steam (such as walls or cupboards).
7. Connect the appliance with power source. When the appliance is used for
the first time, odor or smoke will occur, which is caused by the protective
film on the heating element. This is normal. So it is recommended that
the appliance should work without load for about 15 minutes remove the
odor. Please open the door and window and make the room be ventilated
when the appliance is used for the first time.
OPERATION INSTRUCTION
Air Frying
zDo not place anything on top of your air fryer. This disrupts airflow and
causes poor air frying results.
zAn air fryer is not a deep fryer. Do not fill the pan with oil, frying fat, or any
liquid.
Preset Air Frying Programs
Using a preset is the easiest way to air fry. Presets are programmed with an
ideal time and temperature for cooking certain foods.
1. Add food to the basket.
2. Select a preset cooking program. (Optionally, customize the temperature
and time)

9
INTRODUCTION FOR MENUS
Ingredient Default
temperature
Suggested cook
time
Food
flipping
Remark
Frozen French
fries
200°C 15-20mins Yes Adjustable time: 1-60mins
Chop 200°C 15-20mins Yes Adjustable time: 1-60mins
Bake 180°C 30mins Adjustable time: 1-60mins
Chicken leg,
chicken wing
200°C 25-40mins Yes Adjustable time: 1-60mins
Fish 200°C 12mins Yes Adjustable time: 1-60mins
Beefsteak 200°C 15mins Yes Adjustable time: 1-60mins
Dry fruit 30°C (Adjustable
temperatures:
30-80°C)
4 hours Adjustable time: 2-24 hours
Shrimp 180°C 12-15mins Adjustable time: 1-60mins
NOTE: You can do this anytime during cooking.
Cooking Guide
Over-Filling
zIf the basket is overfilled, food will cook unevenly.
zDo not pack in food.
Using Oil
zAdding a small amount of oil to your food will make it crispier. Use no more
than tablespoons of oil.
zOil sprays are excellent for applying small amounts of oil evenly to all food
items.
French fries
1. Connect the appliance with power source. One beep can be heard and all
the indicators on the control panel illuminate. Press Menu button “ ” to
select the “French fries” “ ”, and the default temperature and time of
“French fries” setting are 200°C and 20 minutes separately, which are
indicated in the display. And you can adjust your desired temperature and
time by following the operation specified in the section of “Manual Air
Frying”, and the display will indicate the new temperature and time.
NOTE: The appliance will enter into the standby mode if there is not
any operation within 10 minutes after the appliance is powered on. At
that time, only the Power button “ ” and its corresponding indicator

1110
are activated while other buttons and their corresponding indicator are
deactivated. And you can press the Power button “ ” to activate all the
functional buttons and indicators.
2. Put the wire rack into the frying tank and then add 500g frozen French
fries on the wire rack.
3. Install the frying tank well in position and then press the Start/Stop
button “ ”, then the appliance starts to work.
NOTE: During working, press the Start/Stop button “ ”, its
corresponding indicator flashes and the appliance will pause working.
Press the Start/Stop button “ ” again, the appliance will continue to
work. To make the appliance stop working, hold and press the Start/Stop
button “ ”.
4. When the appliance finishes working, five beeps can be heard, and the
food are fried well.
Chop
1. Connect the appliance with power source. One beep can be heard and all
the indicators on the control panel illuminate. Press Menu button “ ” to
select the “Chop” “ ”, and the default temperature and time of “Chop”
setting are 200°C and 15 minutes separately, which are indicated in the
display. And you can adjust your desired temperature and time by
following the operation specified in the section of “Manual Air Frying”,
and the display will indicate the new temperature and time.
NOTE: The appliance will enter into the standby mode if there is not
any operation within 10 minutes after the appliance is powered on. At
that time, only the Power button “ ” and its corresponding indicator
are activated while other buttons and their corresponding indicator are
deactivated. And you can press the Power button “ ” to activate all the
functional buttons and indicators.
2. Put the wire rack into the frying tank and then evenly add a layer of chops
on the wire rack.
3. Install the frying tank well in position and then press the Start/Stop
button “ ”, then the appliance starts to work.

11
NOTE: During working, press the Start/Stop button “ ”, its
corresponding indicator flashes and the appliance will pause working.
Press the Start/Stop button “ ” again, the appliance will continue to
work. To make the appliance stop working, hold and press the Start/Stop
button “ ”.
4. When the appliance finishes working, five beeps can be heard, and the
food are fried well.
Bake
1. Connect the appliance with power source. One beep can be heard and all
the indicators on the control panel illuminate. Press Menu button “ ” to
select the “Bake” “ ”, and the default temperature and time of “Bake”
setting are 180°C and 30 minutes separately, which are indicated in the
display. And you can adjust your desired temperature and time by
following the operation specified in the section of “Manual Air Frying”,
and the display will indicate the new temperature and time.
NOTE: The appliance will enter into the standby mode if there is not
any operation within 10 minutes after the appliance is powered on. At
that time, only the Power button “ ” and its corresponding indicator
are activated while other buttons and their corresponding indicator are
deactivated. And you can press the Power button “ ” to activate all the
functional buttons and indicators.
2. Put the wire rack into the frying tank and then add appropriate amount of
food on the wire rack.
3. Install the frying tank well in position and then press the Start/Stop
button “ ”, then the appliance starts to work.
NOTE: During working, press the Start/Stop button “ ”, its
corresponding indicator flashes and the appliance will pause working.
Press the Start/Stop button “ ” again, the appliance will continue to
work. To make the appliance stop working, hold and press the Start/Stop
button “ ”.
4. When the appliance finishes working, five beeps can be heard, and the
food are fried well.

1312
Chicken leg, chicken wing
1. Connect the appliance with power source. One beep can be heard and all
the indicators on the control panel illuminate. Press Menu button “ ” to
select the “Chicken leg, chicken wing” “ ”, and the default temperature
and time of “Chicken leg, chicken wing” setting are 200°C and 20 minutes
separately, which are indicated in the display. And you can adjust your
desired temperature and time by following the operation specified in the
section of “Manual Air Frying”, and the display will indicate the new
temperature and time.
NOTE: The appliance will enter into the standby mode if there is not
any operation within 10 minutes after the appliance is powered on. At
that time, only the Power button “ ” and its corresponding indicator
are activated while other buttons and their corresponding indicator are
deactivated. And you can press the Power button “ ” to activate all the
functional buttons and indicators.
2. Put the wire rack into the frying tank and then evenly add a layer of
chicken legs or chicken wings on the wire rack.
3. Install the frying tank well in position and then press the Start/Stop
button “ ”, then the appliance starts to work.
NOTE: During working, press the Start/Stop button “ ”, its
corresponding indicator flashes and the appliance will pause working.
Press the Start/Stop button “ ” again, the appliance will continue to
work. To make the appliance stop working, hold and press the Start/Stop
button “ ”.
4. When the appliance finishes working, five beeps can be heard, and the
food are fried well.
NOTES:
(1) Please pay attention to the food to avoid it being scorched during
working process, and it is necessary apply some seasonings on the
food at the end of the work.
(2) Be careful when removing food after the food is cooked well. Use
special gloves to prevent being burnt.

13
Fish
1. Connect the appliance with power source. One beep can be heard and all
the indicators on the control panel illuminate. Press Menu button “ ” to
select the “Fish” “ ”, and the default temperature and time of “Fish”
setting are 200°C and 12 minutes separately, which are indicated in the
display. And you can adjust your desired temperature and time by
following the operation specified in the section of “Manual Air Frying”,
and the display will indicate the new temperature and time.
NOTE: The appliance will enter into the standby mode if there is not
any operation within 10 minutes after the appliance is powered on. At
that time, only the Power button “ ” and its corresponding indicator
are activated while other buttons and their corresponding indicator are
deactivated. And you can press the Power button “ ” to activate all the
functional buttons and indicators.
2. Put the wire rack into the frying tank and then evenly add a layer of fishes
on the wire rack.
3. Install the frying tank well in position and then press the Start/Stop
button “ ”, then the appliance starts to work.
NOTE: During working, press the Start/Stop button “ ”, its
corresponding indicator flashes and the appliance will pause working.
Press the Start/Stop button “ ” again, the appliance will continue to
work. To make the appliance stop working, hold and press the Start/Stop
button “ ”.
4. When the appliance finishes working, five beeps can be heard, and the
food are fried well.
Beefsteak
1. Connect the appliance with power source. One beep can be heard and all
the indicators on the control panel illuminate. Press Menu button “ ” to
select the “Beefsteak” “ ”, and the default temperature and time of
“Beefsteak” setting are 200°C and 25 minutes separately, which are
indicated in the display. And you can adjust your desired temperature and
time by following the operation specified in the section of “Manual Air
Frying”, and the display will indicate the new temperature and time.

1514
NOTE: The appliance will enter into the standby mode if there is not
any operation within 10 minutes after the appliance is powered on. At
that time, only the Power button “ ” and its corresponding indicator
are activated while other buttons and their corresponding indicator are
deactivated. And you can press the Power button “ ” to activate all the
functional buttons and indicators.
2. Put the wire rack into the frying tank and then evenly add a layer of
beefsteaks on the wire rack.
3. Install the frying tank well in position and then press the Start/Stop
button “ ”, then the appliance starts to work.
NOTE: During working, press the Start/Stop button “ ”, its
corresponding indicator flashes and the appliance will pause working.
Press the Start/Stop button “ ” again, the appliance will continue to
work. To make the appliance stop working, hold and press the Start/Stop
button “ ”.
4. When the appliance finishes working, five beeps can be heard, and the
food are fried well.
Dry fruit
1. Connect the appliance with power source. One beep can be heard and all
the indicators on the control panel illuminate. Press Menu button “ ” to
select the “Dry fruit” “ ”, and the default temperature and time of “Dry
fruit” setting are 30°C and 4 hours separately, which are indicated in the
display. And you can adjust your desired temperature and time by
following the operation specified in the section of “Manual Air Frying”,
and the display will indicate the new temperature and time.
NOTE: The appliance will enter into the standby mode if there is not
any operation within 10 minutes after the appliance is powered on. At
that time, only the Power button “ ” and its corresponding indicator
are activated while other buttons and their corresponding indicator are
deactivated. And you can press the Power button “ ” to activate all the
functional buttons and indicators.
2. Put the wire rack into the frying tank and then evenly add a layer of fruits
which have been cut well and are of uniform thickness on the wire rack.

15
3. Install the frying tank well in position and then press the Start/Stop
button “ ”, then the appliance starts to work.
NOTE: During working, press the Start/Stop button “ ”, its
corresponding indicator flashes and the appliance will pause working.
Press the Start/Stop button “ ” again, the appliance will continue to
work. To make the appliance stop working, hold and press the Start/Stop
button “ ”.
4. When the appliance finishes working, five beeps can be heard, and the
food are fried well.
Shrimp
1. Connect the appliance with power source. One beep can be heard and all
the indicators on the control panel illuminate. Press Menu button “ ” to
select the “Shrimp” “ ”, and the default temperature and time of
“Shrimp” setting are 180°C and 12 minutes separately, which are indicated
in the display. And you can adjust your desired temperature and time by
following the operation specified in the section of “Manual Air Frying”,
and the display will indicate the new temperature and time.
NOTE: The appliance will enter into the standby mode if there is not
any operation within 10 minutes after the appliance is powered on. At
that time, only the Power button “ ” and its corresponding indicator
are activated while other buttons and their corresponding indicator are
deactivated. And you can press the Power button “ ” to activate all the
functional buttons and indicators.
2. Put the wire rack into the frying tank and then evenly add a layer of
shrimps on the wire rack.
3. Install the frying tank well in position and then press the Start/Stop
button “ ”, then the appliance starts to work.
NOTE: During working, press the Start/Stop button “ ”, its
corresponding indicator flashes and the appliance will pause working.
Press the Start/Stop button “ ” again, the appliance will continue to
work. To make the appliance stop working, hold and press the Start/Stop
button “ ”.

1716
4. When the appliance finishes working, five beeps can be heard, and the
food are fried well.
Manual Air Frying
1. Add food to the baskets.
2. Set the temperature and time.
NOTE: You can do this anytime during cooking.
a. Press once. The temperature will blink on the display. Press the
or button to change the temperature (between 80°C-200°C).
b. Press once. The time will blink on the display. Press the or
button to change the time (between 1-60 minutes)
3. Press to begin air frying.
4. The air fryer will beep 5 times when finished. The display will show. (Fig 1)
Fig 1
Food Tips
zYou can air fry any frozen foods or goods that can be baked in an oven.
zTo make cakes, hand pies, or any food with filling or batter, place food in a
heat-safe container before placing in the baskets.
zAir frying high-fat foods will cause fat to drip to the bottom of the
baskets. To avoid excess smoke while cooking, pour out fat drippings after
cooking.
zLiquid-marinated foods create splatter and excess smoke. Pat these foods
dry before air frying.

17
CARE & MAINTENANCE
NOTE: Always clean the air fryer after every use. Lining the outer basket with
foil may make cleanup easier.
zUnplug the air fryer and allow it to cool completely before cleaning. Pull out
the baskets for faster cooling.
zWipe the outside of the air fryer with a moist cloth.
zThe baskets are dishwasher safe. You can also wash the baskets with hot,
soapy water and a non-abrasive sponge. Soak if necessary.
NOTE: Baskets have a non-stick coating. Avoid metal utensils and abrasive
cleaning materials.
zFor stubborn grease:
a. In a small bowl, mix ½ cup (118 ml) of baking soda and a few
tablespoons of water (1 tbsp = 15 ml) until forming a spreadable paste.
b. Use a sponge to spread the paste on the baskets and scrub. Before
rinsing, let the baskets sit for 15 minutes.
c. Wash baskets with soap and water before using.
zClean the inside of the air fryer with a slightly moist, non-abrasive sponge
or cloth. Do not immerse in water.
zClean the heating coil, if needed, to remove food debris.
zDry before using.
NOTE: Make sure that the heating coil is dry before turning on the air fryer.

1918
INTRODUCTION FOR MENUS
Problem Possible Solution
The air fryer will not turn on. Make sure the air fryer is plugged in.
Push the basket securely into the air
fryer.
Foods are not completely cooked. Place smaller batches of ingredients
into the inner basket.
If the basket is overstuffed, then
ingredients will be under cooked.
Increase cooking temperature or
time.
Foods are cooked unevenly. Spraying or brushing a small amount
of oil on food can increase crispiness
(see Cooking Guide).
French fries are not fried correctly. See French Fries (see Cooking Guide).
White smoke is coming out of the air
fryer.
The air fryer may produce some
white smoke when you use it for the
first time. This is normal.
Make sure the pan is cleaned properly
and not greasy.
Frying greasy foods will cause oil to
leak into the outer basket. This oil
will produce white smoke, and the
baskets may be hotter than usual.
This is normal, and would not affect
cooking. Handle baskets with care.
Dark smoke is coming out of the air
fryer.
Immediately unplug your air fryer.
Food is burning. Wait for smoke to
clear before pulling the basket out.
clean the air fryer after every use. Lining the outer basket with foil may make
cleanup easier.

19
SPECIFICATION
Model: POAF7006XL
Rated Voltage: 220-240V~ 50-60Hz
Rated power: 1800W
This symbol on the product or in the instructions means that your electrical
and electronic equipment should be disposed at the end of its life separately
from your household waste. There are separate collection systems for
recycling in the EU. For more information, please contact the local authority
or your retailer where you purchased the product.

2120
Imported and Exclusively marketed by:
Power International AS,
PO Box 523, N-1471 Lørenskog, Norway
Power Norge:
https://www.power.no/kundeservice/
T: 21 00 40 00
Expert Danmark:
https://www.expert.dk/kundeservice/
T: 70 70 17 07
Power Danmark:
https://www.power.dk/kundeservice/
T: 70 33 80 80
Punkt 1 Danmark:
https://www.punkt1.dk/kundeservice/
T: 70 70 17 07
Expert Finland:
https://www.expert.fi/tuki/asiakaspalvelu/
T: 020 7100 670
Power Finland:
https://www.power.fi/tuki/asiakaspalvelu/
T: 0305 0305
Power Sverige:
https://www.power.se/kundservice/
T: 08 517 66 000
Table of contents
Languages:
Other point Fryer manuals