Polivac MM1700E User manual

POLIVAC MM1700E AUTO SCRUBBER
Operations Manual & Trouble Shooting Guide

1700E AUTO SCRUBBER
Page 1 of 2
SAFE OPERATING PROCEDURES
1700E AUTO SCRUBBER
DO NOT use this machine unless you are fully conversant in its safe
use and operation and appropriate training has been given.
PRE-OPERATIONAL SAFETY CHECKS
1.
The operator’s hand should be run along the total length of the lead to check for cuts or
other damage as the lead is rolled out / rolled up.
2. No electrical machine should be used unless it contains current Test and Tag
requirements.
3. Please remove the extension lead prior to add solution to the tank.
4. Check lead is correctly fitted to the cable restraint so that no tension is applied to the
sockets.
5. Power to the machine should be disconnected at the wall socket prior to cleaning the
equipment, undertaking any form of repairs or changing the pad.
6. Trail electrical lead behind you as you work.
7. Under no circumstance should extension leads be used with this machine.
Let the machine do the work.
Avoid twisting and awkward postures.
Weight over your feet – stand naturally.
Share the load - take turns with your team partner.
STARTING AND USING THE AUTO SCRUBBER
1.
Plug the lead into the power socket and turn the switch on.
2. Stand upright; all operations with this equipment should be undertaken with the intention
of maintaining the back’s natural curves.
3. Once the brush/pad is engaged please press the “BRUSH” switch to ON position. Then
MM1700E will start to move forward slowly by itself, via the Poliflow forward propulsion
System .
4. To release fluid from the solution tank, please press “SOLUTION” switch to ON position
If no solution is noticed on the floor then please check the Solution valve located near
the bottom of the tank along the solution path and turn it to on.
Please note this solution valve can be used as a mode to control volume of sultion flows
on to the brush or pad.
5. Please lower the lever attach to the back of the tank to lower the squuegy assembly to
The floor.then Please press the “VACCUM” switch to ON position.
6. Always start at power point end of work area and work away from it with the electric cord
behind you. Do NOT place lead over your shoulder while operating the machine.
7. If you loose control of the machine, please press the “BRUSH” switch to OFF position.
machine will immediately stop forward motion.
REMEMBER: This is an in-line machine and is not operated similar to a swing polisher.
PERSONAL PROTECTION EQUIPMENT
No loose clothing and covered footwear should be used when operating this machine.

1700E AUTO SCRUBBER
Page 2 of 2
TROUBLE SHOOTING
ISSUE SOLUTION
Machine doesn’t work when "BRUSH" , "SOLUTION" & "VACCUM "
switches are on
1) Check extension lead connection to the inlet socket
in the machine and to the wall socket
2) Recovery Tank may be full. Please empty the tank
"VACCUM" switch is ON but no suction
1) Please check Squuegy assembly has been lowered to
the floor
2) Recovery tank lid may be not closed properly
Machine moves to side ways not straight
height adjustment knob located at the
back of casting to be carefully adjusted
Dirt water still on the floor and hasn’t been sucked properly Please clean squeegy blades properly for dirt and debris
HOUSEKEEPING
when you are finished the job, ensure the recovery tank is emptied, via the clear hose situated
on the right of the tank. A bucket is best to use for this. Simply unscrew the top valve and the
fluid will pour out. Rinse out the recovery tank with a hose and repeat the process to ensure
the tank is completely clean.
1. If you have left over solution in the tank then please press the “SOLUTION” switch to
ON position (while power is connected). That should empty the solution left over in tank
2. Wipe machine over after each use. Care should be taken to clean the underside of the
machine.
3. Remove the pad or brush from the 1700E. Clean pad or brush, with strong stream of
fresh water. Allow to dry thoroughly before storing.
4. Remove the squeegee tool and rinse it under running water, ensure that all dirt and
debris are removed from the squeegee blade.
5. Wipe cord, to clean and check for any damage, each time you roll it up. Wind from
machine end always to avoid twisting.
6. Equipment should be stored in a secure location with the skirt sitting neatly around the
machine.
7. All attachments should be removed and stored suitably e.g. on a shelf or in boxes.
8. Electrical cords should be coiled and tied for protection against damage and for ease of
storing.
POTENTIAL HAZARDS
1. Slip, trip and fall hazards exist when operating this machine.
2. Do not store MM1700 in upright position with brush or pad holder attached.
3. Take care not to run MM1700E over cable.
4. Do not store other equipment or items on top of this scrubber.
5. Do NOT place lead over your shoulder while operating the machine.
STARTING AND USING THE AUTO SCRUBBER CONTINUE…..
8.
Please note machine will automatically come to stop once recovery tank is full. This is
Controlled by a float switch installed in the recovery tank. In order to continue using
the machine, please make sure following
a) Press “ BRUSH” , “SOLUTION , “ VACCUM” switches to off position
b) Then drain the dirt water in the tank sensibly
9. Please note machine tend stop/start frequently when the recovery tank is near full.

131
132
133
134
135
P
VAC
LI
INTERNATIONAL PTY LTD
Page1
1700E Autoscrubber
PARTS LIST
1700E Autoscrubber
136
137
138
139
140
138
137
136
59
59
141 142 143 144
70a
70b

105b
105a
105c
105d
81
81a
81b
103a
103a
47
1700E Autoscrubber
PARTS LIST
1700E Autoscrubber
P
VAC
LI
INTERNATIONAL PTY LTD
115a
119a
Page 2
109

1700E Autoscrubber
PARTS LIST
1700E Autoscrubber
P
VAC
LI
INTERNATIONAL PTY LTD
20mm PVC Pipe
PVT014
PVT042 32mm Elbow 45DG
PVS004 32mm PVC Pipe
PVT004 Inlet Elbow 15DG
RT013 White Socket
PVT012 Black Adaptor
Page 3

382350
Squeege
Assy.
1700E Autoscrubber
PARTS LIST
1700E Autoscrubber
P
VAC
LI
INTERNATIONAL PTY LTD
Page 4
128
123
124
125
126
127
129
130

1. PVT005 Lid (Solution Tank)
2. PVT001 Solution Tank
3. PVT001A Recovery Tank
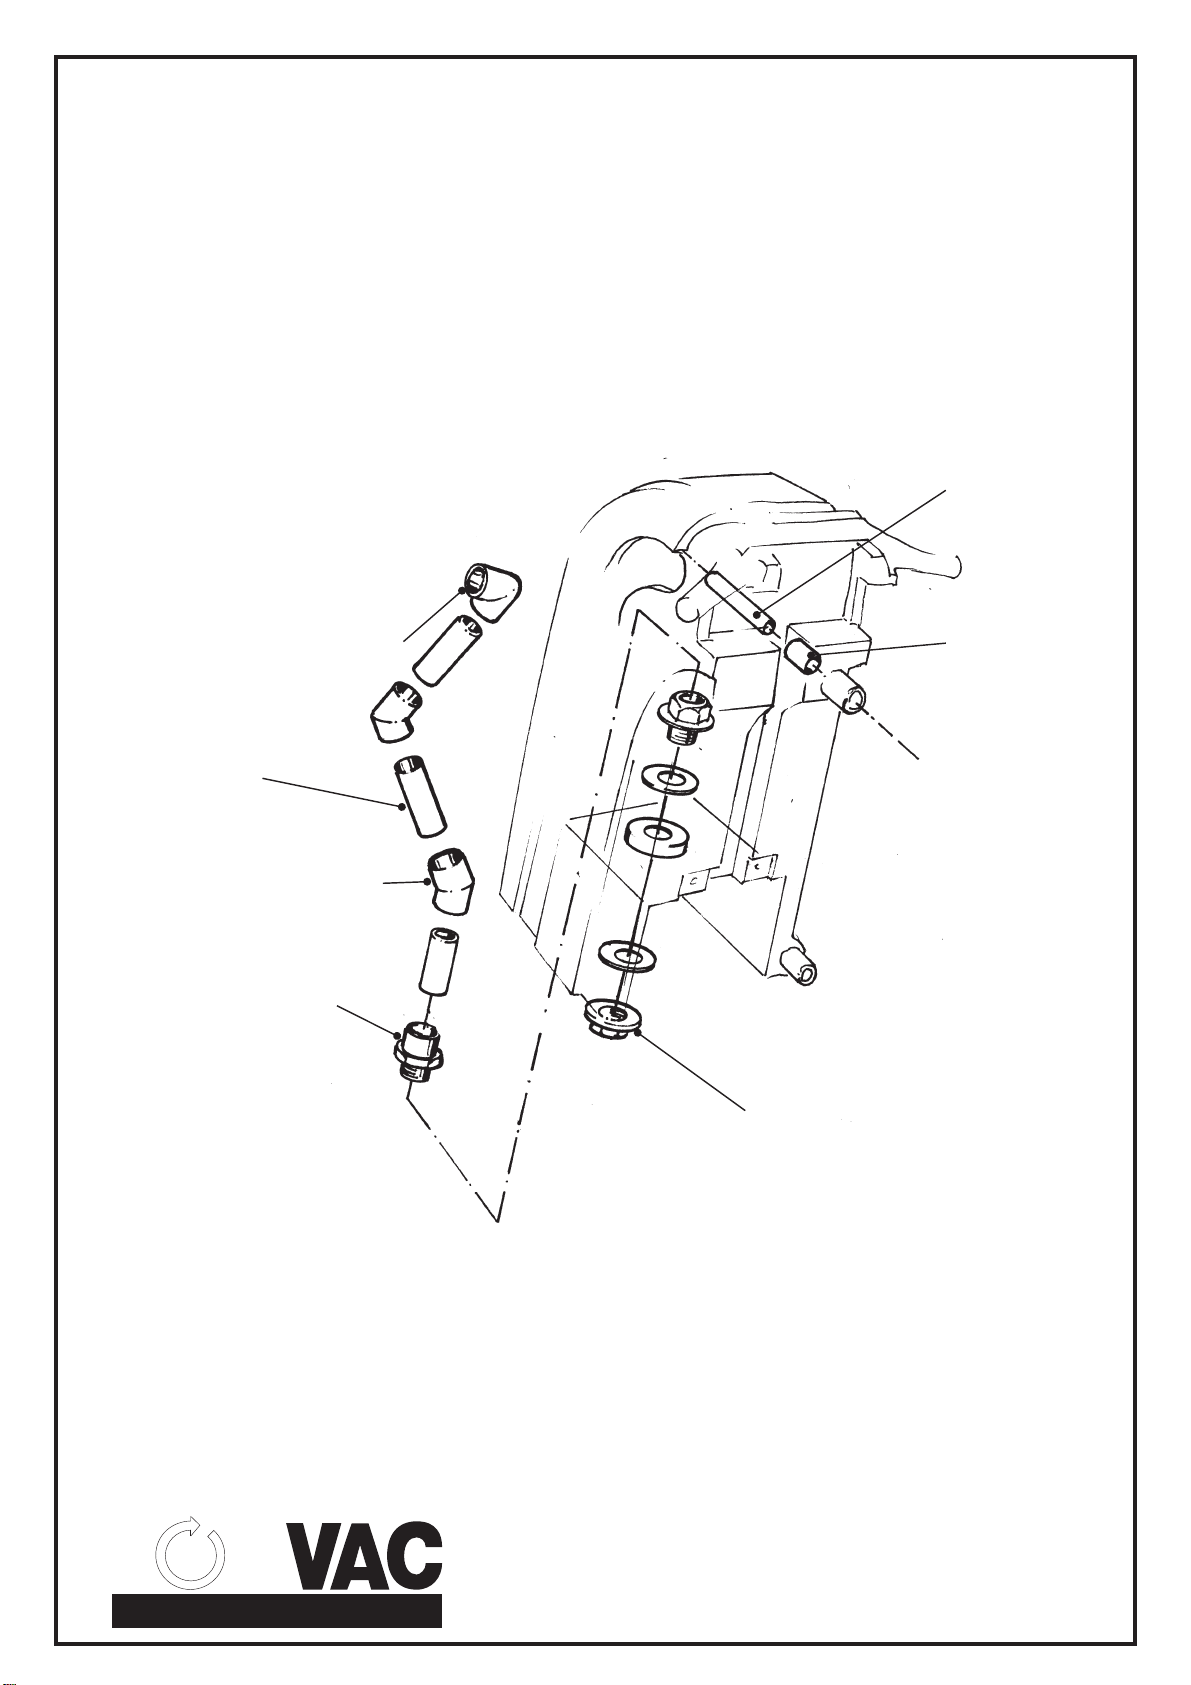
4 PVT035 Elbow Fitting
5 PVS060 Hose Quick Clamp
6 PVS067 Solution Hose
7 PVS013 Solution Valve Assembly
8 AAA537 6mm x 12mm Set Screw
9 AAD039 Bolt
10 VPA284 Nut
12 AAD038 1/4 x 1½
14 COM019 Rubber Seal
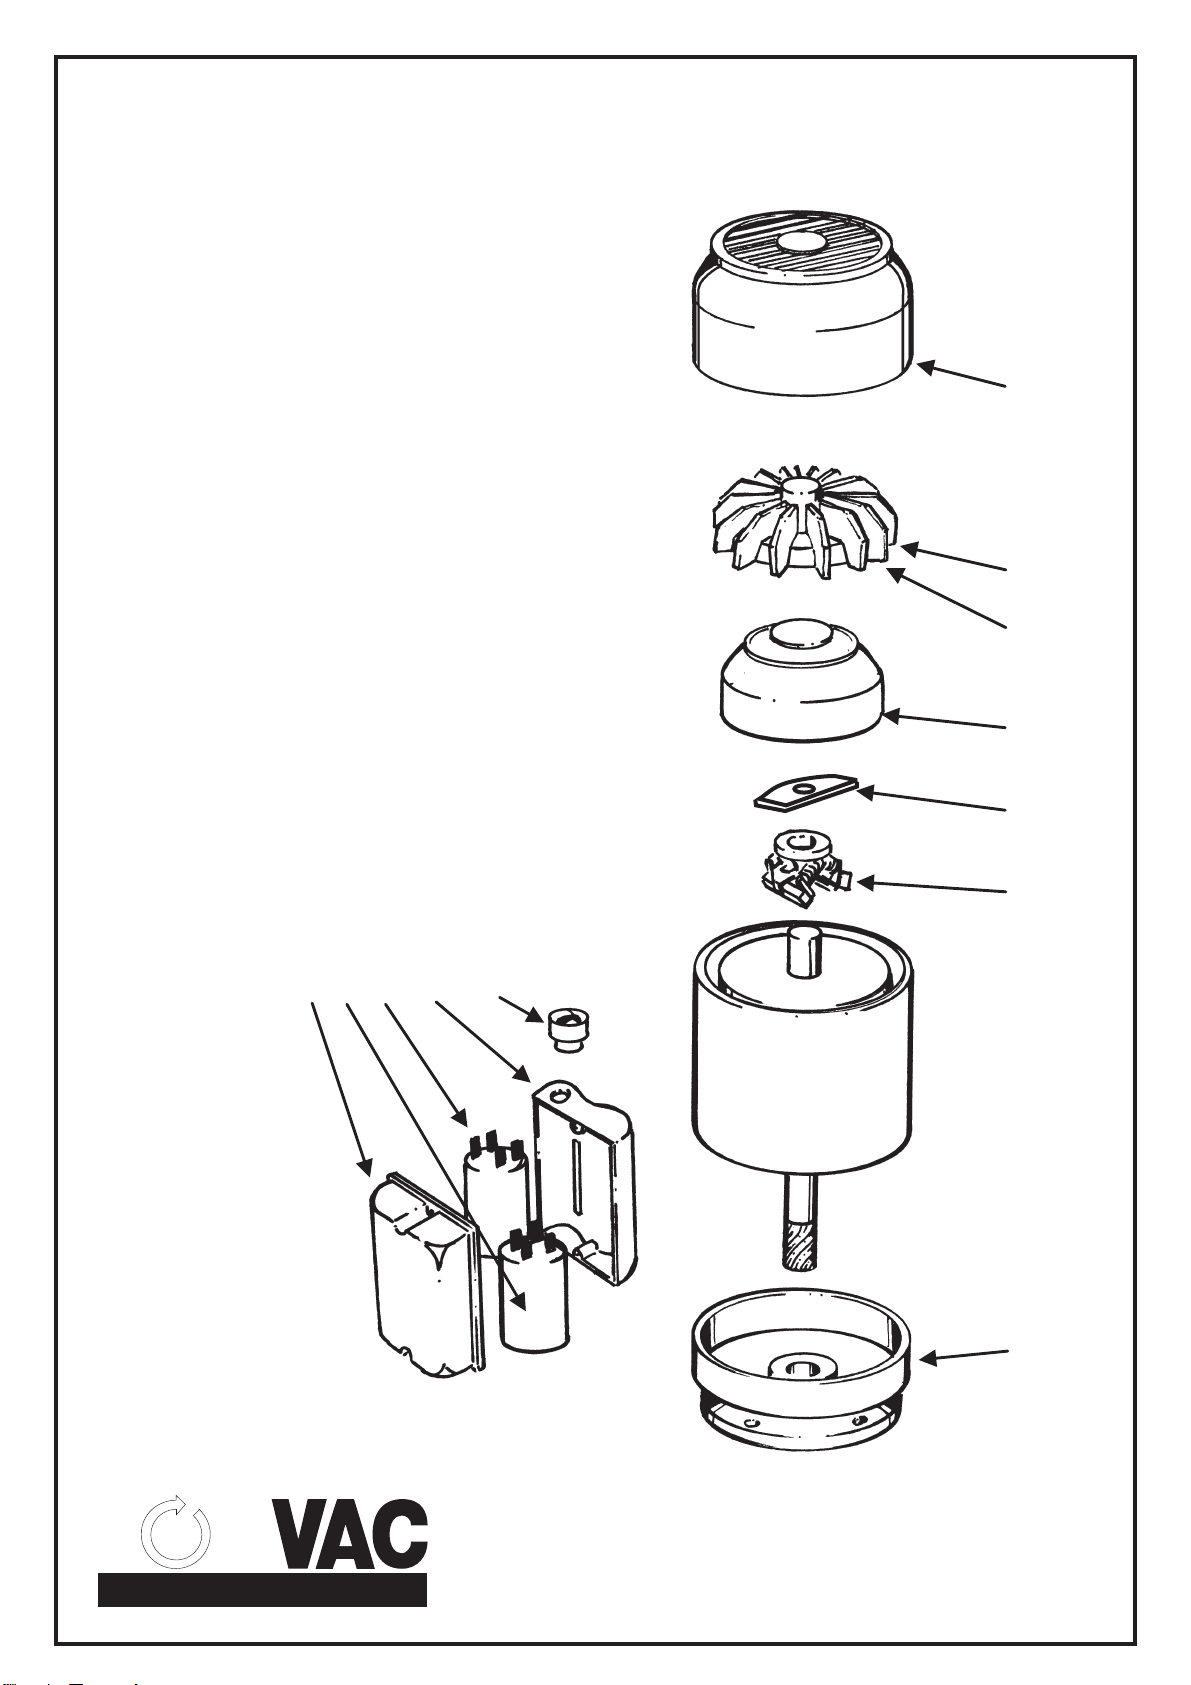
15 PVT100D Bottom Plate (Vac Cover)
16 PVT033 Spring
17 PVT002 Vac Motor
18 COM086 Seal (Motor Support)
19 VPA906 Spring Tensioner Trigger
20 AAA501 3/16 x 1 / Screw C/S
21 VPA838 Trigger
22 PVT100J Exhaust Cover
23 PVT100A Handle Stem
24 VPA231 Tongue Assembly
25 AAF140 1/4 Nylon Nut
26 VPA767 Fork
27 VPA284 Handle Pin & Nut
28 SLB038 3/16 Nylon Nut
29 AAG236 Flat Washer
30 PVT086 Support Bracket (Handle)
31 AAA604 Bolt (H/T 1/4 x 1) S/S
32 PVT027 Flat Washer
33 SLB038 3/16 Nylon Nut
34 PVS077 Water Release Hose
35 PVT047 Plug PVT048 Sleeve
36 VPV156 Ring
37 PVS974 Terminal Block (5 Term)
38 PVS041 Wiring Box
39 PVS096 Gland
40 AAM601 Terminal Block
41. PVT200 Hose Clamp
42 388019 Micro Switch (Activate Drive Motor)
43 VPA622 Half Clamp
44 AAJ002 Star Washer
45 AAA354 3mm Nut
46 388019 Micro Switch (Activate Vac Motor)
47 PVT008 Squeegee Lift Cable
48 AAA353 3mm x 25mm Screw
49. PVT006 Lid (Recovery Tank)
50. PVT015 Rubber Seal
51 AAA354 6mm Nylon Nut
52 PVT100K Rod (Squeegee Lift Handle)
53. 364527 Knob (Squeegee Lift Handle)
54. PVT100E Squeegee Lift Handle
55. PVT100A Backing Switch Plate
56. PVT100G Switch Plate
58 PVT100E Washer (Activate Vac Motor)
59 AAG385 Washer
60 PVS095 Hose Cuff
61 PVS121 Extract Hose
62 VVA019 No. 4 Clamp
63 ZDR078 Indicator Light
65 PVT100F Cover Plate
66 387670 Knob (Detergent Lift Handle)
67 PVT017 Rod Solution
68 PVT028 3/16 x 5/8 Self Tap
69 VPV120 Clip (Hose Retainer)
70a VVA019 Cable Clamp No.4
70b BV8003 Ring
71 BV8003 Strain Relief
72 AAA564 Set Screw 1/4 x ¾
73 AAG236 Flat Washer
74 VPA104 Oil Seal
75 VPA114 Bearing
76 VPA116 Shaft
77 AAA501 3/16 x 1”
78 PVS424 Casting
79 VPV239 Insert
"
80 VPV087 Buffer
81 VPA328CMG Drive Motor
81a SK006 Screw 5/16
81b VPV542 Nut 5/16
82 AAD041 Screw
83 VPA836 Rubber Grommet
84 VPA177 Base Plate
85 VPA121 Wavy Washer
86 VPA570 Bearing
87 VPA411 Gear
88 VAA113 Cover Plate
89 VPA122 Washer
90 AAA564 Set Screw 1/4 x ¾
91 PVT045 Nut 5/16
92 PVT044 Cap Head Screw 5/16
93 PVS085 Knob
94 PVS042 Gcrub Screw
95 PVT044 Cap Head Screw 5/16
96 VFB115 Woodruff Key
97 PVT090 Height Adjustment Wedment
98 PVS078 Drive Hub
99 PVS009 Height Adjustment Rod
100 387116 Pilot Hub
101 PVS087 Height Adjustment Bracket
102 PVS026 Cap/Head Screw 5/16 x 11/4
103 AAA564 Set Screw 5/8 x ¼
103a GAS041 ¼ Spring Washer
103b AAG236 Washer
104 PVS092 Shaft
105a PVS118L Left Spring
105b PVS119R Right Spring
105c PVS119L Left Spring
105d PVS118R Right Spring
106 370711 Thumb Nut
107 VPA820 Spacer (Swivel Tongue & Squeegee)
108 PVS006 Swivel Squeegee
109 PVS052 Skirt Assembly
110 VPV168 Mini Skirt (ref 109 Skirt Assy.)
111 VPV172 Retainer Skirt
112 VPV042 Pickup Ring
113 PVS40B2 Brush
114 PVT009 Turn Buckle
115 PPR095 Nut Nylon
115a PVS039 S/S Nut 3/16
116 VPA829 5/32 Roll Pin
117 PVT038 Flat Washer
118 PVT007 Wheels
119 SLB040 Flat washer
119a GAS041 Spring Washer ¼
120 AAA564 Set Screw 5/8 x ¼
121 PVS006 Swivel Squeegee Tongue
122 PVT011 Axle
Ref pg4 382350 Squeegee Assembly
123 382352 Weldment
124 105550 Channel
125 105551 Retainer
126 105533 Blade
127 393746 Weights
128 370711 Thumb Nut
129 387376 Roller Assy
130 363855 Frame Roller
131 ECG157 Lead Protector
132 PVT016 Plug & Lead
133 300187 Belt Clip
134 PVS070A Plastic Clamp
135 VPV476 Lead
136 VPA459 Brass Barb 5/16
137 PVS059 Brass Reducer Bush
138 PVS054 Washer 11/16 x 1 5/16
139 PVS013 Solution Valve Assy
140 PVS084 Solution Valve Retainer
141 PVT028 Screw
142 PVT018 Hinge
143 AAE232 Dom Nut
144 AAK044 Pop Rivet
(ref 109 Skirt Assy.)
1700E Autoscrubber PARTS LIST1700E Autoscrubber PARTS LIST
Page 5

1700E/A23
VPA328CMG
1700E/A23
VPA328CMG
1 VPV818CMG Capacitor Box Cover
2a VPV797CMG Start Capacitor
2b VPV825CMG Run Capacitor
3 VPV817CMG Capacitor Box Base
4 VPV807CMG Manual Reset
5 VPV813CMG Cowl
6 VPV812CMG Cooling Fan
6a VPV819CMG Clip on cooling fan
7 VPV811CMG Non Drive Endshield
8 VPV826CMG Switch Plate
9 VPV806CMG Centrifugal Switch
10 VPV810CMG Flanged Endshield
1 2a 2b 3 4
1700E/A23
VPA328CMG
1700E/A23
VPA328CMG
P
VAC
LI
I N T E R N A T I O N A L P T Y L T D
5
6
6a
7
8
9
10
Other manuals for MM1700E
2
Table of contents
Other Polivac Scrubber manuals
Popular Scrubber manuals by other brands

Kärcher
Kärcher BD 50/50 C Bp Classic manual

Lincoln Electric
Lincoln Electric Mobiflex 200-M user manual

Nilfisk-Advance
Nilfisk-Advance BA 340 Use and maintenance manual

Comet Spa
Comet Spa CPS 36 ADVANCE instructions

Numatic
Numatic TTV - 4555/100T Owner's instructions

Matrix
Matrix CHF611 Manual for installation, use and maintenance