Pololu Corporation Baby Orangutan B-48 User manual

Pololu Baby Orangutan B User's
Guide
1. Overview . . . . . . . . . . . . . . . . . . . . . . . . . . . . . . . . . . . . . . . . . . . . . . . . . . . . . . . . . 2
2. Contacting Pololu . . . . . . . . . . . . . . . . . . . . . . . . . . . . . . . . . . . . . . . . . . . . . . . . . . . . . 3
3. Schematic Diagram . . . . . . . . . . . . . . . . . . . . . . . . . . . . . . . . . . . . . . . . . . . . . . . . . . . . 4
4. Module Pinout and Component Identification . . . . . . . . . . . . . . . . . . . . . . . . . . . . . . . . . . . . . . 5
5. Included Header Pins . . . . . . . . . . . . . . . . . . . . . . . . . . . . . . . . . . . . . . . . . . . . . . . . . . . 7
6. Getting Started . . . . . . . . . . . . . . . . . . . . . . . . . . . . . . . . . . . . . . . . . . . . . . . . . . . . . . 8
7. AVR Pin Assignment Table Sorted by Function . . . . . . . . . . . . . . . . . . . . . . . . . . . . . . . . . . . . . 9
8. AVR Pin Assignment Table Sorted by Pin . . . . . . . . . . . . . . . . . . . . . . . . . . . . . . . . . . . . . . . 10
9. Motor Driver Truth Table . . . . . . . . . . . . . . . . . . . . . . . . . . . . . . . . . . . . . . . . . . . . . . . 11
Pololu Baby Orangutan B User's Guide © 2001–2012 Pololu Corporation
http://www.pololu.com/docs/0J14 Page 1 of 11

1. Overview
The Baby Orangutan B-48 [http://www.pololu.com/catalog/product/1215],B-168 [http://www.pololu.com/catalog/product/1216], and
B-328 [http://www.pololu.com/catalog/product/1220] robot controllers are complete control solutions for small robots. The small
module includes a powerful Atmel ATmega48/168/328P microcontroller, two channels of bidirectional motor control, a
user potentiometer, 18 user I/O lines (16 of which can be used as general-purpose digital I/Os and 8 of which can be used
as analog input channels) that can be used to expand the system. A battery, motors, and sensors can be connected directly
to the module to create simple robots.
Note: This user’s guide applies only to the most recent Baby Orangutan B revision. The older, discontinued
Baby Orangutans [http://www.pololu.com/catalog/product/216] have green solder masks while the new Baby
Orangutan Bs have blue solder masks.
Pololu Baby Orangutan B User's Guide © 2001–2012 Pololu Corporation
1. Overview Page 2 of 11

2. Contacting Pololu
You can check the Baby Orangutan B-328 robot controller page [http://www.pololu.com/catalog/product/1220] for additional
information, including pictures, example code, and application notes.
We would be delighted to hear from you about any of your projects and about your experience with the Baby Orangutan
Robot controller. You can contact us [http://www.pololu.com/contact] directly or post on our forum [http://forum.pololu.com/].
Tell us what we did well, what we could improve, what you would like to see in the future, or anything else you would
like to say!
Pololu Baby Orangutan B User's Guide © 2001–2012 Pololu Corporation
2. Contacting Pololu Page 3 of 11

3. Schematic Diagram
The basic schematic of the Baby Orangutan B is identical to that of the larger Orangutan SV-328
[http://www.pololu.com/catalog/product/1227] and Orangutan LV-168 [http://www.pololu.com/catalog/product/775] robot controllers.
You can effectively build your own Orangutan SV-328 by adding a buzzer, LCD [http://www.pololu.com/catalog/product/356],
and pushbuttons as indicated in the Orangutan SV-328 schematic. This design means software can be written for one
device that will work on the other, provided the Baby Orangutan is given matching hardware connections.
Pololu Baby Orangutan B-48/B-168/B-328 schematic diagram.
Pololu Baby Orangutan B User's Guide © 2001–2012 Pololu Corporation
3. Schematic Diagram Page 4 of 11

4. Module Pinout and Component Identification
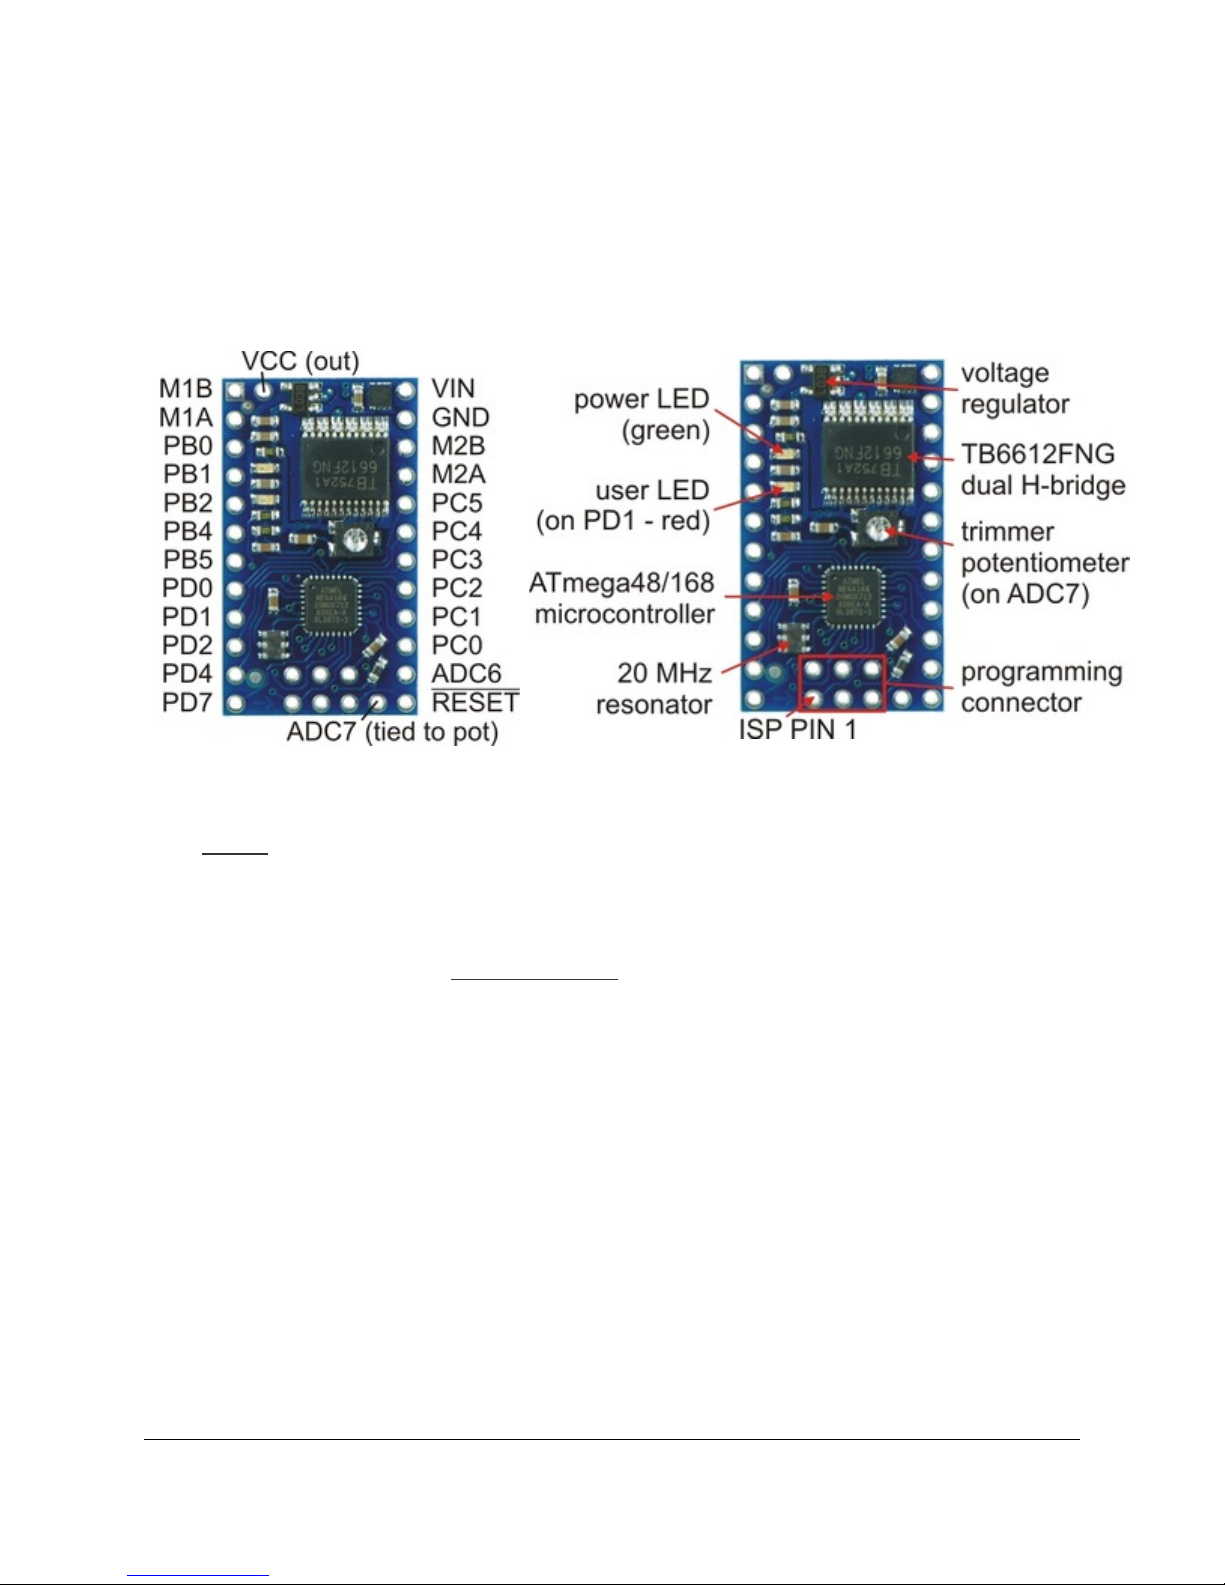
The Baby Orangutan contains a programmable ATmega48, ATmega168, or ATmega328P AVR microcontroller, a
TB6612FNG dual H-bridge for direct control of two DC motors, a 10k user trimmer potentiometer (connected to ADC7),
a green power LED, a red user LED (connected to PD1), a 20 MHz resonator, and a reverse-battery-protection MOSFET,
all containted in a tiny 1.2" x 0.7" 24-pin DIP package. Power pins, one of the motor outputs, and several I/O lines are all
accessible from one side to enable use of the Baby Orangutan as a single in-line pin (SIP) package for applications that
do not require all of the I/O lines.
•VIN should be from 5 to 13.5 V, with an absolute maximum of 15 V.
•RESET can be brought low to reset the controller, but it can otherwise be left disconnected (it is internally pulled
high). This pin is labeled as PC6 in the ATmega48/168/328 datasheet (and on the Baby Orangutan silkscreen).
•Vcc can be used to tap into the Baby Orangutan’s regulated 5V line. This line can supply a total of around 100 mA
at 5 V, but thermal dissipation limits the total Vcc current to around 50 mA at 13.5 V. Note that attempting to pull
too much current from Vcc could permanently damage the Baby Orangutan’s voltage regulator.
•M1A & M1B are the outputs used to drive motor 1. These outputs can supply around 1 A continuous (3 peak).
•M2A & M2B are the outputs used to drive motor 2. These outputs can supply around 1 A continuous (3 peak).
•PC0 – PC5 can be used as both analog inputs and digital I/O lines
•ADC6 & ADC7 are dedicated analog inputs. Note that ADC7 is internally connected to the 10k user trimmer
potentiometer.
•PB0, PB3, PB4, PB5, PD0, PD1, PD2, PD3, PD4, & PD7 are digital I/O lines with alternate functions
determined by the AVR hardware peripherals to which they connect. For example, PD0 and PD1 connect to the
ATmega48/168’s UART and can be configured to function as RX and TX, respectively. Note that PD1 is internally
connected to the red user LED, which may limit its ability to be used as an input (if the source cannot drive the PD1
hard enough, the voltage will be pulled below the AVR’s high threshold by the LED-resistor circuit ).
Pololu Baby Orangutan B User's Guide © 2001–2012 Pololu Corporation
4. Module Pinout and Component Identification Page 5 of 11

Warning: Pins PB4 and PB5 are used as ISP programming pins in addition to digital user I/O lines. Be
careful not to connect anything to these pins that might interfere with programming (e.g. large capacitance
or an external device that could drive those lines during programming). Similarly, don’t connect anything
to those lines that might behave unexpectedly when they are driven during programming (e.g. if you use
these lines as inputs to a motor driver IC, it could drive your motors in strange and potentially dangerous
ways during programming) .
You can tap into the Baby Orangutan’s regulated 5V Vcc line using the pin labeled “Vcc” or either of the two pads on the
bottom of the board directly to the left of this pin. You can tap into the Baby Orangutan’s ground using the two pads on
the bottom of the board directly to the right of the “GND” pin.
Pololu Baby Orangutan B User's Guide © 2001–2012 Pololu Corporation
4. Module Pinout and Component Identification Page 6 of 11

5. Included Header Pins
The Baby Orangutan ships with 0.1" header pins as shown in the left picture below: two 12×1 strips and one 3×2
ISP programming header. Both 12×1 strips can be soldered in to allow the module to be used as a DIP component on
breadboards or prototyping boards, or a single 12×1 strip can be soldered in to allow the module to be used as a single
in-line pin (SIP) component (since power pins, one of the motor outputs, and several I/O lines are all accessible from
one side). The header pins can be left off and wires can be directly soldered to the Baby Orangutan for space-constrained
installations.
Baby Orangutan B with included 0.1" header
pins. Baby Orangutan B with included header pins
soldered in for breadboard installation.
If you solder in the 3×2 ISP header pins, the solder connections should be made along the bottom side of the board so the
pin connections are available from the top side of the board, as shown in the right picture above. If you solder the ISP pins
to the wrong side of the board, your programmer’s ISP cable will not be able to connect correctly to the Baby Orangutan.
Pololu Baby Orangutan B User's Guide © 2001–2012 Pololu Corporation
5. Included Header Pins Page 7 of 11

6. Getting Started
The Baby Orangutan is powered via the VIN and GND pins, which are located at the top-right corner of the board. The
device is protected by a MOSFET against accidental reverse-battery connection. The supply voltage should be 5 – 13.5 V,
with an absolute maximum of 15 V, so a 5- to 9-cell NiCd or NiMH battery pack is a good choice. This Orangutan can
work with a 10-cell NiCd or NiMH battery pack or a 12V lead-acid battery, but you should be aware that such a power
source might exceed the controller’s maximum voltage rating if the batteries are freshly charged. When the Orangutan
is powered, the green power LED is illuminated. The RESET pin can be brought low to reset the controller, but it can
otherwise be left disconnected (it is internally pulled high).
Please see the Pololu AVR Programming Quick Start Guide [http://www.pololu.com/docs/0J51] for tutorials on how to
get started programming the Baby Orangutan in Windows, Linux, and Mac OS X. That guide also covers the Pololu
AVR C/C++ Library [http://www.pololu.com/docs/0J20] and the Pololu USB AVR Programmer [http://www.pololu.com/catalog/
product/1300].
Pololu Baby Orangutan B User's Guide © 2001–2012 Pololu Corporation
6. Getting Started Page 8 of 11

7. AVR Pin Assignment Table Sorted by Function
Function Pin
digital I/Os (x16)
PB0, PB1, PB2, PB4, PB5,
PC0, PC1, PC2, PC3, PC4, PC5,
PD0, PD1, PD2, PD4, PD7
analog inputs (x8) PC0, PC1, PC2, PC3, PC4, PC5, ADC6, ADC7
motor 1 control (A and B) PD5 and PD6
motor 2 control (A and B) PD3 and PB3
red user LED PD1
user trimmer potentiometer ADC7
ISP programming lines (x3) PB3, PB4, PB5
RESET PC6
UART (RX and TX) PD0 and PD1
I2C/TWI (SDA and SCL) PC4 and PC5
SPI inaccessable to user
Timer1 PWM outputs (A and B) PB1 and PB2
Pololu Baby Orangutan B User's Guide © 2001–2012 Pololu Corporation
7. AVR Pin Assignment Table Sorted by Function Page 9 of 11

8. AVR Pin Assignment Table Sorted by Pin
Port Pin Orangutan Function Notes/Alternate Functions
PB0 digital I/O Timer1 input capture (ICP1)
divided system clock output (CLK0)
PB1 digital I/O Timer1 PWM output A (OC1A)
PB2 digital I/O Timer1 PWM output B (OC1B)
PB3 M2 control line Timer2 PWM output A (OC2A)
ISP programming line
PB4 digital I/O Caution: also an ISP programming line
PB5 digital I/O Caution: also an ISP programming line
PB6 20 MHz resonator input not accessable to the user
B
PB7 20 MHz resonator input not accessable to the user
PC0 analog input and digital I/O ADC input channel 0 (ADC0)
PC1 analog input and digital I/O ADC input channel 1 (ADC1)
PC2 analog input and digital I/O ADC input channel 2 (ADC2)
PC3 analog input and digital I/O ADC input channel 3 (ADC3)
PC4 analog input and digital I/O ADC input channel 4 (ADC4)
I2C/TWI input/output data line (SDA)
PC5 analog input and digital I/O ADC input channel 5 (ADC5)
I2C/TWI clock line (SCL)
C
PC6 RESET pin internally pulled high; active lowdigital I/O disabled by default
PD0 digital I/O USART input pin (RXD)
PD1 digital I/O connected to red user LED (high turns LED on)
USART output pin (TXD)
PD2 digital I/O external interrupt 0 (INT0)
PD3 M2 control line Timer2 PWM output B (OC2B)
PD4 digital I/O USART external clock input/output (XCK)
Timer0 external counter (T0)
PD5 M1 control line Timer0 PWM output B (OC0B)
PD6 M1 control line Timer0 PWM output A (OC0A)
D
PD7 digital I/O
ADC6 dedicated analog input ADC input channel 6 (ADC6)
ADC7 dedicated analog input connected to user trimmer potentiometer
ADC input channel 7 (ADC7)
Pololu Baby Orangutan B User's Guide © 2001–2012 Pololu Corporation
8. AVR Pin Assignment Table Sorted by Pin Page 10 of 11

9. Motor Driver Truth Table
input output
PD5, PD3 PD6, PB3 M1A, M2A M1B, M2B motor effect
HH L L brake
L H L H “forward”
H L H L “reverse”
L L OFF (high-impedance) coast
Motor 1 is controlled by pins PD5 and PD6, and motor 2 is controlled by PD3 and PB3. These pins are connected to
the ATmega48/168’s four eight-bit hardware PWM outputs, which allows you to achieve variable motor speeds through
hardware timers rather than software. This frees the CPU to perform other tasks while motor speed is automatically
maintained.
The suggested procedure for using hardware PWM outputs to control the motors is as follows:
1. Make the four motor control pins outputs and drive them high; this drives all four motor outputs low.
2. Configure Timer0 and Timer2 to use a prescaler of 8, which results in a PWM frequency of 20 MHz/8/256 =
9.8 kHz. Set these timers for inverted PWM mode output on both OCxA and OCxB, meaning that these PWM pins
are set on timer compare match and cleared on timer overflow. This results in negative PWM pulses with duty cycles
determined by registers OCR0A, OCR0B, OCR2A, and OCR2B.
3. You can command motor 1 to drive “forward” at a speed ranging from 0 – 255 by setting OCR0B = speed and
holding fixed OCR0A = 0. You can command motor 1 to drive “reverse” at a speed ranging from 0 – 255 by setting
OCR0A = speed and OCR0B = 0. During the period where the two input pins have opposite values, the motor drives
at full speed. During the period where the two inputs have the same value (high), the motor brakes. Cycling between
drive and brake and high frequency results in variable motor speed that changes as a function of PWM duty cycle.
Analogous results can be obtained for motor 2 using OCR2A and OCR2B. (Note that the concept of “forward” is
arbitrary as simply flipping the motor leads results in rotation in the opposite direction.)
Using these PWM settings, OCR0B = 255 is equivalent to holding PD5 low while OCR0A = 0 is equivalent to holding
PD6 high. As you can see from the truth table above, in this state M1B connects to your battery’s positive terminal and
M1A connects to ground. Decreasing OCR0B to something less than 255 decreases the percentage of time PD5 is low,
causing M1B to alternate between VIN and GND (and hence causing motor 1 to alternate between drive and brake).
Similarly, OCR2B = 255 is equivalent to holding PD3 low while OCR2A = 0 is equivalent to holding PB3 high. In this
state, M2B connects to your battery’s positive terminal and M2A connects to ground.
Pololu Baby Orangutan B User's Guide © 2001–2012 Pololu Corporation
9. Motor Driver Truth Table Page 11 of 11
This manual suits for next models
2
Table of contents
Other Pololu Corporation Controllers manuals