Poly EduCart 2 Manual

© 2021 Plantronics, Inc. All rights reserved. Poly, the propeller design, and the Poly logo are trademarks of Plantronics, Inc. The Bluetooth trademark
is owned by Bluetooth SIG, Inc. and any use of the mark by Plantronics, Inc. is under license. All other trademarks are the property of their respective owners.
Poly EduCart 2
SETUP SHEET
3725-86812-001B
support.polycom.com/video
Flat Screen Display
(Not Supplied - Must meet
Poly’s specications)
EagleEye IV Camera
Speakers
Base with
Locking Wheels
“Grab”
Handles
Basket
H Frame
Poles
Back
Cover
Poly G7500
on back side
of H frame
Power supplies
on front side
of H frame

Poly EduCart 2 Setup Sheet 2
3
2
Loosen and rotate the camera bracket and slide it out
to avoid hitting the display during installation. The
camera bracket is rotated for packaging and must be
rotated to the correct position.
1Place the base on the oor and lock the wheels. Insert
each pole into the base with the threaded inserts lined
up with the holes at the rear of the base. Loosely insert
two 3/8” bolts with at washers on the back side and
one in the bottom of each pole. Tighten with a 9/16”
wrench.
Remove the basket and basket bracket from the H frame
by removing the two screws circled in red.
4Attach the power supplies to the back of the codec
mounting plate. Carefully loosen or remove the pre-
installed power supply mounting screws to slide the
power supplies into the brackets. Tighten the screws.
Note that spare screws are provided.

Poly EduCart 2 Setup Sheet 3
Only the EduCart 2 components and customer-
supplied display should be plugged into the power
bar outlet. Do not power any other electrical
equipment from this power bar outlet.
5Insert the top M3 x 8 stainless steel Phillips pan head
screw through the back of the codec mounting plate.
Align the top right corner of the codec with the top right
corner of the codec mounting plate (circled in red). This
aligns the top hole in the bottom of the codec with the
screw. Tighten the screw.
Insert the bottom codec mounting screw into the bottom
hole in the rear of the codec. Tighten the screw.
6Attach and route the cables as shown below using the supplied cable ties
and attachment points (circled in red) on the codec mounting plate.
Run the left and right speaker cables down the adjacent poles and exit at
the appropriate locations for connection to the speakers.
A power bar outlet and IEC adapter cable are provided with the system
for powering the display. Run the power cord from the power bar outlet,
down the adjacent pole, and exit the cord end at the hole at the bottom of
the pole. Run an Ethernet cable the same way.
Store excess cable with the cable wrap bracket at the bottom of the cart
base.
Refer to the wiring diagram at the end of this document for details.
Codec
Power supplies
are on other
side of codec
Camera plate
points towards
the power supply side
AC connectors
on bottom

Poly EduCart 2 Setup Sheet 4
9
Remove your display from packaging. If possible, leave
the display on the bottom portion of the packaging.
For mounting purposes, Poly supplies four long M8 × 25
screws and spacers to use between the H frame and the
display. Note: Depending on the display selected, you
may require M6 or M8 screws that are not supplied.
Attach the H frame to the rear of the display using
the holes circled in red below. If the packaging interferes,
either cut the foam or lift the display out.
78Insert four M8 × 16 screws on the back of the frame
(circled in red below) and hand tighten to about half way.
The screws must be loose to t onto the cart.
Ensure that the cart casters are locked. With a person
on each side, lift the display, by the handles, onto the
cart at the desired height. Ensure that all four M8
screws installed in step 8 are hooked into the keyhole
slots in the cart poles. Tighten the four M8 screws
through the holes.
Attach H frame using
holes circled in red.
M8 x 16 screws
circled in red.
Maximum supported displays:
The display used must have VESA mounting
400 mm ×400 mm, or 400 mm ×600 mm.
To avoid risk of toppling over, displays must not
exceed any of the following tested parameters.
High Position
Diagonal 65”
Weight 39 kg (86 lb.)
W: 1458.6 mm ×D: 50.0 mm ×H: 836.4 mm
(57.4” ×2.0” ×32.9”)
Mid Position
Diagonal 75”
Weight 64 kg (141 lb.)
W: 1735.0 mm ×D: 79.1 mm ×H: 1017.4 mm
(68.3” ×3.1” ×40.0”)
Low Position
Diagonal 75”
Weight 64 kg (141 lb.)
W: 1735.0 mm ×D: 79.1 mm ×H: 1017.4 mm
(68.3” ×3.1” ×40.0”)

Poly EduCart 2 Setup Sheet 5
12
Adjust the handles by loosening the two screws on
each bar (four screws per side). Extend the handle at
or beyond the display by 1” to 2”. Replace the screws and
tighten. Use the same hole in the series of holes on
both sides. These handles will be used to move the cart.
Install the left and right speaker brackets grill forward
and directly under the display on the outside of the
poles, oriented as shown below. Attach the brackets
using 1/4-20 hex nuts and a 7/16” wrench.
11
Connect the audio and DC speaker wires. Refer to the
wiring diagram at the end of this document for details.
13
Place the speaker inside the grill bracket, with the
angled edge pointing towards the cart, and fasten
to the bracket with two M16-1.0 pan head
screws on the rear side.
10

6
Poly EduCart 2 Setup Sheet
16 Loosen the two screws on the camera bracket (circled
in red) and lower the camera shelf to the top of the
display. Tighten the screws. Route the camera cable
behind the camera bracket, through the hole, and
connect to the camera.
17
Attach the storage basket to the bottom of the H
bracket under the power bar using the two screws
removed in step 2.
Attach the EagleEye IV camera to the camera
mounting bracket using four black M3 x 6mm Phillips
at head screws.
15
Attach the magnetic vanity plate on the front of the
cart between the speakers. This plate can be used
for your company name or logo.
14

Poly EduCart 2 Setup Sheet 7
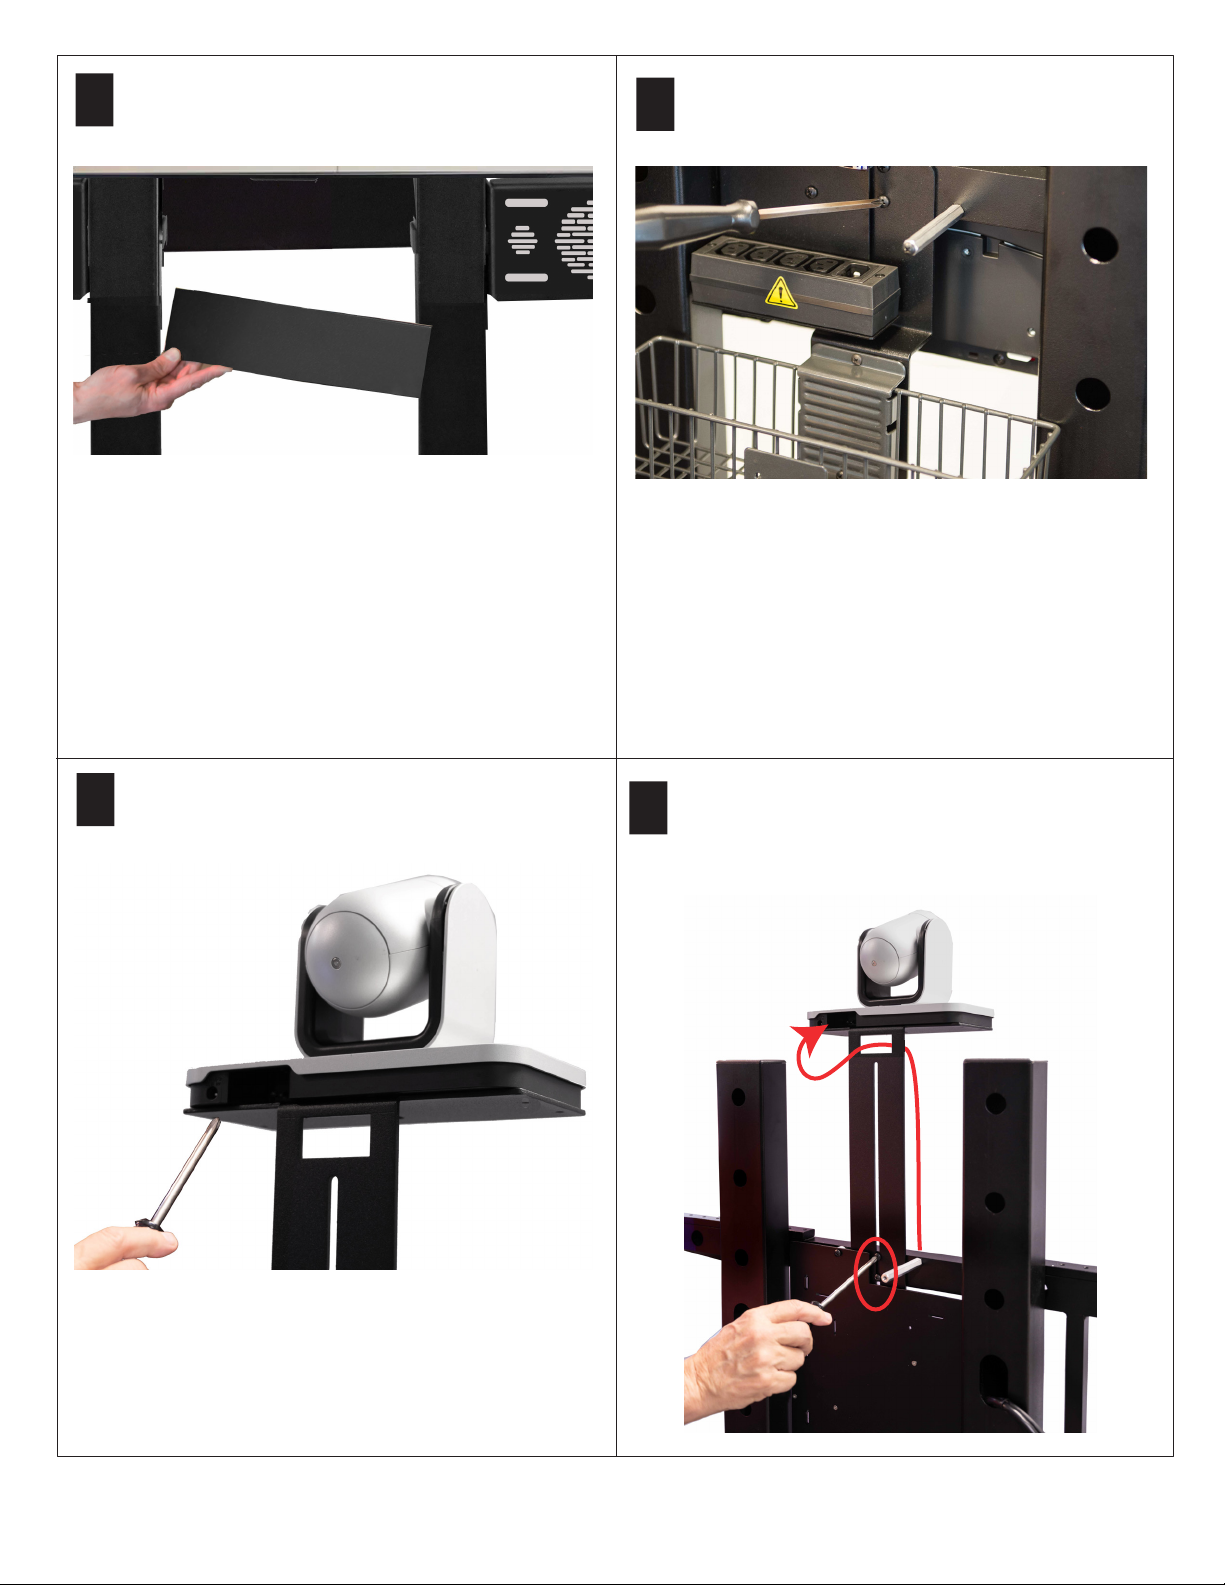
18 Install the magnetic back cover over the codec and
cables and fasten with the two supplied screws.
If needed, attach a padlock to the storage basket. Child Safety Warnings:
Death or serious injury may occur when children climb on audio
and/or video equipment furniture. A remote control or toys placed
on the furnishing may encourage a child to climb on the furnishing
and as a result the furnishing may tip over onto the child.
Relocating audio and/or video equipment to furniture not
specically designed to support audio and/or video equipment
may result in death or serious injury due to furniture collapsing
or overturning onto a child.
Regulatory Notices and General Warnings:
This equipment is intended for indoor use only.
This equipment is intended to be suitable for institutional use.
Do not use a power cord that is damaged. This could cause re
or electric shock. Contact the manufacturer for a replacement
cord, if necessary.
Only use a power cord which is appropriately rated and approved
relevant to the country of use.
This equipment should be used only on even surfaces.
This equipment has lockable wheels which should be applied
while the cart is stationary.
When connecting to the mains supply, connect only to an
earthed supply outlet which is installed near the equipment
and is easily accessible.
Keep ventilation openings free from any obstructions.
The ambient operating temperature rating of this equipment is
0 - 40ºC and should not be exceeded.
Do not immerse the system in any liquid or place any liquids on it.
Do not spray liquids directly onto the system when cleaning.
Always apply the liquid rst to a static-free cloth or wipe with a
disinfectant wipe.
For further information concerning the individual components
of this equipment, please refer to the respective product
literature.
For support or service, please contact your Poly distributor
or go to Poly Support at support.polycom.com.
Weight:
EduCart 2 weight (without display): ~80 lbs (36.3 Kgs)
For more information about Poly G7500, go to
support.polycom.com/video.
For more information about the Polycom EagleEye IV camera,
go to support.polycom.com/peripherals.

Poly EduCart 2 Setup Sheet 8
EduCart 2 Wiring Diagram