PolyJohn E SaniStand PSD1-1000 User manual

SAN2-1001/SAN2-1002 Assembly - May 2020
Page 1 of 4
SAN2-1001 PJ Sanitizer
SAN2-1002 Foaming Sanitizer
E SaniStand®
Hand Sanitizer Stand
Assembly Instructions
We recommend reading through the entire booklet prior to proceeding with use, service or maintenance.
Height 52 in 132 cm
Width 29.5 in 75 cm
Depth 29.5 in 75 cm
Weight Empty 17 lb 7.71 kg
SAN2-1000 STAND SPECIFICATIONS
Dimension Imperial Metric
NOTE: All dimensions are subject to change due to environmental factors.
POLYJOHN
USA
PolyJohn Enterprises Corp
2500 Gaspar Ave.
Whiting, IN 46394
Phone: 800-292-1305
Fax: 219-659-0625
www.polyjohn.com
POLYJOHN
WORLDWIDE
PolyJohn (UK) Ltd.
Equinox 1 Audby Lane
Wetherby, England LS22 7RD
Phone: 44 (0) 1937-583333
Fax: 44 (0) 1937-583322
www.polyjohn.co.uk
POLYJOHN
CANADA
PolyJohn Canada
P.O. Box 2300
199 Forest Plain Rd.
Orillia, Ontario LV3 6S2
Phone: 800-465-9590
Fax: 705-325-8250
www.polyjohncanada.ca
The E-Sanistand stores flat, can be easily assembled/disassembled,
and is a great answer to an immediate need for hand sanitation. The
mounting face of the stand can accommodate dispensers up to 6.70 in. (17
cm) wide. The unit can be assembled with the smooth finish out or a textured
finish out. This unit comes with 2 - PSD1-1000 Soap/Sanitizer dispensers. To
mount the dispensers, you will need a drill with a 3/16” bit and a screwdriver
and 3/8” wrench (if using the screws) or rivet gun (if using the rivets)
PSD1-1000
Dispenser
FD1-1000
Dispenser
Height 6.5 in 16.5 cm
Width 4.5 in 11.7 cm
Depth 4.5 in 11.7 cm
Capacity 30 oz 887 ml
Amount Dispensed
per push .034 oz 1 ml
PSD1-1000 DISPENSER SPECIFICATIONS
Dimension Imperial Metric
Height 11 in 28 cm
Width 6.4 in 16.25 cm
Depth 7.5 in 19 cm
Capacity 27 oz 800 ml
FD1-1000 DISPENSER SPECIFICATIONS
Dimension Imperial Metric

SAN2-1001/SAN2-1002 Assembly - May 2020
Page 2 of 4
Step 1: Insert the tabs of one panel into the slots of a second panel and slide down into place. Repeat
this step for the remaining panels.
Assembly Instructions
Wood Block
Step 2: For the final panel, You will need to twist the whole assembly
to get the last tabs into the slots. To do this, place your foot or a piece
of a 2 x 4 wood block under the panel with the tabs and push down on
the panel with the slots. Place the bottom tab partially into the bottom
slot but do not fully install it. This will hold the two panels into alignment
and enable you to insert the remaining tabs into their corresponding slots.
Once you have all the tabs inserted, you can ‘pop’ the tabs through the
slots and the unit will fully engage.
Step 3: Slide the leg brace into the slots located at the bottom of the panels and insert the tabs into
the corresponding slots. Pull the tab into the slots. Repeat this for the other leg brace. You will have
to guide the second brace under the first brace and into the slot of the side panel.
Step 5: Stand the unit upright. If you want to add a ballast of some sort (sandbag, gallon jug(s) of water/sand), do that now by
sliding the ballast down into the center of the Sani Stand.
Step 4: Turn the unit upside down and line
up the pre-drilled holes in the two leg braces. Fasten into place
using the supplied PC-000369 plastic fastener

SAN2-1001/SAN2-1002 Assembly - May 2020
Page 3 of 4
Assembly Instructions Cont.
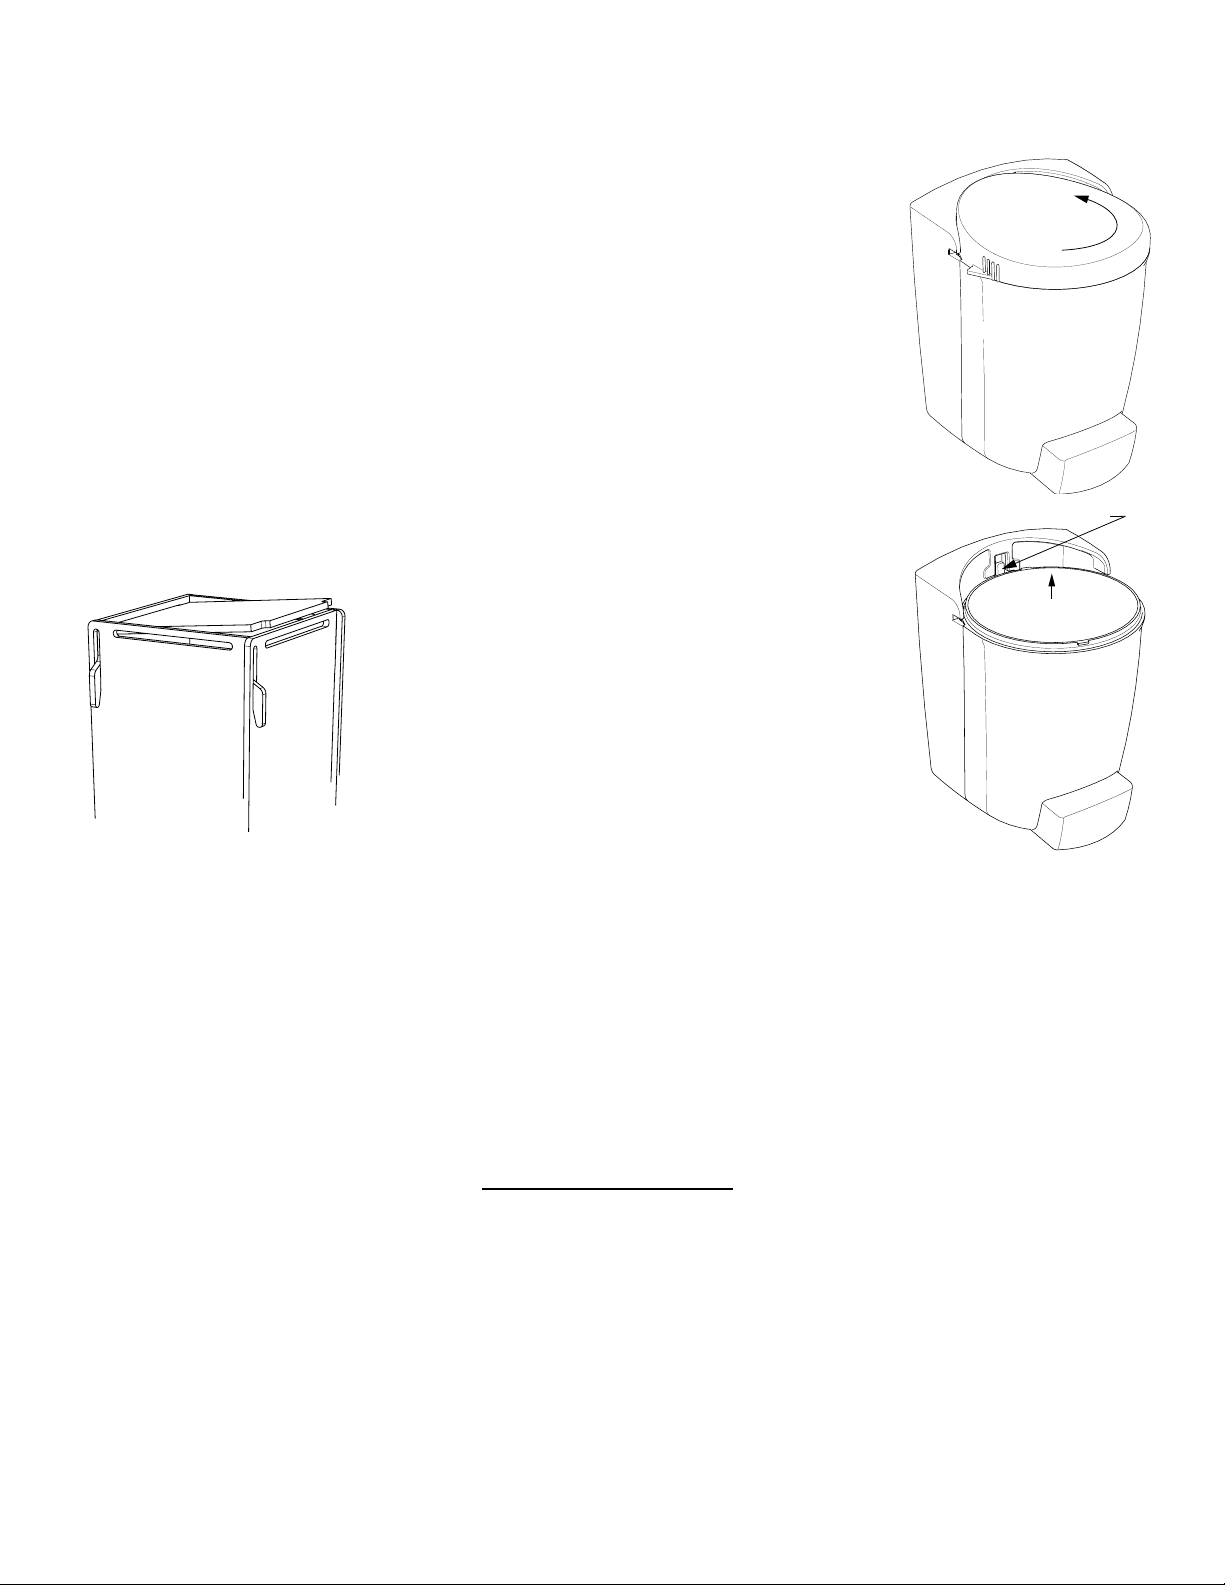
Step 12: Insert the tab on the top panel into one of the
slots at the top of one of the sides. Using a screwdriver
or other tool to pry with, pry the opposite side out so that
the tab will insert into the corresponding slot.
Assembly is complete
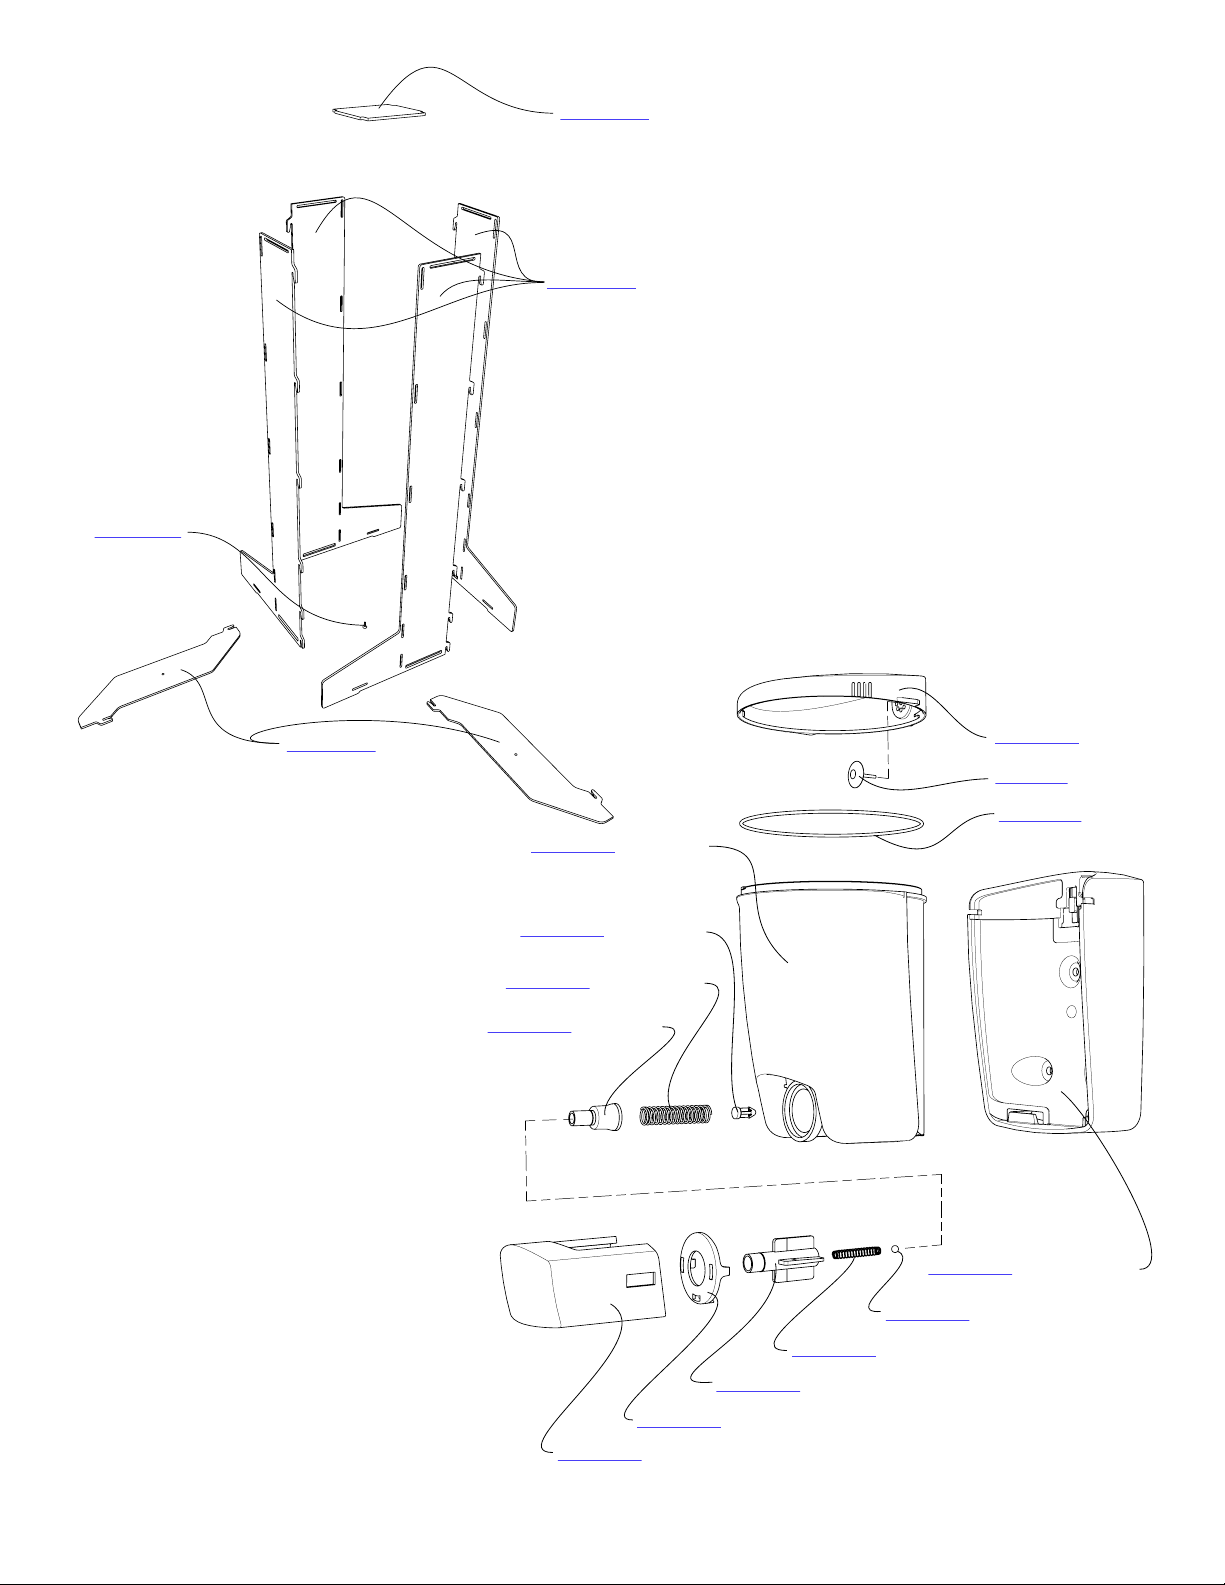
Dispenser Installation
(See included instruction sheet if installing the FD1-1000 Foam Dispenser)
Step 6: Remove the lid by turning counterclockwise and lift up.
Step 7: Push the locking tab back and lift up on the dispenser container.
Step 8: Holding the backing plate in the place where you would like to mount the dispenser,
mark the placement for the three mounting holes. Use a drill with a 3/16” drill bit to drill the
holes in the marked spots.
Step 9: Secure the backing plate in place using the desired fasteners. If riveting, please rivet
from the outside using the PC-000104 rivets with PC-000106 washers on the inside. If using the
PC-000229 screws, insert the screw through the backing plate and apply a PC-000106 washer
and PC-000230 nut on the inside. Tighten in place using a phillips screwdriver with 3/8” wrench.
Step 10: Slide the liquid container back in place, making sure the locking tab is in place,
and fill with desired soap or hand sanitizing solution. If the dispenser is fitted with a foaming
pump, only foaming soap/hand sanitizing solution may be used.
Step 11: Replace the lid and secure in place by turning clockwise.
1) Push In Tab
2) Lift Up Container
Maintenance and Care
• Use only mild cleaners with no abrasives using a soft cloth to clean all surfaces.
• Some silicone grease should be applied occasionally to the o-ring at the top of the soap
container to keep the lid from sticking. Mineral oil should NEVER be used.
• If there is a chance for freezing, remove the dispenser and drain the soap. Be sure to
remove the soap from the pump as well.
• All testing and statements thereof pertain to PolyJohn approved chemicals. Any results
of non-approved chemicals to PolyJohn products are the responsibility of the customer.
OUR MISSION STATEMENT
“PolyJohn is a family owned, state of the art, plastics manufacturing company dedicated to providing its employees with a work
environment committed to excellence, and its customers with innovative products, services and technology that meet or exceed
their requirements.”
THANK YOU FOR PURCHASING POLYJOHN PRODUCTS!
For a video demonstration of assembly and more product information, visit
www.polyjohn.com/emergency-sanistand
For more products and information, visit
www.PolyJohn.com
2500 Gaspar Ave., Whiting, IN 46394

SAN2-1001/SAN2-1002 Assembly - May 2020
Page 4 of 4
SAN2-0001
Side Panel
SAN2-0003
Top Panel
SAN2-0002
Leg Brace
PC-000369
Tree Fastener
http://www.polyjohn.com/san2-0003
http://www.polyjohn.com/san2-0001
http://www.polyjohn.com/san2-0002
http://www.polyjohn.com/pc-000369
PSD1-0003 - Lid
PC-000243 - O-Ring
FP1-0021 - Valve
PSD1-0002 - Soap Body
PSD1-0001 - Mounting Plate
PSD1-0012 - Check Valve
PSD1-0020 - Return Spring
PSD1-0010 - Pump Cup
PSD1-0030 - Check Ball
PSD1-0021 - Check Spring
PSD1-0011 - Pump Shaft
PSD1-0005 - Pump Retainer
PSD1-0004 - Pump Button
http://www.polyjohn.com/psd1-0003
http://www.polyjohn.com/fp1-0021
http://www.polyjohn.com/pc-000243
http://www.polyjohn.com/psd1-0002
http://www.polyjohn.com/psd1-0012
http://www.polyjohn.com/psd1-0020
http://www.polyjohn.com/psd1-0010
http://www.polyjohn.com/psd1-0001
http://www.polyjohn.com/psd1-0030
http://www.polyjohn.com/psd1-0021
http://www.polyjohn.com/psd1-0011
http://www.polyjohn.com/psd1-0005
http://www.polyjohn.com/psd1-0004
Other manuals for E SaniStand PSD1-1000
2
This manual suits for next models
3
Other PolyJohn Accessories manuals
Popular Accessories manuals by other brands

Sony
Sony JME-US15L operating instructions

ETCR
ETCR 016 user manual

KUNDALINI
KUNDALINI SHAKTI Assembly instructions

Black Diamond Equipment
Black Diamond Equipment JetForce Instruction and use

LuxaFlex
LuxaFlex Armony Plus Instruction manual for use and maintenance

Cornelius
Cornelius Triton Series Manual operation