manuals.online logo
Brands
  1. Home
  2. •
  3. Brands
  4. •
  5. PolyJohn
  6. •
  7. Accessories
  8. •
  9. PolyJohn E SaniStand User manual

PolyJohn E SaniStand User manual

Other PolyJohn Accessories manuals

PolyJohn SaniStand SAN2-1000 E User manual

PolyJohn

PolyJohn SaniStand SAN2-1000 E User manual

PolyJohn E SaniStand PSD1-1000 User manual

PolyJohn

PolyJohn E SaniStand PSD1-1000 User manual

Popular Accessories manuals by other brands

Quincy lab 140AE-1 operating manual

Quincy lab

Quincy lab 140AE-1 operating manual

HomePro ZIR000 user manual

HomePro

HomePro ZIR000 user manual

DOL 20SCR Technical user guide

DOL

DOL 20SCR Technical user guide

RAB Smart Task installation manual

RAB

RAB Smart Task installation manual

Kemppi KMS 300 quick guide

Kemppi

Kemppi KMS 300 quick guide

Stearns 57,500 Series Installation and service instructions

Stearns

Stearns 57,500 Series Installation and service instructions

iGuzzini TWILIGHT COPENAGHEN manual

iGuzzini

iGuzzini TWILIGHT COPENAGHEN manual

Adelaide Annexe & Canvas Avan Deluxe installation guide

Adelaide Annexe & Canvas

Adelaide Annexe & Canvas Avan Deluxe installation guide

OHAUS 5000 instruction manual

OHAUS

OHAUS 5000 instruction manual

HOME8 WLS1300 quick start guide

HOME8

HOME8 WLS1300 quick start guide

MAXBOTIX MaxSonar quick start guide

MAXBOTIX

MAXBOTIX MaxSonar quick start guide

ioSmart iSmart56 Installation and user guide

ioSmart

ioSmart iSmart56 Installation and user guide

Focusrite Scarlett 18i8 user guide

Focusrite

Focusrite Scarlett 18i8 user guide

Velleman ED38105 user manual

Velleman

Velleman ED38105 user manual

JumpSport SkyBounce user manual

JumpSport

JumpSport SkyBounce user manual

Prima-Temp PRIYA Instructions for use

Prima-Temp

Prima-Temp PRIYA Instructions for use

Tefcold BC85I-BC85I W user manual

Tefcold

Tefcold BC85I-BC85I W user manual

Vaisala WMS302 user guide

Vaisala

Vaisala WMS302 user guide

manuals.online logo
manuals.online logoBrands
  • About & Mission
  • Contact us
  • Privacy Policy
  • Terms and Conditions

Copyright 2025 Manuals.Online. All Rights Reserved.

SAN2 Assembly - March 2020
Page 1 of 4
E SaniStand®
Hand Sanitizer Stand
Assembly Instructions
We recommend reading through the entire booklet prior to proceeding with use, service or maintenance.
Height 52 in 132 cm
Width 29.5 in 75 cm
Depth 29.5 in 75 cm
Weight Empty 17 lb 7.71 kg
SPECIFICATIONS
Dimension Imperial Metric
NOTE: All dimensions are subject to change due to environmental factors.
POLYJOHN
USA
PolyJohn Enterprises Corp
2500 Gaspar Ave.
Whiting, IN 46394
Phone: 800-292-1305
Fax: 219-659-0625
www.polyjohn.com
[email protected]
POLYJOHN
WORLDWIDE
PolyJohn (UK) Ltd.
Equinox 1 Audby Lane
Wetherby, England LS22 7RD
Phone: 44 (0) 1937-583333
Fax: 44 (0) 1937-583322
www.polyjohn.co.uk
[email protected].uk
POLYJOHN
CANADA
PolyJohn Canada
P.O. Box 2300
199 Forest Plain Rd.
Orillia, Ontario LV3 6S2
Phone: 800-465-9590
Fax: 705-325-8250
www.polyjohncanada.ca
[email protected]
Shown with dispensers
Dispensers not included
The E-Sanistand stores flat, can be easily assembled/
disassembled, and is a great answer to an immediate
need for hand sanitation. The mounting face of the stand
can accommodate dispensers up to 6.70 in. (17 cm) wide.
The unit can be assembled with the smooth finish out or a
textured finish out.
SAN2 Assembly - March 2020
Page 2 of 4
Step 1: Insert the tabs of one panel into the slots of a second panel and slide
down into place. Repeat this step for the remaining panels.
Assembly Instructions
Wood Block
Step 2: For the final panel, You will need to twist the whole assembly
to get the last tabs into the slots. To do this, place your foot or a piece
of a 2 x 4 wood block under the panel with the tabs and push down on
the panel with the slots. Place the bottom tab partially into the bot-
tom slot but do not fully install it. This will hold the two panels into
alignment and enable you to insert the remaining tabs into their cor-
responding slots. Once you have all the tabs inserted, you can ‘pop’
the tabs through the slots and the unit will fully engage.
SAN2 Assembly - March 2020
Page 3 of 4
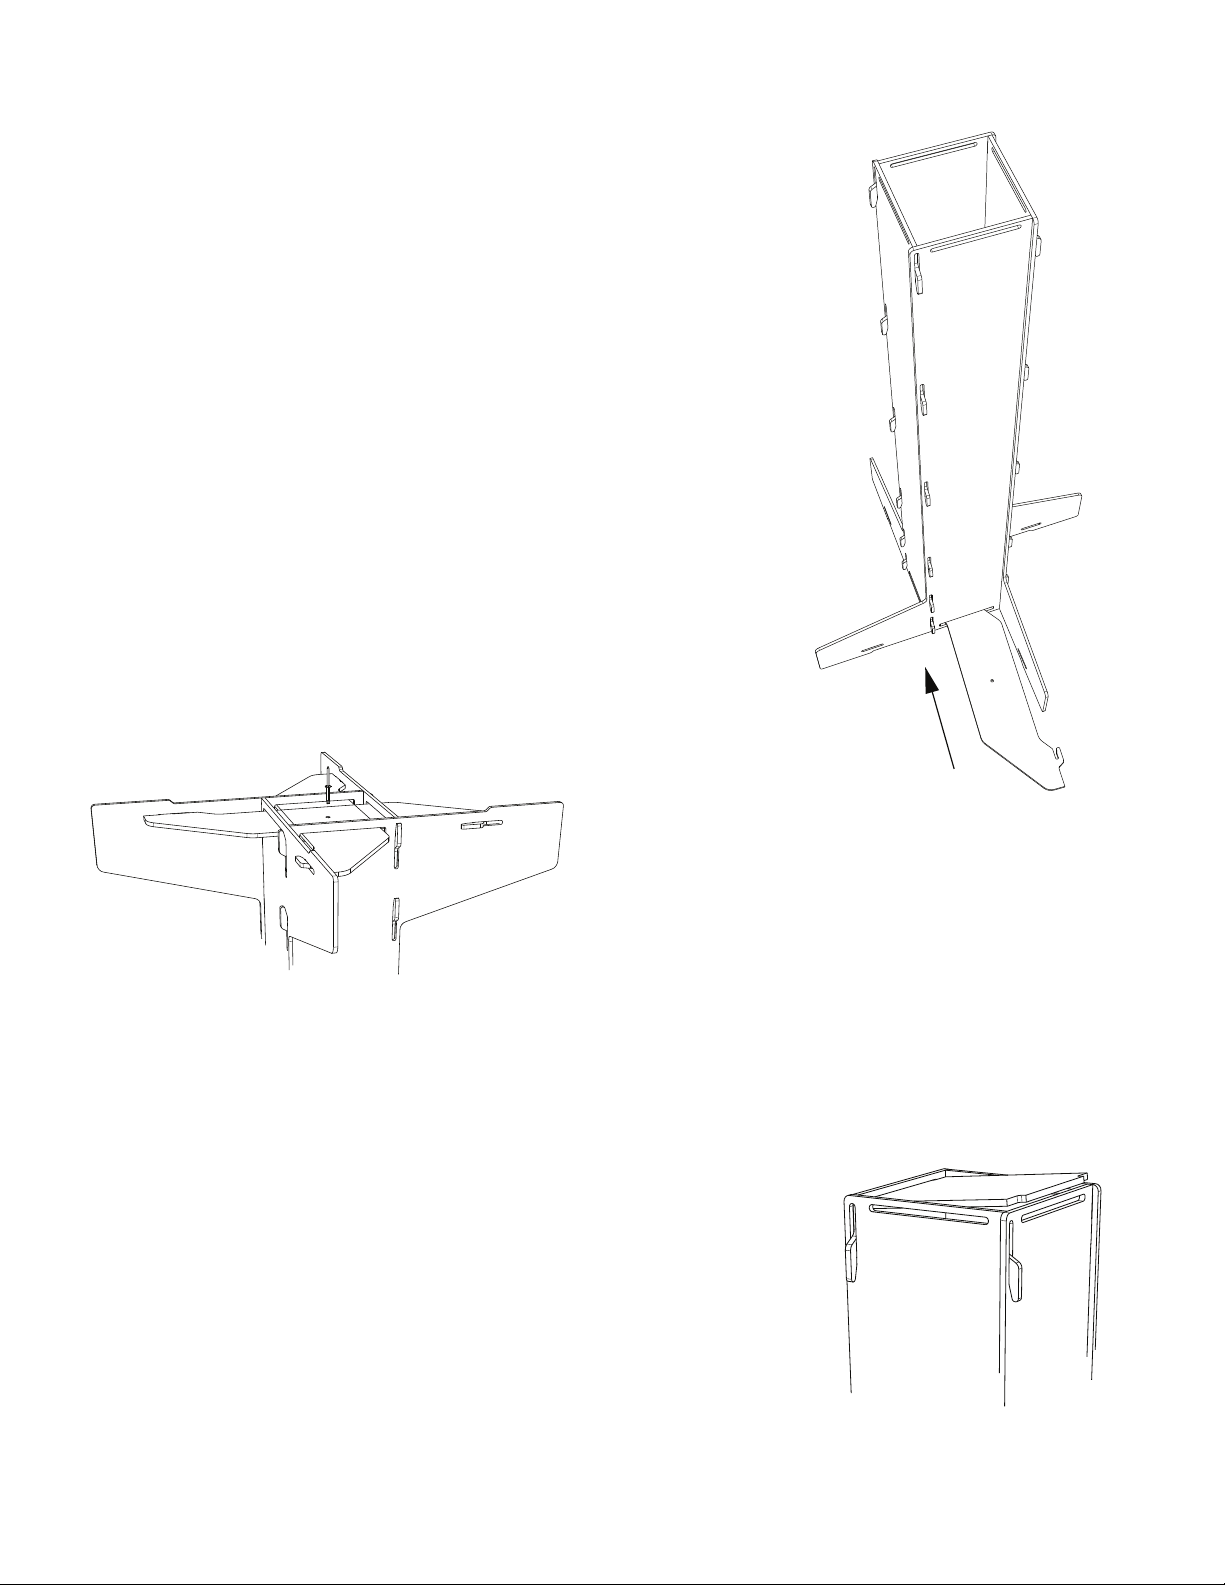
Assembly Instructions Cont.
Step 3: Slide the leg brace into the slots located at the bottom of the panels and
insert the tabs into the corresponding slots. Pull the tab into the slots. Repeat this
for the other leg brace. You will have to guide the second brace under the first brace
and into the slot of the side panel.
Step 5: Stand the unit upright. If you want to add a ballast of some sort (sandbag, gallon jug(S) of water/sand), do that
now by sliding the ballast down into the center of the Sani Stand.
Step 6:Install your dispensers following the manufacturer’s recommended installation instructions.
Step 4: Turn the unit upside down and line up the pre-drilled
holes in the two leg braces. Fasten into place using the
supplied PC-000105 rivet. If you would like to make the unit
more easily disassembled, you could drive a 5/16 -18 x 3/4”
bolt or screw into the two holes.
Step 7: Insert the tab on the top panel into one of the slots at the top of one of the
sides. Using a screwdriver or other tool to pry with, pry the opposite side out so
that the tab will insert into the corresponding slot.
Assembly is complete
SAN2 Assembly - March 2020
Page 4 of 4
SAN2-0001
Side Panel
SAN2-0003
Top Panel
SAN2-0002
Leg Brace
PC-000105 Rivet