Pomiacam AS-602 User manual

[
键入文字
]
1 / 21
HD Mobile SD Card DVR
User Manual

[
键入文字
]
2 / 21
Important notice:
1. Please read over all cautions.
2. Please keep this manual for reference in the future.
3. Please notice all warning information.
4. Please strictly follow the instructions in this manual while operating.
5. Please EVER put this device under the place which is easily poured by water.
6. Please do OT use abrasive chemicals, cleaning solvents or strong detergents to clean the
device. Wipe
the device with a soft and dry cloth.
7. Please do OT get the gate of airiness heat exchange closed.
8. Please leave the device far away from hot and high temperature environment.
9. Install the device with the accessories coming with it.
10. Please take care when moving the device, make sure of security, and avoid being damaged
by dropping
from high place.
11. Call for qualified maintenance man to repair when needed.
12. The device can only be installed horizontally. Installed vertically or out of the horizontal
could hurt
person or damage the device or/and its parts.
WARNING
RISK OF ELECTRONIC
SHOCK
DO NOT O EN
To prevent electric shock
and risk of fire hazards:
Do NOT use other than
the specified power
source.
WAR I G: TO REDUCE THE R SK
OF ELECTRON C SHOCK, DO NOT
REMOVE COVER(OR BACK), NO
USER SERV CEABLE PARTS NS DE.
REFER SERV C NG TO QUAL F ED
SERV CE PERSONNEL.
Changes or modifications
not expressly approved by
the manufacturer could
void the user's authority to
operate the equipment.

[
键入文字
]
3 / 21
1.Features ......................................................................................................................................... 4
2.Parts .............................................................................................................................................. 4
2.1
Front
......................................................................................................... 5
2.2 Back ........................................................................................................... 5
2.3 Remote Control............................................................................................ 6
3.How to Use .................................................................................................................................... 7
1
:
Insert the SD Card
..................................................................................... 7
2
,
Camera Connection
....................................................................................... 7
3
,
Power Connection
........................................................................................ 8
4
,
Connect monitor
.......................................................................................... 8
5
,
Format SD Card
............................................................................................ 9
6
,
Start Record................................................................................................. 9
4.General Operation ..................................................................................................................... 10
4.1Playback .................................................................................................... 10
4.2Ima e Quality & Frame Settin ..................................................................... 11
4.3Record Mode Settin ................................................................................... 12
4.4Schedual Record Settin .............................................................................. 13
4.5Motion Detection......................................................................................... 14
4.6System Time Settin ................................................................................... 15
4.7Lo in Password Settin ................................................................................ 15
4.8Default Settin ............................................................................................ 16
4.9Firmware Up rade ...................................................................................... 16
4.10Display Settin .......................................................................................... 17
4.11How to Use Power ..................................................................................... 18
5.Appendi 1
:
Specifications ....................................................................................................... 19
7.Appendi
:
FAQ ......................................................................................................................... 20
6.Appendi
:
Packing List ............................................................................................................ 21

[
键入文字
]
4 / 21
1.Features:
This is a smallest HD 1080 2 Channel SD DVR, with the most powerful functions in China
market here now, it can work in vehicles and other ranges. It works with CVBS and AHD 5.0M ,
avi format and save videos in SD cards. You can use 4 modes on records: ower-up, Manual,
Motion Detection, Scheduled Record; You can also take J EG photos with audio playback,
fast-forward, pause, HDMI 1080p output, and normal analog CVBS video output, password login,
etc.
New HD Audio Video Encoding and decoding technology
H.264 High Profile(Level 4.1) compression, high resolution, full real-time recording, AV
format
G711 audio compression, Audio and video synchronization
AHD max 5.0M (2592X1944)camera input.
2 Channel for different camera video input
2 Channel HD video, audio synchronal record
Intelligent Power Support
Stable working in 10V to 32V, suitable for 12-24V vehicles
Built-in supper electric capacity, which can effectively avoid power-off
protection.
DVR can output stable 12V power for each camera, and power short-circuit protection.
Vehicle ignition control the power ON/OFF of the unit, also the system can work in power
delayed recording by the ignition.
Multi Record Modes
Auto Record when power is ON
Timer Record
Manual Record
Motion Detection Record
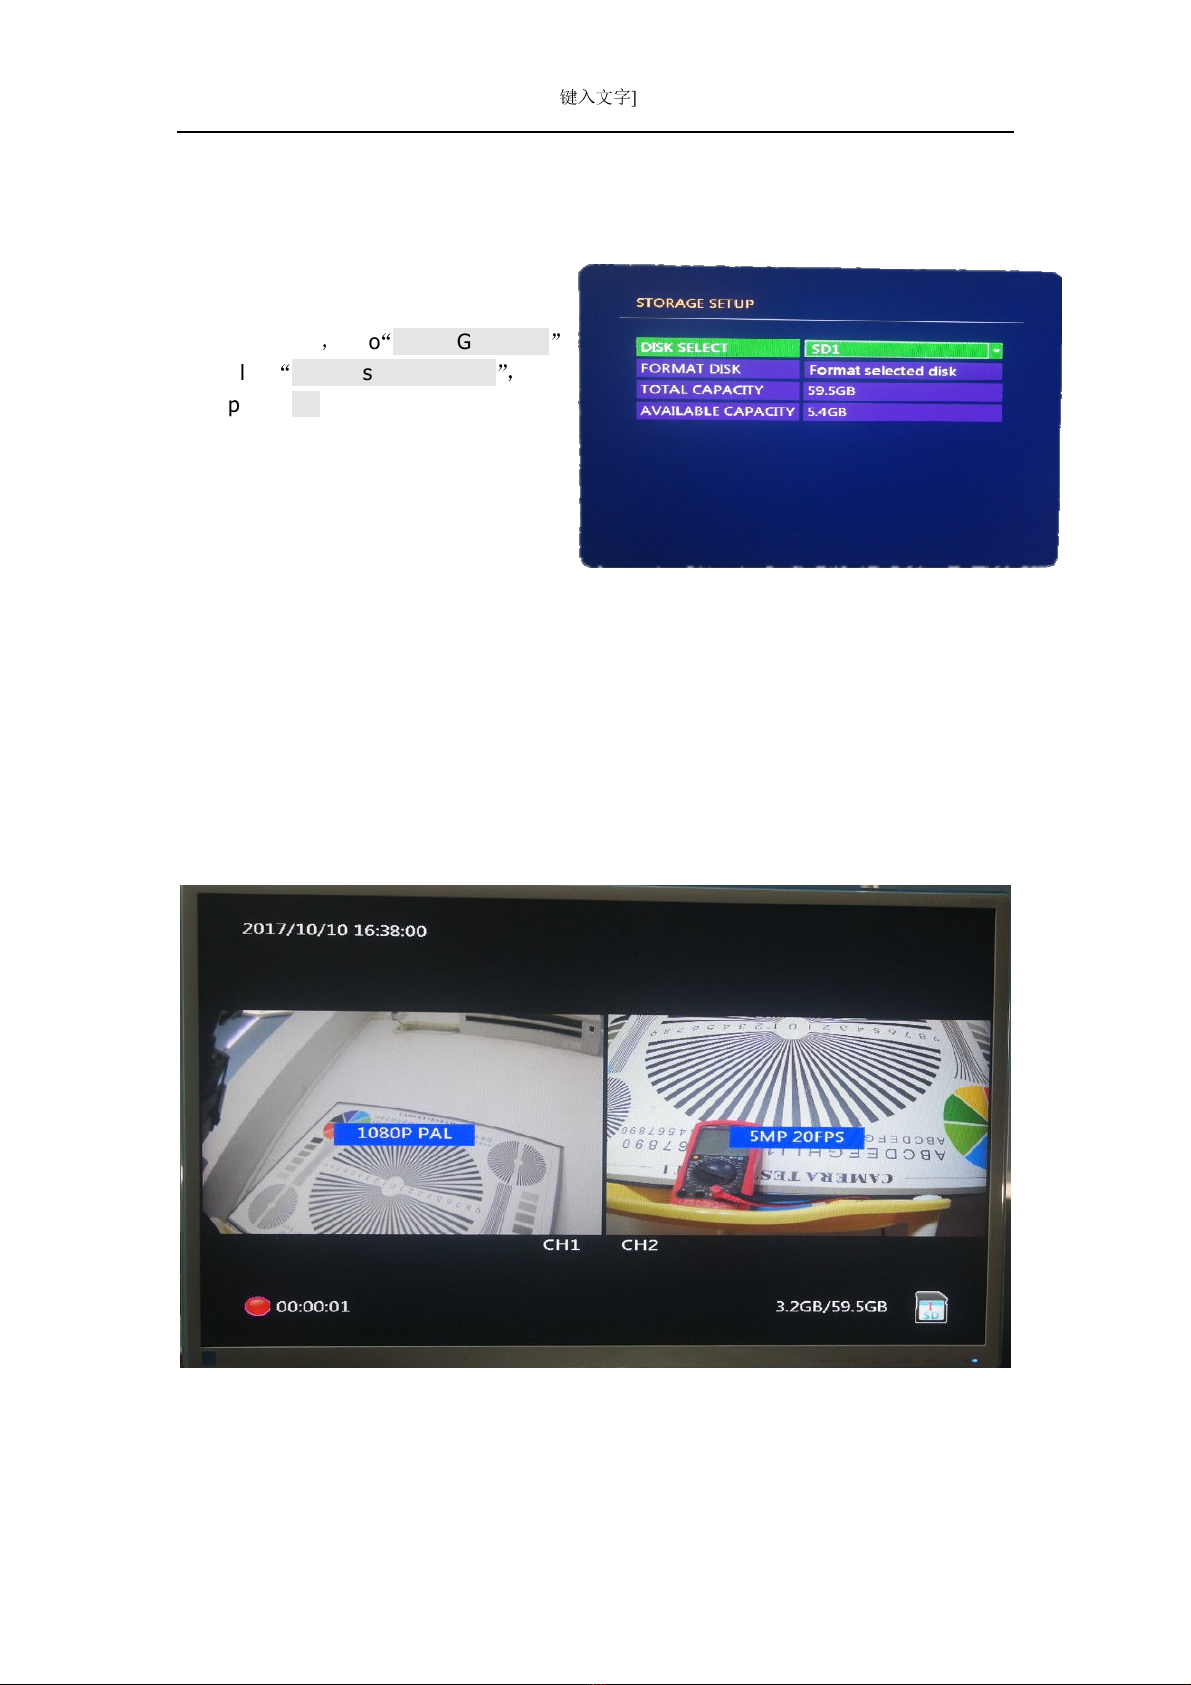
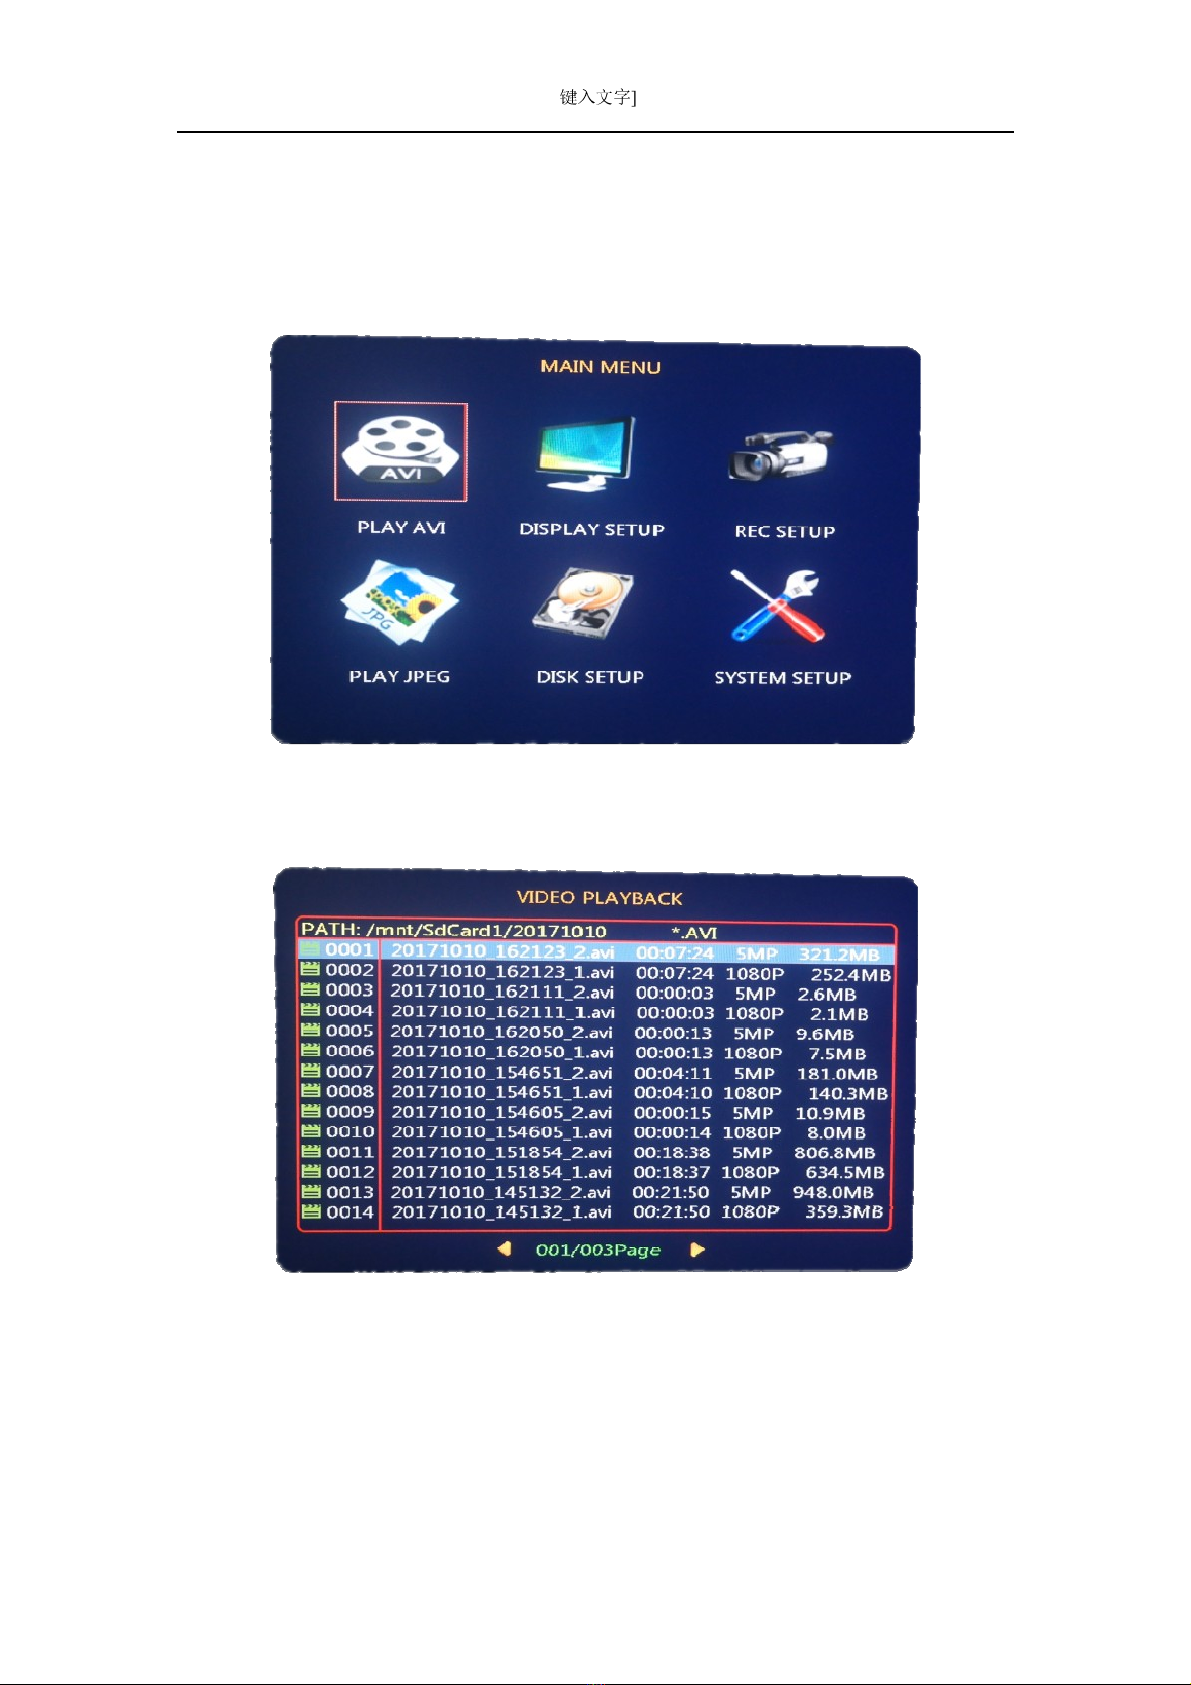
SD Card Hot Insert/Remove Support
You can insert/remove the SD card when it is not recording or under playback mode
Support Universal 3rd Party Media Players
Video files can be playback by the media players below:
VLC media player(version 1.0.0 above)
Storm media(version 2009 above)
Winamp(version 5.531 above)
Media player in Windows Vista or Win7

[
键入文字
]
5 / 21
2.Parts
2.1Front Part
①:
Record indicator
②:
Workin indicator
③:
IR receiver
④:
SD card lock
⑤:
SD1 slot
⑥:
SD2 slot
⑦:
HDMI port
⑧:
SD card slot cover
Indicators when recording and normal working:
2.2 Back Part
①:
Power input
②:
Camera 2 input
③:
Camera 1 input
④:
Video output to monitor
Interface Instruction:
NC
:
Null
POW
:
Power input
CC
:
ACC input(connected to vehicle i nition, or connect
with POWER cable, but it won't have Delayed Record if
you connect this way)
GND
:
GND Input
Status Means
Record Indicator Flashin /Not-Flashin Recordin /Not Recordin
Workin Indicator Stable ON Normal Workin

[
键入文字
]
6 / 21
viation connector:
①:
Video Input
②:
12V Output
③:
GND
④:
Audio Input
2.3Remote Control
Press MENU to enter into the menu, UP/DOWN/LEFT/RIGHT to select the sub-menu and
options, press OK to confirm your selection; ESC to cancel your selection or exit the menu;
if there is no OK/NO shows up when you chan e any options, press ESC and it will ask if
you want to save chan es.
Buttons
1. Record
2. Snapshot
3. UP
4. Confirm
5. LEFT
6. RIGHT
7. DOWN
8. Stop Record/Play
9. Menu
10. Back
11. Play
12. Delete

[
键入文字
]
7 / 21
3.How to Use SD Card
1)Install SD Card
lease use original brand of SD cards, Class 10 is recommended.
Note: Use the key to open the lock of the slot and you need to insert the SD card inside the
port and when you hear the sound, it means SD card is inserted corrrectly.
2) Connect cameras
Connect the cameras by the aviation connector according to the photo above

[
键入文字
]
8 / 21
3)Power connection:
Power cable: Red cable to power positive, black cable to power ne ative; yellow cable to
vehicle i nition. You can also put a fuse between the red cable to power positive.
Note: fuse should be connected to power positive part directly.
Note:
1
.
DVR should use DC power
2
.
DVR works only in 10V-32V
3
.
DVR power cable should be connected to vehicle battery directly.
4
.
DVR power is less than 5W.
5
.
Fuse should be installed to the side of battery.
4) Connect monitor
Cvbs Monitor:
AV output cable: red to video output, white to audio output, red for power output. This output
cable is for normal CVBS output.
Hdmi Monitor:
You can link the front panel to the HDMI HD interface.

[
键入文字
]
9 / 21
5) Format SD card
Press <MENU>
,
o to
“
STORAGE SETUP
”
and select
“
Format selected disk
”,
and
then press<OK>to format the SD card;
NOTE: we recommend to format SD card
the first time when you use the DVR.
6) Start Record
Press REC to start recordin ; if the system is under POWER-UP record mode, then it will
start recordin automatically when you exit the menu.

[
键入文字
]
10 / 21
4.General Operation
4.1Playback
ress MENU to enter into main menu, and use UP/DOWN to select the sub-menu options.
Select the < LAY AVI>, and press OK to go to video list, use U /DOWN to choose the files, you
can press DEL to delete all files.

[
键入文字
]
11 / 21
The files name stands for date of the file, 20171010 means the date, _1 means channel 1, _2
means channel 2; and then it is the video length, resolution and file size.
Note
:
Select the first line of the list
“
ATH:/mnt/SdCard1/
”
, press LEFT/RIGHT to choose
playback SD1/SD2::
SD1:
“
ATH:/mnt/SdCard1/
”
SD2:
“
ATH:/mnt/SdCard2/
”
4.2 Image Quality & Frame
ress MENU to <RECORD SETU >, and then <VIDEO ARAMTERS>, press OK to go to:

[
键入文字
]
12 / 21
You can set the data for 2 channels separately:
Frame
:
1F S - 30F S, the more frame value you choose, the more files size it will make, but the
more smooth video image it will make too.
Image Quality
:
5 levels
,
Very Good, Good, Normal, Bad, Low you can set the image quality
according to your recording use and requirements..
Video format
:
support AUTO and other 14 different type of video input; when you set AUTO,
DVR will automatically recognize the video type of the camera.
Record
:
ON to turn on the record of this channel; OFF to stop record for this channel.
4.3 Record Modes
POWER-UP Record: auto start recordin when power is ON
Manual-Record: press OK and stop for the recordin
Scheduled Record: starts recordin accordin to the time table
Motion Detection: starts recordin when there is any movement in front of the camera

[
键入文字
]
13 / 21
4.4 Schedule Record
There are 3 periods available for this mode, you can set the different periods to start and
stop recordin .
You can choose to record by weekday, when you select the DAY, it records, otherwise it
won't record that DAY.

[
键入文字
]
14 / 21
4.5 Motion Detection
Sensitivity: HIGH, MIDDLE, LOW to set accordin to the conditions.
Speed: HIGH, MIDDLE, LOW, to set the speed of the chan e, if the subject is movin fast
into the view of the camera, it starts record; if it moves really slowly into the view of
camera, it don't tri er the recordin very sensitively.
Coverage rea: set the 2 channel separately as bellowin . The blue selected rids are
the area that you don't need to tri er motion detection, you can use the UP/DOWN to
select, and press OK to confirm this rid.

[
键入文字
]
15 / 21
4.6 System Time
Set the time: o to menu-<SYSTEM SETUP> -> <DATE TIME> and save it after you set.
Set the format of the date: o to menu, <SYSTEM SETUP> -> <DATE FORMAT>
4.7 Login Password
1. Password set: Menu-<SYSTEM SETUP> -><LOGIN PASSWORD> to set 4 di its lo in
password
2. Lo in check-in: o to menu, <SYSTEM SETUP> -><VALIDATE LOGIN> and turn it ON to
use this function.

[
键入文字
]
16 / 21
4.8 Default Setting
Go to menu, -> <SYSTEM SETUP> -><DEFAULT>, DVR will restart after you set it.
4.9 Firmware Upgrade
Steps
:
1. Copy the firmware to the root of the SD card(we su uest you format the SD card first,
make sure the card is empty), the firmware is a file called UpdatePack-xxxxx(X stands for
the date and time), and you need to un-zip the firmware, so that you can find it in the card.
2. Enter into <MAIN MENU> -> <SYSTEM SETUP> -><SYSTEM INFO>, and then you can
see the up rade, press OK to update.

[
键入文字
]
17 / 21
3. The up rade process will last for about 3 minutes and please make sure NOT cut the
power while it is up radin , otherwise the system will be dama ed and the only way is
return to our factory for update.
4.10 Display Setting
HDMI output: use the HDMI accordin to your need, it supports 800X600
,
1024X768
,
1280X1024
,
1366X768
,
1440X900
,
1280X720
,
1920X1080.
Note: the system supports CVBS and HDMI output as the same time, and the ima e
output from CVBS is compressed based on HDMI, so if you set the resolution very hi h for
HDMI, then the resolution for CVBS will be very small, includin the fonts and menu text.
When it detects no HDMI input, the system will auto adjust to 800*600 to adapt with CVBS;
if you want to use HDMI as output, you need to connect to HDMI display first and then turn
on the DVR.
Channel Display Mode:
Dual channel-when the DVR turn on, it shows 2channel ima es by default.
Channel 1 mode: when the DVR turns on, it shows CH1 in full screen by default
Channel 2 mode: when the DVR turns on, it shows CH2 in full screen by default
Chanenl Full Screen Mode:
Left-Ri ht Mode: the ima e of CH1 CH2 will be displayed in middle of the screen, ima e not
distorted.
Left-Ri ht Extend Mode: the ima e of CH1 CH2 will be displayed in the middle of the
screen, but it will take up the full screen, so the ima e of each channel is distorted.
UP-DOWN Extend Mode: the ima e of CH1 CH2 will be displayed UP and DOWN of the
screen, but it will take up the full screen, so the ima e of each channel is distorted.
CVBS System: set the type for CVBS output

[
键入文字
]
18 / 21
4.11Power
(1)vehicle i nition to the power cables
1) Yellow cable from the DVR connected to the ignition of vehicle, RED to the
positive of the battery, and BL CK to the negative of the battery.
2) o to <MAIN MENU> -<SHUTDOWN TIME(S)>, then press OK, it shows the seconds of
the delayed record time, you can put 0-9999 seconds for the delay time for recordin ,
press OK a ain to save and exit. When you set a time for delay record, the DVR starts
when i nition is ON; when i nition is OFF, DVR still workin for the time you set and the
after that it will shut down automatically.
I nition
Battery or Power adapter
Fuse
+
DVR
RED
-
Yellow
BLACK

[
键入文字
]
19 / 21
6.Specifications:
Item Data Description
System Language Simple Chinese/English
Interface Image menu
Encryption Admin password
Video Video input
1/2 Channel composite input AHD) 1.0V, p-p,impendence
75Ω,BNC
Video output
1 Channel composite output, 1.0V, p-p,impendence 75
Ω,BNC
Video display 1/2 channel in 1 screen
Resolution &
AHD Standard
CVBS 720X576)
AHD 720P (1280X720)
AHD 1080P 1920X1080)
AHD 3.0MP not realtime/ AHD 3.0MP realtime 2048X1536)
AHD 4.0MP not realtime/ AHD 4.0MP realtime 2560X1440)
AHD 5.0MP not realtime/ AHD 5.0MP realtime 2592X1944)
Audio Audio input 1/2 channel audio input,impendence 47KΩ,RCA
Audio output 1 channel audio output,impendence 10K,RCA
Record mode Audio video Synchronous recording
Audio
compression
G711
Image
and
storage
Image
compression
H.264
High Profile
,运动自适应动态码流 auto adapt to
dynamic bit stream
video bitrate
D1: 200Kbps ~ 10Mbps,5 levels of image quality for options
Audio bitrate
8KB/s after compression)
storage Dual SD slot
Record
AVI audio video sync file output
3rd
party
media
VLC media player, storm media, WINAMP
Update SD card upgrade
Power Input DC:+10V ~ +32V
Output +12V@1.5A
Power
Less than 5W
Temp Working Temp -10℃ ~ +60℃
Dimensio
n
10CM W)×2.8CM H)×11.2CM L
)

[
键入文字
]
20 / 21
FAQ
1) Q: Why is the device power indicator light is OFF, the monitor no image?
A: First check whether the power is connected, the supply voltage is sufficient, need more
than 10V or more stable voltage at least to provide 3A current power supply, then check if ACC
(yellow line) come in with voltage.
2) Q: the screen says "no disk", how to do?
A: First check the SD card or USB hard drive connection is good or not, if the
connection is good, and then see if this SD card or hard drive is a new card, if it is
necessary to format it in the C, if it still cannot solve the problem, please send the SD
card or hard drive to manufacturers or check with our services personnel.
3) Q: DVR output no image after connecting the camera
A: first check the input video signal source is connected, and then see if the camera
format is supported by the format of the DVR, the DVR does not support TVI CVI
format camera input, and can not enter more than 5 million AHD camera or no picture.
4) Q: Why is the TV (CVBS) display on the menu and the font is very small?
A: If you connect an HDMI monitor and set the HDMI output resolution is very high, then
the TV display the menu text will be very small, the solution is disconnect the HDMI display,
and restart the boot DVR; or you can set lower for the HDMI output resolution.
5) Q: Why is the HDMI monitor set up 1920X1080 and output is 800X600 instead?
A: You need to connect to a HDMI monitor, and then open the DVR power supply, you can
get output 1920X1080;, because the DVR will check and if it doesn't recognize the HDMI
monitor is connected, then it will automatically set the HDMI output to 800X600 resolution
to adapt to CVBS display.
acking List:
Table of contents
Popular DVR manuals by other brands

Motorola
Motorola DCT3416 quick start guide

Wisenet
Wisenet SRD-1656D Quick manual

Panasonic
Panasonic DMR-E65S - DVD Recorder With SD Card Slot operating instructions

LaView
LaView LV-D1104CW SERIES user manual

Scientific Atlanta
Scientific Atlanta Explorer 8240HD user guide

Security Camera King
Security Camera King DVR-CVI8240M user guide