PondBuilder PBSIM User manual

Serenity
Waterfall & Skimmer
Installation Manual
Item #PBSIM
Manufacturers of Quality Pond Equipment & Supplies

Choose Skimmer Location
a. The skimmer should be positioned at the
pond edge, opposite the waterfall, to
circulate the water properly.
Excavation of Skimmer Area
a. Set skimmer box in intended area and spray
outline of skimmer for area to be excavated.
b. The skimmer should be positioned so that the
face of the skimmer will meet with the pond
liner at the side of the pond. Excavate the
hole a few inches larger than the width and
length of the skimmer box.
c. The skimmer should be set at a depth that
positions the top of the skimmer box approxi-
mately 3.5” above your desired pond water
level. This will set your water level 1” below
the top edge of the snout opening allowing
clearance for surface debris to flow into the
skimmer during normal operation.
Position & Backfill Skimmer
a. Your skimmer should be level from front to
back and side to side.
b. Make sure the base below your skimmer is
compacted well to prevent settling in the future.
c. Slide the mechanical media mat and black
mesh net into position.
d. Once the skimmer is properly positioned
begin filling the soil in around the back and
sides. Be sure to pack the soil as you go to
help keep the skimmer in position and to limit
any settling around the skimmer. You should
1a.
2a.
2c.
3a.
2b.
3c. 3c.
3d. 3d.
SERENITY SKIMMER
INSTALL

pack the soil tight enough so that the skim-
mer is held in position tightly but not so
much as to distort the sides of the skimmer.
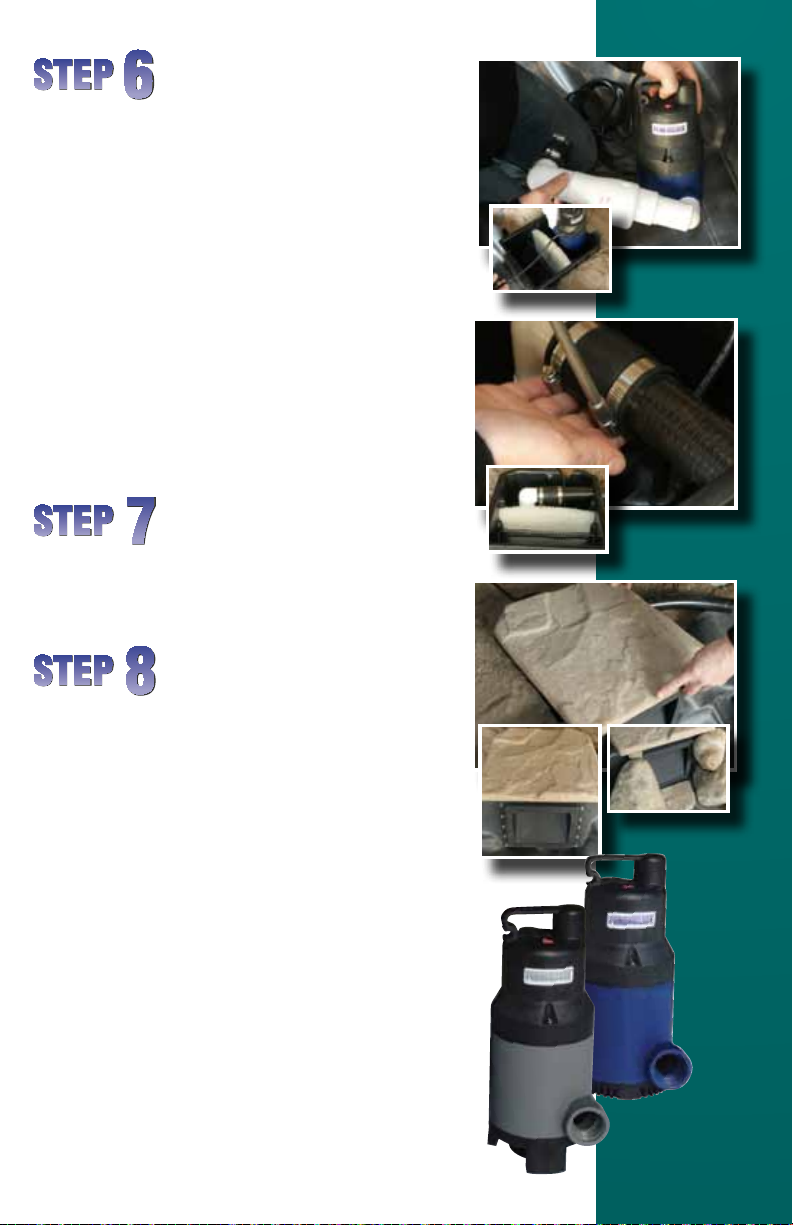
Attach Rubber Liner to Skimmer
a. Bring the liner up to the skimmer and check
the positioning of the liner against the skim-
mer. Use the liner clips to temporarily hold
the liner to the face of the skimmer. Be
sure the liner follows the contours of the
pond and the face of the skimmer. It is a
good idea to leave a little slack in the liner
where it transitions from the pond ledge to
the face of the skimmer. This will ensure
that the weight of any rockwork and water
in the pond do not pull down on the liner
where it is attached to the skimmer.
b. Kneel in front of the skimmer and have the
following within reach: cordless screwdriver
(set to lowest torque), 5/16” nut driver bit,
plastic nails (included), skimmer snout (in-
cluded), silicone (included), stainless steel
self-drilling screws (included), black vinyl
screw caps (included), utility knife (with new
blade), & a clean rag.
c. Kneeling in front of the skimmer remove
the liner clips and fold the liner back toward
you leaving it rest on your lap. Using the
clean rag wipe down the face of the skim-
mer. Also, wipe the surface of the liner that
will be coming in contact with the area you
cleaned on the skimmer box.
d. Apply a bead of silicone along the sides
and bottom of the opening of the face of the
skimmer. Use one of the two guide holes at
the top corners of the opening as the start-
ing point and begin by running your bead
straight down from that point. The bead of
silicone should be about an inch out from
the edge of the opening; this will position it
in-line with the screws when we attach the
skimmer snout.
e. Bring the liner back up into position against
the face of the skimmer. Hold the liner in
place again with the liner clips to help keep
it from moving around as we prepare to
4c.
4d.
4e.
4f.
4a.

attach the snout. Gently run your fingers
along the liner over the area you applied
the silicone and flatten the bead out slightly.
This will help ensure a more even distribu-
tion of the silicone as we compress it while
screwing down the snout.
f. Push the guide nails through the guide
holes and liner from the inside of the skim-
mer (this will puncture a small hole in the
liner). Place the snout into position by
sliding the top corner holes of the snout
over the guide nails. (The snout should
be installed so that the snout door hinges
at the bottom). While holding the snout in
position remove one of the guide nails and
drive the first screw into that hole. Keep-
ing the snout in position, remove the other
guide nail and drive a screw into the second
guide hole. With the snout held into position
with the first two screws, continue driving
the remaining screws into the pre-drilled
holes around the snout. Be sure to install
screws into all pre-drilled holes to prevent
water from leaking around the snout.
g. From inside the skimmer use your utility
knife to cut out the liner in the snout area so
water can flow from the pond into the skim-
mer. Simply follow the edge of the skimmer
opening with your knife to cut away liner.
This works best with a new, sharp blade.
h. At this time you can also trim away any
excess liner that extends above the front top
edge of the skimmer box.
i. Use your remaining silicone to run an ad-
ditional bead along the joint inside of the
snout where the skimmer, liner, and snout
come together. Use your finger to smooth
out the excess silicone.
Install Black Screw Caps
a. Push the black screw caps onto each of
the screw tips on the inside of the skimmer
box. We recommend placing a small dab of
silicone on the end of the screw first before
pushing the black cap over the screw. This
will help keep the screw caps in place.
4f.
4g.
4h.
4i.
5a.

Install Submersible Pump
(not included)
a. Screw your pre-assembled pump dis-
charge assembly into your pump.
b. Position your pump and discharge assem-
bly in the back chamber of the skimmer
so that the top of the discharge assembly
faces the discharge hole.
c. Bring the flexible pipe into the skimmer
through the discharge hole and attach it to
your discharge assembly.
d. Run the pump power cord over to the
power source and position the cord so that
it transitions out of the skimmer at the cord
notch; this will allow the Natural Landscape
Lid to sit flush on the skimmer.
Finishing Touches
a. Place Natural Landscape Lid on top of
skimmer to disguise the skimmer within the
landscape.
Maintenance
a. During normal operation the skimmer net
will remove larger leaves and debris while
the mat will remove the smaller particles
allowing the clean water to flow into the
pump chamber area where it can be re-
circulated back to the pond, preferably
via the appropriately sized PondBuilder
Biological Waterfall Filter. As necessary,
remove the filter mat and mesh net and
clean thoroughly.
PondBuilder recommends the following products for
use with their line of Mechanical Skimmer Filters:
Clear Water & Solids Handling Pumps
Check Valve Discharge Assembly
View other great PondBuilder products on-line
at www.pondbuilder.com.
6c.
6d.
7a.
6a.
6b.

Choose Waterfall Location
a. The waterfall should be positioned so that
the water flowing from it enters the pond
opposite the skimmer to ensure proper
water circulation. The waterfall is best
positioned so that you can view it from the
outdoor and indoor areas where you plan
to enjoy your new water feature.
b. You can position the waterfall right at the
ponds edge or at the top of a stream.
Assemble Waterfall Plumbing
a. Your PondBuilder Serenity Waterfall Box
has one spinweld fitting, located on the
back side near the bottom of the box.
Thread the PVC 90 adapter (included) into
that spinweld (use the Teflon Tape (not
included) on the threads first).
Position Waterfall Box
a. Compact the area where the waterfall box
will sit to prevent future settling. The wa-
terfall box should sit level from side to side
and should be tilted forward slightly (about
¼ bubble on your level) to ensure that the
water flows forward through the spillway.
b. Using soil, backfill around both sides and
the back of the waterfall box.
1a.
2a.
3a.
3b.
SERENITY WATERFALL
INSTALL

Hook-Up Flexible PVC Pipe
a. The Serenity Waterfalls are plumbed to
accept 1.5” Flexible PVC Pipe. We recom-
mend using Flexible PVC pipe as it is very
flexible and easy to work with.
b. Using PVC Primer & Cement, glue the flex
pipe into the PVC male adapter.
c. If you are using Vinyl or Kink-Free Tubing
first glue the barbed fitting into the PVC
90 adapter using PVC Primer & Cement.
Then attach the tubing to the barbed end
and secure with a hose clamp.
Attach Liner to Waterfall
a. Bring the liner up to the face of the water-
fall box and check the positioning of the
liner against the waterfall box. The liner
should follow the contours of the pond
edge or stream and the face of the water-
fall box. It is a good idea to leave a little
slack in the liner where it transitions from
the pond edge or stream to the face of
the waterfall box. This will ensure that the
weight of the rocks used in the waterfalls
will not pull down on the liner.
b. Using boulders and rockwork, begin build-
ing the waterfall up the face of the box. Be
sure to keep the liner pinched into position
against the waterfall with the rockwork.
The Serenity Waterfall has several drip
points that will not allow any water to leak
between the liner and the waterfall box
when installed properly.
c. Another option is to bring the liner up
behind the waterfall box so that the entire
box is sitting inside the liner.
4b.
4c.
5a.
5b.
5b.

Install Filter Media
a. Position the filter mat horizontally in the
bottom of the waterfall box. The Serenity
Waterfall includes one white mat.
b. Place the BioTwist Biological Media on top
of the white mat.
a. Use PondBuild ‘n Foam to fill in the gaps of
the rockwork leading up to the waterfall box.
The foam will force the water on top of the
rockwork rather than around and behind it
where it can’t be seen. This will give you a
much more dramatic waterfall display!
PondBuilder recommends the
following products for use
with their line of Biological
Waterfall Filters:
PondBuild ‘n Foam
Waterfall Foam
View other great PondBuilder
products on-line at
www.pondbuilder.com.
6a.
6b.
For additional installation
instructions view the
PondBuild ‘n Steps DVD.
www.pondbuilder.com
Manufacturers of Quality Pond Equipment & Supplies
Table of contents
Other PondBuilder Lawn And Garden Equipment manuals