PondMAX 24PL690 User manual

VERSION
MARCH 2017
COLOR CHANGING LED
LIGHTING SYSTEM
INSTRUCTION MANUAL
888.868.1185
www.pondmax.com

P O NDMA X . C O M
WELCOME TO THE WORLD OF PONDMAX™.
YOU MADE THE RIGHT CHOICE INVESTING IN THIS
QUALITY PRODUCT. THANK YOU AND ENJOY.
TECHNICAL SPECIFICATIONS
DESCRIPTION
POWER
CONSUMPTION VOLTAGE CABLE
LENGTH TRANSFORMER
24PL690 Small Color Changing Complete Light Kit
2.3 Watts 8-16Volt AC/DC 16 Ft 18 Watt
24PL680 Small Color Changing Starter Light
2.3 Watts 8-16Volt AC/DC 16 Ft Not Included
24PL681 Small Color Changing Add-On Light
2.3 Watts 8-16Volt AC/DC9 FtNot Included
24PL692 Large Color Changing Complete Light Kit
5.8 Watts 8-16Volt AC/DC 16 Ft 36 Watt
24PL682 Large Color Changing Starter Light
5.8 Watts 8-16Volt AC/DC 16 FtNot Included
24PL683 Large Color Changing Add-On Light
5.8 Watts 8-16Volt AC/DC 9 Ft Not Included
31PS454 36 Watt Color Changing Controller w/Remote*
1 Watt 8-16Volt AC N/A N/A
24ST430 Photo Cell Sensor*
N/A 8-16Volt AC N/A N/A
BEFORE USING THIS PRODUCT, PLEASE READ THESE INSTRUCTIONS CAREFULLY AND
FAMILIARIZE YOURSELF WITH THE UNIT. PLEASE KEEP THESE INSTRUCTIONS IN A SAFE
PLACE FOR FUTURE REFERENCE.
** COMES WITH “STARTER LIGHT ” AND “COMPLETE LIGHT KITS” ONLY
* OFFERED SEPARATELY
INSTRUCTIONS INCLUDE
TECHNICAL SPECIFICATIONS
DESIGN HIGHLIGHTS
BENEFITS INCLUDE
IMPORTANT SAFEGUARDS
INSTALLATION AND MAINTENANCE
- Transformer (Please note: Transformers comes with “Complete Light Kits” only. “Starter Lights” and “Add-On Lights” do not come with
Transformers. A 12-Volt AC Transformer can be purchased separately to power lights.)
- Transformer Adapter Cable
- Photocell Light Sensor (optional)
- Starter Light
- Add-On Light (optional)
- Extension Cables (optional)
- Splitters (optional)
PARTS BREAKDOWN
TROUBLESHOOTING
WARRANTY
1
P O NDMA X . C O M

WAT ERGARDENING TO THE MA X
WATERGARDENING TO THE M A X
COLOR CHANGING LED
LIGHTING SYSTEM
DESIGN HIGHLIGHTS
The PondMAX Color Changing Lights have been manufactured to provide you with the best quality lighting system for
your outdoor landscape or water feature. Visit our website www.pondmax.com to view our complete range of pond
filtration, pumps, water treatments and all other pond and water feature related products.
• Your PondMAX Remote controlled Color Changing LED Pond/Garden Light has been manufactured with advanced
technology and quality materials to ideally integrate into any pond and garden, thanks to their compact design.
• The PondMAX light has a sealed glass lens and is suitable for use in or out of water.
• The energy ecient LED’s emit multi colored light with special eects and is emote controlled providing years of
ease and maintenance-free satisfaction.
• The easy to use emote ontrol operates from up to 30Ft from the controller.
• The lights can be daisy chained in series to simplify the installation wiring requirements and do not require a
certified electrician to install.
• A 115 Volt Transformer converts the power supply to a safe 12 Volts for peace of mind in your pond or garden.
(Please note: Transformers comes with “Complete Light Kits” only. “Starter Lights” and “Add-On Lights” do not
come with Transformers. A 12 Volt AC Transformer can be purchased separately to power lights.)
BENEFITS INCLUDE
The benefits of this product lay in the root meaning of the word
What PondMAX has achieved in designing a modular Lighting System is greater than the product by itself. PondMAX
has created a whole set of products that can be arranged in so many dierent configurations, that you will be hard
pressed to prove that it will not work for you. Follow through the remaining portion of this manual to see for yourself
your light system can help you make your outdoor living easy.
IMPORTANT SAFEGUARDS
Correct and safe use of the system requires strict compliance with the safety instructions. For safety reasons, persons
less than 16 years of age or persons that are not familiar with these instructions should not use this equipment.
2

P O NDMA X . C O M
PRODUCT SPECIFIC SAFEGUARDS
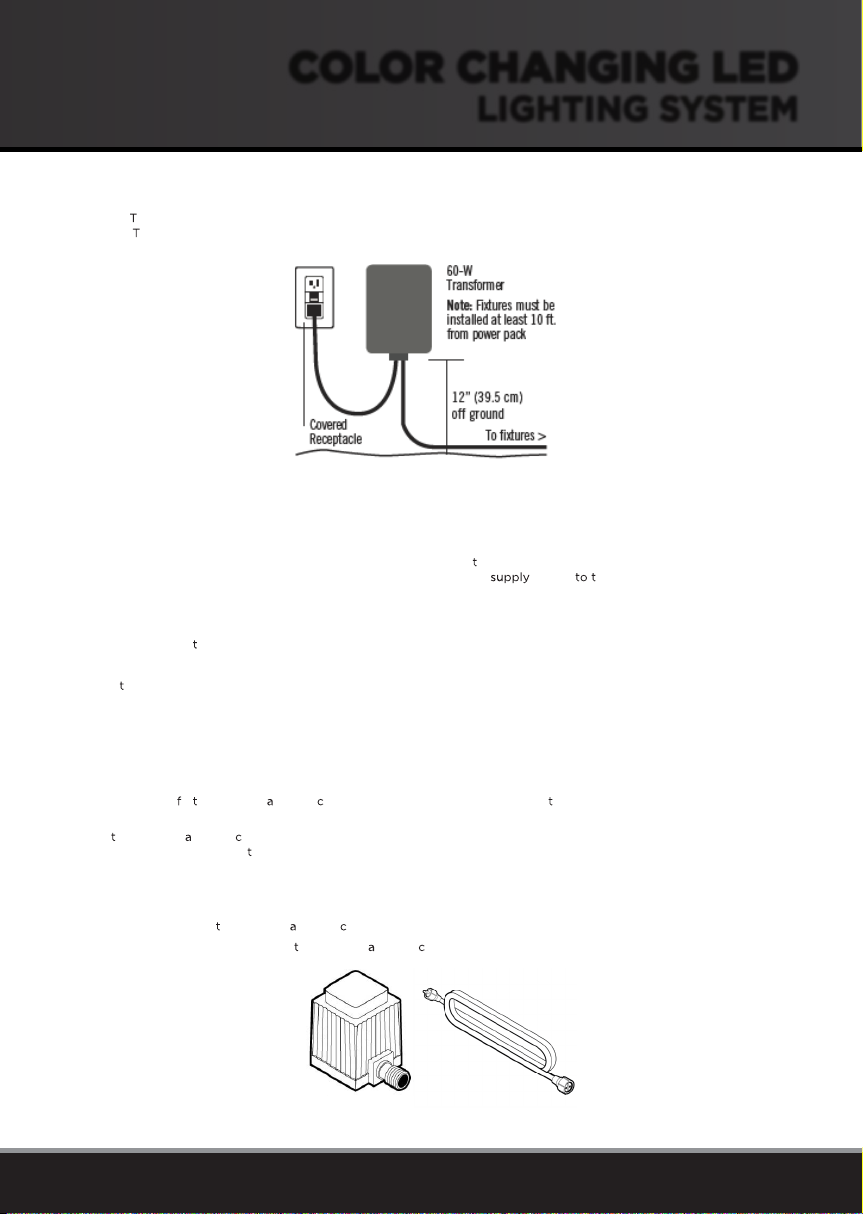
• Avoid connecting the power supply to an extension
cord. Please connect the Transformer directly to an
outdoor GFCI protected hooded, flush style, cover plate
receptacle marked “Wet Location”, while in use.
• Do not operate the light system if the appliance or any
components of the system, such as the power cable,
has been damaged. Check appliance for defects
regularly.
• Do not operate the lighting system without checking
that the connections are tight first.
• When used in submerged application, be sure the
equipment does not come in contact with chlorine,
hydrogen peroxide or other oxidizers. The maximum
depth should not exceed 3Ft.
• If used externally, keep away from other heat
generating equipment such as patio heaters etc.
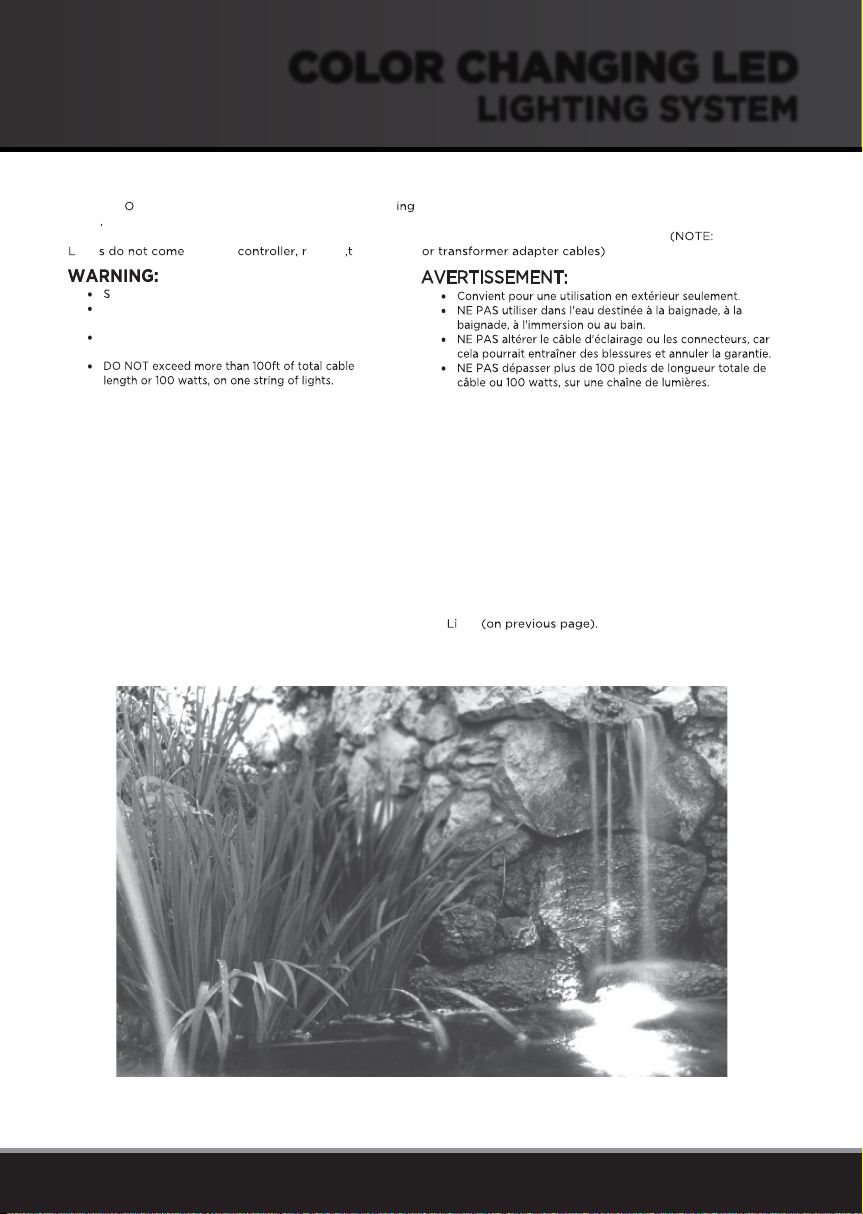
• The lights are designed to be used inside fountains,
directly in a pond or used as outdoor landscape
lighting. Never shall these lights be used in human
body applications ( spa or pool).
• Any damage to the equipment or unmerited operation
will bring dangers to the surrounding precincts. If there
is any damage of the equipment, it must not be used.
The equipment should be placed out of reach of
children.
• To avoid an electric shock, do not attach the plug to the
power supply socket with wet hands. The drip loop
method should be used to prevent water from traveling
down the cable and onto the plug or power supply.
If the plug does get wet, do not unplug the cable.
Disconnect the circuit breaker that supplies power to
the power supply point. Then unplug and examine the
plug and power supply point for presence of water. If
the power point has become wet, you should consult an
electrician before using the power point again.
• Do not install or store the appliance where it will be
exposed to extreme hot or cold temperatures. Do not
use in water above 95°C.
• Do not cut the fixture cable as this result in voiding
your warranty.
• Care should be taken to arrange the power cable so
that it cannot be accidentally tripped over or pulled.
• Do not attempt to repair the electrical appliance
yourself. Return to an authorized service center or
place of purchase if a fault occurs, (regular
maintenance is not considered repair and is required by
user).
INSTALLATION AND MAINTENANCE
TRANSFORMER
The Transformer is the power supply that is required for your PondMAX lighting system to work. You are not required to
use the PondMAX brand Transformer specifically and in some configurations you may want to integrate your PondMAX
lighting system into an existing low voltage power source . Please read the below instruction either way,
to get an understanding of the requirements for the PondMAX lighting system installation. (Please note: ransformers
with “Complete Light Kits” only. “Starter Lights” and “Add-On Lights” do not come with Transformers. A 12-Volt
AC Transformer can be purchased separately to power lights.)
3
P O NDMA X . C O M

WAT ERGARDENING TO THE MA X
WATERGARDENING TO THE M A X
COLOR CHANGING LED
LIGHTING SYSTEM
• If required, have a qualified electrician install an outdoor GFCI protected hooded flush type cover plate receptacle
marked “Wet Location” and following the requirements above.
• Route fixture cable to desired fixture locations. CAUTION: Fixture(s) must be installed in accordance with all local
codes and ordinances.
• Follow the remaining steps in this manual before plugging in the ransformer to a GFCI outdoor electrical outlet
that has a weather-resistant cover. Do not use an extension cord to power ransformer.
TRANSFORMER INSTALLATION
Install the ransformer unit 10 feet (3.05 m) or more from a water feature and 12 inches (0.3m) above the ground.
Mount the ransformer to a secure object such as a post or the side of your home. (See diagram below)
TRANSFORMER ADAPTER CABLES
INSTALLATION
• Connect your 3 t. ransformer dapter able (2) plug to the outlet side of the ransformer (1) and tighten the rubber
nut to ensure a safe connection.
• The ransformer dapter able can also be cut and spliced rather than the light cable, to allow connection to any
other approved 12 Volt AC ransformer. This will not void the warranty of the lighting system.
MAINTENANCE
• Do not submerge the ransformer dapter able.
• Check that the connections on the ransformer dapter able are tight on a periodic basis.
MAINTENANCE
• Do not submerge ransformer.
• Do not repair, or tamper with the power cord or plug.
• Keep ransformer free of debris and/or plant life to reduce the risk of fire.
1. 2.
* ALL PICTURES SHOWN ARE FOR ILLUSTRATION PURPOSE ONLY. ACTUAL PRODUCT MAY VARY
4

P O NDMA X . C O M
PHOTOCELL LIGHT SENSOR (OPTIONAL)
The hotocell ight ensor is an item purchased separately to provide your PondMAX lighting system with the ability
to turn on automatically at dusk and turn o at dawn.
INSTALLATION
• The dusk-till-dawn hotocell ensor (3) comes with an additional 3 t ransformer dapter able (2). This adapter
cable must be used to connect the photocell from the “Inlet” port, directly to the ransformer (1).
• Then use the 3 t ransformer dapter able (4) that is provided with your light, to connect to the “Outlet” port of the
hotocell ensor (3).
• Tighten the rubber nuts to ensure safe connections.
• Mount the hotocell ensor 12 inches (0.3M) above the ground and at least 10 t (3.5m) from the water feature.
• Make sure that the photo eye on top of the hotocell ensor is fully exposed to the daylight and is clear of any
foliage. Also make sure it is free from the beam of any lights, which may be on at night. This will prevent it from
working correctly.
MAINTENANCE
• Do not submerge the hotocell ensor.
• Keep the photocell lens on top of the unit clean from dirt and other debris.
* ALL PICTURES SHOWN ARE FOR ILLUSTRATION PURPOSE ONLY. ACTUAL PRODUCT MAY VARY
1.
2.
3.
4.
P O NDMA X . C O M

WAT ERGARDENING TO THE MA X
WATERGARDENING TO THE M A X
COLOR CHANGING LED
LIGHTING SYSTEM
INSTALLATION
• Use the 3 t ransformer dapter able (2) that is provided with your light to connect the ransformer (1) or optional
hotocell ensor (not pictured) to the inlet side of the RF ontroller. (3)
• Then attach your starter light fixture cable ( ) to the outlet side of the RF ontroller (3).
• Tighten the rubber nuts to ensure safe connections.
• Mount the RF ontroller 12 inches (0.3M) above the ground and at least 10 t (3.5m) from a water feature.
• Make sure that the RF ontroller is not exposed to direct sunlight and in a well ventilated area to avoid overheating.
• Carefully install the battery into your emote. ( )
MAINTENANCE
• Do not submerge the controller or emote at any time.
• Replace the emote battery periodically to ensure uninterrupted use.
* ALL PICTURES SHOWN ARE FOR ILLUSTRATION PURPOSE ONLY. ACTUAL PRODUCT MAY VARY
1.
2. 3.
.
.
.
RF CONTROLLER & REMOTE
The RF Controller (3) and Remote (5) is the brain for your PondMAX lighting system. It provides you the ability to
control the dierent colors and a variety of modes, anywhere within 30 t of the ontroller. The dierent selections you
make on the Remote are then transmitted to the RF Controller via radio frequencies and the lights will
change accordingly.
6

P O NDMA X . C O M
Suitable for outdoor use only.
DO NOT use in water intended for swimming, wading,
immersion, or bathing.
DO NOT tamper with the light cable or connectors, as
this can result in injury and void the
INSTALLATION
• Install your light in the desired place in your landscape or in your water feature.
• Run the cable back to your RF controller. (The RF controller must be 10Ft from the water feature.)
• Connect your light cable connector to the outlet side of the RF ontroller and tighten the plastic nut to ensure a safe
connection.
• Bury the cable 6” below the surface to protect it from damage. Avoid damage to the cable from knives, shovels and
stones.
• Now plug the ransformer into a power supply and test your emote. Transformer not included. (Rem f you are
using a photocell to wait until dark to confirm the system is working correctly.)
• Finally tighten the cap on the electrical connector on the side of the light to prevent leaking, which could cause a short
circuit.
MAINTENANCE
• Clean the lens of the light on a regular basis.
• Check cable connections to make sure they
are tight and waterproof on a regular basis.
• If it is determined that the lamp has bad,
you can replace it easily. First unplug the
lighting system from the power source.
Remove the light from the water and dry
the lens (3) and the lens gasket (2). You can
now remove the LED lamp module (5) from
the housing (1). This can be done by cupping
your hand and clapping the fixture on your
hand so that the lamp falls into the palm of
your hand, when it comes out. Inspect the
lamp holder in the bottom of the fixture for
any corrosion or damage before installing
the new lamp in its place. Next clean the
gasket and lens thoroughly and reinstall. The
gasket must then be reinstalled and then
the lens. Finally, while holding the lens in a
central position with your thumb, go ahead
and tighten the lens ring back into place. Do
not over tighten.
* ALL PICTURES SHOWN ARE FOR ILLUSTRATION PURPOSE ONLY. ACTUAL PRODUCT MAY VARY
1.
2.
3.
4.
5.
STARTER LIGHT
Your Starter Light is the first light you will connect in your lighting system. The Starter light comes with a 16Ft underwater
cable to connect between your RF controller and the fixture. These lights also include an underwater daisy chain connector
on the side of the fixture that can be used to connect more lights to your lighting system. These lights are designed to work
in or out of the water and can be used for many purposes to fit your needs. (Please note: “Starter Lights”, do not come with
ransformer. You must purchase a 12 Volt AC ransformer separately to power lights.)
7
P O NDMA X . C O M

WAT ERGARDENING TO THE MA X
WATERGARDENING TO THE M A X
COLOR CHANGING LED
LIGHTING SYSTEM
ADD-ON LIGHT
The Add- n Lights are perfect for extending your light system. The Add-On light comes with a 9Ft underwater
cable to connect directly to your Starter Light or other Add-On Lights. Similar to the Starter light these lights also
include an underwater daisy chain connector on the side of the fixture, to continue the sequence on. Add-On
ight with RF emote ransformer .
uitable for outdoor use only.
DO NOT use in water intended for swimming,
wading, immersion, or bathing.
DO NOT tamper with the light cable or connectors,
as this can result in injury and will void the warranty.
INSTALLATION
• Install your light in the desired place in your landscape or water feature.
• Run the cable back to the previous light in the chain.
• Connect your light cable connector to the daisy chain connector on the side of the previous light and tighten the
plastic nut to ensure a safe connection.
• Bury the cable 6” below the surface to protect it from damage. Avoid damage to the cable from knives, shovels and
stones.
• Finally tighten the cap on the electrical connector on the side of the light to prevent leaking and a short circuit.
MAINTENANCE
• Follow the maintenance procedures as noted for the Starter ght
8

P O NDMA X . C O M
Extension cables maybe necessary to get your lights positioned where you want them. This Extension Cable can be
used before the lights or in between the lights. This is especially helpful when you need to make sure the controller is
more than 10Ft from you’re a water feature. (Note: Due to voltage line drop, the maximum recommended length of
cable in one string is 100Ft from the Transformer to the final light fixture.)
DO NOT tamper with the cable or connectors as
this can result in injury and void the warranty
INSTALLATION
• To extend the distance from the ontroller (1) to the starter light (3) connect the appropriate end of your
extension cable (2) to the utlet side of the RF ontroller (1). Then connect the remaining end of extension cable, to
the cable of Starter ight (3).
• To extend the distance between two lights, simply connect the appropriate end of the extension cable (2) to the daisy
chain connector (4) from the first light and then connect remaining end of extension cable to the cable of second
light (5).
• Tighten the plastic nuts to ensure a safe connection.
MAINTENANCE
• Check that the extension cable connecters are tight on a periodic basis.
• Avoid damage to the cable with knives, shovels and stones etc.
* ALL PICTURES SHOWN ARE FOR ILLUSTRATION PURPOSE ONLY. ACTUAL PRODUCT MAY VARY
1. 2.
3.
4.
2.
5.
P O NDMA X . C O M

WAT ERGARDENING TO THE MA
WATERGARDENING TO THE M A X
COLOR CHANGING LED
LIGHTING SYSTEM
SPLITTERS (OPTIONAL)
lines. This is so you can power multiple light systems with one Transformer. This Splitter will always be inline after the
Transformer but before the Transformer Adapter Cable. Available as a 3-way and 5-way splitter (like image below).
The other type of Splitter is an underwater rated splitter that is used to split power to additional lights within a single
light system. This type of Splitter is installed a ter the controller and between lights, in the same fashion as you would
connect an extension cable.
Do not submerge the ower plitters.
INSTALLATION
• Refer to the installation of the hotocell witch to learn how to install the power plitters.
• Refer to the installation of the xtension ables above to learn how to install the nderwater plitter.
PARTS BREAKDOWN
* ALL PICTURES SHOWN ARE FOR ILLUSTRATION PURPOSE ONLY. ACTUAL PRODUCT MAY VARY
1.
2. 3.
4.
5.
6.
7.
3 Way 5 Way
10

P O NDMA X . C O M
PARTS BREAKDOWN
REF
NO.
DESCRIPTION
PART NO.
SM L CC LIGHT
PART NO.
LRG CC LIGHT
1
Light Fixture N/A
2LED Color Changing Lamp 31PS451 31PS445
3
Lens Gasket 31PS321 31PS320
4
Lens N/A
5
Lens Ring 31PS317 31PS316
6
Weighted Foot Base N/A
7
Garden Stake N/A
8
RF Controller and Remote Set 31PS454
9
Remote Only 31PS260
NOT SHOWN
Remote Battery 31PS456
10
Transformer Adapter Cable, 3Ft (Only available with “Starter Lights”
and “Complete Light Kits”) 31PS457
11
Transformer (Only available with “Complete Light Kits”)
12
Photocell Light Sensor (Optional)* 24ST430
13
3-Way Power Splitter, 2-Wire (Optional)* 24ST030
NOT SHOWN
5-Way Power Splitter, 2-Wire (Optional)* 24ST031
NOT SHOWN
5-Way Underwater Power Splitter, 4-Wire (Optional)* 24ST684
14
Extension Cable, 4-Wire, 16Ft (Optional)* 24ST440
* OFFERED SEPARATELY
10.
11.
8.
13.
12
9.
14.
* ALL PICTURES SHOWN ARE FOR ILLUSTRATION PURPOSE ONLY. ACTUAL PRODUCT MAY VARY
16
1
1
P O NDMA X . C O M

WAT ERGARDENING TO THE MA X
WATERGARDENING TO THE M A X
COLOR CHANGING LED
LIGHTING SYSTEM
TROUBLESHOOTING
Problem Reason Solution
LIGHT NOT WORKING
No Power Check that the ransformer plug is connected and
power point is working.
Bad Transformer
Replace the ransformer or the fuse within the
ransformer (if applicable). Check that there is
not more than the recommended amount of
lights running o the ransformer.
Short Circuit/Bad Connection
Inspect and test every light, lamp and connection
individually on a good ransformer until it is
determined where the short is at. Replace parts to
correct the short.
Damaged Cable
Inspect the entire length of the lighting system
cable and look for cuts or damage resulting in
exposed copper wire. Replace cable or complete
fixture where the damage is.
Defective Lamp
Inspect the lamp socket is not damaged and make
sure that the inside of fixture is free of moisture.
Replace the lamp.
Bad Controller
If Possible test the controller with a good ransformer
an amp meter. Do not connect a light during
this test. The controller should only read 0.05 amps.
Replace the controller. Check that there is not more
than the recommended amount of lights on one
controller .
Remote Not Working
Change the battery in the emote. air the emote
to the controller by unplugging the power. Then
hold your finger on the power button on the emote
and plug the system in while doing so. Continue to
hold the button until the lights blink, then test again.
Replace emote if necessary.
LIGHT WORKING
INTERMITTINGLY
Damaged Cable
Inspect the entire length of the lighting system
cable and look for cuts or damage resulting in
exposed copper wire. Replace cable or complete
fixture where the damage is.
Short Circuit/Bad Connection
Inspect the entire length of the lighting system
cable and look for cuts or damage resulting in
exposed copper wire. Replace cable or complete
fixture where the damage is.
Defective Lamp
Inspect the lamp socket is not damaged and make
sure that the inside of fixture is free of moisture.
Replace the lamp.
Bad Transformer
Replace the ransformer. Check that there is
not more than the recommended amount of
lights running o the ransformer.
Lights Not Coordinated With Remote
Test by removing the first light in the system.
If problem is fixed replace that one light. If not
fixed then replace the controller and emote set.
Check to make sure there is not more than the
recommended lights on one controller.
Remote Not Working
Change the battery in the emote. Pair the emote
to the controller by unplugging the power. Then
hold your finger on the power button on the emote
and plug the system in while doing so. Continue to
hold the button until the lights blink, then test again.
Replace emote if necessary.
12

P O NDMA X . C O M
NOTES
13
P O NDMA X . C O M

WAT ERGARDENING TO THE MA
Please consult your retailer for quality original PondMAX replacement parts.
Visit www.pondmax.com for your nearest dealer.
WATERGARDENING TO THE M A X
COLOR CHANGING LED
LIGHTING SYSTEM
LIMITED WARRANTY
• This product is warranted to the initial purchaser
to be free of defects in materials and manufacture
workmanship at the time of initial purchase and for a
period of 2 years aFter. Some parts are consumable and
may need to be replaced as part of ongoing product
maintenance and are not covered by this Warranty. In
the event this product malfunctions within 2 years from
the date of purchase, the sole obligation of PondMAX™
International (hereinaFter referred to as PondMAX™ )
will be to repair the unit or replace with an equivalent
new or factory refurbished unit at PondMAX’s
discretion, subject to the following condition:
• The malfunction is proved attributable to a defect
in materials or manufacture workmanship, including
repairs performed under this warranty. Malfunction for
any other reason including but not limited to misuse,
negligence, accident, or tampering with parts, incorrect
wiring, or improper installation-will not be remedied
under this warranty.
• PondMAX™ specifically does not guarantee chemical
compatibility, and expressly does not warrant units from
any problems caused by chemical attack or failure due
to incompatibility of fluid used near this lights system.
• All warranty repairs must be performed by PondMAX™
or a PondMAX™ authorized company.
• Purchaser must retain the purchase receipt and present
it with this certificate as proof of ownership and
entitlement to warranty repairs. Unauthorized repairs
will not be compensated by PondMAX™, and are not the
responsibility of PondMAX™, and if such repairs damage
the product, such damages are not remedied under this
warranty.
• Purchaser shall bear all onsite labor, shipping, packing
and insurance costs and all other costs, excluding in
under this warranty.
• This warranty is in lieu of all other express warranties
which now or hereaFter might otherwise arise with
respect to this product. Any and all limited warranties,
including the warranties of merchantability and fitness
for particular purpose, shall have no greater duration
than the duration period of the express written
warranty applicable to this product, and shall terminate
automatically the expiration of such duration period.
• Some states do not allow limitations on how long an
implied warranty lasts, so the above limitation may not
apply to you. No action shall be brought for breach
of any implied or express warranty aFter one year
subsequent to the expiration of the duration period of
the express written warranty.
• Incidental and consequential damages caused by
malfunction, defect, or otherwise, and with respect
to breach of any express or implied warranty, are not
the responsibility of PondMAX™, and, to the extent
permitted by law, are hereby excluded for property
damage, loss of livestock and, to the extent not
unconscionable, for personal injury damage. Some
states do not allow the exclusion or limitation of
incidental or consequential damages, so the above
limitation or exclusion may not apply to you.
• This warranty does not apply to any malfunction arising
out of any application of this product other than normal
use, unless such application is upon request specifically
approved in writing by PondMAX™.
• The provisions of this warranty are severable and if
any provision shall be deemed invalid, the remaining
• Rights under this warranty are not assignable without
the express prior consent in writing by PondMAX™ and,
regardless of the terms of such consent in writing, such
assignee shall have no greater rights than his assignor
had against PondMAX™.
Please consult your retailer for quality original PondMAX replacement parts.
Visit www.pondmax.com for your nearest dealer.
888.868.1185
14
This manual suits for next models
7
Table of contents