Ponpe BX615 User manual

TABLE OF CONTENTS
I. DESCRIPTION 2
II. SPECIFICATION 3
III. OPERATION INSTRUCTIONS 4
IV. CALIBRATION 10
V. MAINTENANCE 20
VI. STORE CONDITION 21
VII. ACCESSORIES 21

4-IN-1 GAS DETECTOR
2
II. SPECIFICATION
Sampling method:natural diffusion air;
Battery:3.7V Li-on rechargeable battery, 1800mAh;
Battery life:18 hours of continuous use (15 hours for
flammable gas detection);
Sensor type:electro-chemical (flammable gases, i.e.
H2S, CO and O2 as catalysts);
TYPE
OF
GAS
RANGE ACCURACY MIN.SCALE RESPONSE
TIME
O20-25%VOL <±5%(F.S)0.1% ≤30MINS
Ex 0-100%LEL <±5%(F.S)0.1% ≤40MINS
CO 0-1000ppm <±5%(F.S)1ppm ≤40MINS
H2S 0-100ppm <±5%(F.S)1ppm ≤60MINS
WWW.PONPE.COM

4-IN-1 GAS DETECTOR
3
Sensor Life:1 year;
Display:LCD;
Alarm types: flashes, alarms and vibrations;
Data display:real-time readings, peak data, and battery
status;
Range of temperature :-10~40℃;
Range of humidity:5~90RH;
Dimension:126mm(L)×66mm(W)×32mm(H);
Net weight:220 grams(including charger)。
III. OPERATION INSTRUCTIONS
1. Power on
Press“”, the detector turn on after the buzzer goes off
once。
2. Power off
Press and hold “ ”, the LCD will count down for 5
seconds before the buzzer rings shortly, after which the
device will turn off. If holding “” too shortly, the
detector will return back to measuring status。
3. Low battery
WWW.PONPE.COM

4-IN-1 GAS DETECTOR
4
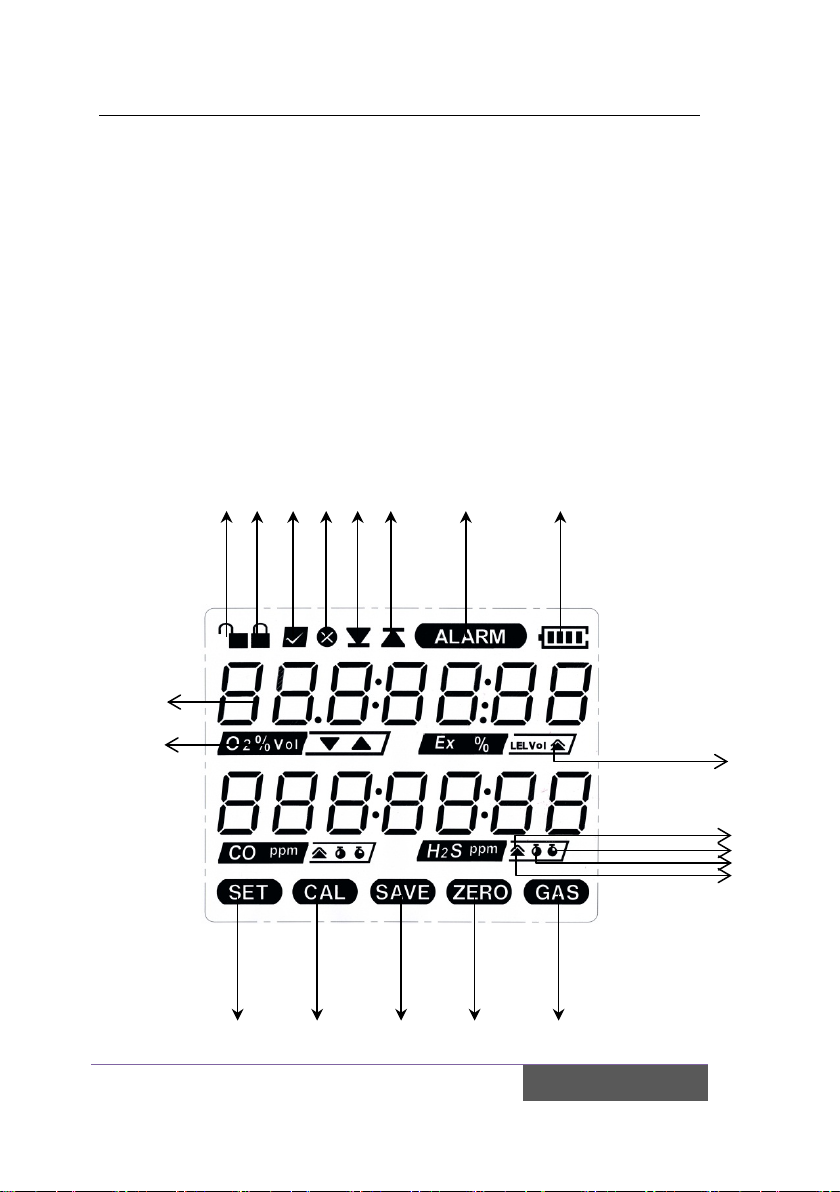
When it is working in low battery,the detector will lash and
buzz as a warning indicator. When reading is deficient, LCD
display will display the failure indicator (“ ”). At the same
time, the success indicator (“ ”) will blink together along
with the “Low Battery” sign (“ ”). When the device
has no battery, the “Low Battery” indicator (“ ”) will
show on the LCD along with a text warning reading as
“Battery Low.” The device will shut off shortly after.
When the “Low Battery” indicator appears, the device is
suggested to be turned off and recharged for 4 to 6 hours.
(The first three times of use require a full charge each time
of more than 12 hours).
4. Descriptions of function keys
Power on/off Up ▲Down ▼
Power on
Select a menu
item
Select a menu
item
Power off Increase number Decrease number
WWW.PONPE.COM

4-IN-1 GAS DETECTOR
6
5. LCD display
LCD is backlit, which can be activated when a gas
density is greater than the alarm threshold or press any
button.
If performing routine check in a low-light environment,
backlight can be activated manually by pressing the Up
or Down keys once.
1 2 3 4 5 6 7 8
11 12 13 14 15
16
17
18
19
20
9
10
WWW.PONPE.COM

4-IN-1 GAS DETECTOR
7
1、ID passed
2、ID lock
3、Success indicator
4、Failure indicator
5、Alarm
6、Vibration
7、Alarm
8、Battery indicator
9、Measurement result
10、Type of gas detected and its unit
11、Menu setup
12、Calibration
13、Save data
14、Zero - calibration
15、Type of gas
16、Measuring unit: LEL, Vol
17、Warning (Level 2):
18、Reserved mark 1:
WWW.PONPE.COM

4-IN-1 GAS DETECTOR
8
19、Reserved mark 2:
20、Warning (Level 1):
6. Measure
The meter can detect gas in a disseminated environment or
through specific “feeding” to the detector. The device can
be used hand-held or worn close to the body. Once
powered on,the detector will be working in continuous
measuring status, and gas will enter into meter by
dissemination. The normal flow of air can sufficiently carry
the target gas into the detector, at which point, the device
will provide a reading for
the density of the targeted
gas. The dissemination
method uses the
aforementioned method to
test and record density
levels of various gases in the air. The main advantage of this
method is the short response and measurement time.
When the targeted source gas is too far away from the
detector, a “feeding” method is needed to measure the
WWW.PONPE.COM

4-IN-1 GAS DETECTOR
9
gas densities. Testing in this particular mode requires the
use of a calibration cover and a manual pump (separate
part, optional). When testing using the calibration cover,
please ensure the flow of the gas follows the indication
arrows. The type of gas detected and its density will be
shown simultaneously on the LCD screen.
3.6.1 Warning mode
The detector has two instant warning levels, which are
warning level 2 for toxic gas with higher density levels and
warning level 1 for toxic gas with lower density levels. The
detector has another two accumulative effects mode, STEL
and TWA. STEL is accumulative in 15minuts, TWA is
accumulative in 8 hours。
User can reset both warning level 1 and level 2 in setting
mode。
Note:STEL: Shot Time Exposure Limit;TWA: Time Weighted
Average。
!: warning level 1 must be lower than warning level 2. If
they are same, the detector will be working in warning
WWW.PONPE.COM

4-IN-1 GAS DETECTOR
10
level 2。
When warning occurs, the warning mark“ ”will be
displayed and lights begin to flash, meanwhile the gas
type and level will be display [“ ”( Level 1),“”( Level
2)].
3.6.2 Sound and vibration indicators
The buzzer can be set to go off every 5 minutes as an
indication that the detector is working properly.
3.7 Model setting
Note:when detector is in the setting mode,detector cannot
take measurements.
User setting:
Turn on or off the warning mode;
Behaviours of the flash and sound indicators;
Vibration;and
Set points for warning level 1 and warning level 2.
IV. Adjustment
4.1 Power on
WWW.PONPE.COM

4-IN-1 GAS DETECTOR
11
①Press ON/OFF key, and hold
3 seconds, the detector will
display all characters, then
warning light, buzz, vibration
go off subsequently once.
②one second later, the
current version of the software
will be on display.
③one second after, warning
level 1 will be displayed for 2
seconds.
④2 seconds later, warning
level 2 will be display for
another 2 seconds.
⑥2 seconds after, the STEL
will show for 2 seconds.

4-IN-1 GAS DETECTOR
12
⑦2 seconds later, the TWA
will be displayed for 2 seconds.
⑧2 seconds later, the
detector initiates by counting
down 10 seconds.
⑨After the initiation process
and self-checking, the device
will enter measurement mode.
Error messages will be
displayed if according to each
error type accordingly.
WWW.PONPE.COM

4-IN-1 GAS DETECTOR
13
4.2 Power off
①Press the “ ” key and hold
5 seconds, it will begin the
5-second countdown.
②During the countdown,
buzzer goes off 5 times in
shorter audio, after which the
buzzer rings one more time in
longer audio,the the device is
powered off。
4.3 Warning setup
①in measuring status, press
key “▲” in 5seconds,buzzing
1 time in shorter audio,get
into ID setting。
②select key“▲”or“▼”, then
press key“OK”for confirm,
display in 2 seconds。
WWW.PONPE.COM

4-IN-1 GAS DETECTOR
14
Once wrong ID, it will be turn
back to measuring status。
③2seconds later, get into
CO’s warning level 1 setting。
due time, press key“▲”or“▼”
to adjust target value,Press
key “OK” for confirm. So then
get into CO’s warning level 2
status。
If do not modify, press key
“ ”, get into next step。
④CO’s warning level 2
setting status。
Due time,press▲or▼to
adjust target value,press“OK”
for confirm,so then get into
next next step (H2S’s warning
level 1 setting status。
If do not modify, press” ”,
get into next step
WWW.PONPE.COM

4-IN-1 GAS DETECTOR
15
⑤H2S warning level 1 setup.
Due time, press▲and▼to
adjust target value, press“OK”
for confirm,so then get into
next step(H2S’s warning level
2 status)。
If do not modify, press” ”,
get into next step
⑥H2S’s warning level 2
setting status。
Due time,press ▲or▼to
adjust target value, press“OK”
for confirm,so then get into
next step(O2’s warning level 1
status)。
If do not modify, press ”
”,get into next step
⑦O2’s warning level 1 setting
status。
Due time , press ▲or▼to
WWW.PONPE.COM

4-IN-1 GAS DETECTOR
16
adjust target value, press“OK”
for confirm,so then get into
next step(O2’s warning level 2
setting status)。
If do not modify, press”
”,get into next step
⑧O2’s warning level 2 setting
status。
Due time, press▲or▼to
adjust target value,press“OK”
for confirm,get into next
step(EX’s warning level 1
setting status)。
If do not modify, press”
”,get into next step
⑨EX’s warning level 1
setting status。
Due time,press ▲or▼to
adjust target value, press“OK”
WWW.PONPE.COM

4-IN-1 GAS DETECTOR
17
for confirm,get into next
step(EX’ s warning level 2
setting status)。
If do not modify, press ”
”,get into measuring status。
⑩EX’ s warning level 2
setting status。
Due time, press ▲or▼to
adjust target value, press“OK”
for confirm,get into measuring
status。
If do not modify, press”
”,get into measuring status。
4.4 Zero calibration
①in measuring status, press
“▲”in 5-second, buzzing 1
time in shorter audio, get into
ID setting。
WWW.PONPE.COM

4-IN-1 GAS DETECTOR
18
②press“▲”or“▼”to adjust
ID code, press“OK”for
confirm,display unlock in
2-second。
If wrong ID, it will return to
measuring status.
③after 2-second, get into
zero calibration status, CO、,
H2S,、EX value will be 0ppm or
0%LEL。O2 value will be
20.9%VOL。it is basic standard
level, and display 0 or
20.9%VOL。
in this status, press “OK”,
return to testing status
④if it is not in right status,
disply Err。
press“ ” for return
WWW.PONPE.COM
Table of contents