Pool Patrol GA-25 User manual

DRIVEN DESIGNS, INC. ● 1135 S. Bridge St. ● Belding MI 48809
P a g e 1
Figure 1 Battery Cover
Figure 3 Magnetic sensor
Magnet
Sensor
GA-25 & GA-30
The Pool Patrol Door/Gate Alarm is intended to warn homeowners of
potential unauthorized intrusions into unsupervised areas of their home
and yard.
Although the gate alarm is simple to use, it is important to spend sufficient
time to become familiar with the operation of your alarm and to properly
test the unit regularly.
The Pool Patrol Door/Gate alarm is activated via magnetic sensors. The
GA-20 sounds an alarm at the point of entry only. The GA-30 sounds an
alarm at the point of entry and transmits a signal to a remote receiver. The
receiver may be placed as far as 200 feet from the alarm.
OVERVIEW OF GATE ALARM:
There are currently three models of the Pool Patrol Door/Gate Alarms;
GA-20, GA-25, and GA-30. This instruction manual covers the GA-25
and the GA-30.
GA-20 - This model is a stand-alone unit only. It is a basic unit intended
to only alert you at the point of entry. This model will not transmit and
does not include the receiver.
GA-30 - This model will transmit and includes a receiver. It is intended to
alert you at the point of entry and will transmit to a receiver located nearby.
GA-25 - This model is designed with a transmitter and will work with other
GA-30’s and its receiver. Sometimes large areas with more than one entry
require additional gate alarms but do not require additional receivers. The
GA-25 is intended to work with the GA-30’s receiver allowing multiple
alarms to be installed, without additional receivers.
TO INSTALL OR CHANGE BATTERY:
The gate alarm requires a 9V alkaline battery. One 9V alkaline battery
will last for one year under normal use.
1. Remove the battery cover
on front of alarm by pulling down on
it (Figure 1).
2. Plan to place unit within 6”
of the mounted magnetic sensor.
3. The mounting holes are
located inside the battery
compartment (Figure 2). Use these
holes to install the unit at least
54” above the threshold of the
entrance you are trying to protect.
Double-sided tape may be used
in lieu of screws.
When mounting to a chain link
fence, use nylon cable ties and
insert through the holes in the back
of the unit and then around the
chain link.
4. The magnetic sensor is show in
Figure 3. The magnetic sensor
already has a double-faced tape
attached. Peel the protective
covering from the back of the
magnets and install so that the two
magnets are not more than ¾”
apart. Some installations, such as
outdoor applications, may require
the use of four #10 screws
(included) to attach the magnets.
In some cases you may have to
shim one side of the magnetic sensor so that when the door is
closed, the magnetic sensors are even. When mounting to any
metal door, slider, or fence post, a ¼” wood or plastic spacer must
be placed behind the magnetic sensor so as to avoid false tripping
of the alarm.
5. Install the 9-volt alkaline battery and then replace the battery cover.
When connecting the battery, if the alarm has 3 short beeps, a
pause, and 3 short beeps, there is a problem. Reconnect the
battery again. If the beeps continue to occur send the unit in for
repair. See warranty below.
6. Once the battery is connected the unit is ready to go.
HOW TO OPERATE GATE ALARM
Seven Second Delay
1) If the door is opened and then closed and the reset button is pushed
within seven seconds:
a) Alarm will not sound and will be ready for next function.
2) If the door opens and remains open:
a) Seven seconds after opening the door, the alarm will sound
b) The alarm will continue to sound until the door is first closed and
then the reset button is pushed.
3) If the door is opened and then closed without hitting the reset button:
a) Seven seconds after opening the door, the alarm will sound
b) The alarm will continue to sound until the door is first closed and
then the reset button is pushed.
4) If the door is opened and it remains open while the reset button is
being pushed:
a) Seven seconds after opening the door, the alarm will sound.
b) The alarm will continue to sound until the door is first closed and
then the reset button is pushed.
5) To disable the alarm for 15 minutes**New Feature**
a) Be sure the door is closed.
b) Press and hold the reset button for five seconds.
c) The alarm will chirp twice. This indicates the alarm is disabled
for 15 minutes.
d) The alarm will chirp when the 15 minutes has expired.
Figure 2 Mounting Holes
IMPORTANT:
Use of this product does not replace constant adult supervision.
Install the unit at least 54” above the threshold of the entrance
you are trying to protect.
Retest your alarm every 90 days.
Do NOT attempt to alter or repair the alarm yourself. This will
void your warranty.
Do not use this product prior to reading the instructions
Do not leave out overnight until you have learned how to op-
erate the alarm.

DRIVEN DESIGNS, INC. ● 1135 S. Bridge St. ● Belding MI 48809
P a g e 2
e) To re-enable the alarm when it is inactive: close door and press
the reset button until it chirps once. The chirp indicates the
alarm is again active.
Zero Delay
In the Zero Delay Mode the alarm will sound for 30 seconds. After 30
seconds the unit will check if the door is closed. If the door is closed it will
shut off the alarm, if the door is still open it will continue to sound again.
Once the alarm is activated, the reset button is disabled.
1) If the door is opened and remains open the alarm will continue to
sound until:
a) The door is closed.
b) And the 30 second alarm has expired.
2) If the door is opened and then is closed without pushing the reset
button before opening door, the alarm will sound and continue to
sound until:
a) The 30 second alarm has expired.
3) If the door is opened and it remains open while the reset button is
pushed, the alarm will continue to sound until:
a) The door is closed.
b) And the 30 second alarm has expired.
4) If the reset button is pushed before the door is opened, and the door
is opened and closed within 15 seconds:
a) The alarm will not sound and remains ready.
5) If the reset button is pushed before the door is opened, and the door
is opened and not closed within 15 seconds:
a) The alarm will sound and continue to sound for 30 seconds or
until the door has closed and alarm has reset.
Changing delay modes
To change the mode between the seven second delay and the zero
second delay follow the steps below.
1. Remove the 9V battery from the Door/Gate alarm.
2. With the battery removed hold the reset button in.
3. While holding the reset button in touch the battery to the
terminals of the battery clip. The unit will chirp.
A single chirp indicates the unit is in the zero second delay mode. Two
chirps indicate the unit is in the seven second delay mode. After the unit
chirps release the reset button and reconnect the 9V battery and replace it
in the unit.
The alarm will remain in this mode even if the 9V battery is replaced.
TO OPERATE YOUR REMOTE RECEIVER:
Figure 4 Receiver
Your remote receiver works with the Door/Gate alarm allowing you to
monitor your door or gate from within your house. When the gate alarm is
activated it sends a signal to activate the receiver.
Plug in the power jack to a wall outlet and plug the other end into the power
jack connector (Figure 4). Turn power switch to “on” position, the red LED
indicator will turn on.
The receiver has two modes of operation: Serial Number mode (SN mode)
and ID mode. When the receiver is in SN mode it will accept the
transmission of any Pool Patrol transmitter (this is the default setting). The
serial number is common to all transmitters. When the receiver is in ID
mode it will accept the serial number plus the ID number of the
transmission. The ID number is unique to each transmitter.
Mode Change
To change from SN mode (default) to ID mode or back from ID mode to SN
mode, turn off the receiver. Locate the mode button on the top left corner
of the receiver (Figure 5). Using a paper clip or tooth pick hold the mode
button down while turning on the receiver. Once the receiver is turned on,
release the mode button. The unit has now changed modes.
SN mode
In this mode the receiver will accept any Pool Patrol transmitter.
ID mode
In this mode the receiver will only accept the transmissions from only those
ID codes the receiver has learned. It locks out all other transmitters.
Learn
With the receiver in ID mode, pushing and
releasing the mode button once will put the
receiver in learn mode causing the LED on the
front of the receiver to turn green. Learn mode
will timeout after 18 seconds and the receiver
will go back to normal operation causing the
LED to change back to red. Once in learn
mode the receiver is waiting for the ID code
from a transmitter Door/Gate alarm. Trigger
the transmitter and send the serial number and
ID number to the receiver. To trigger the
transmitter separate the magnetic sensor by
opening the door or gate and set off the alarm.
The receiver will take the ID number and store it in memory. Up to 8
transmitters can be learned by each receiver. If the receiver accepts the ID
code from the transmitter the green LED will turn off and on and then turn
red and blink rapidly.
Erasing Memory
Place the receiver in ID mode. Holding the mode button in for 10 seconds
will erase the receiver memory. All of the transmitter ID numbers stored in
memory will be cleared. Once the mode button is pressed the LED will
turn green for 10 seconds. When the LED turns off the memory is erased.
After releasing the mode button the LED will briefly turn green and then
red. When the LED is back to red, the receiver is back to normal operation
in ID mode.
Power
Jack
Speaker
Indicator
LED
Security
System
Connections
Mode Button
Figure 5 Mode Button

DRIVEN DESIGNS, INC. ● 1135 S. Bridge St. ● Belding MI 48809
P a g e 3
RECEIVER RESET
The remote receiver will sound the alarm for 3 minutes and automatically
reset after such time. To reset the remote receiver flip the on/off switch to
“off” for several seconds and then back “on”.
PLACEMENT OF RECEIVER:
It is best to place the receiver next to a window or wood door adjacent to
the pool with-in 200 feet from the transmitter. Do not place the receiver
near steel walls, cabinets, on or alongside an electrical appliance, such as
a computer, or on a metal surface as this may affect signal reception. The
pool alarm will not transmit its signal through the ground.
Placing the receiver in front of a window will increase the ability of the
receiver to accept the signal.
Once the receiver has been placed, test the alarm multiple times to be sure
it will receive the transmitted signal.
LOW BATTERY:
Your door and gate alarm is equipped with a low battery indicator. If your
9-volt alkaline battery drops below 6V it will sound a “chirp” once every 60
seconds. The receiver will also chirp once every 60 seconds to indicate
the alarm in the pool has a low battery.
Replace the battery in the alarm following TO INSTALL OR CHANGE
BATTERY on page one, next reset the remote receiver following the
RECEIVER RESET.
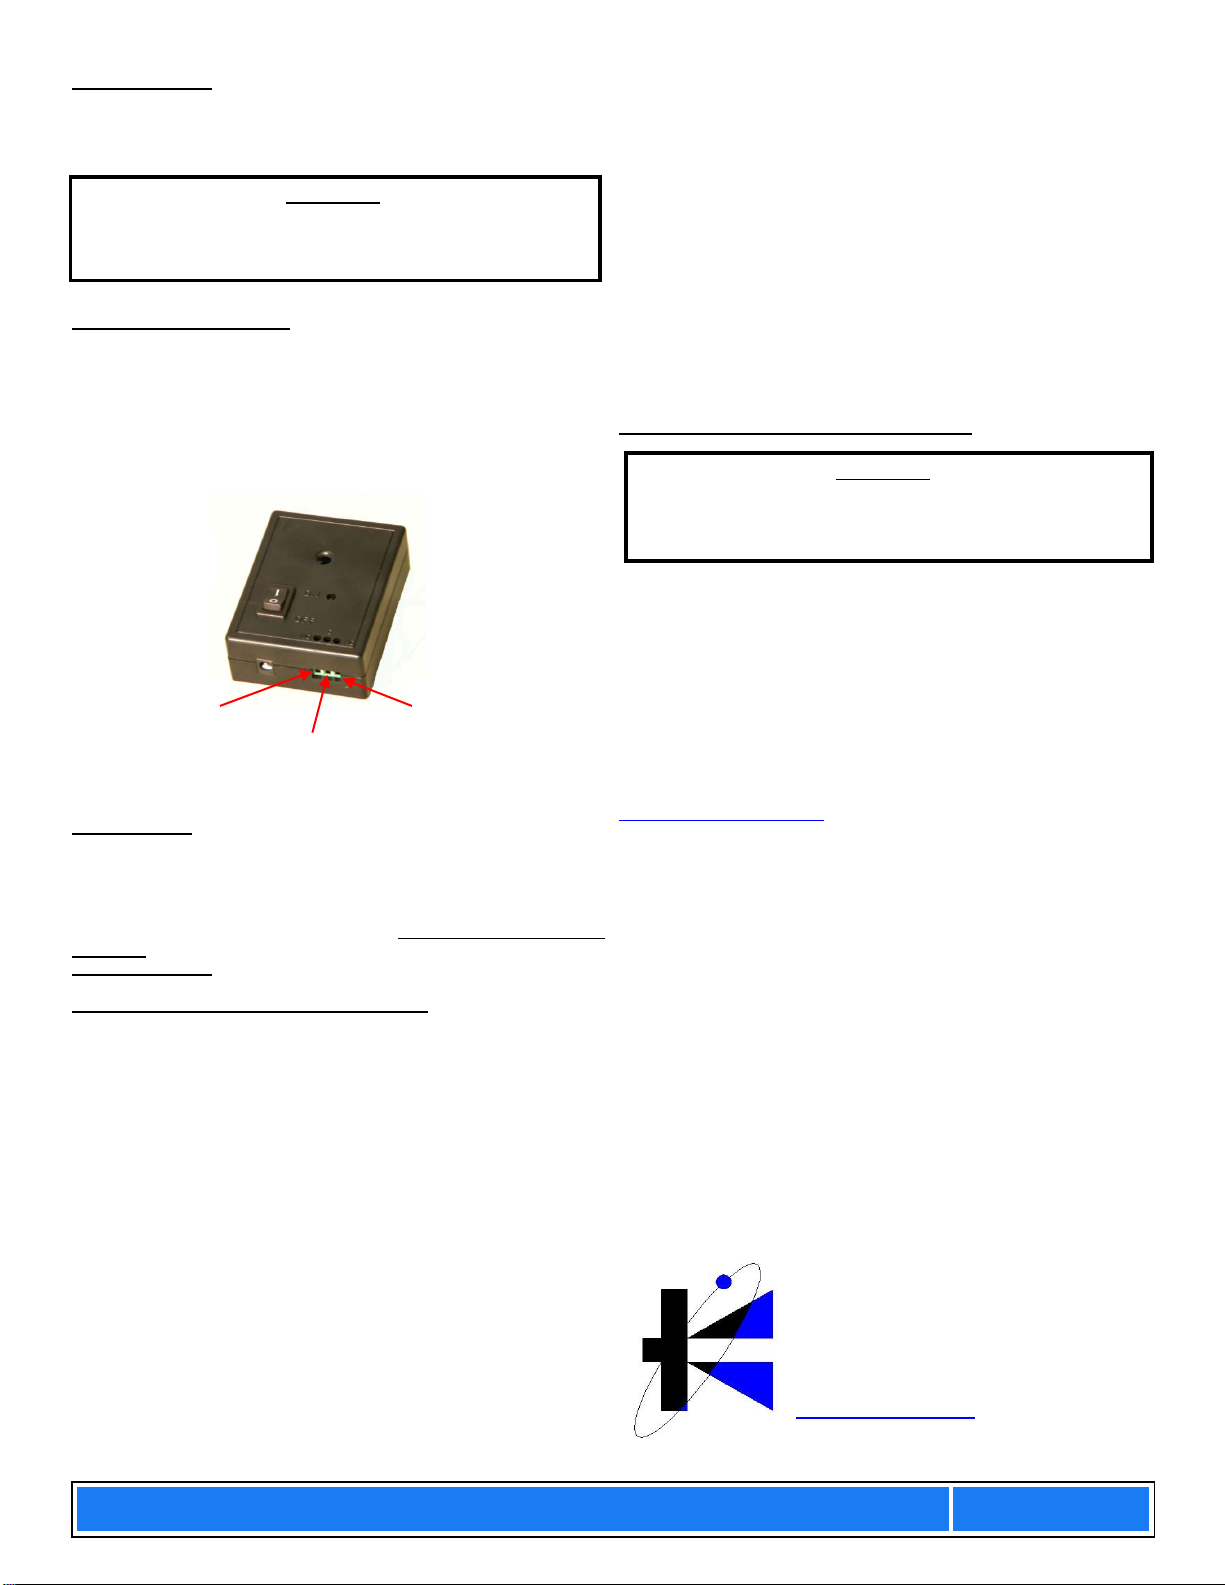
TO CONNECT TO HOME SECURITY SYSTEMS:
If you have a home security system the receiver can be installed to work
with your security system.
To connect to a home security system there is a connector at the bottom of
the receiver with three inputs: (See Figure 6)
The home security system will connect to two of the three terminals.
Check the security system documentation to determine if the system is an
“open loop” or a “closed loop” system. These inputs are connected to a
relay and only provide an open or closed contact.
Closed Loop:
If the security system is closed loop, the connections are made to the “C”
and “NC” terminals. When the receiver alarms the relay will open and
trigger the home security system.
Open Loop:
For an open loop system, connections are made to the “C” and “NO”
terminals. When the receiver alarms the relay will close and trigger the
home security system.
FCC ID
THIS DEVICE COMPLIES WITH PART 15 OF THE FCC RULES.
OPERATION IS SUBJECT TO THE FOLLOWING TWO CONDITIONS: (1)
THIS DEVICE MAY NOT CAUSE HARMFUL INTERFERENCE, AND (2)
THIS DEVICE MUST ACCEPT ANY INTERFERENCE RECEIVED,
INCLUDING INTERFERENCE THAT MAY CAUSE UNDESIRED
OPERATION.
INFORMATION TO USER
NOTE: THE MANUFACTURER IS NOT RESPONSIBLE FOR ANY RA-
DIO OR TV INTERFERENCE CAUSED BY UNAUTHORIZED MODIFICA-
TIONS TO THIS EQUIPMENT. SUCH ODIFICATIONS COULD VOID
THE USER'S AUTHORITY TO OPERATE THE QUIPMENT.
POOL PATROL LIMITED WARRANTY:
Driven Designs, Inc. warrants that your product when purchased from an
approved dealer, except as noted below, is on the date of purchase free
from defect in material and workmanship for two years. We will correct
any such defect without charge if you return the complete product, either
in person or by other shipping means prepaid, to Driven Designs, Inc.
Service Center within two years after the date of purchase.
Warranty service must be performed by Driven Designs, Inc. and damage
or loss of any kind resulting from servicing by any other person is not
covered under our warranty. Please return the product postpaid to
Driven Designs, Inc., 1135 S. Bridge St., Belding, MI, 48809, Attn:
Service Department. For questions you can email
[email protected]om or call (616) 794-9977 Monday-Friday 8 am
– 5 pm Eastern Time.
This warranty does not cover damage caused by acts of God, accident,
misuse, abuse, or by affixing any unauthorized accessory or alteration of
the product, or by connection of the product to any but the specific
current and voltage indicated in the accompanying instruction booklet, or
by any other conditions beyond our control.
ALL IMPLIED WARRANTIES INCLUDED BUT NOT LIMITED TO
IMPLIED WARRANTIES OF FITNESS AND MERCHANTABILITY ARE
LIMITED IN DURATION TO TWO YEARS FROM DATE OF ORIGINAL
PURCHASE.
This warranty gives you specific legal rights, and you may have other
rights, which vary from state to state. Some states do not allow the
exclusion or limitation of incidental or consequential damages or
limitations on how long an implied warranty lasts, so that the above
limitations and exclusions may not apply to you.
No responsibility, obligation, or liability is assumed for the installation or
maintenance of the Pool Patrol Alarm or for any incidental or
consequential damages.
Please remember to include your information when sending returns
to Driven Designs. Your Name, Address, City, State, Zip, Phone
Number, email address, and a description of the issue if there is
one.
IMPORTANT
Turning off the alarm at the gate or door will not deactivate the
receiver alarm inside your house. Turning off the receiver inside
your house will not turn off the alarm at the gate or door.
Figure 6 Security
Connections
IMPORTANT
Do not return the product to be repaired to the retailer from
whom the product was purchased. ALL REPAIRS NEED TO BE
SENT TO DRIVEN DESIGNS.
DRIVEN DESIGNS, INC.
1135 S. Bridge St.
Belding, MI 48809
Phone 616.794.9977
Fax 616.794.9987
www.poolpatrol.com
C - Common
NO – Normally
Open
NC – Normally
Closed
This manual suits for next models
1